How to Fix Windows 11 Mail App Not Working
Why doesn't my Windows 11 Mail app work?
There are many potential reasons for email applications not being able to run on Windows 11. When the app won't launch at all, it could be because of corrupted system files. Or the app itself might be out of date or broken in some way. Windows 11 includes tools and repair options that can resolve such issues.
Many sync issues can cause the Windows 11 Mail app to fail to send emails. Some third-party antivirus software and firewalls may prevent the application from syncing mail and calendars. This security utility may prevent the Windows Mail application from downloading attachments.
Due to some configuration errors, the mail application may not run. Your Windows 11 localization options may not be set correctly. Or the app may be blocked due to privacy permission settings. The Mail app can be successfully repaired by adjusting these options in Windows 11.
There are many different possible fixes, as the reasons why Mail can't run on Windows 11 vary. The solutions provided below can help fix Windows 11 Mail app not working issue.
How to fix Microsoft Mail app not working?
1. Run the MS Store App Troubleshooter
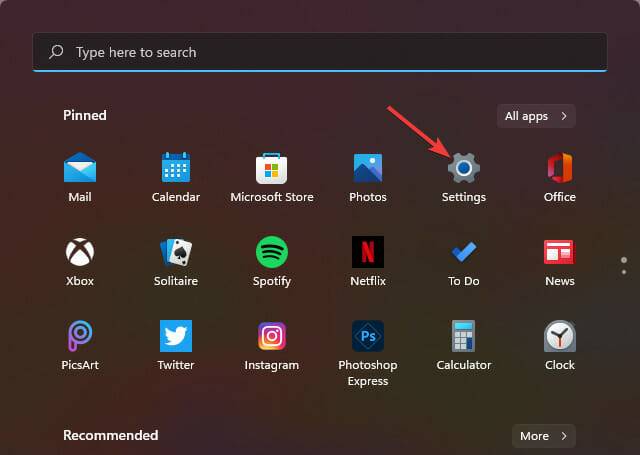
- Click the Start button and its pinned Settings application.

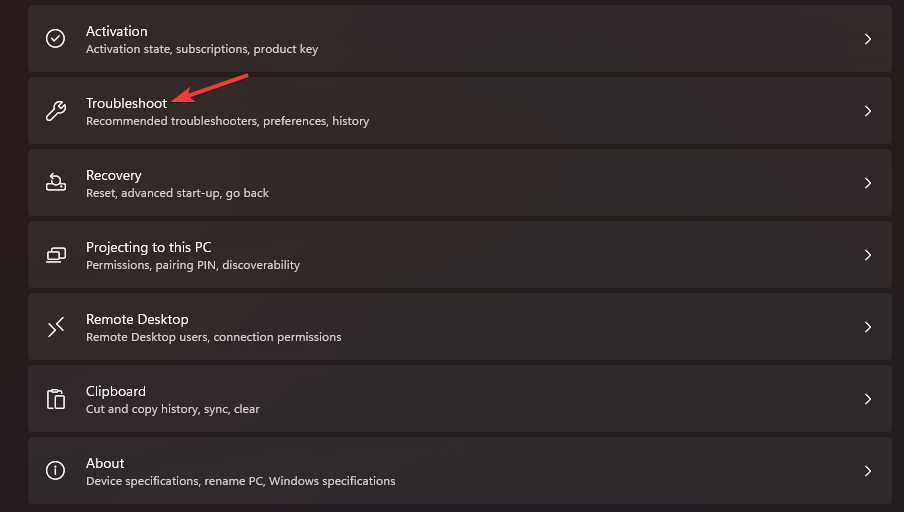
- Select the troubleshooting option shown directly below.

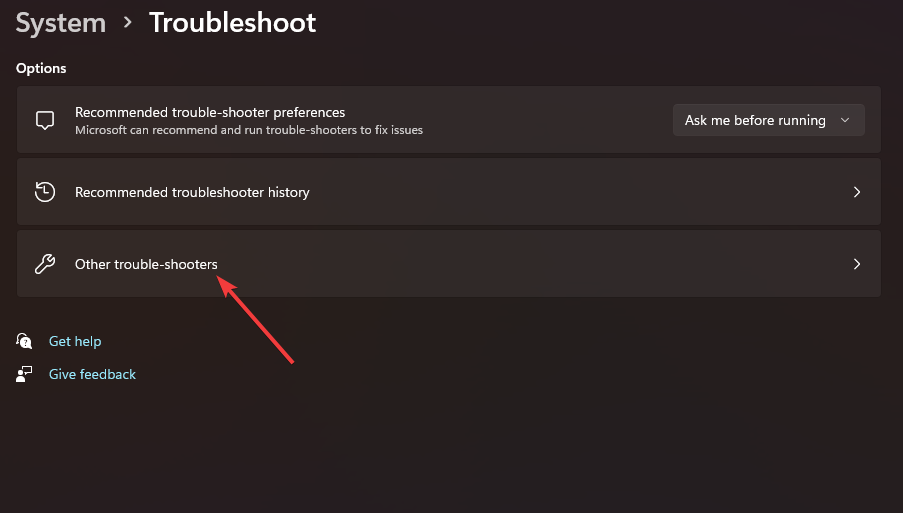
- Click Other Troubleshooters to see a list of Windows 11 troubleshooters.

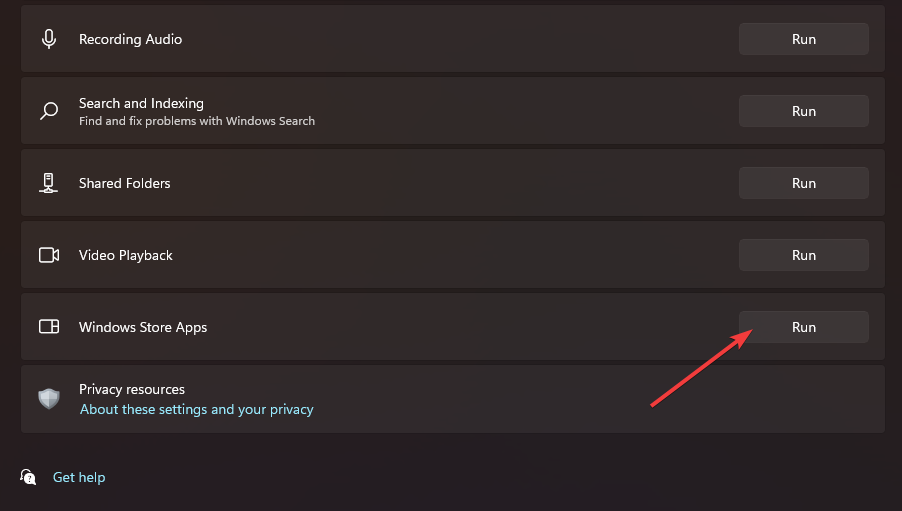
- Press the Run button of the Windows Store App Troubleshooter. The troubleshooter may then detect and fix application issues.

2. Update the Mail app
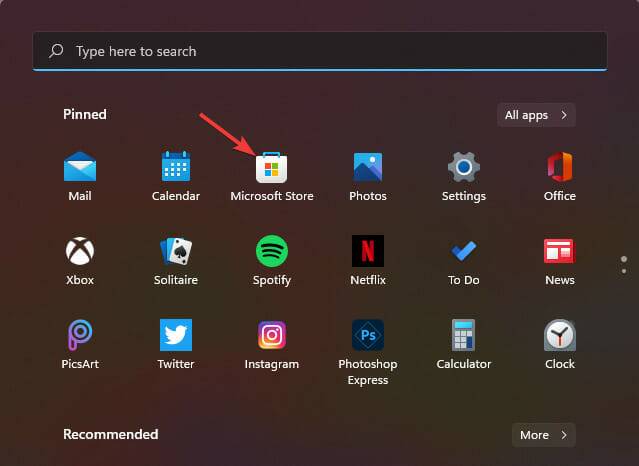
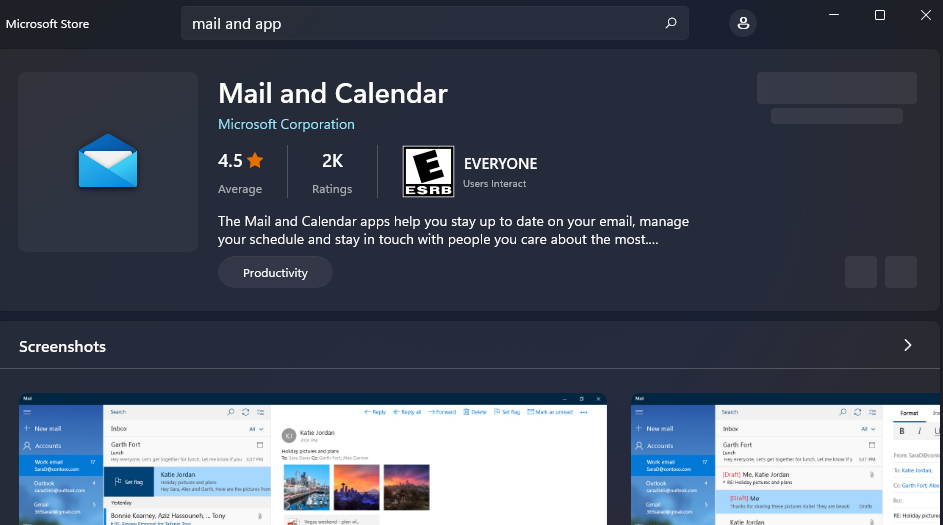
- Open the Start menu and select theMicrosoft Store app from there.

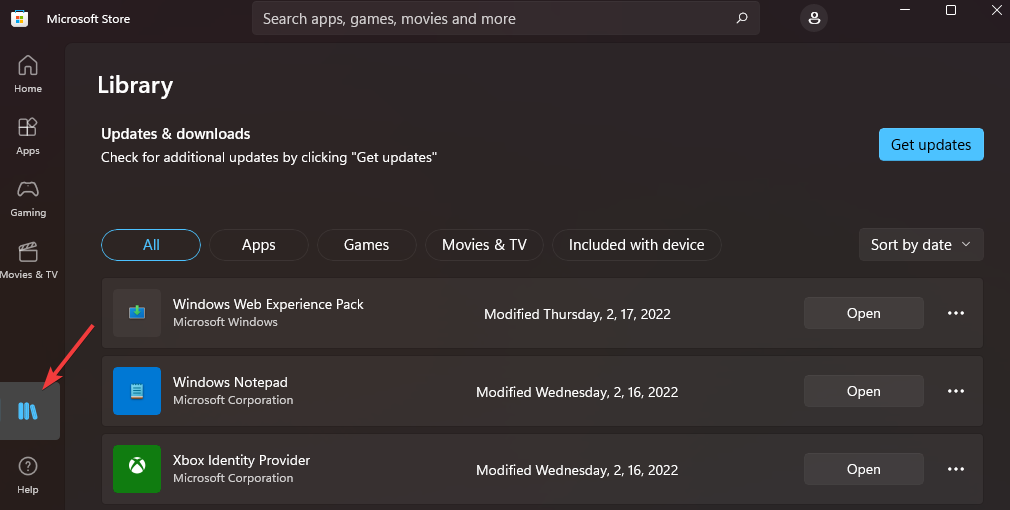
- Click the library to the left of the Microsoft Store app for Windows 11.

- If the message belongs to an application that needs to be updated, click the Update All button. Alternatively, click the Update option in the Mail app.
3. Repair and Reset App
- Open settings (press the Windows I hotkey for that app) .
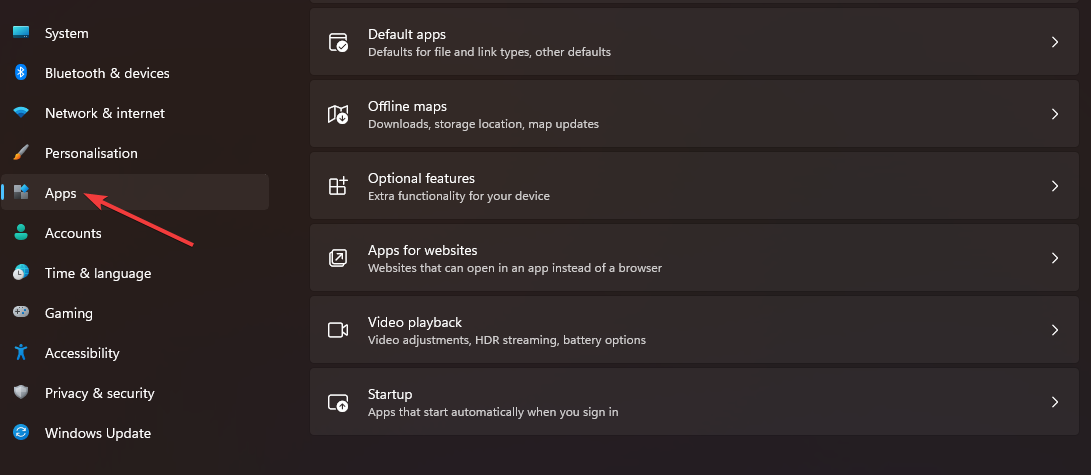
- Select Applications on the left side of Settings.

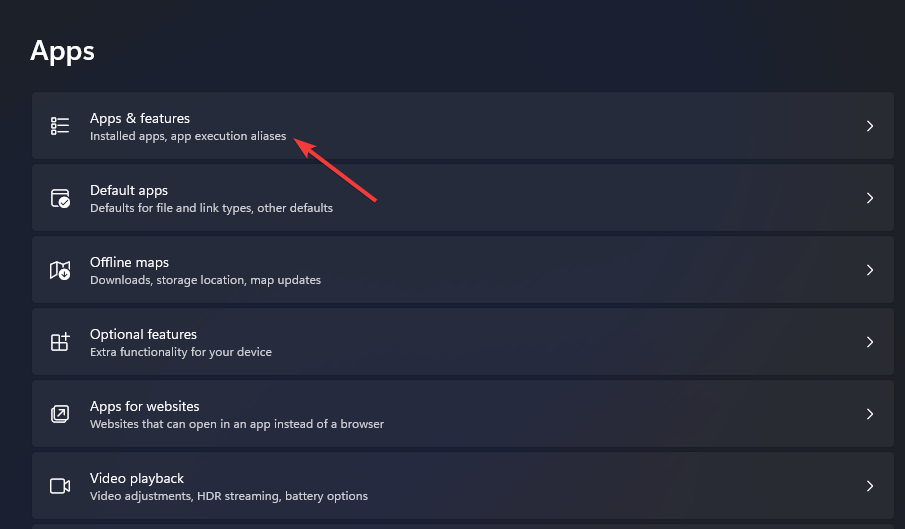
- Click on the Apps & Features navigation option.

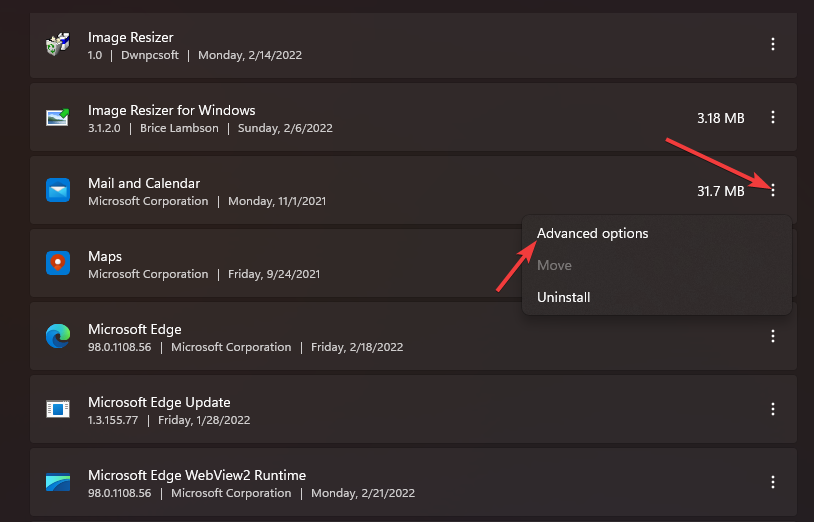
- Next, click the three-dot button for Mail and Calendar. Select Advanced Options on the menu that opens.

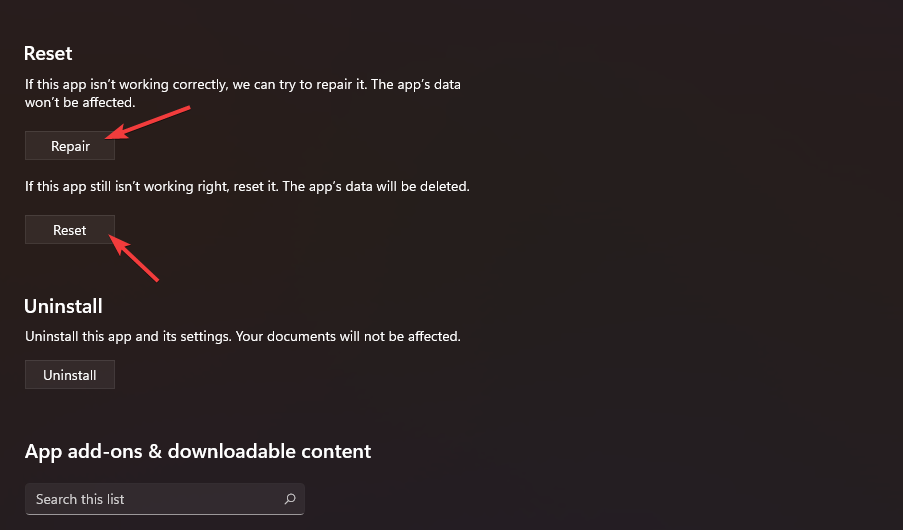
- Press the Repair button.
- Click Reset and then Reset again to clear the app's data.

4. Run a system file scan
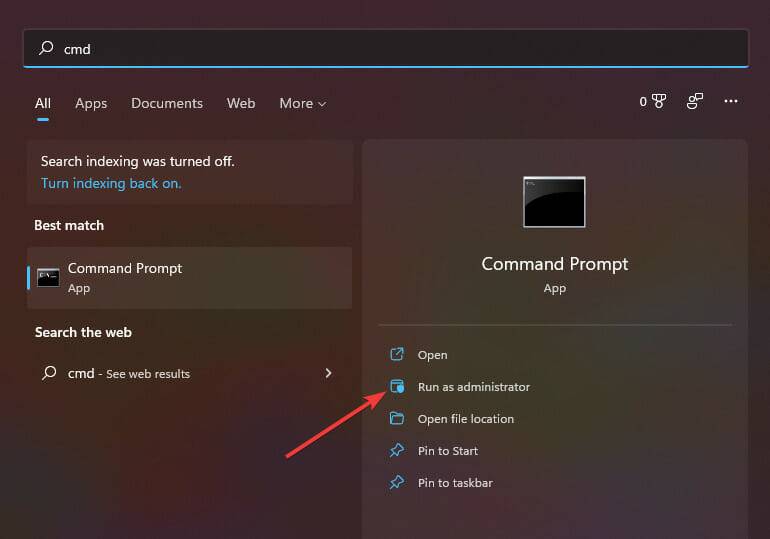
- Open the "Start" menu and enter cmd in the search box.
- Click the Run as administrator option for the Command Prompt search results displayed directly below.

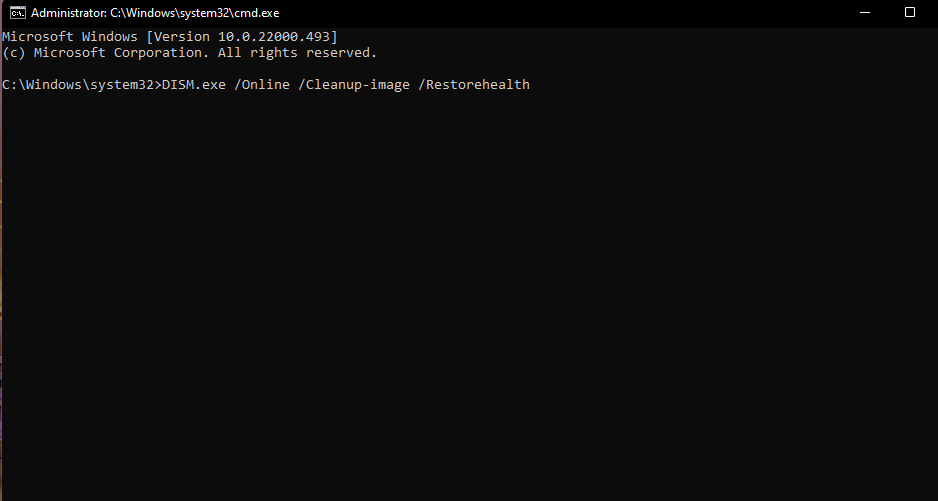
- Enter this command into the prompt window and press Return:
<strong>DISM.exe /Online /Cleanup-image /Restorehealth</strong>
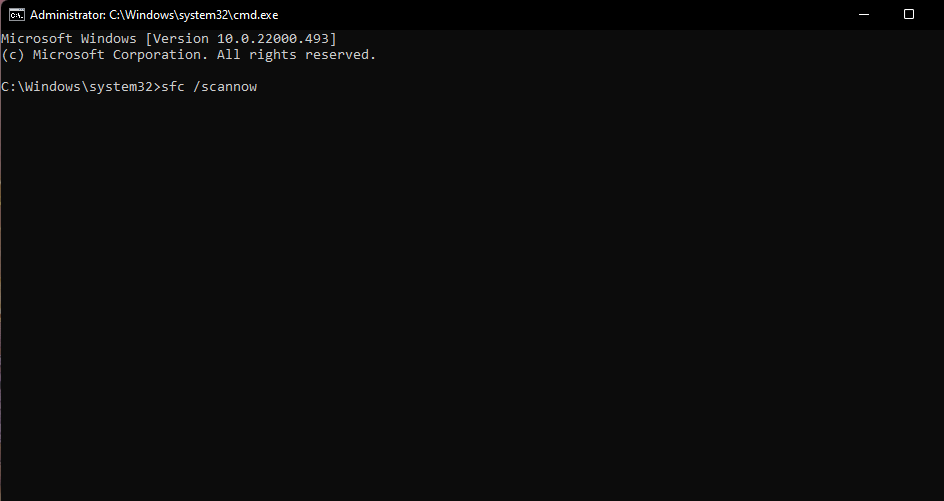
- Then run System File Checker by entering this command and pressing Enter:
<strong>sfc /scannow</strong>
- Wait for the scan to reach 100% and display some kind of result.
5. Check privacy settings
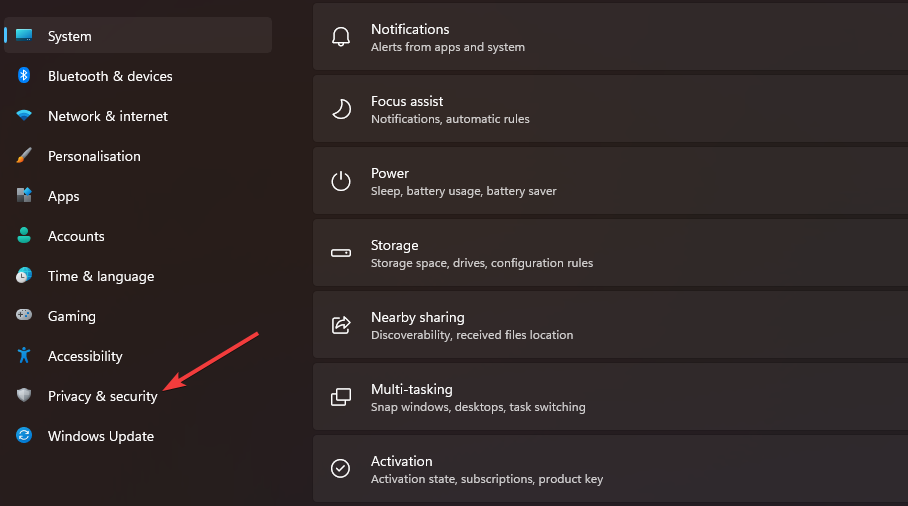
- Open the Settings app.
- Then click on the Privacy and Security tab.

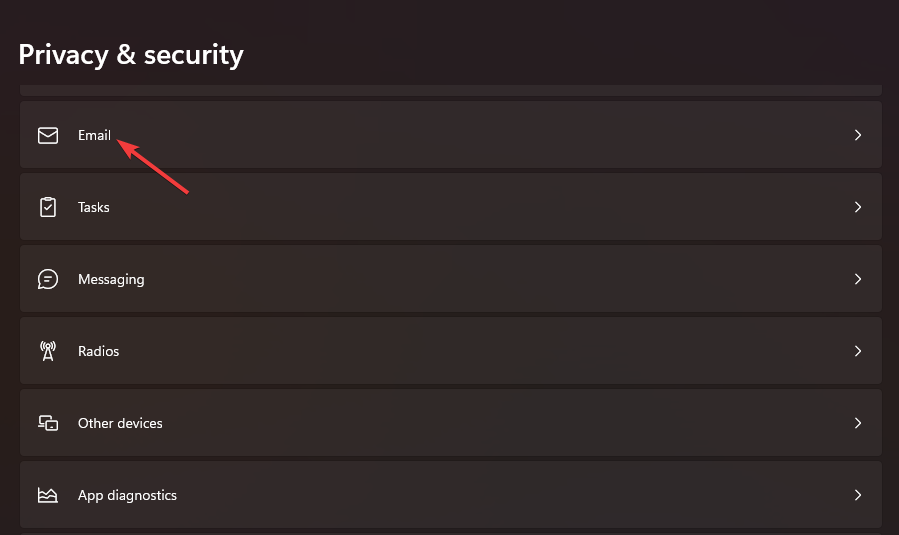
- Select the Email navigation option.

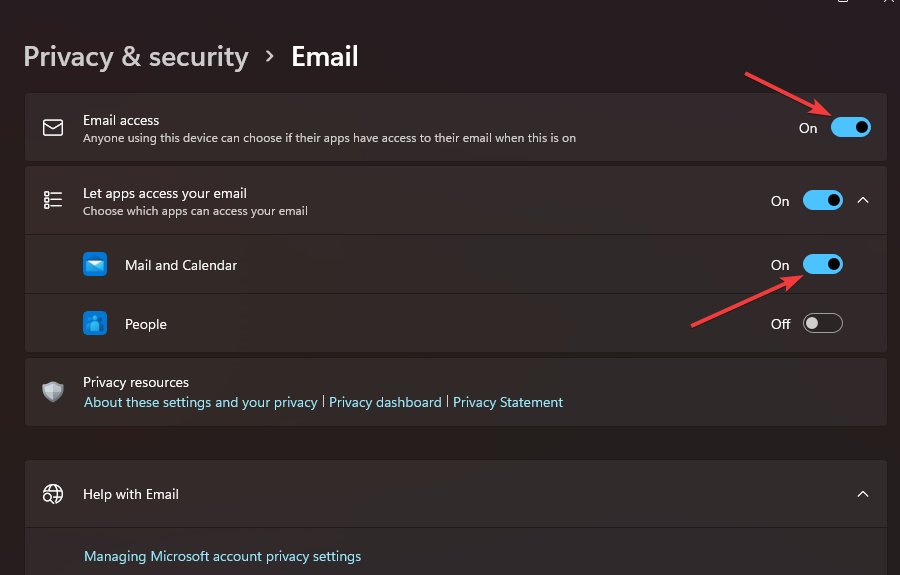
- Make sure the email access option is enabled there.
- Toggle Mail and Calendar options.

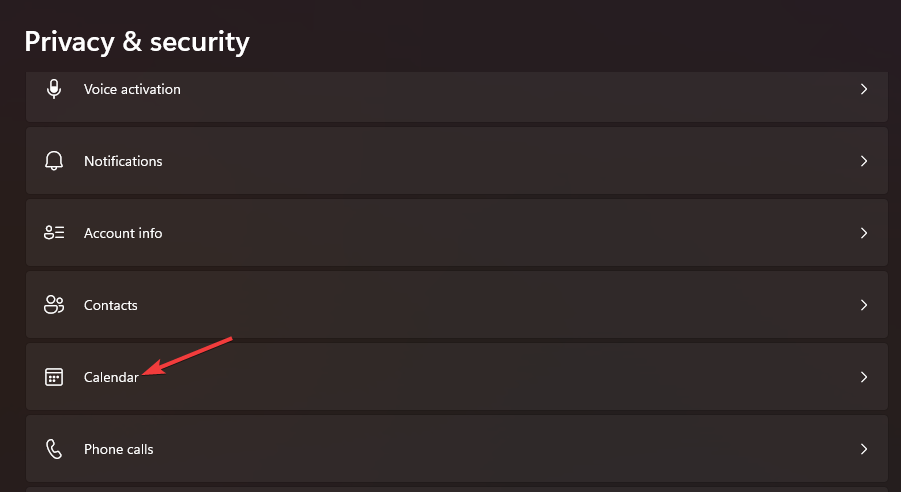
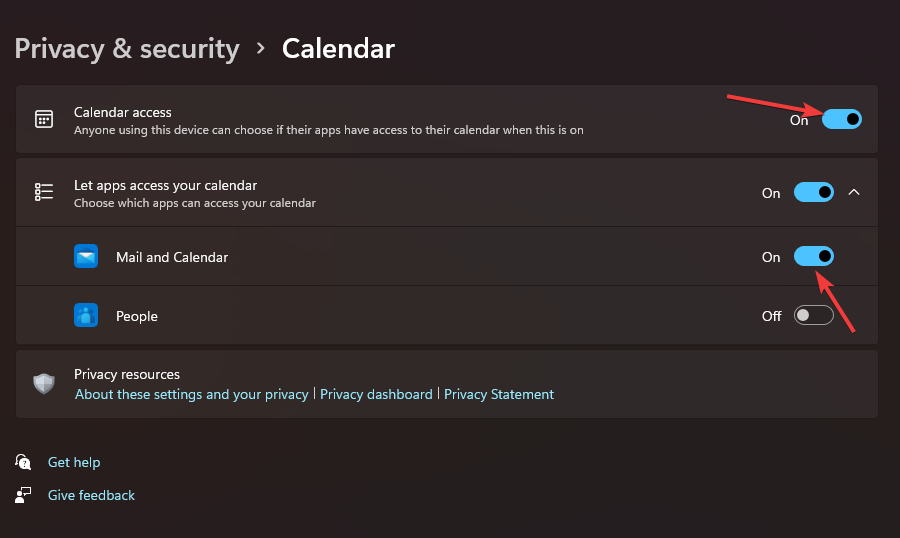
- Click the Privacy & Security tab and select the Calendar option.

- Then make sure Calendar Access and Mail and Calendar Settings are both turned on there.

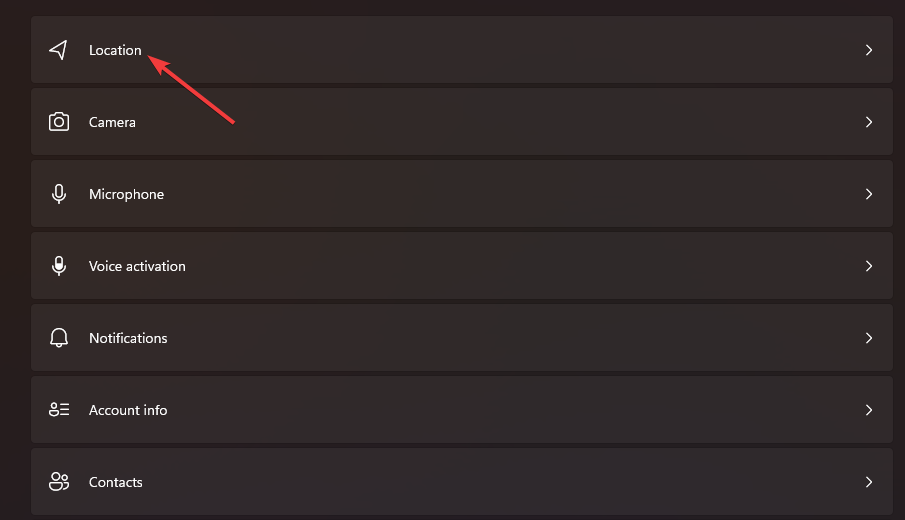
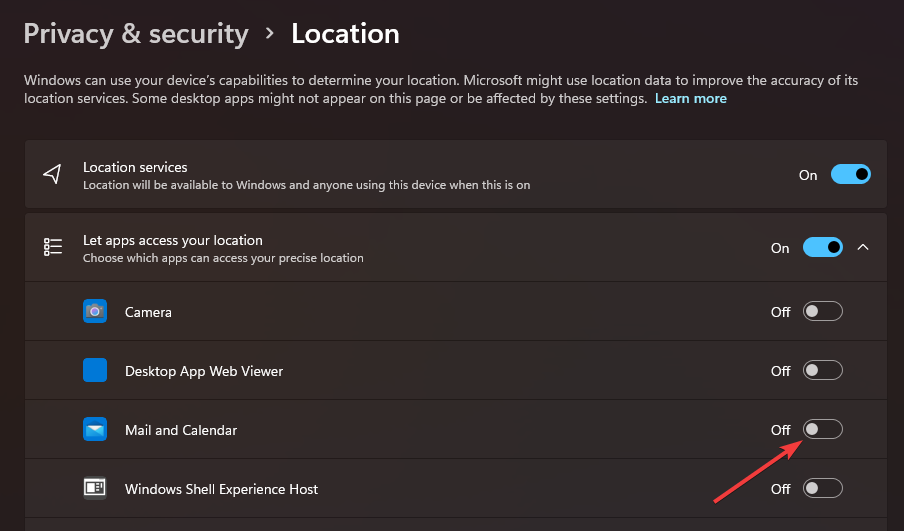
- Return to the Privacy & Security tab to select the Location option.

- If enabled, turn off the Mail and calendar location access setting.

6. Check the localization settings
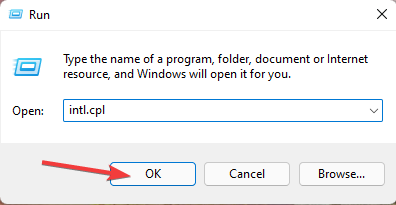
- Press the Windows R hotkey to start running.
- Type this run command in the Open box and click "OK":
<strong>intl.cpl</strong>
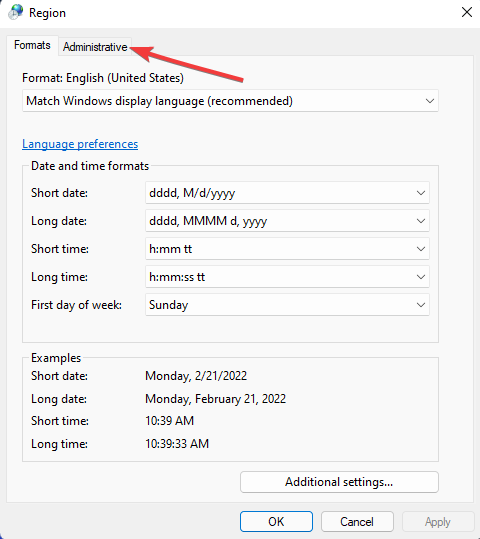
- Select the "Management" tab in the "Area" window.

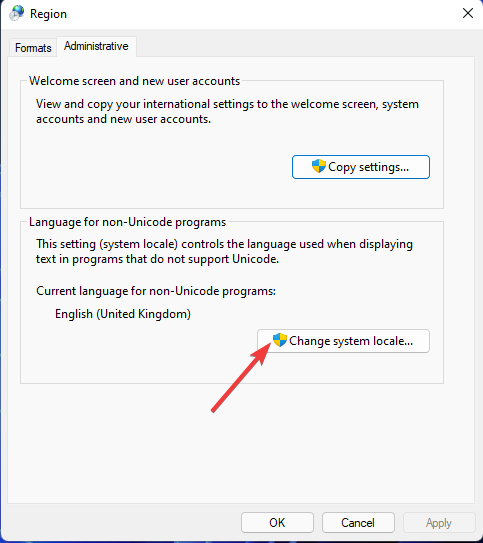
- Press the Change System Locale button there.

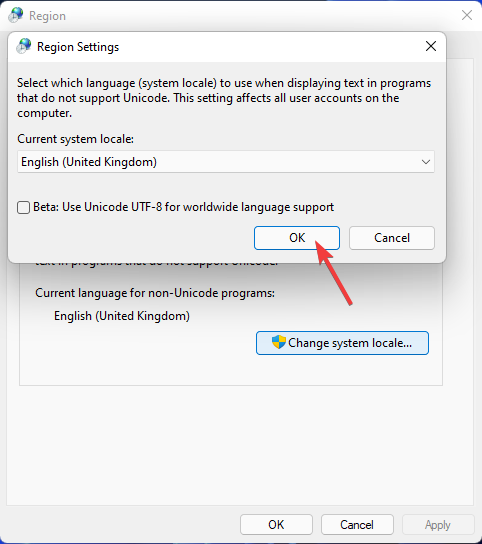
- If the system locale is incorrect, please select your current locale in the drop-down menu.
- Click OK to save the changed settings.

7. Enable the Mail application through Windows Firewall
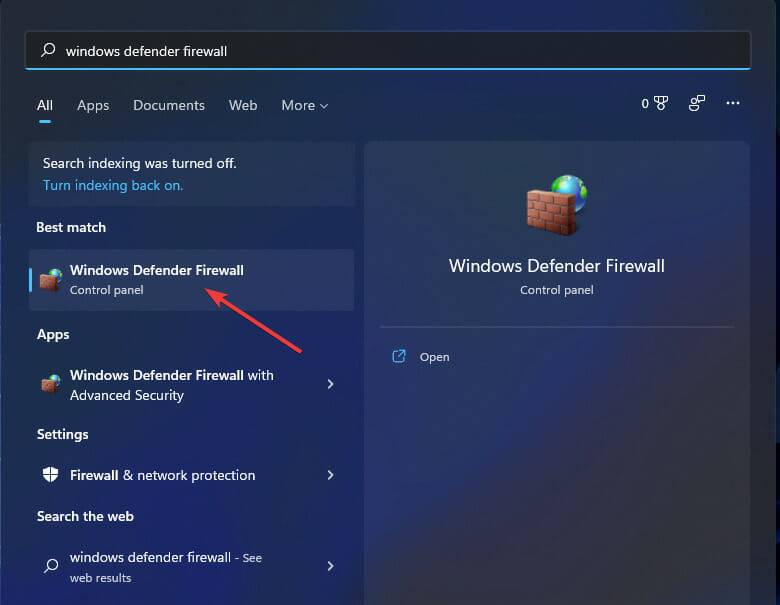
- Click the Starttaskbar button and then in the menu Enter Windows Defender Firewall in the search box.
- Select Windows Defender Firewall in the search results.

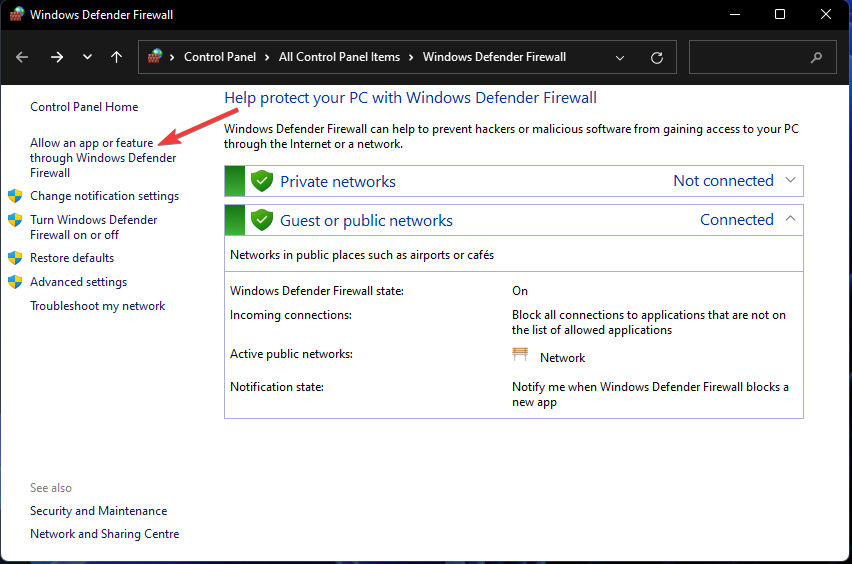
- Click the Allow an app or feature through Windows Defender Firewall option.

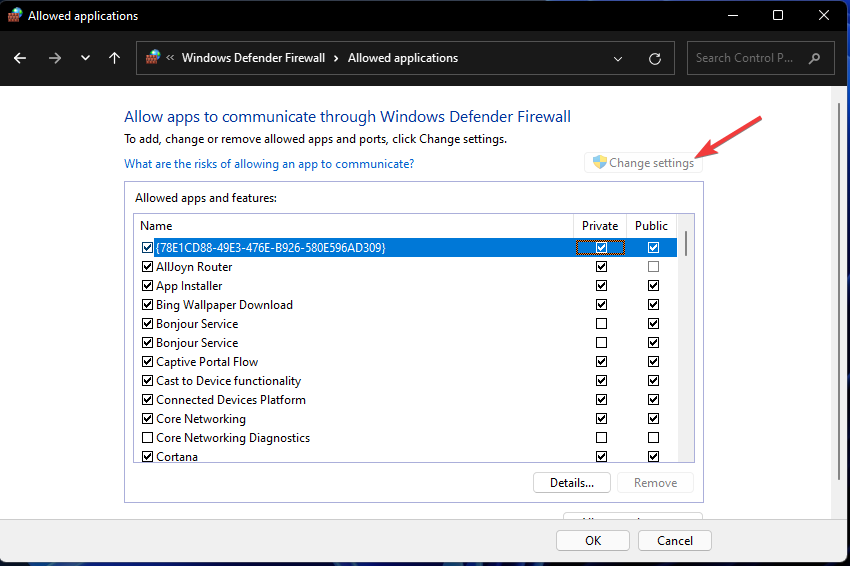
- Press the Change Settings button.

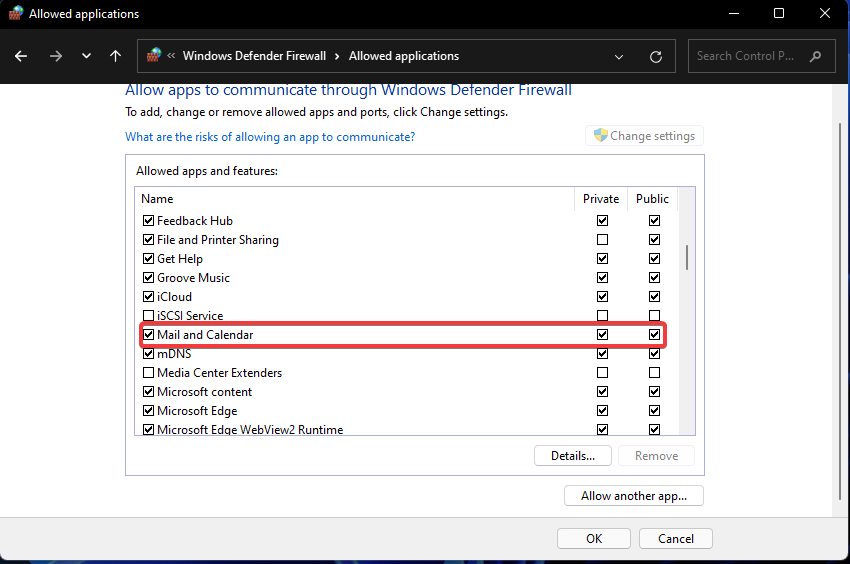
- If the Mail and Calendar apps are not selected, select both their Private and Public checkboxes.

- Click Confirm to apply.
8. Disable third-party anti-virus software
You need to disable the blocking function of the installed third-party anti-virus program before opening Mail. Follow these steps to disable (turn off) the antivirus tool: Right-click on the antivirus tool's system tray icon and select the Disable option in the context menu. If possible, choose to disable the shield for a few hours.
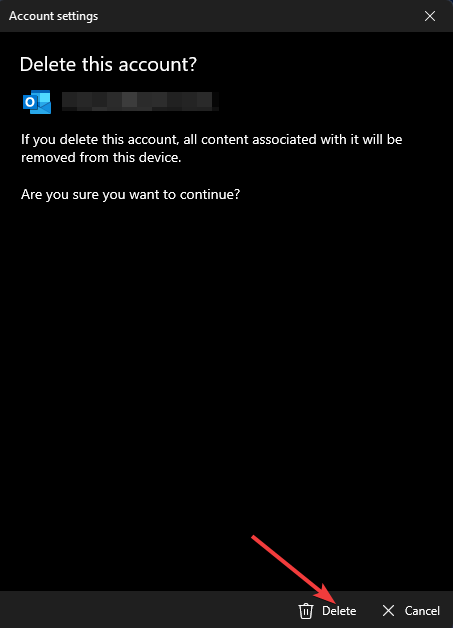
9. Add your email account again
- If you can launch Mail (but can't use it to send email), open a window for that application.
- Click in the upper left corner of the email to expand.

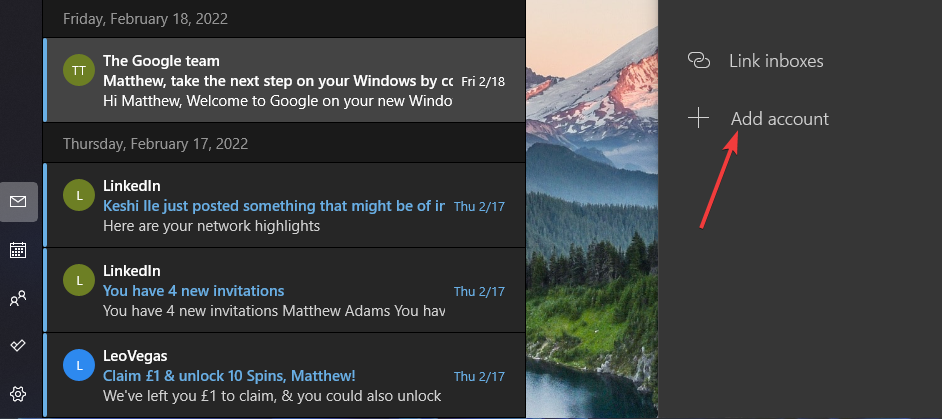
- Select the Manage Account option in the email again. Click on the Add Account option.

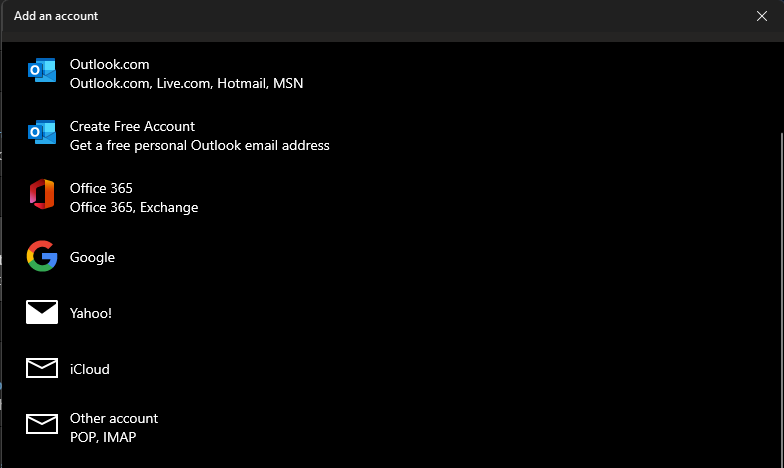
- Select the account type you want to add.

- Then enter the required credentials for the email account you just deleted.
10. Reinstall the Mail app
- Press the Windows S keyboard shortcut to open the search tool.
- Enter keywordsPowerShell to find the application.
- Click PowerShell's Run as administrator option and if a UAC prompt pops up, select Yes.

The above is the detailed content of How to Fix Windows 11 Mail App Not Working. For more information, please follow other related articles on the PHP Chinese website!

Hot AI Tools

Undresser.AI Undress
AI-powered app for creating realistic nude photos

AI Clothes Remover
Online AI tool for removing clothes from photos.

Undress AI Tool
Undress images for free

Clothoff.io
AI clothes remover

Video Face Swap
Swap faces in any video effortlessly with our completely free AI face swap tool!

Hot Article

Hot Tools

Notepad++7.3.1
Easy-to-use and free code editor

SublimeText3 Chinese version
Chinese version, very easy to use

Zend Studio 13.0.1
Powerful PHP integrated development environment

Dreamweaver CS6
Visual web development tools

SublimeText3 Mac version
God-level code editing software (SublimeText3)

Hot Topics
 1386
1386
 52
52
 How to disable driver signature enforcement in Windows 11
May 20, 2023 pm 02:17 PM
Microsoft has built several security features into Windows to ensure your PC remains secure. One of them is driver signature enforcement in Windows 11. When this feature is enabled, it ensures that only drivers digitally signed by Microsoft can be installed on the system. This helps most of the users to a great extent as it protects them. But there is a downside to enabling driver signature enforcement. Suppose you find a driver that works for your device, but it is not signed by Microsoft, although it is completely safe. But you won't be able to install it. Therefore, you must know how to disable driver signing in Windows 11
 How to fix Windows 11 activation error 0xc004c060
May 17, 2023 pm 08:47 PM
Why am I encountering Windows 11 activation error 0xc004c060? First make sure you are using genuine Windows and that the license key is valid. Also, check if it was obtained from an official source and if the key is suitable for the installed OS version. If there is an issue with any of these, you may encounter Windows 11 activation error 0xc004c060. So be sure to verify these and if you find everything is in order, move on to the next section. If you obtained the key through unreliable means or believe that the installed copy is a pirated version, you will need to purchase a valid key from Microsoft. In addition to this, misconfigured settings, missing
 0x80010105: How to fix this Windows update error
May 17, 2023 pm 05:44 PM
Microsoft regularly releases Windows updates to improve functionality or increase the security of the operating system. You can ignore some of these updates, but it's important to always install security updates. While installing these updates, you may encounter error code; 0x80010105. An unstable connection usually causes most update errors, and once the connection is reestablished you're good to go. However, some require more technical troubleshooting, such as the 0x80010105 error, which is what we will see in this article. What causes WindowsUpdate error 0x80010105? This error may occur if your computer has not been updated in a while. Some users may have permanently disabled W for their reasons
 Outlook emails lost from control panel in Windows 11
Feb 29, 2024 pm 03:16 PM
Is the Outlook mail icon missing from Windows 11's Control Panel? This unexpected situation has caused confusion and concern among some individuals who rely on OutlookMail for their communication needs. Why don't my Outlook emails show up in Control Panel? There may be several possible reasons why there are no Outlook mail icons in Control Panel: Outlook is not installed correctly. Installing Office applications from the Microsoft Store does not add the Mail applet to Control Panel. The location of the mlcfg32.cpl file in Control Panel is missing. The path to the mlcfg32.cpl file in the registry is incorrect. The operating system is not currently configured to run this application
 How to disable display scaling for high DPI settings in Windows 11 or 10
May 22, 2023 pm 10:11 PM
The default display scaling feature on Windows 10 or later is a core component of the Windows operating system. But sometimes, this feature of certain apps can cause compatibility issues, unreadable text, blurry logos, and ultimately, app crashes. This can be a huge headache if you're dealing with 2160p or higher resolutions. There are many ways to disable the default display scaling feature on high DPI settings. We've selected the best ones and detailed step-by-step instructions for each process. How to Disable Display Scaling on High DPI Settings There is a way, all you have to do is disable high DPI scaling for a single application, and there is a way to do it for the entire Window
 NET HELPMSG 3774: How to fix this error in 5 steps
May 17, 2023 pm 09:27 PM
Many of our readers have encountered error code NETHELPMSG3774 when trying to create a new user account through the command prompt. The error states that the user was successfully created but could not be added to the USERS local group. Why do I receive the NETHELPMSG3774 error code? If you receive error code NETHELPMSG3774 when trying to create a user account on your Windows PC, it may be due to one or more of the following reasons. Incomplete Windows Installation – If Windows was not installed correctly, or the installation process was interrupted, the NETHELPMSG3774 error may occur during user account creation. Corrupted user profile – if
 Tiny10 makes Windows 10 durable on (very old) PCs
May 22, 2023 pm 04:02 PM
Tiny10 is one developer's attempt to make Microsoft's Windows 10 operating system usable on both older PC systems and modern systems. When Microsoft released Windows 10 in 2015, it ensured that the operating system had the same system requirements as previous versions of Windows. That changes with the release of Windows 11 in 2021. Still, Windows 10 felt noticeably heavier than previous Windows versions, and users began looking for ways to improve the usability of the operating system. Faster hard drive, more memory, faster and more powerful CP
 How to Fix Error Code 1132 in Zoom on Windows PC
May 30, 2023 am 11:08 AM
Zoom's video conferencing capabilities have made it popular among users while working from home. Many Zoom desktop client users have reported seeing error code 1132 along with an “Unknown error has occurred” message on their Windows PCs. Usually, this error code pops up when users try to log into their account and join any meeting in Zoom. In the error window, the user has the option to open a browser and join the meeting. However, some users reported that they were unable to open the meeting even on the browser. Windows firewall settings, outdated Zoom installation, or Zoom blacklisting your account could be some of the possible reasons for this error. Are you encountering an error code while using the Zoom app


