

How to use docker to install the web service provided by nginx

1. Pull the image
The docker pull command is used to pull the application image, and the docker pull nginx command is used to pull the latest version of the nginx image. The following is the response result of the image pulling process:
# docker pull nginx
Using default tag: latest
latest: Pulling from library/nginx
c229119241af: Pull complete
2215908dc0a2: Pull complete
08c3cb2073f1: Pull complete
18f38162c0ce: Pull complete
10e2168f148a: Pull complete
c4ffe9532b5f: Pull complete
Digest: sha256:2275af0f20d71b293916f1958f8497f987b8d8fd8113df54635f2a5915002bf1
Status: Downloaded newer image for nginx:latest
docker.io/library/nginx:latest
From the above we can see that the nginx image is pulled from the URL docker.io.
Use the docker images command to view which image files have been downloaded in the current operating system.
# docker images
REPOSITORY    TAG       IMAGE ID       CREATED        SIZE
nginx         latest    12766a6745ee   33 hours ago   142MB
hello-world   latest    feb5d9fea6a5   6 months ago   13.3kB
REPOSITORY image warehouse and image name. If the image warehouse is not displayed, the default is
docker.ioTAG The version or milestone label of the image, latest represents the latest version
IMAGE ID The unique identifier of the image
CREATED The time when this image was created
SIZE represents the size of the image file
2. Run the image to start the container
Through docker run The command starts a container with the container name nginx-zimug.
# docker run -d --name nginx-zimug -p  80:80  nginx
81bb1211144bc0991a789f860458548643c60b5459466c14d0604be9a4ccbfd7
-dindicates that the container is running in the background--nameCreate a name for the container Name-pPort mapping, the format isHost port:Container port, the above meaning is to map port 80 in the container To port 80 of the host machine, provide external access services. The last field is the image name
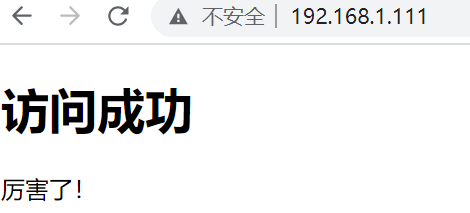
When the browser accesses port 80 of the host through the HTTP protocol, the port number can be omitted. The access results obtained are as follows, indicating that our nginx service has been started successfully.

You can view the running container through docker ps, as shown below:
CONTAINER ID   IMAGE     COMMAND                  CREATED          STATUS          PORTS                               NAMES
81bb1211144b   nginx     "/docker-entrypoint.…"   11 minutes ago   Up 11 minutes   0.0.0.0:80->80/tcp, :::80->80/tcp   nginx-zimug
3. File mapping
First of all, it is clear that the contents of files in the container can be modified, but once the container is restarted, all modifications to data files and configuration files written to the container will be lost. Therefore, in order to save the running status and execution results of the container, we need to map some important data files, log files, and configuration files in the container to the host.
Take nginx as an example. nginx has three important file directories:
| Path in the container | Automatically in the host Define the mapping path | |
|---|---|---|
| The directory where website pages are stored | /usr/share/nginx/html | /root/nginx /html |
| nginx configuration file directory | /etc/nginx/nginx.conf | /root/nginx/conf/nginx.conf |
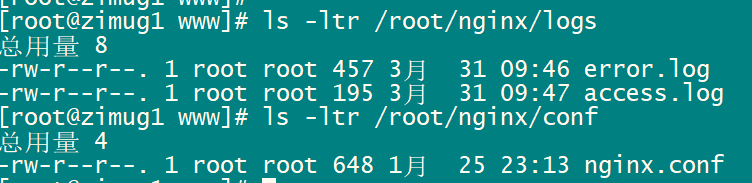
| Log directory | /var/log/nginx | /root/nginx/logs |
Create a new file directory in the host machine
mkdir -p /root/nginx/logs /root/nginx/html /root/nginx/conf;
Copy the files in the container to the host machine
Copy the nginx configuration file to the host machine
docker cp nginx-zimug:/etc/nginx/nginx.conf /root/nginx/conf;
Put a simulated html file into the html directory
Save the following file as index.html and put it into the host's /root/nginx/htmlDirectory, because there is a mapping relationship, it is actually placed in the /usr/share/nginx/html directory of the container.
<!DOCTYPE html>
<html>
<head>
<meta charset="utf-8">
<title>使用docker搭建nginx web服务</title>
</head>
<body>
    <h2 id="访问成功">访问成功</h2>
    <p>厉害了!</p>
</body>
</html>4. Start the container service again
-vThe parameter expresses the mapping relationship between the host file and the file in the container, and the format is -v host Directory: Container file system directory . Start a new container. The name of the container is nginx-prod
docker run -d -p 80:80 \
--name nginx-prod \
-v /root/nginx/html:/usr/share/nginx/html \
-v /root/nginx/conf/nginx.conf:/etc/nginx/nginx.conf \
-v /root/nginx/logs:/var/log/nginx  nginx
Before starting the new container, delete the old nginx-zimug container. If the old container is not deleted, the port of the new container will conflict with the port of the old container. Use the following command to delete the container:
docker stop nginx-zimug;
docker rm nginx-zimug;
Execute the above docker run command to start a new container. After startup, access port 80 of the host through the browser. The response result is as follows, which proves that nginx is providing web services normally.
At the same time, you can modify the nginx configuration on the host machine and view the runtime log file. Changing the configuration file will affect the nginx service running in the container because there is a mapping relationship between the host and the configuration file in the container.
The above is the detailed content of How to use docker to install the web service provided by nginx. For more information, please follow other related articles on the PHP Chinese website!

Hot AI Tools

Undresser.AI Undress
AI-powered app for creating realistic nude photos

AI Clothes Remover
Online AI tool for removing clothes from photos.

Undress AI Tool
Undress images for free

Clothoff.io
AI clothes remover

AI Hentai Generator
Generate AI Hentai for free.

Hot Article
Hot Tools

Notepad++7.3.1
Easy-to-use and free code editor

SublimeText3 Chinese version
Chinese version, very easy to use

Zend Studio 13.0.1
Powerful PHP integrated development environment

Dreamweaver CS6
Visual web development tools

SublimeText3 Mac version
God-level code editing software (SublimeText3)
Hot Topics


 Pi Node Teaching: What is a Pi Node? How to install and set up Pi Node?
Mar 05, 2025 pm 05:57 PM
Pi Node Teaching: What is a Pi Node? How to install and set up Pi Node?
Mar 05, 2025 pm 05:57 PM
Detailed explanation and installation guide for PiNetwork nodes This article will introduce the PiNetwork ecosystem in detail - Pi nodes, a key role in the PiNetwork ecosystem, and provide complete steps for installation and configuration. After the launch of the PiNetwork blockchain test network, Pi nodes have become an important part of many pioneers actively participating in the testing, preparing for the upcoming main network release. If you don’t know PiNetwork yet, please refer to what is Picoin? What is the price for listing? Pi usage, mining and security analysis. What is PiNetwork? The PiNetwork project started in 2019 and owns its exclusive cryptocurrency Pi Coin. The project aims to create a one that everyone can participate
 Agile development and operation of PHP microservice containerization
May 08, 2024 pm 02:21 PM
Agile development and operation of PHP microservice containerization
May 08, 2024 pm 02:21 PM
Answer: PHP microservices are deployed with HelmCharts for agile development and containerized with DockerContainer for isolation and scalability. Detailed description: Use HelmCharts to automatically deploy PHP microservices to achieve agile development. Docker images allow for rapid iteration and version control of microservices. The DockerContainer standard isolates microservices, and Kubernetes manages the availability and scalability of the containers. Use Prometheus and Grafana to monitor microservice performance and health, and create alarms and automatic repair mechanisms.
 How to install deepseek
Feb 19, 2025 pm 05:48 PM
How to install deepseek
Feb 19, 2025 pm 05:48 PM
There are many ways to install DeepSeek, including: compile from source (for experienced developers) using precompiled packages (for Windows users) using Docker containers (for most convenient, no need to worry about compatibility) No matter which method you choose, Please read the official documents carefully and prepare them fully to avoid unnecessary trouble.
 Deploy JavaEE applications using Docker Containers
Jun 05, 2024 pm 08:29 PM
Deploy JavaEE applications using Docker Containers
Jun 05, 2024 pm 08:29 PM
Deploy Java EE applications using Docker containers: Create a Dockerfile to define the image, build the image, run the container and map the port, and then access the application in the browser. Sample JavaEE application: REST API interacts with database, accessible on localhost after deployment via Docker.
 How to use PHP CI/CD to iterate quickly?
May 08, 2024 pm 10:15 PM
How to use PHP CI/CD to iterate quickly?
May 08, 2024 pm 10:15 PM
Answer: Use PHPCI/CD to achieve rapid iteration, including setting up CI/CD pipelines, automated testing and deployment processes. Set up a CI/CD pipeline: Select a CI/CD tool, configure the code repository, and define the build pipeline. Automated testing: Write unit and integration tests and use testing frameworks to simplify testing. Practical case: Using TravisCI: install TravisCI, define the pipeline, enable the pipeline, and view the results. Implement continuous delivery: select deployment tools, define deployment pipelines, and automate deployment. Benefits: Improve development efficiency, reduce errors, and shorten delivery time.
 How to install Docker extension in vscode Steps to install Docker extension in vscode
May 09, 2024 pm 03:25 PM
How to install Docker extension in vscode Steps to install Docker extension in vscode
May 09, 2024 pm 03:25 PM
1. First, after opening the interface, click the extension icon button on the left 2. Then, find the search bar location in the opened extension page 3. Then, enter the word Docker with the mouse to find the extension plug-in 4. Finally, select the target plug-in and click the right Just click the install button in the lower corner
 PHP microservice containerized monitoring and log management practice
May 08, 2024 pm 12:06 PM
PHP microservice containerized monitoring and log management practice
May 08, 2024 pm 12:06 PM
PHP microservice containerized monitoring and log management monitoring: Use Prometheus and Grafana to monitor resource usage, number of requests, and latency. Log management: Use ELKStack (ElasticSearch, Logstash, Kibana) to collect, parse and visualize logs. Deploy the Filebeat agent to send logs to ElasticSearch.
 Questions and Answers on PHP Enterprise Application Microservice Architecture Design
May 07, 2024 am 09:36 AM
Questions and Answers on PHP Enterprise Application Microservice Architecture Design
May 07, 2024 am 09:36 AM
Microservice architecture uses PHP frameworks (such as Symfony and Laravel) to implement microservices and follows RESTful principles and standard data formats to design APIs. Microservices communicate via message queues, HTTP requests, or gRPC, and use tools such as Prometheus and ELKStack for monitoring and troubleshooting.
