How to create SpringBoot HikariCP connection pool
Common pooling package Commons Pool 2
Let’s first study the common object pooling package Commons Pool 2 in Java to understand the general object pool structure.
According to our business needs, using this set of APIs can easily achieve object pooling management.
<dependency>
    <groupId>org.apache.commons</groupId>
    <artifactId>commons-pool2</artifactId>
    <version>2.11.1</version>
</dependency>GenericObjectPool is the core class of the object pool. By passing in the configuration of an object pool and an object factory, you can quickly create an object pool.
public GenericObjectPool(
            final PooledObjectFactory<T> factory,
final GenericObjectPoolConfig<T> config)Case
Redis’ common client Jedis uses Commons Pool to manage the connection pool, which can be said to be a best practice. The following figure is the main code block for Jedis to use factories to create objects.
The main method of the object factory class is makeObject. Its return value is of PooledObject type. The object can be simply packaged and returned using new DefaultPooledObject<>(obj).
redis.clients.jedis.JedisFactory, uses the factory to create objects.
@Override
public PooledObject<Jedis> makeObject() throws Exception {
  Jedis jedis = null;
  try {
    jedis = new Jedis(jedisSocketFactory, clientConfig);
    //主要的耗时操作
    jedis.connect();
    //返回包装对象
    return new DefaultPooledObject<>(jedis);
  } catch (JedisException je) {
    if (jedis != null) {
      try {
        jedis.quit();
      } catch (RuntimeException e) {
        logger.warn("Error while QUIT", e);
      }
      try {
        jedis.close();
      } catch (RuntimeException e) {
        logger.warn("Error while close", e);
      }
    }
    throw je;
  }
}Let’s introduce the object generation process, as shown below. When acquiring an object, it will first try to take one out from the object pool. If there is no free object in the object pool, use the factory class to provide it. method to generate a new one.
public T borrowObject(final Duration borrowMaxWaitDuration) throws Exception {
    //此处省略若干行
    while (p == null) {
        create = false;
        //首先尝试从池子中获取。
        p = idleObjects.pollFirst();
        // 池子里获取不到,才调用工厂内生成新实例
        if (p == null) {
            p = create();
            if (p != null) {
                create = true;
            }
        }
        //此处省略若干行
    }
    //此处省略若干行
}Where does the object exist? This storage responsibility is borne by a structure called LinkedBlockingDeque, which is a two-way queue.
Next, let’s take a look at the main properties of GenericObjectPoolConfig:
// GenericObjectPoolConfig本身的属性
private int maxTotal = DEFAULT_MAX_TOTAL;
private int maxIdle = DEFAULT_MAX_IDLE;
private int minIdle = DEFAULT_MIN_IDLE;
// 其父类BaseObjectPoolConfig的属性
private boolean lifo = DEFAULT_LIFO;
private boolean fairness = DEFAULT_FAIRNESS;
private long maxWaitMillis = DEFAULT_MAX_WAIT_MILLIS;
private long minEvictableIdleTimeMillis = DEFAULT_MIN_EVICTABLE_IDLE_TIME_MILLIS;
private long evictorShutdownTimeoutMillis = DEFAULT_EVICTOR_SHUTDOWN_TIMEOUT_MILLIS;
private long softMinEvictableIdleTimeMillis = DEFAULT_SOFT_MIN_EVICTABLE_IDLE_TIME_MILLIS;
private int numTestsPerEvictionRun = DEFAULT_NUM_TESTS_PER_EVICTION_RUN;
private EvictionPolicy<T> evictionPolicy = null;
// Only 2.6.0 applications set this
private String evictionPolicyClassName = DEFAULT_EVICTION_POLICY_CLASS_NAME;
private boolean testOnCreate = DEFAULT_TEST_ON_CREATE;
private boolean testOnBorrow = DEFAULT_TEST_ON_BORROW;
private boolean testOnReturn = DEFAULT_TEST_ON_RETURN;
private boolean testWhileIdle = DEFAULT_TEST_WHILE_IDLE;
private long timeBetweenEvictionRunsMillis = DEFAULT_TIME_BETWEEN_EVICTION_RUNS_MILLIS;
private boolean blockWhenExhausted = DEFAULT_BLOCK_WHEN_EXHAUSTED;
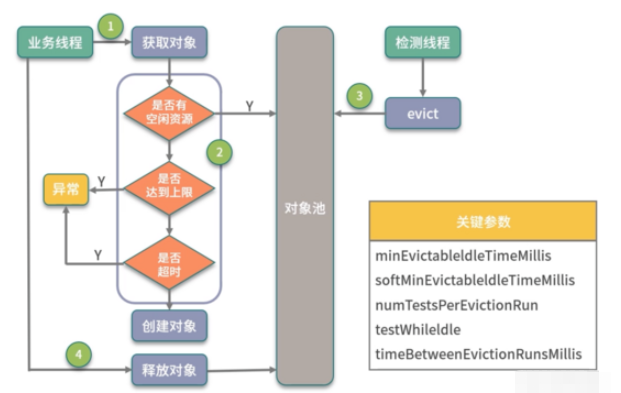
There are many parameters. To understand the meaning of the parameters, let’s first take a look at the life cycle of a pooled object in the entire pool.
As shown in the figure below, there are two main operations of the pool: one is the business thread, and the other is the detection thread.

When the object pool is initialized, three main parameters must be specified:
maxTotal The upper limit of objects managed in the object pool
maxIdle maximum idle number
minIdle minimum idle number
maxTotal is related to business threads , when the business thread wants to obtain an object, it will first check whether there is an idle object.
If there is one, return one; otherwise, enter the creation logic. If the maximum size has been reached in the pool, object creation will fail and an empty object will be returned.
When the object is acquired, there is a very important parameter, which is the maximum waiting time (maxWaitMillis). This parameter has a relatively large impact on the performance of the application. This parameter defaults to -1, which means it will never time out until an object is free.
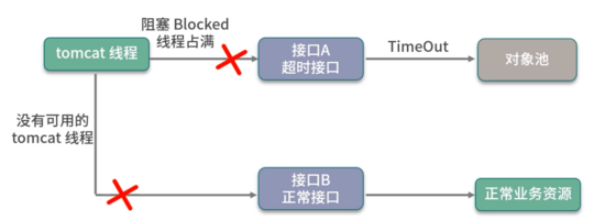
As shown in the figure below, if the object creation is very slow or the use is very busy, the business thread will continue to block (blockWhenExhausted defaults to true), which will cause normal services to fail to run.

Interview questions
I am usually asked during the interview: "How long will you set the timeout parameter?" My approach is to The maximum wait time is set to the maximum delay that the interface can tolerate.
For example, if a normal service response time is about 10ms, and if it reaches 1 second, you will feel stuck, then it is okay to set this parameter to 500~1000ms.
After the timeout, a NoSuchElementException exception will be thrown, and the request will fail quickly without affecting other business threads. This Fail Fast idea is widely used on the Internet.
Parameters with the word evcit are mainly used to handle object eviction. The creation and destruction operations of pooled objects not only consume time, but also occupy system resources during runtime.
For example, the connection pool will occupy multiple connections, and the thread pool will increase scheduling overhead. When the business encounters burst traffic, it will apply for object resources from the pool that exceed normal requirements. When these objects are no longer used, we need to clean them up.
Objects that exceed the value specified by the minEvictableIdleTimeMillis parameter will be forcibly recycled. This value defaults to 30 minutes; the softMinEvictableIdleTimeMillis parameter is similar, but it will only be removed when the current number of objects is greater than minIdle, so The former's actions are more violent.
There are also 4 test parameters: testOnCreate, testOnBorrow, testOnReturn, and testWhileIdle, which respectively specify whether to check the validity of the pooled object during creation, acquisition, return, and idle detection.
Enabling these detections can ensure the effectiveness of resources, but it will consume performance, so the default is false.
In a production environment, it is recommended to only set testWhileIdle to true and adjust the idle detection interval (timeBetweenEvictionRunsMillis), such as 1 minute, to ensure resource availability and efficiency.
JMH Test
How big is the performance gap between using connection pooling and not using connection pooling?
The following is a simple JMH test example (see the warehouse), which performs a simple set operation to set a random value for the redis key.
@Fork(2)
@State(Scope.Benchmark)
@Warmup(iterations = 5, time = 1)
@Measurement(iterations = 5, time = 1)
@BenchmarkMode(Mode.Throughput)
public class JedisPoolVSJedisBenchmark {
JedisPool pool = new JedisPool("localhost", 6379);@Benchmarkpublicvoid testPool() {
Jedis jedis = pool.getResource(); jedis.set("a", UUID.randomUUID().toString());
jedis.close();
}
@Benchmarkpublicvoid testJedis() {
Jedis jedis = new Jedis("localhost",6379);
jedis.set("a", UUID.randomUUID().toString());
jedis.close();
}//此处省略若干行}将测试结果使用 meta-chart 作图,展示结果如下图所示,可以看到使用了连接池的方式,它的吞吐量是未使用连接池方式的 5 倍!

数据库连接池 HikariCP
HikariCP 源于日语“光る”,光的意思,寓意软件工作速度和光速一样快,它是 SpringBoot 中默认的数据库连接池。
数据库是我们工作中经常使用到的组件,针对数据库设计的客户端连接池是非常多的,它的设计原理与我们在本文开头提到的基本一致,可以有效地减少数据库连接创建、销毁的资源消耗。
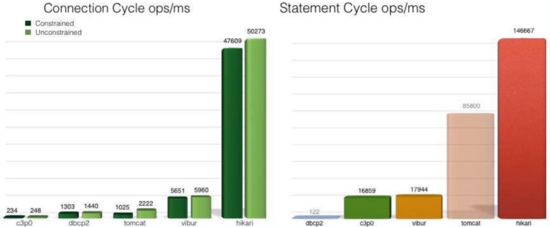
同是连接池,它们的性能也是有差别的,下图是 HikariCP 官方的一张测试图,可以看到它优异的性能,官方的 JMH 测试代码见 Github。

一般面试题是这么问的:HikariCP 为什么快呢?
主要有三个方面:
它使用 FastList 替代 ArrayList,通过初始化的默认值,减少了越界检查的操作
优化并精简了字节码,通过使用 Javassist,减少了动态代理的性能损耗,比如使用 invokestatic 指令代替 invokevirtual 指令
实现了无锁的 ConcurrentBag,减少了并发场景下的锁竞争
HikariCP 对性能的一些优化操作,是非常值得我们借鉴的,在之后的博客中,我们将详细分析几个优化场景。
数据库连接池同样面临一个最大值(maximumPoolSize)和最小值(minimumIdle)的问题。一个在面试中经常被问到的问题是:你通常会将连接池设置为多大?
许多学生误以为,连接池设置得越大越好,有些学生甚至将该值设置为1000以上。
根据经验,数据库连接,只需要 20~50 个就够用了。具体的大小,要根据业务属性进行调整,但大得离谱肯定是不合适的。
HikariCP 官方是不推荐设置 minimumIdle 这个值的,它将被默认设置成和 maximumPoolSize 一样的大小。如果你的数据库Server端的连接资源空闲很多,你可以考虑禁用连接池的动态调整功能。
另外,根据数据库查询和事务类型,一个应用中是可以配置多个数据库连接池的,这个优化技巧很少有人知道,在此简要描述一下。
业务类型通常有两种:一种需要快速的响应时间,把数据尽快返回给用户;另外一种是可以在后台慢慢执行,耗时比较长,对时效性要求不高。
如果这两种业务类型,共用一个数据库连接池,就容易发生资源争抢,进而影响接口响应速度。
虽然微服务能够解决这种情况,但大多数服务是没有这种条件的,这时就可以对连接池进行拆分。
如图,在同一个业务中,根据业务的属性,我们分了两个连接池,就是来处理这种情况的。

HikariCP 还提到了另外一个知识点,在 JDBC4 的协议中,通过 Connection.isValid() 就可以检测连接的有效性。
这样,我们就不用设置一大堆的 test 参数了,HikariCP 也没有提供这样的参数。
结果缓存池
到了这里你可能会发现池(Pool)与缓存(Cache)有许多相似之处。
它们有一个共同点,即将经过加工的对象存储在相对高速的区域中。我习惯性将缓存看作是数据对象,而把池中的对象看作是执行对象。缓存中的数据有一个命中率问题,而池中的对象一般都是对等的。
考虑下面一个场景,jsp 提供了网页的动态功能,它可以在执行后,编译成 class 文件,加快执行速度;再或者,一些媒体平台,会将热门文章,定时转化成静态的 html 页面,仅靠 nginx 的负载均衡即可应对高并发请求(动静分离)。
这些时候,你很难说清楚,这是针对缓存的优化,还是针对对象进行了池化,它们在本质上只是保存了某个执行步骤的结果,使得下次访问时不需要从头再来。
我通常把这种技术叫作结果缓存池(Result Cache Pool),属于多种优化手段的综合。
小结
下面我来简单总结一下本文的内容重点:我们从 Java 中最通用的公用池化包 Commons Pool 2 说起,介绍了它的一些实现细节,并对一些重要参数的应用做了讲解。
Jedis 就是在 Commons Pool 2 的基础上封装的,通过 JMH 测试,我们发现对象池化之后,有了接近 5 倍的性能提升。
接下来介绍了数据库连接池中速度很快的 HikariCP ,它在池化技术之上,又通过编码技巧进行了进一步的性能提升,HikariCP 是我重点研究的类库之一,我也建议你加入自己的任务清单中。
总体来说,当你遇到下面的场景,就可以考虑使用池化来增加系统性能:
对象的创建或者销毁,需要耗费较多的系统资源
对象的创建或者销毁,耗时长,需要繁杂的操作和较长时间的等待
对象创建后,通过一些状态重置,可被反复使用
将对象池化之后,只是开启了第一步优化。要想达到最优性能,就不得不调整池的一些关键参数,合理的池大小加上合理的超时时间,就可以让池发挥更大的价值。和缓存的命中率类似,对池的监控也是非常重要的。
如下图,可以看到数据库连接池连接数长时间保持在高位不释放,同时等待的线程数急剧增加,这就能帮我们快速定位到数据库的事务问题。

平常的编码中,有很多类似的场景。比如 Http 连接池,Okhttp 和 Httpclient 就都提供了连接池的概念,你可以类比着去分析一下,关注点也是在连接大小和超时时间上。
在底层的中间件,比如 RPC,也通常使用连接池技术加速资源获取,比如 Dubbo 连接池、 Feign 切换成 httppclient 的实现等技术。
你会发现,在不同资源层面的池化设计也是类似的。在后续的文章中,我们将介绍线程池的功能,例如利用队列对任务进行二层缓冲、提供多种拒绝策略等。
线程池的这些特性,你同样可以借鉴到连接池技术中,用来缓解请求溢出,创建一些溢出策略。
现实情况中,我们也会这么做。那么具体怎么做?有哪些做法?这部分内容就留给大家思考了。
<?xml version="1.0" encoding="UTF-8"?>
<project xmlns="http://maven.apache.org/POM/4.0.0" xmlns:xsi="http://www.w3.org/2001/XMLSchema-instance"
         xsi:schemaLocation="http://maven.apache.org/POM/4.0.0 https://maven.apache.org/xsd/maven-4.0.0.xsd">
    <modelVersion>4.0.0</modelVersion>
    <parent>
        <groupId>org.springframework.boot</groupId>
        <artifactId>spring-boot-starter-parent</artifactId>
        <version>2.3.12.RELEASE</version>
        <relativePath/> <!-- lookup parent from repository -->
    </parent>
    <groupId>com.ykq</groupId>
    <artifactId>qy151-springboot-vue</artifactId>
    <version>0.0.1-SNAPSHOT</version>
    <name>qy151-springboot-vue</name>
    <description>Demo project for Spring Boot</description>
    <properties>
        <java.version>1.8</java.version>
    </properties>
    <dependencies>
        <dependency>
            <groupId>com.baomidou</groupId>
            <artifactId>mybatis-plus-generator</artifactId>
            <version>3.5.2</version>
        </dependency>
        <dependency>
            <groupId>org.freemarker</groupId>
            <artifactId>freemarker</artifactId>
            <version>2.3.31</version>
        </dependency>
        <dependency>
            <groupId>com.baomidou</groupId>
            <artifactId>mybatis-plus-boot-starter</artifactId>
            <version>3.5.2</version>
        </dependency>
        <dependency>
            <groupId>com.alibaba</groupId>
            <artifactId>druid-spring-boot-starter</artifactId>
            <version>1.2.8</version>
        </dependency>
        <dependency>
            <groupId>com.github.xiaoymin</groupId>
            <artifactId>swagger-bootstrap-ui</artifactId>
            <version>1.9.6</version>
        </dependency>
        <dependency>
            <groupId>com.spring4all</groupId>
            <artifactId>swagger-spring-boot-starter</artifactId>
            <version>1.9.1.RELEASE</version>
        </dependency>
        <dependency>
            <groupId>org.springframework.boot</groupId>
            <artifactId>spring-boot-starter-web</artifactId>
        </dependency>
        <dependency>
            <groupId>org.mybatis.spring.boot</groupId>
            <artifactId>mybatis-spring-boot-starter</artifactId>
            <version>2.2.2</version>
        </dependency>
        <dependency>
            <groupId>mysql</groupId>
            <artifactId>mysql-connector-java</artifactId>
            <scope>runtime</scope>
        </dependency>
        <dependency>
            <groupId>org.projectlombok</groupId>
            <artifactId>lombok</artifactId>
            <optional>true</optional>
        </dependency>
        <dependency>
            <groupId>org.springframework.boot</groupId>
            <artifactId>spring-boot-starter-test</artifactId>
            <scope>test</scope>
        </dependency>
    </dependencies>
    <build>
        <plugins>
            <plugin>
                <groupId>org.springframework.boot</groupId>
                <artifactId>spring-boot-maven-plugin</artifactId>
                <configuration>
                    <excludes>
                        <exclude>
                            <groupId>org.projectlombok</groupId>
                            <artifactId>lombok</artifactId>
                        </exclude>
                    </excludes>
                </configuration>
            </plugin>
        </plugins>
    </build>
</project>The above is the detailed content of How to create SpringBoot HikariCP connection pool. For more information, please follow other related articles on the PHP Chinese website!

Hot AI Tools

Undresser.AI Undress
AI-powered app for creating realistic nude photos

AI Clothes Remover
Online AI tool for removing clothes from photos.

Undress AI Tool
Undress images for free

Clothoff.io
AI clothes remover

Video Face Swap
Swap faces in any video effortlessly with our completely free AI face swap tool!

Hot Article

Hot Tools

Notepad++7.3.1
Easy-to-use and free code editor

SublimeText3 Chinese version
Chinese version, very easy to use

Zend Studio 13.0.1
Powerful PHP integrated development environment

Dreamweaver CS6
Visual web development tools

SublimeText3 Mac version
God-level code editing software (SublimeText3)

Hot Topics
 1386
1386
 52
52
 How Springboot integrates Jasypt to implement configuration file encryption
Jun 01, 2023 am 08:55 AM
Introduction to Jasypt Jasypt is a java library that allows a developer to add basic encryption functionality to his/her project with minimal effort and does not require a deep understanding of how encryption works. High security for one-way and two-way encryption. , standards-based encryption technology. Encrypt passwords, text, numbers, binaries... Suitable for integration into Spring-based applications, open API, for use with any JCE provider... Add the following dependency: com.github.ulisesbocchiojasypt-spring-boot-starter2. 1.1Jasypt benefits protect our system security. Even if the code is leaked, the data source can be guaranteed.
 How SpringBoot integrates Redisson to implement delay queue
May 30, 2023 pm 02:40 PM
Usage scenario 1. The order was placed successfully but the payment was not made within 30 minutes. The payment timed out and the order was automatically canceled. 2. The order was signed and no evaluation was conducted for 7 days after signing. If the order times out and is not evaluated, the system defaults to a positive rating. 3. The order is placed successfully. If the merchant does not receive the order for 5 minutes, the order is cancelled. 4. The delivery times out, and push SMS reminder... For scenarios with long delays and low real-time performance, we can Use task scheduling to perform regular polling processing. For example: xxl-job Today we will pick
 How to use Redis to implement distributed locks in SpringBoot
Jun 03, 2023 am 08:16 AM
1. Redis implements distributed lock principle and why distributed locks are needed. Before talking about distributed locks, it is necessary to explain why distributed locks are needed. The opposite of distributed locks is stand-alone locks. When we write multi-threaded programs, we avoid data problems caused by operating a shared variable at the same time. We usually use a lock to mutually exclude the shared variables to ensure the correctness of the shared variables. Its scope of use is in the same process. If there are multiple processes that need to operate a shared resource at the same time, how can they be mutually exclusive? Today's business applications are usually microservice architecture, which also means that one application will deploy multiple processes. If multiple processes need to modify the same row of records in MySQL, in order to avoid dirty data caused by out-of-order operations, distribution needs to be introduced at this time. The style is locked. Want to achieve points
 How to solve the problem that springboot cannot access the file after reading it into a jar package
Jun 03, 2023 pm 04:38 PM
Springboot reads the file, but cannot access the latest development after packaging it into a jar package. There is a situation where springboot cannot read the file after packaging it into a jar package. The reason is that after packaging, the virtual path of the file is invalid and can only be accessed through the stream. Read. The file is under resources publicvoidtest(){Listnames=newArrayList();InputStreamReaderread=null;try{ClassPathResourceresource=newClassPathResource("name.txt");Input
 Comparison and difference analysis between SpringBoot and SpringMVC
Dec 29, 2023 am 11:02 AM
SpringBoot and SpringMVC are both commonly used frameworks in Java development, but there are some obvious differences between them. This article will explore the features and uses of these two frameworks and compare their differences. First, let's learn about SpringBoot. SpringBoot was developed by the Pivotal team to simplify the creation and deployment of applications based on the Spring framework. It provides a fast, lightweight way to build stand-alone, executable
 How to implement Springboot+Mybatis-plus without using SQL statements to add multiple tables
Jun 02, 2023 am 11:07 AM
When Springboot+Mybatis-plus does not use SQL statements to perform multi-table adding operations, the problems I encountered are decomposed by simulating thinking in the test environment: Create a BrandDTO object with parameters to simulate passing parameters to the background. We all know that it is extremely difficult to perform multi-table operations in Mybatis-plus. If you do not use tools such as Mybatis-plus-join, you can only configure the corresponding Mapper.xml file and configure The smelly and long ResultMap, and then write the corresponding sql statement. Although this method seems cumbersome, it is highly flexible and allows us to
 How SpringBoot customizes Redis to implement cache serialization
Jun 03, 2023 am 11:32 AM
1. Customize RedisTemplate1.1, RedisAPI default serialization mechanism. The API-based Redis cache implementation uses the RedisTemplate template for data caching operations. Here, open the RedisTemplate class and view the source code information of the class. publicclassRedisTemplateextendsRedisAccessorimplementsRedisOperations, BeanClassLoaderAware{//Declare key, Various serialization methods of value, the initial value is empty @NullableprivateRedisSe
 How to get the value in application.yml in springboot
Jun 03, 2023 pm 06:43 PM
In projects, some configuration information is often needed. This information may have different configurations in the test environment and the production environment, and may need to be modified later based on actual business conditions. We cannot hard-code these configurations in the code. It is best to write them in the configuration file. For example, you can write this information in the application.yml file. So, how to get or use this address in the code? There are 2 methods. Method 1: We can get the value corresponding to the key in the configuration file (application.yml) through the ${key} annotated with @Value. This method is suitable for situations where there are relatively few microservices. Method 2: In actual projects, When business is complicated, logic


