 Operation and Maintenance
 Nginx
Nginx
 How to build a load balancing server based on Centos7+Nginx+Tomcat8
How to build a load balancing server based on Centos7+Nginx+Tomcat8
After manually installing nginx, everything is normal, and there are no problems with the configuration of the virtual host and load balancing. It was successfully enabled. The specific configuration file is as follows:
Added: include vhost/*.conf; to the nginx.conf file of conf to introduce all the .conf files in the vhost directory for future configuration. Simple, of course, you can add them one by one if necessary.
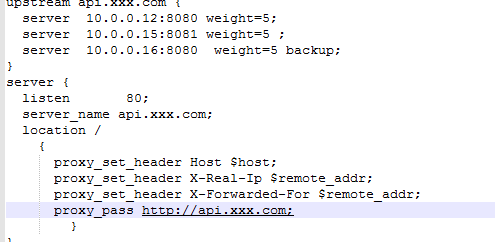
Because the load service is api service, the name of the conf file here is called api.xxx.com.conf. The configuration of opening the file is as follows:

The ip polling method is not used here, but the usstream method is used. For the specific differences between these methods, you can Baidu or Google for relevant introductions. It should be noted that proxy_pass is configured here as the name of upstream. Others are not allowed to be used. If the IP address is configured directly, load balancing will not be achieved.
The weight represented by weight, the larger the number, the higher the weight, the greater the chance of allocation. backup represents the hot standby server, that is, when there are problems with the first two loads, the hot standby server These visits will be automatically assumed.
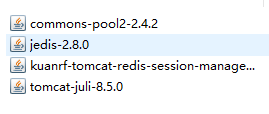
The configuration of nginx load balancing configurator is completed at this point, but after the load is involved, if it is an ordinary URL, the session loss will occur when accessing, so at this time, it is necessary to deal with the session loss. Problem, to deal with this problem, there are multiple solutions. One is to use cookies proxy, and the other is to realize session sharing. Here, session sharing is used. When realizing sharing, relevant configurations need to be performed in tomcat. To achieve this According to requirements, the shared server of the session configured here is redis memory service, mainly to ensure efficient reading and storage of data. When using redis for session sharing, the following names must be added:
 These packages support tomcat8 without any problems. No relevant tests have been conducted on the specific support of other versions.
Then modify the configuration file in tomcat:

The addresses of 10.0.0.x seen here are all completed within the internal network. The network is blocked, and only the server responsible for the load is directly connected to the external network.
At this time, the tomcat server and nginx server can be started successfully, but before that, the nginx server must be started first, otherwise tomcat may fail to start. The nginx service can be started smoothly
The three configurations are as follows:
The reference content added in nginx.conf
include vhost/*.conf;
Load balancing configuration:
upstream api.xxx.com {
 server 10.0.0.12:8080 weight=5;
 server 10.0.0.15:8081 weight=5 ;
 server 10.0.0.16:8080 weight=5 backup;
}
server {
 listen    80;
 server_name api.xxx.com;
 location /
  {
   proxy_set_header host $host;
   proxy_set_header x-real-ip $remote_addr;
   proxy_set_header x-forwarded-for $remote_addr;
   proxy_pass http://api.xxx.com;
    }
}tomcat configuration
<valve classname="com.radiadesign.catalina.session.redissessionhandlervalve" />
<manager classname="com.radiadesign.catalina.session.redissessionmanager"
       host="10.0.0.16"
       port="10000"
       database="0"
maxinactiveinterval="60" />The above is the detailed content of How to build a load balancing server based on Centos7+Nginx+Tomcat8. For more information, please follow other related articles on the PHP Chinese website!

Hot AI Tools

Undresser.AI Undress
AI-powered app for creating realistic nude photos

AI Clothes Remover
Online AI tool for removing clothes from photos.

Undress AI Tool
Undress images for free

Clothoff.io
AI clothes remover

AI Hentai Generator
Generate AI Hentai for free.

Hot Article

Hot Tools

Notepad++7.3.1
Easy-to-use and free code editor

SublimeText3 Chinese version
Chinese version, very easy to use

Zend Studio 13.0.1
Powerful PHP integrated development environment

Dreamweaver CS6
Visual web development tools

SublimeText3 Mac version
God-level code editing software (SublimeText3)

Hot Topics
 1378
1378
 52
52
 How to configure nginx in Windows
Apr 14, 2025 pm 12:57 PM
How to configure Nginx in Windows? Install Nginx and create a virtual host configuration. Modify the main configuration file and include the virtual host configuration. Start or reload Nginx. Test the configuration and view the website. Selectively enable SSL and configure SSL certificates. Selectively set the firewall to allow port 80 and 443 traffic.
 How to start nginx in Linux
Apr 14, 2025 pm 12:51 PM
Steps to start Nginx in Linux: Check whether Nginx is installed. Use systemctl start nginx to start the Nginx service. Use systemctl enable nginx to enable automatic startup of Nginx at system startup. Use systemctl status nginx to verify that the startup is successful. Visit http://localhost in a web browser to view the default welcome page.
 How to check whether nginx is started
Apr 14, 2025 pm 01:03 PM
How to confirm whether Nginx is started: 1. Use the command line: systemctl status nginx (Linux/Unix), netstat -ano | findstr 80 (Windows); 2. Check whether port 80 is open; 3. Check the Nginx startup message in the system log; 4. Use third-party tools, such as Nagios, Zabbix, and Icinga.
 How to start nginx server
Apr 14, 2025 pm 12:27 PM
Starting an Nginx server requires different steps according to different operating systems: Linux/Unix system: Install the Nginx package (for example, using apt-get or yum). Use systemctl to start an Nginx service (for example, sudo systemctl start nginx). Windows system: Download and install Windows binary files. Start Nginx using the nginx.exe executable (for example, nginx.exe -c conf\nginx.conf). No matter which operating system you use, you can access the server IP
 How to solve nginx403
Apr 14, 2025 am 10:33 AM
How to fix Nginx 403 Forbidden error? Check file or directory permissions; 2. Check .htaccess file; 3. Check Nginx configuration file; 4. Restart Nginx. Other possible causes include firewall rules, SELinux settings, or application issues.
 How to solve nginx304 error
Apr 14, 2025 pm 12:45 PM
Answer to the question: 304 Not Modified error indicates that the browser has cached the latest resource version of the client request. Solution: 1. Clear the browser cache; 2. Disable the browser cache; 3. Configure Nginx to allow client cache; 4. Check file permissions; 5. Check file hash; 6. Disable CDN or reverse proxy cache; 7. Restart Nginx.
 How to check whether nginx is started?
Apr 14, 2025 pm 12:48 PM
In Linux, use the following command to check whether Nginx is started: systemctl status nginx judges based on the command output: If "Active: active (running)" is displayed, Nginx is started. If "Active: inactive (dead)" is displayed, Nginx is stopped.
 How to solve nginx403 error
Apr 14, 2025 pm 12:54 PM
The server does not have permission to access the requested resource, resulting in a nginx 403 error. Solutions include: Check file permissions. Check the .htaccess configuration. Check nginx configuration. Configure SELinux permissions. Check the firewall rules. Troubleshoot other causes such as browser problems, server failures, or other possible errors.


