

Example analysis of the implementation principle of redis distributed lock

First of all, in order to ensure that distributed locks are available, we must at least ensure that the lock implementation meets the following four conditions at the same time:
1. Mutual exclusivity. At any time, only one client can hold the lock.
2. No deadlock will occur. Even if a client crashes while holding the lock without actively unlocking it, it is guaranteed that other clients can subsequently lock it.
3. Fault-tolerant. As long as most Redis nodes are running normally, the client can lock and unlock.
4. To untie the bell, you must also tie the bell. The locking and unlocking must be done by the same client. The client itself cannot unlock the lock added by others.
The following is the code implementation. First, we need to introduce the Jedis open source component through Maven, and add the following code to the pom.xml file:
<dependency>
    <groupId>org.springframework.boot</groupId>
    <artifactId>spring-boot-starter-data-redis</artifactId>
</dependency>
<dependency>
    <groupId>redis.clients</groupId>
    <artifactId>jedis</artifactId>
    <version>3.1.0</version>
</dependency>Distributed lock implementation code, DistributedLock.java
import redis.clients.jedis.Jedis;
import redis.clients.jedis.JedisPool;
import redis.clients.jedis.JedisPoolConfig;
import redis.clients.jedis.Transaction;
import redis.clients.jedis.exceptions.JedisException;
import java.util.List;
import java.util.UUID;
/**
 * @author swadian
 * @date 2022/3/4
 * @Version 1.0
 * @describetion Redis分布式锁原理
 */
public class DistributedLock {
    //redis连接池
    private static JedisPool jedisPool;
    static {
        JedisPoolConfig config = new JedisPoolConfig();
        // 设置最大连接数
        config.setMaxTotal(200);
        // 设置最大空闲数
        config.setMaxIdle(8);
        // 设置最大等待时间
        config.setMaxWaitMillis(1000 * 100);
        // 在borrow一个jedis实例时,是否需要验证,若为true,则所有jedis实例均是可用的
        config.setTestOnBorrow(true);
        jedisPool = new JedisPool(config, "192.168.3.27", 6379, 3000);
    }
    /**
     * 加锁
     * @param lockName       锁的key
     * @param acquireTimeout 获取锁的超时时间
     * @param timeout        锁的超时时间
     * @return 锁标识
     * Redis Setnx(SET if Not eXists) 命令在指定的 key 不存在时,为 key 设置指定的值。
     * 设置成功,返回 1 。 设置失败,返回 0 。
     */
    public String lockWithTimeout(String lockName, long acquireTimeout, long timeout) {
        Jedis jedis = null;
        String retIdentifier = null;
        try {
            // 获取连接
            jedis = jedisPool.getResource();
            // value值->随机生成一个String
            String identifier = UUID.randomUUID().toString();
            // key值->即锁名
            String lockKey = "lock:" + lockName;
            // 超时时间->上锁后超过此时间则自动释放锁 毫秒转成->秒
            int lockExpire = (int) (timeout / 1000);
            // 获取锁的超时时间->超过这个时间则放弃获取锁
            long end = System.currentTimeMillis() + acquireTimeout;
            while (System.currentTimeMillis() < end) { //在获取锁时间内
                if (jedis.setnx(lockKey, identifier) == 1) {//关键:设置锁
                    jedis.expire(lockKey, lockExpire);
                    // 返回value值,用于释放锁时间确认
                    retIdentifier = identifier;
                    return retIdentifier;
                }
                // ttl以秒为单位返回 key 的剩余过期时间,返回-1代表key没有设置超时时间,为key设置一个超时时间
                if (jedis.ttl(lockKey) == -1) {
                    jedis.expire(lockKey, lockExpire);
                }
                try {
                    Thread.sleep(10);
                } catch (InterruptedException e) {
                    Thread.currentThread().interrupt();
                }
            }
        } catch (JedisException e) {
            e.printStackTrace();
        } finally {
            if (jedis != null) {
                jedis.close();
            }
        }
        return retIdentifier;
    }
    /**
     * 释放锁
     * @param lockName   锁的key
     * @param identifier 释放锁的标识
     * @return
     */
    public boolean releaseLock(String lockName, String identifier) {
        Jedis jedis = null;
        String lockKey = "lock:" + lockName;
        boolean retFlag = false;
        try {
            jedis = jedisPool.getResource();
            while (true) {
                // 监视lock,准备开始redis事务
                jedis.watch(lockKey);
                // 通过前面返回的value值判断是不是该锁,若是该锁,则删除,释放锁
                if (identifier.equals(jedis.get(lockKey))) {
                    Transaction transaction = jedis.multi();//开启redis事务
                    transaction.del(lockKey);
                    List<Object> results = transaction.exec();//提交redis事务
                    if (results == null) {//提交失败
                        continue;//继续循环
                    }
                    retFlag = true;//提交成功
                }
                jedis.unwatch();//解除监控
                break;
            }
        } catch (JedisException e) {
            e.printStackTrace();
        } finally {
            if (jedis != null) {
                jedis.close();
            }
        }
        return retFlag;
    }
}In order to verify it, we create the SkillService.java business class
import lombok.extern.slf4j.Slf4j;
@Slf4j
public class SkillService {
    final DistributedLock lock = new DistributedLock();
    public static final String LOCK_KEY = "lock_resource";
    int n = 500;
    /**
     * 线程业务方法
     */
    public void seckill() {
        // 返回锁的value值,供释放锁时候进行判断
        String identifier = lock.lockWithTimeout(LOCK_KEY, 5000, 1000);
        log.info("线程:"+Thread.currentThread().getName() + "获得了锁");
        log.info("剩余数量:{}",--n);
        lock.releaseLock(LOCK_KEY, identifier);
    }
}If the @Slf4j log cannot be found, inpom.xmlAdd the following code to the file:
<!--@Slf4j日志依赖组件-->
  <dependency>
      <groupId>org.projectlombok</groupId>
      <artifactId>lombok</artifactId>
</dependency>Edit a test class TestLock.java
/**
 * @author swadian
 * @date 2022/3/4
 * @Version 1.0
 */
public class TestLock {
    public static void main(String[] args) {
        SkillService service = new SkillService();
        for (int i = 10; i < 60; i++) { //开50个线程
            SkillThread skillThread = new SkillThread(service, "skillThread->" + i);
            skillThread.start();
        }
    }
}
class SkillThread extends Thread {
    private SkillService skillService;
    public SkillThread(SkillService skillService, String skillThreadName) {
        super(skillThreadName);
        this.skillService = skillService;
    }
    @Override
    public void run() {
        skillService.seckill();
    }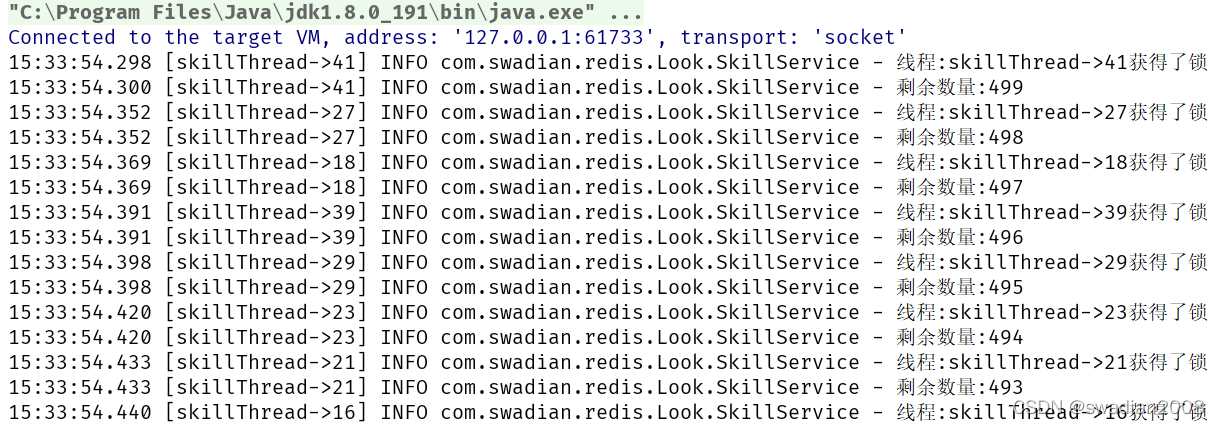
}The test results show that the remaining numbers after locking are all sequential and serial, 499,498,497...
We modify the SkillService.java business class and comment out the locking logic
@Slf4j
public class SkillService {
    final DistributedLock lock = new DistributedLock();
    public static final String LOCK_KEY = "lock_resource";
    int n = 500;
    /**
     * 线程业务方法
     */
    public void seckill() {
        // 返回锁的value值,供释放锁时候进行判断
        //String identifier = lock.lockWithTimeout(LOCK_KEY, 5000, 1000);
        log.info("线程:"+Thread.currentThread().getName() + "获得了锁");
        log.info("剩余数量:{}",--n);
        //lock.releaseLock(LOCK_KEY, identifier);
    }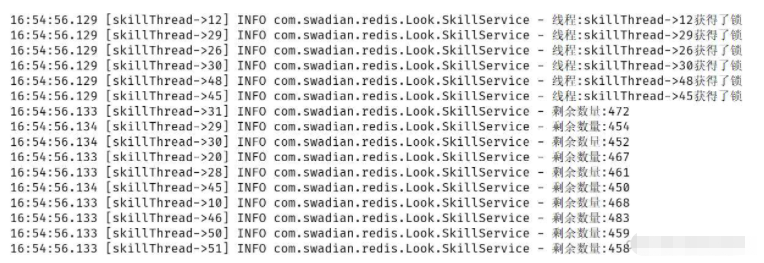
}Re-execute the test and after commenting out the locking logic, the remaining quantities are all messed up In sequence, 472,454,452...
The above is the detailed content of Example analysis of the implementation principle of redis distributed lock. For more information, please follow other related articles on the PHP Chinese website!

Hot AI Tools

Undresser.AI Undress
AI-powered app for creating realistic nude photos

AI Clothes Remover
Online AI tool for removing clothes from photos.

Undress AI Tool
Undress images for free

Clothoff.io
AI clothes remover

AI Hentai Generator
Generate AI Hentai for free.

Hot Article
Hot Tools

Notepad++7.3.1
Easy-to-use and free code editor

SublimeText3 Chinese version
Chinese version, very easy to use

Zend Studio 13.0.1
Powerful PHP integrated development environment

Dreamweaver CS6
Visual web development tools

SublimeText3 Mac version
God-level code editing software (SublimeText3)
Hot Topics


 Solution to 0x80242008 error when installing Windows 11 10.0.22000.100
May 08, 2024 pm 03:50 PM
Solution to 0x80242008 error when installing Windows 11 10.0.22000.100
May 08, 2024 pm 03:50 PM
1. Start the [Start] menu, enter [cmd], right-click [Command Prompt], and select Run as [Administrator]. 2. Enter the following commands in sequence (copy and paste carefully): SCconfigwuauservstart=auto, press Enter SCconfigbitsstart=auto, press Enter SCconfigcryptsvcstart=auto, press Enter SCconfigtrustedinstallerstart=auto, press Enter SCconfigwuauservtype=share, press Enter netstopwuauserv , press enter netstopcryptS
 Analyze PHP function bottlenecks and improve execution efficiency
Apr 23, 2024 pm 03:42 PM
Analyze PHP function bottlenecks and improve execution efficiency
Apr 23, 2024 pm 03:42 PM
PHP function bottlenecks lead to low performance, which can be solved through the following steps: locate the bottleneck function and use performance analysis tools. Caching results to reduce recalculations. Process tasks in parallel to improve execution efficiency. Optimize string concatenation, use built-in functions instead. Use built-in functions instead of custom functions.
 Golang API caching strategy and optimization
May 07, 2024 pm 02:12 PM
Golang API caching strategy and optimization
May 07, 2024 pm 02:12 PM
The caching strategy in GolangAPI can improve performance and reduce server load. Commonly used strategies are: LRU, LFU, FIFO and TTL. Optimization techniques include selecting appropriate cache storage, hierarchical caching, invalidation management, and monitoring and tuning. In the practical case, the LRU cache is used to optimize the API for obtaining user information from the database. The data can be quickly retrieved from the cache. Otherwise, the cache can be updated after obtaining it from the database.
 Which one has better performance, erlang or golang?
Apr 21, 2024 am 03:24 AM
Which one has better performance, erlang or golang?
Apr 21, 2024 am 03:24 AM
There are performance differences between Erlang and Go. Erlang excels at concurrency, while Go has higher throughput and faster network performance. Erlang is suitable for systems that require high concurrency, while Go is suitable for systems that require high throughput and low latency.
 Caching mechanism and application practice in PHP development
May 09, 2024 pm 01:30 PM
Caching mechanism and application practice in PHP development
May 09, 2024 pm 01:30 PM
In PHP development, the caching mechanism improves performance by temporarily storing frequently accessed data in memory or disk, thereby reducing the number of database accesses. Cache types mainly include memory, file and database cache. Caching can be implemented in PHP using built-in functions or third-party libraries, such as cache_get() and Memcache. Common practical applications include caching database query results to optimize query performance and caching page output to speed up rendering. The caching mechanism effectively improves website response speed, enhances user experience and reduces server load.
 How to use Redis cache in PHP array pagination?
May 01, 2024 am 10:48 AM
How to use Redis cache in PHP array pagination?
May 01, 2024 am 10:48 AM
Using Redis cache can greatly optimize the performance of PHP array paging. This can be achieved through the following steps: Install the Redis client. Connect to the Redis server. Create cache data and store each page of data into a Redis hash with the key "page:{page_number}". Get data from cache and avoid expensive operations on large arrays.
 How to upgrade Win11 English 21996 to Simplified Chinese 22000_How to upgrade Win11 English 21996 to Simplified Chinese 22000
May 08, 2024 pm 05:10 PM
How to upgrade Win11 English 21996 to Simplified Chinese 22000_How to upgrade Win11 English 21996 to Simplified Chinese 22000
May 08, 2024 pm 05:10 PM
First you need to set the system language to Simplified Chinese display and restart. Of course, if you have changed the display language to Simplified Chinese before, you can just skip this step. Next, start operating the registry, regedit.exe, directly navigate to HKEY_LOCAL_MACHINESYSTEMCurrentControlSetControlNlsLanguage in the left navigation bar or the upper address bar, and then modify the InstallLanguage key value and Default key value to 0804 (if you want to change it to English en-us, you need First set the system display language to en-us, restart the system and then change everything to 0409) You must restart the system at this point.
 Can navicat connect to redis?
Apr 23, 2024 pm 05:12 PM
Can navicat connect to redis?
Apr 23, 2024 pm 05:12 PM
Yes, Navicat can connect to Redis, which allows users to manage keys, view values, execute commands, monitor activity, and diagnose problems. To connect to Redis, select the "Redis" connection type in Navicat and enter the server details.
