How to merge pictures on iPhone 15
How to Create an iPhone Shortcut to Merge Pictures Together
Although the iPhone does not come pre-installed with any features that allow you to merge pictures together, it has everything you need to create your own using the Shortcuts app .
To create a shortcut to merge iPhone photos:
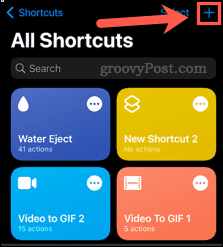
- Launch the Shortcuts app on your iPhone.
- Click the (Add) symbol in the upper right corner of the screen.

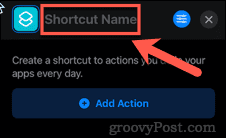
- Click Shortcut Name.

- Give your shortcut a name you recognize.

- Click the Settings icon.

- Now tap the toggle switch to turn on Show in share sheet, then tap to finish.

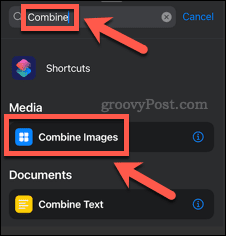
- Click "Search Apps and Actions" at the bottom of the screen.

- Enter the word combine and when it appears, click Combine Images.

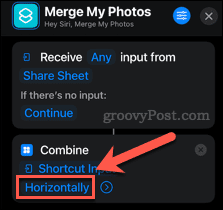
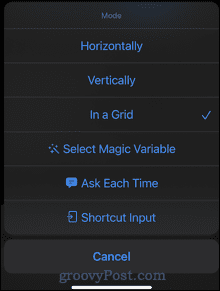
- Click Level.

- You can choose to merge images horizontally, vertically, or in a grid each time, or you can choose to be asked for your choice every time when you use the shortcut.

- If you want to add spacing between images, click the arrow icon and enter a spacing value.

- Tap "Search Apps and Actions" at the bottom of the screen again.

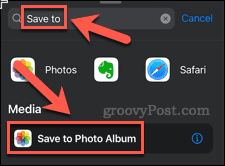
- Enter save to and click Save to Photo Album.

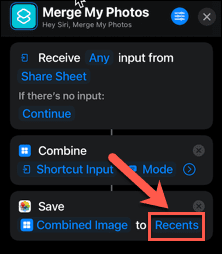
- If you want to change where the merged images are saved, click "Recent" and select a different album.

- Click X in the upper right corner to save and close your shortcut.

Your shortcut is now created. Now let's see how to use it.
How to use shortcuts to merge photos on iPhone
Now that you have created a shortcut, you can use it to merge your iPhone photos together.
That's it:
- Open the Photos application.
- Click Select in the upper right corner of the screen.

- Next, click on all the photos you want to merge, then click on the Share icon.

- Scroll down and click the shortcut's name.

- If you selected Ask every time when creating the shortcut, select your option.

- Once the shortcut has finished running, you will see a check mark.

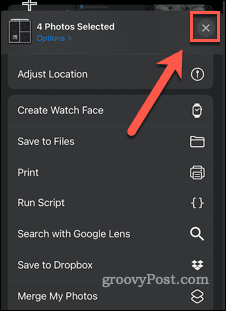
- Click X to close the share sheet.

- Your merged image will now appear in the folder you selected when creating the shortcut.

How to use apps to merge pictures on iPhone
You can use many apps to merge photos on your iPhone, including several free options. In this example, we will use the Pic Stitch application. This app offers in-app purchases, but you can use the basic features for free.
The app will add a watermark to your images after a few uses, but you can unlock unlimited use with in-app payment.
To merge photos using Pic Stitch on iPhone:
- Launch the Pic Stitch app.
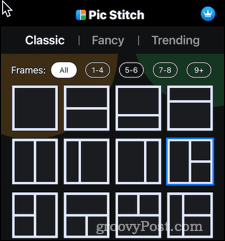
- Click the layout you want to use for your photo.

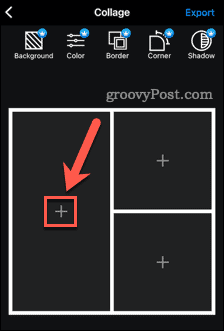
- Click on the symbol in one of the frames.

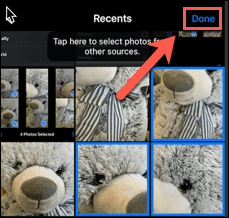
- Grant access to your photos, then select the photos you want to appear in the image and click Done.

- Drag one of the images into the grid and click Done.

- Repeat for other images.
- Drag images to position them within the frame.
- After completion, click Export.

- Click Save to Photo or choose one of the other sharing options.

- Your merged image will be saved or shared.

Edit Photos Directly on iPhone
Know how to merge pictures together on iPhone and you can create photo montages directly on your phone without having to Use a computer.
The above is the detailed content of How to merge pictures on iPhone 15. For more information, please follow other related articles on the PHP Chinese website!

Hot AI Tools

Undresser.AI Undress
AI-powered app for creating realistic nude photos

AI Clothes Remover
Online AI tool for removing clothes from photos.

Undress AI Tool
Undress images for free

Clothoff.io
AI clothes remover

AI Hentai Generator
Generate AI Hentai for free.

Hot Article

Hot Tools

Notepad++7.3.1
Easy-to-use and free code editor

SublimeText3 Chinese version
Chinese version, very easy to use

Zend Studio 13.0.1
Powerful PHP integrated development environment

Dreamweaver CS6
Visual web development tools

SublimeText3 Mac version
God-level code editing software (SublimeText3)

Hot Topics
 1382
1382
 52
52
 iPhone 16 Pro and iPhone 16 Pro Max official with new cameras, A18 Pro SoC and larger screens
Sep 10, 2024 am 06:50 AM
Apple has finally lifted the covers off its new high-end iPhone models. The iPhone 16 Pro and iPhone 16 Pro Max now come with larger screens compared to their last-gen counterparts (6.3-in on the Pro, 6.9-in on Pro Max). They get an enhanced Apple A1
 iPhone parts Activation Lock spotted in iOS 18 RC — may be Apple\'s latest blow to right to repair sold under the guise of user protection
Sep 14, 2024 am 06:29 AM
Earlier this year, Apple announced that it would be expanding its Activation Lock feature to iPhone components. This effectively links individual iPhone components, like the battery, display, FaceID assembly, and camera hardware to an iCloud account,
 iPhone parts Activation Lock may be Apple\'s latest blow to right to repair sold under the guise of user protection
Sep 13, 2024 pm 06:17 PM
Earlier this year, Apple announced that it would be expanding its Activation Lock feature to iPhone components. This effectively links individual iPhone components, like the battery, display, FaceID assembly, and camera hardware to an iCloud account,
 Gate.io trading platform official app download and installation address
Feb 13, 2025 pm 07:33 PM
This article details the steps to register and download the latest app on the official website of Gate.io. First, the registration process is introduced, including filling in the registration information, verifying the email/mobile phone number, and completing the registration. Secondly, it explains how to download the Gate.io App on iOS devices and Android devices. Finally, security tips are emphasized, such as verifying the authenticity of the official website, enabling two-step verification, and being alert to phishing risks to ensure the safety of user accounts and assets.
 Multiple iPhone 16 Pro users report touchscreen freezing issues, possibly linked to palm rejection sensitivity
Sep 23, 2024 pm 06:18 PM
If you've already gotten your hands on a device from the Apple's iPhone 16 lineup — more specifically, the 16 Pro/Pro Max — chances are you've recently faced some kind of issue with the touchscreen. The silver lining is that you're not alone—reports
 Anbi app official download v2.96.2 latest version installation Anbi official Android version
Mar 04, 2025 pm 01:06 PM
Binance App official installation steps: Android needs to visit the official website to find the download link, choose the Android version to download and install; iOS search for "Binance" on the App Store. All should pay attention to the agreement through official channels.
 How to solve the problem of 'Undefined array key 'sign'' error when calling Alipay EasySDK using PHP?
Mar 31, 2025 pm 11:51 PM
Problem Description When calling Alipay EasySDK using PHP, after filling in the parameters according to the official code, an error message was reported during operation: "Undefined...
 Beats adds phone cases to its lineup: unveils a MagSafe case for the iPhone 16 series
Sep 11, 2024 pm 03:33 PM
Beats is known for launching audio products such as Bluetooth speakers and headphones, but in what can best be described as a surprise, the Apple-owned company has branched into making phone cases, starting with the iPhone 16 series. The Beats iPhone


