
 Database
Mysql Tutorial
How to implement MySQL master-slave replication based on SSL secure connection
Database
Mysql Tutorial
How to implement MySQL master-slave replication based on SSL secure connection
How to implement MySQL master-slave replication based on SSL secure connection

A mysql host in the production environment has a single point of failure, so we need to ensure the high availability of mysql, that is, if one of the two MySQL servers hangs up, , another one can immediately take over its work.
The principle of master-slave replication
The master records the binary log. Before each transaction updates the data, the master records these changes in the secondary log. The storage engine receives a notification from the master server after the binary log is completed to commit the MySQL transaction. Next, the slave needs to copy the master's binary log to its own relay log. First, the slave starts a working thread - the I/O thread. The I/O thread opens a normal connection on the master, and then starts the binlog dump process. The Binlog dump process reads events from the master's binary log. If the master has been synchronized, it sleeps and waits for the master to generate new events. The I/O thread writes these events to the relay log. The final step of this process is handled by the SQL slave thread.. The SQL thread reads the events in the relay log and reproduces these events to update the data in the slave database to maintain consistency with the data in the master database. Because relay logs are typically stored in the operating system's cache, there is little overhead as long as the thread is consistent with the I/O thread.
Environment preparation: Open two MySQL servers and deploy the network environment.
Deploy master
1. Create an SSL/RSA file on the host
[root@master ~]# cd /usr/local/mysql/bin/
[root@master bin]# mysql_ssl_rsa_setup --user=mysql --basedir=/usr/llocal/mysql --datadir=/usr/local/mysql/data
2. Grant permissions and restart.
[root@master bin]# chmod +r /usr/local/mysql/data/server-key.pem
[root@master bin]# service mysqld restart
Shutting down MySQL..                                      [  确定  ]
Starting MySQL.                                            [  确定  ]
3. Log in to mysql to check whether ssl is enabled and create a replication user.
Note: Enable mysql to support ssl secure connection, which is mainly used for mysql master-slave replication (LAN can use non-ssh connection, that is, plain text replication, but it is recommended to use ssl connection for internet replication)
mysql> grant replication slave on *.* to rep@'192.168.8.3' identified by '123';
Query OK, 0 rows affected, 1 warning (0.07 sec)
4. The master turns on the binary log and checks the binary log file after restarting.
It should be noted that server_id must be unique.
[root@master ~]# vim /etc/my.cnf
#添加下面内容
log-bin=mysql-bin
service_id=1
[root@master ~]# service mysqld restart
Shutting down MySQL..                                      [  确定  ]
Starting MySQL.                                            [  确定  ]
[root@master ~]# mysql -uroot -p123 -e "show master status"
mysql: [Warning] Using a password on the command line interface can be insecure.
+------------------+----------+--------------+------------------+-------------------+
| File             | Position | Binlog_Do_DB | Binlog_Ignore_DB | Executed_Gtid_Set |
+------------------+----------+--------------+------------------+-------------------+
| mysql-bin.000001 |      154 |              |                  |                   |
+------------------+----------+--------------+------------------+-------------------+
5. Firewall configuration. You can turn off the firewall in the experimental environment. In the production environment, you need to configure firewall rules to allow port 3306.
[root@master ~]# firewall-cmd --permanent --add-port=3306/tcp
success
[root@master ~]# firewall-cmd --reload
success
6. Copy the ssl file to slave
[root@master data]# scp ca.pem client-cert.pem client-key.pem root@192.168.8.3:/usr/local/mysql/data
The authenticity of host '192.168.8.3 (192.168.8.3)' can't be established.
ECDSA key fingerprint is SHA256:LFby9KMDz/kkPfOESbeJ7Qh+3hmQaX2W5gkDDMwSGHA.
ECDSA key fingerprint is MD5:03:32:64:b4:c2:5b:6c:a4:e2:f0:7f:df:7a:35:19:80.
Are you sure you want to continue connecting (yes/no)? yes
Warning: Permanently added '192.168.8.3' (ECDSA) to the list of known hosts.
root@192.168.8.3's password:
ca.pem                             100% 1112   232.5KB/s   00:00
client-cert.pem                    100% 1112   240.4KB/s   00:00
client-key.pem                     100% 1676   205.0KB/s   00:00
Deploy slave
1. Enable ssl and relay logs, grant read permission to the ssl file and restart mysql.
[root@slave ~]# vim /etc/my.cnf
#添加下面内容
server_id=2
relay-log=relay-log
ssl_ca=ca.pem
ssl_cert=client-cert.pem
ssl_key=client-key.pem

[root@slave ~]# cd /usr/local/mysql/data
[root@slave data]# ll ca.pem client-cert.pem client-key.pem
-rw-r--r--. 1 mysql mysql 1112 3月  31 14:31 ca.pem
-rw-r--r--. 1 mysql mysql 1112 3月  31 14:31 client-cert.pem
-rw-------. 1 mysql mysql 1676 3月  31 14:31 client-key.pem
[root@slave data]# chmod +r client-key.pem
[root@slave ~]# service mysqld restart
Shutting down MySQL..                                      [  确定  ]
Starting MySQL.                                            [  确定  ]
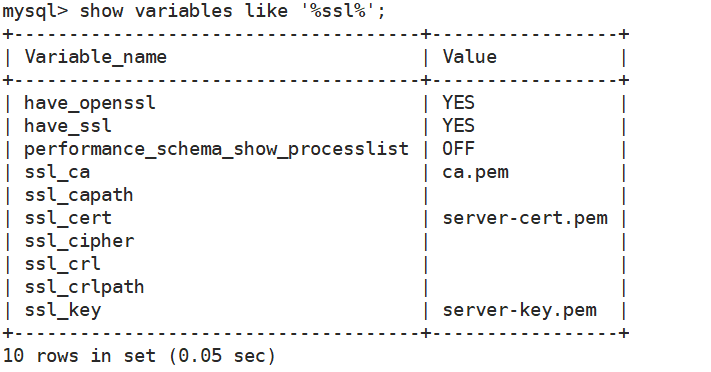
2. Confirm that SSL is enabled successfully
[root@slave ~]# mysql -uroot -p123 -e "show variables like '%ssl%'"
mysql: [Warning] Using a password on the command line interface can be insecure.
+-------------------------------------+-----------------+
| Variable_name                       | Value           |
+-------------------------------------+-----------------+
| have_openssl                        | YES             |
| have_ssl                            | YES             |
| performance_schema_show_processlist | OFF             |
| ssl_ca                              | ca.pem          |
| ssl_capath                          |                 |
| ssl_cert                            | client-cert.pem |
| ssl_cipher                          |                 |
| ssl_crl                             |                 |
| ssl_crlpath                         |                 |
| ssl_key                             | client-key.pem  |
+-------------------------------------+-----------------+
3. Before configuring master-slave replication, you can try using SSL to connect to the master server on the slave mysql.
Pay attention to the IP, 8.2 is the Master's IP. You can see the SSL protocol CIPHER in use is Ecdhe-RSA-AES128-GCM-SHA256
[root@slave ~]# cd /usr/local/mysql/data
[root@slave data]# mysql --ssl-ca=ca.pem --ssl-cert=client-cert.pem --ssl-key=client-key.pem -u rep -p123 -h 192.168.8.2
mysql: [Warning] Using a password on the command line interface can be insecure.
Welcome to the MySQL monitor.  Commands end with ; or \g.
Your MySQL connection id is 3
Server version: 5.7.40-log MySQL Community Server (GPL)

Copyright (c) 2000, 2022, Oracle and/or its affiliates.

Oracle is a registered trademark of Oracle Corporation and/or its
affiliates. Other names may be trademarks of their respective
owners.

Type 'help;' or '\h' for help. Type '\c' to clear the current input statement.

mysql>
mysql> \s
--------------
mysql  Ver 14.14 Distrib 5.7.40, for linux-glibc2.12 (x86_64) using  EditLine wrapper

Connection id:		3
Current database:
Current user:		rep@192.168.8.3
SSL:			Cipher in use is ECDHE-RSA-AES128-GCM-SHA256
Current pager:		stdout
Using outfile:		''
Using delimiter:	;
Server version:		5.7.40-log MySQL Community Server (GPL)
Protocol version:	10
Connection:		192.168.8.2 via TCP/IP
Server characterset:	latin1
Db     characterset:	latin1
Client characterset:	utf8
Conn.  characterset:	utf8
TCP port:		3306
Uptime:			22 min 19 sec

Threads: 1  Questions: 8  Slow queries: 0  Opens: 109  Flush tables: 1  Open tables: 102  Queries per second avg: 0.005
--------------
1. replicate
Remember to exit the connection first and log in to the slave's mysql service.
mysql> exit
Bye
[root@slave data]# mysql -uroot -p123
#省略部分登录信息
mysql> change master to
-> master_host='192.168.8.2', #masterIP
-> master_user='rep', #master用户
-> master_password='123', #master密码
-> master_log_file='mysql-bin.000001', #master二进制日志文件
-> master_log_pos=154, #master位置
-> master_ssl=1, #masterssl
-> master_ssl_cert='client-cert.pem',
-> master_ssl_key='client-key.pem',
-> master_ssl_ca='ca.pem';
Query OK, 0 rows affected, 2 warnings (0.07 sec)
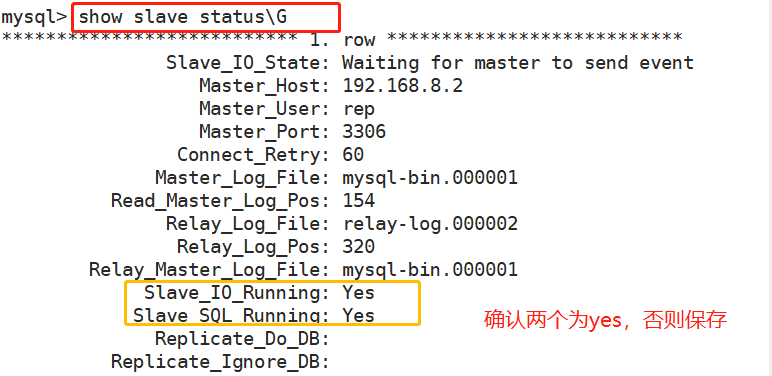
mysql> start slave; #启用从
Query OK, 0 rows affected (0.02 sec)Confirm that the activation is successful.
Test SSL master-slave replication
1. Log in to the master and write some data
[root@master ~]# mysql -uroot -p123
#省略部分内容
mysql> create database bbs;
Query OK, 1 row affected (0.01 sec)

mysql> use bbs;
Database changed
mysql> create table tb1(id int,
    -> name varchar(20));
Query OK, 0 rows affected (0.02 sec)

mysql> insert into tb1 values(1,'z3');
Query OK, 1 row affected (0.02 sec)2. Log in to the slave and view the data
[root@slave ~]# mysql -uroot -p123
#省略部分内容
mysql> select * from bbs.tb1;
+------+------+
| id   | name |
+------+------+
|    1 | z3   |
+------+------+
1 row in set (0.01 sec)
Finally you can see z3, the master and slave are successful.
The above is the detailed content of How to implement MySQL master-slave replication based on SSL secure connection. For more information, please follow other related articles on the PHP Chinese website!

Hot AI Tools

Undresser.AI Undress
AI-powered app for creating realistic nude photos

AI Clothes Remover
Online AI tool for removing clothes from photos.

Undress AI Tool
Undress images for free

Clothoff.io
AI clothes remover

AI Hentai Generator
Generate AI Hentai for free.

Hot Article
Hot Tools

Notepad++7.3.1
Easy-to-use and free code editor

SublimeText3 Chinese version
Chinese version, very easy to use

Zend Studio 13.0.1
Powerful PHP integrated development environment

Dreamweaver CS6
Visual web development tools

SublimeText3 Mac version
God-level code editing software (SublimeText3)
Hot Topics
 1376
1376
 52
52

 The relationship between mysql user and database
Apr 08, 2025 pm 07:15 PM
The relationship between mysql user and database
Apr 08, 2025 pm 07:15 PM
In MySQL database, the relationship between the user and the database is defined by permissions and tables. The user has a username and password to access the database. Permissions are granted through the GRANT command, while the table is created by the CREATE TABLE command. To establish a relationship between a user and a database, you need to create a database, create a user, and then grant permissions.
 Do mysql need to pay
Apr 08, 2025 pm 05:36 PM
Do mysql need to pay
Apr 08, 2025 pm 05:36 PM
MySQL has a free community version and a paid enterprise version. The community version can be used and modified for free, but the support is limited and is suitable for applications with low stability requirements and strong technical capabilities. The Enterprise Edition provides comprehensive commercial support for applications that require a stable, reliable, high-performance database and willing to pay for support. Factors considered when choosing a version include application criticality, budgeting, and technical skills. There is no perfect option, only the most suitable option, and you need to choose carefully according to the specific situation.
 RDS MySQL integration with Redshift zero ETL
Apr 08, 2025 pm 07:06 PM
RDS MySQL integration with Redshift zero ETL
Apr 08, 2025 pm 07:06 PM
Data Integration Simplification: AmazonRDSMySQL and Redshift's zero ETL integration Efficient data integration is at the heart of a data-driven organization. Traditional ETL (extract, convert, load) processes are complex and time-consuming, especially when integrating databases (such as AmazonRDSMySQL) with data warehouses (such as Redshift). However, AWS provides zero ETL integration solutions that have completely changed this situation, providing a simplified, near-real-time solution for data migration from RDSMySQL to Redshift. This article will dive into RDSMySQL zero ETL integration with Redshift, explaining how it works and the advantages it brings to data engineers and developers.
 How to fill in mysql username and password
Apr 08, 2025 pm 07:09 PM
How to fill in mysql username and password
Apr 08, 2025 pm 07:09 PM
To fill in the MySQL username and password: 1. Determine the username and password; 2. Connect to the database; 3. Use the username and password to execute queries and commands.
 Query optimization in MySQL is essential for improving database performance, especially when dealing with large data sets
Apr 08, 2025 pm 07:12 PM
Query optimization in MySQL is essential for improving database performance, especially when dealing with large data sets
Apr 08, 2025 pm 07:12 PM
1. Use the correct index to speed up data retrieval by reducing the amount of data scanned select*frommployeeswherelast_name='smith'; if you look up a column of a table multiple times, create an index for that column. If you or your app needs data from multiple columns according to the criteria, create a composite index 2. Avoid select * only those required columns, if you select all unwanted columns, this will only consume more server memory and cause the server to slow down at high load or frequency times For example, your table contains columns such as created_at and updated_at and timestamps, and then avoid selecting * because they do not require inefficient query se
 How to optimize MySQL performance for high-load applications?
Apr 08, 2025 pm 06:03 PM
How to optimize MySQL performance for high-load applications?
Apr 08, 2025 pm 06:03 PM
MySQL database performance optimization guide In resource-intensive applications, MySQL database plays a crucial role and is responsible for managing massive transactions. However, as the scale of application expands, database performance bottlenecks often become a constraint. This article will explore a series of effective MySQL performance optimization strategies to ensure that your application remains efficient and responsive under high loads. We will combine actual cases to explain in-depth key technologies such as indexing, query optimization, database design and caching. 1. Database architecture design and optimized database architecture is the cornerstone of MySQL performance optimization. Here are some core principles: Selecting the right data type and selecting the smallest data type that meets the needs can not only save storage space, but also improve data processing speed.
 How to copy and paste mysql
Apr 08, 2025 pm 07:18 PM
How to copy and paste mysql
Apr 08, 2025 pm 07:18 PM
Copy and paste in MySQL includes the following steps: select the data, copy with Ctrl C (Windows) or Cmd C (Mac); right-click at the target location, select Paste or use Ctrl V (Windows) or Cmd V (Mac); the copied data is inserted into the target location, or replace existing data (depending on whether the data already exists at the target location).
 Understand ACID properties: The pillars of a reliable database
Apr 08, 2025 pm 06:33 PM
Understand ACID properties: The pillars of a reliable database
Apr 08, 2025 pm 06:33 PM
Detailed explanation of database ACID attributes ACID attributes are a set of rules to ensure the reliability and consistency of database transactions. They define how database systems handle transactions, and ensure data integrity and accuracy even in case of system crashes, power interruptions, or multiple users concurrent access. ACID Attribute Overview Atomicity: A transaction is regarded as an indivisible unit. Any part fails, the entire transaction is rolled back, and the database does not retain any changes. For example, if a bank transfer is deducted from one account but not increased to another, the entire operation is revoked. begintransaction; updateaccountssetbalance=balance-100wh
