What is the method for docker to install mysql and redis images?
docker安装mysql、redis镜像
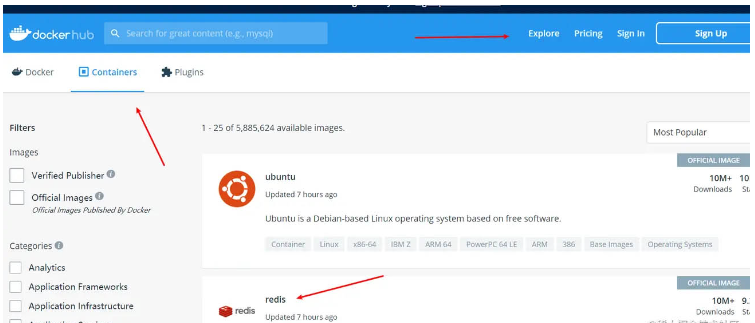
docker镜像商店:官方镜像商店
redis安装下载
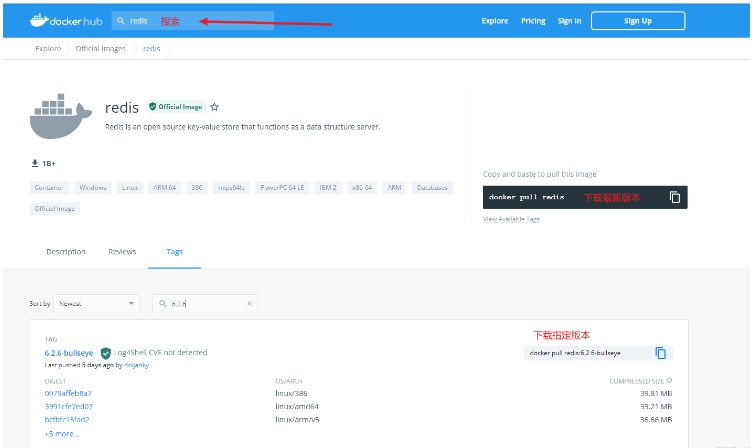
下载镜像:


可直接默认下载最新镜像,也可以指定版本下载【注意,版本差异不大的软件可以直接下载最新版本,差异大的,例如java,mysql等,最好指定熟悉的版本进行下载】
docker pull redis
启动镜像:
docker run --name=redis -d --restart=always -p 6379:6379 redis
--name:别名-d:后台运行,镜像不会随窗口关闭而关闭--restart=always:随docker启动而自启 可以进行后配置:docker update --restart=always [容器名称|id]-p:6379[主机端口]:6379[映射端口],如果有版本号,应该带上版本号redis:6.2.6
挂载外部文件启动:
提前创建好文件夹和文件,redis.conf如果没有特别的配置,可以参考(测试环境,生产环境换成本地,关闭密码即可):

#redis使用自定义配置文件启动

docker run -v /mydata/redis/conf/redis.conf:/etc/redis/redis.conf \
-v /mydata/redis/data:/data \
-d --name redis \
--restart=always \
-p 6379:6379 \
redis:latest  redis-server /etc/redis/redis.conf

#最后这一句代表自启动方式,redis启动默认不加载此处配置
redis-server /etc/redis/redis.conf
mysql安装下载
镜像参考redis直接下载对应版本即可。
-v:配置挂载,冒号左边为容器内部想要挂载出去的配置路径,右边为挂载的实际路径
例如:mysql,挂载日志,数据,配置等信息到外部
docker run -p 3306:3306 --name mysql \
-v /mydata/mysql/log:/var/log/mysql \
-v /mydata/mysql/data:/var/lib/mysql \
-v /mydata/mysql/conf/my.cnf:/etc/mysql/my.cnf \
-e MYSQL_ROOT_PASSWORD=root \
-d mysql:5.7
修改配置文件 my.cnf
[client]
default-character-set=utf8
[mysql]
default-character-set=utf8
[mysqld]
init_connect='SET collation_connection = utf8_unicode_ci'
init_connect='SET NAMES utf8'
character-set-server=utf8
collation-server=utf8_unicode_ci
skip-character-set-client-handshake
skip-name-resolve
lower_case_table_names=1
最后说一下文件外部挂载的优缺点:
优点:修改配置方便,不用每次都进入容器内部
缺点:外部挂载方式镜像将不可以打包传递
docker安装使用及用docker安装mysql,Redis,nacos
安装
卸载之前的docket
sudo yum remove docker \
                   docker-client \
                   docker-client-latest \
                   docker-common \
                   docker-latest \
                   docker-latest-logrotate \
                   docker-logrotate \
docker-enginesudo yum install -y yum-utils //设置存储库
设置仓库地址,默认国外,也可以设置阿里云的
sudo yum-config-manager \
    --add-repo \
https://download.docker.com/linux/centos/docker-ce.repoyum-config-manager \
--add-repo http://mirrors.aliyun.com/docker-ce/linux/centos/docker-ce.repo安装docket引擎等组件
sudo yum install docker-ce docker-ce-cli containerd.io
启动docket
sudo systemctl start docker
配置加速镜像
sudo mkdir -p /etc/docker
sudo tee /etc/docker/daemon.json <<-'EOF'
{
"registry-mirrors": ["https://chqac97z.mirror.aliyuncs.com"]
}
EOFsudo systemctl daemon-reload sudo systemctl restart docker
docket常用命令
systemctl stop docker //关闭docker
systemctl restart docker //重启docker
systemctl status docker //查看docker状态
systemctl enable docker //设置docker开机自启动
docker images //查看自己服务器的镜像列表
docker search 镜像名 //搜索指定镜像
docker search --filter=STARS=9000 mysql //搜索 STARS >9000的 mysql 镜像
docker pull 镜像名 //拉取docker仓库里的镜像
docker pull 镜像名:tag //拉取docker仓库里指定版本的镜像,具体版本号需要到镜像官网查看(https://hub.docker.com/search?type=image)
docker pull mysql 5.7.30 //拉取5.7.30的mysql
docker run 镜像名 //运行镜像
docker run 镜像名:Tag //运行指定版本的镜像
docker rmi -f 镜像名/镜像ID //删除一个镜像,镜像没有被别的镜像使用才可以删除
docker rmi -f 镜像名/镜像ID 镜像名/镜像ID 镜像名/镜像ID //删除多个镜像,空格隔开
docker rmi -f $(docker images -aq) //删除全部镜像 -a 意思为显示全部, -q 意思为只显示ID
docker image rm 镜像名称/镜像ID //强制删除镜像
docker save 镜像名/镜像ID -o 镜像保存在哪个位置与名字
docker save tomcat -o /myimg.tar //保存Tomcat到myimg.tar里
docker commit -m="提交信息" -a="作者信息" 容器名/容器ID 提交后的镜像名:Tag
docker ps //查看正在运行容器列表
docker ps -a //查看所有容器 -----包含正在运行 和已停止的
docker exec -it 容器名 路径//进入容器 里的路径
#删除一个容器
docker rm -f 容器名/容器ID
#删除多个容器 空格隔开要删除的容器名或容器ID
docker rm -f 容器名/容器ID 容器名/容器ID 容器名/容器ID
#删除全部容器
docker rm -f $(docker ps -aq)
docker start 容器ID/容器名 //启动容器
docker stop 容器ID/容器名 //停止容器
docker restart 容器ID/容器名 //重启容器
docker kill 容器ID/容器名 //kill 容器
docker cp 容器ID/名称: 容器内路径 容器外路径 //容器内拷文件到外面
docker cp 容器外路径 容器ID/名称: 容器内路径 //容器外拷文件到容器内
docker run -it -d --name 容器别名 镜像名 --restart=always //容器随着docker启动而启动
docker update --restart=always 容器Id 或者 容器名 //修改容器启动配置(设置自启动)
docker rename 容器ID/容器名 新容器名 //更改容器名
docker logs container-id //查看容器日志
sudo docker info | grep "Docker Root Dir" //查看docker工作目录
du -hs /var/lib/docker/ //查看docker磁盘占用总体情况
docker system df //查看Docker的磁盘使用具体情况
docker rm `docker ps -a | grep Exited | awk '{print $1}'` //# 删除异常停止的容器
docker rmi -f `docker images | grep '<none>' | awk '{print $3}'` //删除名称或标签为none的镜像使用docker安装MySQL
sudo docker pull mysql:5.7.39  //拉取mysql镜像到本地
# --name指定容器名字 -v目录挂载 -p指定端口映射(宿主机端口:容器端口)  -e设置mysql参数 -d后台运行
sudo docker run --name mysql -v /usr/local/mysql/data:/var/lib/mysql -v /usr/local/mysql/conf:/etc/mysql -v /usr/local/mysql/log:/var/log/mysql -v /usr/local/mysql/mysql-files:/var/lib/mysql-files/  -e MYSQL_ROOT_PASSWORD=root  -p 3306:3306 -d mysql:5.7
docker exec -it 容器名称|容器id bin/bash  //进入容器里
exit  //退出容器
 -v /usr/local/mysql/mysql-files:/var/lib/mysql-files/
验证:用连接工具测试能不能连接成功,或window下cmd测试
ssh -v -h 3306 IP
使用docker安装Redis
docker pull redis:6.0.10 //拉取镜像
创建配置文件,docker-Redis里面默认没有配置文件,在宿主机创建并挂载到容器里
mkdir /home/redis
cd /home/redis
vi redis.conf
添加如下内容
bind 0.0.0.0  开启远程权限
appendonly yes  开启aof持久化
启动Redis容器并挂载文件
docker run --name redis  -v /home/redis/data:/data  -v /home/redis/redis.conf:/usr/local/etc/redis/redis.conf -p 6379:6379 -d redis:6.0.10  redis-server /usr/local/etc/redis/redis.conf
docker exec -it redis redis-cli //进入Redis客户端
安装nacos
拉取镜像
docker pull nacos/nacos-server
查看镜像
docker images
启动容器
docker run --env MODE=standalone --name mynacos -d -p 8848:8848 docker.io/nacos/nacos-server
查看启动日志
docker logs -f mynacos
日志中显示nacos服务地址为:
http://172.18.0.2:8848/nacos/index.html
默认账号密码都是nacos
进入nacos容器查看配置
docker ps
docker exec -it 容器名或ID /bin/bash
ls
cd conf/
ls
修改启动配置文件
进入
docker exec -it nacos /bin/bash
进入启动脚本
cd /home/nacos/bin
vim docker-startup.sh
The above is the detailed content of What is the method for docker to install mysql and redis images?. For more information, please follow other related articles on the PHP Chinese website!

Hot AI Tools

Undresser.AI Undress
AI-powered app for creating realistic nude photos

AI Clothes Remover
Online AI tool for removing clothes from photos.

Undress AI Tool
Undress images for free

Clothoff.io
AI clothes remover

AI Hentai Generator
Generate AI Hentai for free.

Hot Article

Hot Tools

Notepad++7.3.1
Easy-to-use and free code editor

SublimeText3 Chinese version
Chinese version, very easy to use

Zend Studio 13.0.1
Powerful PHP integrated development environment

Dreamweaver CS6
Visual web development tools

SublimeText3 Mac version
God-level code editing software (SublimeText3)

Hot Topics
 Pi Node Teaching: What is a Pi Node? How to install and set up Pi Node?
Mar 05, 2025 pm 05:57 PM
Detailed explanation and installation guide for PiNetwork nodes This article will introduce the PiNetwork ecosystem in detail - Pi nodes, a key role in the PiNetwork ecosystem, and provide complete steps for installation and configuration. After the launch of the PiNetwork blockchain test network, Pi nodes have become an important part of many pioneers actively participating in the testing, preparing for the upcoming main network release. If you don’t know PiNetwork yet, please refer to what is Picoin? What is the price for listing? Pi usage, mining and security analysis. What is PiNetwork? The PiNetwork project started in 2019 and owns its exclusive cryptocurrency Pi Coin. The project aims to create a one that everyone can participate
 How to fix mysql_native_password not loaded errors on MySQL 8.4
Dec 09, 2024 am 11:42 AM
One of the major changes introduced in MySQL 8.4 (the latest LTS release as of 2024) is that the "MySQL Native Password" plugin is no longer enabled by default. Further, MySQL 9.0 removes this plugin completely. This change affects PHP and other app
 How to install deepseek
Feb 19, 2025 pm 05:48 PM
There are many ways to install DeepSeek, including: compile from source (for experienced developers) using precompiled packages (for Windows users) using Docker containers (for most convenient, no need to worry about compatibility) No matter which method you choose, Please read the official documents carefully and prepare them fully to avoid unnecessary trouble.
 How to Configure Consul KV Using Docker
Jan 10, 2025 pm 04:31 PM
Consul by HashiCorp is a versatile tool that serves multiple functions in a modern DevOps environment. It’s widely used for service discovery, health checks, load balancing, and, notably, as a distributed key-value (KV) store. The KV store in Consul is perfect for storing dynamic configuration data, feature flags, secrets, and metadata in a highly available, consistent manner across your infrastructure such that it can be dynamically accessed by services in a distributed system. Using Docker to configure Consul’s KV store allows for quick setup and isolated environments, making it ideal for testing and development.
 Why does an error occur when installing an extension using PECL in a Docker environment? How to solve it?
Apr 01, 2025 pm 03:06 PM
Causes and solutions for errors when using PECL to install extensions in Docker environment When using Docker environment, we often encounter some headaches...
 The page is blank after PHP is connected to MySQL. What is the reason for the invalid die() function?
Apr 01, 2025 pm 03:03 PM
The page is blank after PHP connects to MySQL, and the reason why die() function fails. When learning the connection between PHP and MySQL database, you often encounter some confusing things...
 Which country is the Nexo exchange from? Where is it? A comprehensive introduction to the Nexo exchange
Mar 05, 2025 pm 05:09 PM
Nexo Exchange: Swiss cryptocurrency lending platform In-depth analysis Nexo is a platform that provides cryptocurrency lending services, supporting the mortgage and lending of more than 40 crypto assets, fiat currencies and stablecoins. It dominates the European and American markets and is committed to improving the efficiency, security and compliance of the platform. Many investors want to know where the Nexo exchange is registered, and the answer is: Switzerland. Nexo was founded in 2018 by Swiss fintech company Credissimo. Nexo Exchange Geographical Location and Regulation: Nexo is headquartered in Zug, Switzerland, a well-known cryptocurrency-friendly region. The platform actively cooperates with the supervision of various governments and has been in the US Financial Crime Law Enforcement Network (FinCEN) and Canadian Finance
 How To Remove Docker Images, Containers, and Volumes
Jan 09, 2025 am 10:23 AM
Docker makes it easy to wrap your applications and services in containers so you can run them anywhere. However, as you work with Docker, it’s also easy to accumulate an excessive number of unused images, containers, and data volumes that clutter the


