
 Database
Mysql Tutorial
How to implement MySQL real-time incremental data transmission function based on Docker and Canal
Database
Mysql Tutorial
How to implement MySQL real-time incremental data transmission function based on Docker and Canal
How to implement MySQL real-time incremental data transmission function based on Docker and Canal

Introduction to canal
Historical origin of canal
In the early days, Alibaba Company was established in Hangzhou and the United States. Database instances are deployed in all computer rooms, but due to the business need to synchronize data across computer rooms, canal was born, which is mainly based on triggers to obtain incremental changes. Starting in 2010, Alibaba began to gradually try database log analysis to obtain incrementally changed data for synchronization, which resulted in incremental subscription and consumption businesses.
The current data source mysql versions supported by canal include: 5.1.x, 5.5.x, 5.6.x, 5.7.x, 8.0.x.
canal’s application scenarios
Currently, businesses based on log incremental subscription and consumption mainly include:
Based on Database incremental log analysis, providing incremental data subscription and consumption
Database mirroring database real-time backup
Index construction and real-time maintenance (split Heterogeneous index, inverted index, etc.)
Business cache refresh
Incremental data processing with business logic
The working principle of canal
Before introducing the principle of canal, let us first understand the principle of mysql master-slave replication.
mysql master-slave replication principle
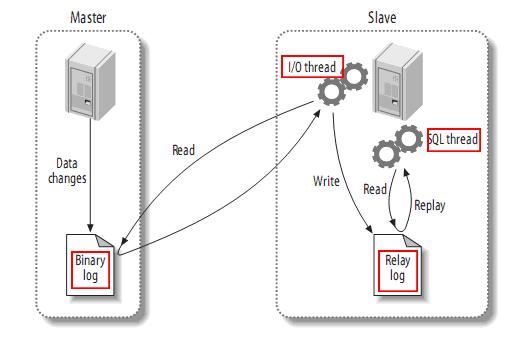
- ##mysql master writes data change operations to the binary log binary log, the recorded content is called binary log events, which can be viewed through the show binlog events command
- mysql slave will copy the binary log events in the master's binary log to Its relay log relay log
- mysql slave rereads and executes the events in the relay log, mapping the data changes to its own database table
Canal working principle

- ##canal simulates the interaction protocol of mysql slave and disguises itself as mysql slave. Send dump protocol to mysql master
- mysql master receives the dump request and starts pushing binary log to slave (that is, canal)
- canal analysis Binary log object (data is byte stream)
- Based on this principle and method, it is possible to complete the acquisition and analysis of database incremental logs, provide incremental data subscription and consumption, and realize mysql real-time Incremental data transfer capabilities.
Since canal is such a framework and is written in pure java language, then we will start to learn how to use it and apply it to our actual work.
canal’s docker environment preparationBecause of the current popularity of containerization technology, this article uses docker to quickly build a development environment. However, the traditional way of building an environment is difficult for us. After learning how to build a docker container environment, you can also successfully build it by yourself. Since this article mainly explains canal, it will not cover too much about docker. It will mainly introduce the basic concepts and command usage of docker. If you want to communicate with more container technology experts, you can add me on WeChat liyingjiese and remark "Add group". The group contains the best practices of major companies around the world and the latest industry trends every week.
What is dockerI believe that most people have used the virtual machine vmware. When using vmware to build the environment, you only need to provide an ordinary system The image is successfully installed. The remaining software environment and application configuration are still operated in the virtual machine as we operate on the local machine. Moreover, vmware takes up more resources of the host machine, which can easily cause the host machine to freeze, and the system image itself Also takes up too much space.
In order to make it easier for everyone to quickly understand docker, let’s compare it with vmware for introduction. Docker provides a platform for starting, packaging, and running apps, which isolates the app (application) from the underlying infrastructure (infrastructure). . The two most important concepts in docker are images (similar to system images in vmware) and containers (similar to systems installed in vmware).
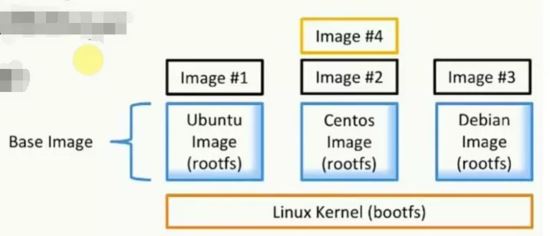
What is an image (mirror)
- A collection of files and meta data (root filesystem)
- Layered, and each layer can add, change or delete files to become a new image
- ##Different images can share the same layer
- The image itself is read-only
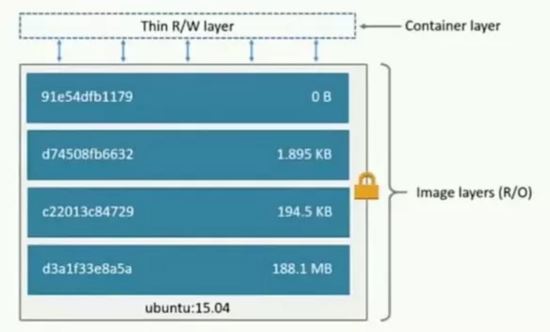
 What is a container
Create through image (copy)
Create a container layer (readable and writable) on top of the image layer
Analogy object-oriented: classes and instances
Image is responsible for the storage and distribution of the app, and the container is responsible for running the app
##docker network introduction
Docker has three network types:- bridge: bridge network. By default, the docker containers started use bridge, a bridge network created during docker installation. Each time the docker container is restarted, the corresponding IP address will be obtained in order. This will cause the docker IP address to change after restarting. .
- none: No specified network. Using --network=none, the docker container will not assign a LAN IP.
- host: Host network. If --network=host is used, the Docker container will share the network with the host and the two can communicate with each other. When running a web service listening on port 8080 in a container, the container is automatically mapped to the host's port 8080.
docker network create --subnet=172.18.0.0/16 mynetwork

Build canal environment
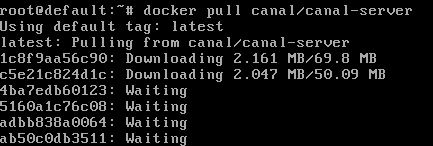
Attached is the download and installation address of docker ==> docker download . Download canal imagedocker pull canal/canal-server:
docker pull mysql , the downloaded one is as shown below:


##生成mysql容器
docker run -d --name mysql --net mynetwork --ip 172.18.0.6 -p 3306:3306 -e mysql_root_password=root mysql
##生成canal-server容器
docker run -d --name canal-server --net mynetwork --ip 172.18.0.4 -p 11111:11111 canal/canal-server
## 命令介绍
--net mynetwork #使用自定义网络
--ip #指定分配ip

mysql configuration modification
The above is just a preliminary preparation of the basic environment, but how to make canal disguise as salve and correctly obtain the binary log in mysql? For self-built mysql, you need to enable the binlog writing function first, configurebinlog-format to row mode, open bin_log by modifying the mysql configuration file, use find / -name my.cnfFind my.cnf and modify the file content as follows:
[mysqld]
log-bin=mysql-bin # 开启binlog
binlog-format=row # 选择row模式
server_id=1 # 配置mysql replaction需要定义,不要和canal的slaveid重复
docker exec -it mysql bash.
mysql -uroot -proot
# 创建账号
create user canal identified by 'canal';
# 授予权限
grant select, replication slave, replication client on *.* to 'canal'@'%';
-- grant all privileges on *.* to 'canal'@'%' ;
# 刷新并应用
flush privileges;
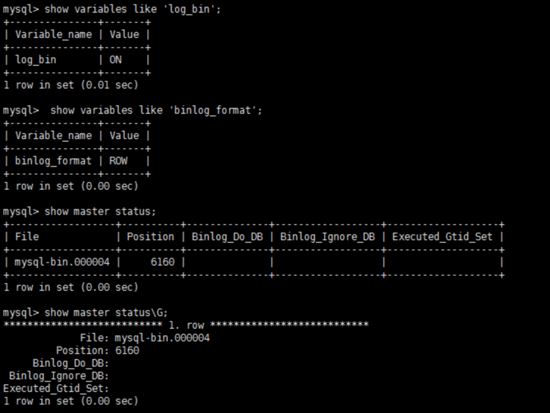
show variables like 'log_bin';
show variables like 'log_bin';
show master status;
canal-server configuration modification
Enter canal-server containerdocker exec -it canal-server bash.
vi canal-server/conf/example/instance.properties:

configuration instructions.
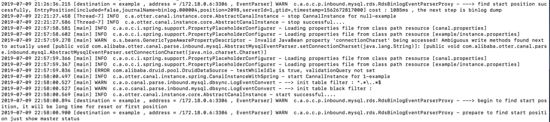
docker restart canal-server Enter the container to view the startup log:
docker exec -it canal-server bash
tail -100f canal-server/logs/example/example.log

# 下载对镜像
docker pull elasticsearch:7.1.1
docker pull mobz/elasticsearch-head:5-alpine
# 创建容器并运行
docker run -d --name elasticsearch --net mynetwork --ip 172.18.0.2 -p 9200:9200 -p 9300:9300 -e "discovery.type=single-node" elasticsearch:7.1.1
docker run -d --name elasticsearch-head --net mynetwork --ip 172.18.0.5 -p 9100:9100 mobz/elasticsearch-head:5-alpine

package com.example.canal.study.pojo;
import lombok.data;
import java.io.serializable;
// @data 用户生产getter、setter方法
@data
public class student implements serializable {
private string id;
private string name;
private int age;
private string sex;
private string city;
}package com.example.canal.study.common;
import com.alibaba.otter.canal.client.canalconnector;
import com.alibaba.otter.canal.client.canalconnectors;
import org.apache.http.httphost;
import org.elasticsearch.client.restclient;
import org.elasticsearch.client.resthighlevelclient;
import org.springframework.beans.factory.annotation.value;
import org.springframework.context.annotation.bean;
import org.springframework.context.annotation.configuration;
import java.net.inetsocketaddress;
/**
* @author haha
*/
@configuration
public class canalconfig {
// @value 获取 application.properties配置中端内容
@value("${canal.server.ip}")
private string canalip;
@value("${canal.server.port}")
private integer canalport;
@value("${canal.destination}")
private string destination;
@value("${elasticsearch.server.ip}")
private string elasticsearchip;
@value("${elasticsearch.server.port}")
private integer elasticsearchport;
@value("${zookeeper.server.ip}")
private string zkserverip;
// 获取简单canal-server连接
@bean
public canalconnector canalsimpleconnector() {
canalconnector canalconnector = canalconnectors.newsingleconnector(new inetsocketaddress(canalip, canalport), destination, "", "");
return canalconnector;
}
// 通过连接zookeeper获取canal-server连接
@bean
public canalconnector canalhaconnector() {
canalconnector canalconnector = canalconnectors.newclusterconnector(zkserverip, destination, "", "");
return canalconnector;
}
// elasticsearch 7.x客户端
@bean
public resthighlevelclient resthighlevelclient() {
resthighlevelclient client = new resthighlevelclient(
restclient.builder(new httphost(elasticsearchip, elasticsearchport))
);
return client;
}
}public static class twotuple<a, b> {
public final a eventtype;
public final b columnmap;
public twotuple(a a, b b) {
eventtype = a;
columnmap = b;
}
}
public static list<twotuple<eventtype, map>> printentry(list<entry> entrys) {
list<twotuple<eventtype, map>> rows = new arraylist<>();
for (entry entry : entrys) {
// binlog event的事件事件
long executetime = entry.getheader().getexecutetime();
// 当前应用获取到该binlog锁延迟的时间
long delaytime = system.currenttimemillis() - executetime;
date date = new date(entry.getheader().getexecutetime());
simpledateformat simpledateformat = new simpledateformat("yyyy-mm-dd hh:mm:ss");
// 当前的entry(binary log event)的条目类型属于事务
if (entry.getentrytype() == entrytype.transactionbegin || entry.getentrytype() == entrytype.transactionend) {
if (entry.getentrytype() == entrytype.transactionbegin) {
transactionbegin begin = null;
try {
begin = transactionbegin.parsefrom(entry.getstorevalue());
} catch (invalidprotocolbufferexception e) {
throw new runtimeexception("parse event has an error , data:" + entry.tostring(), e);
}
// 打印事务头信息,执行的线程id,事务耗时
logger.info(transaction_format,
new object[]{entry.getheader().getlogfilename(),
string.valueof(entry.getheader().getlogfileoffset()),
string.valueof(entry.getheader().getexecutetime()),
simpledateformat.format(date),
entry.getheader().getgtid(),
string.valueof(delaytime)});
logger.info(" begin ----> thread id: {}", begin.getthreadid());
printxainfo(begin.getpropslist());
} else if (entry.getentrytype() == entrytype.transactionend) {
transactionend end = null;
try {
end = transactionend.parsefrom(entry.getstorevalue());
} catch (invalidprotocolbufferexception e) {
throw new runtimeexception("parse event has an error , data:" + entry.tostring(), e);
}
// 打印事务提交信息,事务id
logger.info("----------------\n");
logger.info(" end ----> transaction id: {}", end.gettransactionid());
printxainfo(end.getpropslist());
logger.info(transaction_format,
new object[]{entry.getheader().getlogfilename(),
string.valueof(entry.getheader().getlogfileoffset()),
string.valueof(entry.getheader().getexecutetime()), simpledateformat.format(date),
entry.getheader().getgtid(), string.valueof(delaytime)});
}
continue;
}
// 当前entry(binary log event)的条目类型属于原始数据
if (entry.getentrytype() == entrytype.rowdata) {
rowchange rowchage = null;
try {
// 获取储存的内容
rowchage = rowchange.parsefrom(entry.getstorevalue());
} catch (exception e) {
throw new runtimeexception("parse event has an error , data:" + entry.tostring(), e);
}
// 获取当前内容的事件类型
eventtype eventtype = rowchage.geteventtype();
logger.info(row_format,
new object[]{entry.getheader().getlogfilename(),
string.valueof(entry.getheader().getlogfileoffset()), entry.getheader().getschemaname(),
entry.getheader().gettablename(), eventtype,
string.valueof(entry.getheader().getexecutetime()), simpledateformat.format(date),
entry.getheader().getgtid(), string.valueof(delaytime)});
// 事件类型是query或数据定义语言ddl直接打印sql语句,跳出继续下一次循环
if (eventtype == eventtype.query || rowchage.getisddl()) {
logger.info(" sql ----> " + rowchage.getsql() + sep);
continue;
}
printxainfo(rowchage.getpropslist());
// 循环当前内容条目的具体数据
for (rowdata rowdata : rowchage.getrowdataslist()) {
list<canalentry.column> columns;
// 事件类型是delete返回删除前的列内容,否则返回改变后列的内容
if (eventtype == canalentry.eventtype.delete) {
columns = rowdata.getbeforecolumnslist();
} else {
columns = rowdata.getaftercolumnslist();
}
hashmap<string, object> map = new hashmap<>(16);
// 循环把列的name与value放入map中
for (column column: columns){
map.put(column.getname(), column.getvalue());
}
rows.add(new twotuple<>(eventtype, map));
}
}
}
return rows;
}package com.example.canal.study.common;
import com.alibaba.fastjson.json;
import com.example.canal.study.pojo.student;
import lombok.extern.slf4j.slf4j;
import org.elasticsearch.client.resthighlevelclient;
import org.springframework.beans.factory.annotation.autowired;
import org.springframework.stereotype.component;
import org.elasticsearch.action.docwriterequest;
import org.elasticsearch.action.delete.deleterequest;
import org.elasticsearch.action.delete.deleteresponse;
import org.elasticsearch.action.get.getrequest;
import org.elasticsearch.action.get.getresponse;
import org.elasticsearch.action.index.indexrequest;
import org.elasticsearch.action.index.indexresponse;
import org.elasticsearch.action.update.updaterequest;
import org.elasticsearch.action.update.updateresponse;
import org.elasticsearch.client.requestoptions;
import org.elasticsearch.common.xcontent.xcontenttype;
import java.io.ioexception;
import java.util.map;
/**
* @author haha
*/
@slf4j
@component
public class elasticutils {
@autowired
private resthighlevelclient resthighlevelclient;
/**
* 新增
* @param student
* @param index 索引
*/
public void savees(student student, string index) {
indexrequest indexrequest = new indexrequest(index)
.id(student.getid())
.source(json.tojsonstring(student), xcontenttype.json)
.optype(docwriterequest.optype.create);
try {
indexresponse response = resthighlevelclient.index(indexrequest, requestoptions.default);
log.info("保存数据至elasticsearch成功:{}", response.getid());
} catch (ioexception e) {
log.error("保存数据至elasticsearch失败: {}", e);
}
}
/**
* 查看
* @param index 索引
* @param id _id
* @throws ioexception
*/
public void getes(string index, string id) throws ioexception {
getrequest getrequest = new getrequest(index, id);
getresponse response = resthighlevelclient.get(getrequest, requestoptions.default);
map<string, object> fields = response.getsource();
for (map.entry<string, object> entry : fields.entryset()) {
system.out.println(entry.getkey() + ":" + entry.getvalue());
}
}
/**
* 更新
* @param student
* @param index 索引
* @throws ioexception
*/
public void updatees(student student, string index) throws ioexception {
updaterequest updaterequest = new updaterequest(index, student.getid());
updaterequest.upsert(json.tojsonstring(student), xcontenttype.json);
updateresponse response = resthighlevelclient.update(updaterequest, requestoptions.default);
log.info("更新数据至elasticsearch成功:{}", response.getid());
}
/**
* 根据id删除数据
* @param index 索引
* @param id _id
* @throws ioexception
*/
public void deletees(string index, string id) throws ioexception {
deleterequest deleterequest = new deleterequest(index, id);
deleteresponse response = resthighlevelclient.delete(deleterequest, requestoptions.default);
log.info("删除数据至elasticsearch成功:{}", response.getid());
}
}package com.example.canal.study.action;
import com.alibaba.otter.canal.client.canalconnector;
import com.alibaba.otter.canal.protocol.canalentry;
import com.alibaba.otter.canal.protocol.message;
import com.example.canal.study.common.canaldataparser;
import com.example.canal.study.common.elasticutils;
import com.example.canal.study.pojo.student;
import lombok.extern.slf4j.slf4j;
import org.springframework.beans.factory.annotation.autowired;
import org.springframework.beans.factory.annotation.qualifier;
import org.springframework.stereotype.component;
import java.io.ioexception;
import java.util.list;
import java.util.map;
/**
* @author haha
*/
@slf4j
@component
public class binlogelasticsearch {
@autowired
private canalconnector canalsimpleconnector;
@autowired
private elasticutils elasticutils;
//@qualifier("canalhaconnector")使用名为canalhaconnector的bean
@autowired
@qualifier("canalhaconnector")
private canalconnector canalhaconnector;
public void binlogtoelasticsearch() throws ioexception {
opencanalconnector(canalhaconnector);
// 轮询拉取数据
integer batchsize = 5 * 1024;
while (true) {
message message = canalhaconnector.getwithoutack(batchsize);
// message message = canalsimpleconnector.getwithoutack(batchsize);
long id = message.getid();
int size = message.getentries().size();
log.info("当前监控到binlog消息数量{}", size);
if (id == -1 || size == 0) {
try {
// 等待2秒
thread.sleep(2000);
} catch (interruptedexception e) {
e.printstacktrace();
}
} else {
//1. 解析message对象
list<canalentry.entry> entries = message.getentries();
list<canaldataparser.twotuple<canalentry.eventtype, map>> rows = canaldataparser.printentry(entries);
for (canaldataparser.twotuple<canalentry.eventtype, map> tuple : rows) {
if(tuple.eventtype == canalentry.eventtype.insert) {
student student = createstudent(tuple);
// 2。将解析出的对象同步到elasticsearch中
elasticutils.savees(student, "student_index");
// 3.消息确认已处理
// canalsimpleconnector.ack(id);
canalhaconnector.ack(id);
}
if(tuple.eventtype == canalentry.eventtype.update){
student student = createstudent(tuple);
elasticutils.updatees(student, "student_index");
// 3.消息确认已处理
// canalsimpleconnector.ack(id);
canalhaconnector.ack(id);
}
if(tuple.eventtype == canalentry.eventtype.delete){
elasticutils.deletees("student_index", tuple.columnmap.get("id").tostring());
canalhaconnector.ack(id);
}
}
}
}
}
/**
* 封装数据至student
* @param tuple
* @return
*/
private student createstudent(canaldataparser.twotuple<canalentry.eventtype, map> tuple){
student student = new student();
student.setid(tuple.columnmap.get("id").tostring());
student.setage(integer.parseint(tuple.columnmap.get("age").tostring()));
student.setname(tuple.columnmap.get("name").tostring());
student.setsex(tuple.columnmap.get("sex").tostring());
student.setcity(tuple.columnmap.get("city").tostring());
return student;
}
/**
* 打开canal连接
*
* @param canalconnector
*/
private void opencanalconnector(canalconnector canalconnector) {
//连接canalserver
canalconnector.connect();
// 订阅destination
canalconnector.subscribe();
}
/**
* 关闭canal连接
*
* @param canalconnector
*/
private void closecanalconnector(canalconnector canalconnector) {
//关闭连接canalserver
canalconnector.disconnect();
// 注销订阅destination
canalconnector.unsubscribe();
}
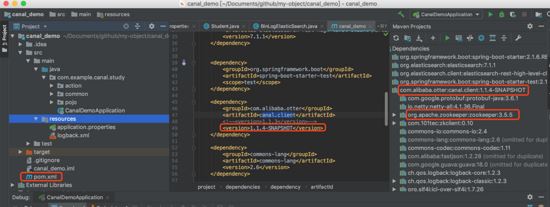
}canaldemoapplication.java(spring boot启动类)
package com.example.canal.study;
import com.example.canal.study.action.binlogelasticsearch;
import org.springframework.beans.factory.annotation.autowired;
import org.springframework.boot.applicationarguments;
import org.springframework.boot.applicationrunner;
import org.springframework.boot.springapplication;
import org.springframework.boot.autoconfigure.springbootapplication;
/**
* @author haha
*/
@springbootapplication
public class canaldemoapplication implements applicationrunner {
@autowired
private binlogelasticsearch binlogelasticsearch;
public static void main(string[] args) {
 springapplication.run(canaldemoapplication.class, args);
}
// 程序启动则执行run方法
@override
public void run(applicationarguments args) throws exception {
 binlogelasticsearch.binlogtoelasticsearch();
}
}application.properties
server.port=8081
spring.application.name = canal-demo
canal.server.ip = 192.168.124.5
canal.server.port = 11111
canal.destination = example
zookeeper.server.ip = 192.168.124.5:2181
zookeeper.sasl.client = false
elasticsearch.server.ip = 192.168.124.5
elasticsearch.server.port = 9200
canal集群高可用的搭建
通过上面的学习,我们知道了单机直连方式的canala应用。在当今互联网时代,单实例模式逐渐被集群高可用模式取代,那么canala的多实例集群方式如何搭建呢!
基于zookeeper获取canal实例
准备zookeeper的docker镜像与容器:
docker pull zookeeper
docker run -d --name zookeeper --net mynetwork --ip 172.18.0.3 -p 2181:2181 zookeeper
docker run -d --name canal-server2 --net mynetwork --ip 172.18.0.8 -p 11113:11113 canal/canal-server
1、机器准备:
运行canal的容器ip: 172.18.0.4 , 172.18.0.8
zookeeper容器ip:172.18.0.3:2181
mysql容器ip:172.18.0.6:3306
2、按照部署和配置,在单台机器上各自完成配置,演示时instance name为example。
3、修改canal.properties,加上zookeeper配置并修改canal端口:
canal.port=11113
canal.zkservers=172.18.0.3:2181
canal.instance.global.spring.xml = classpath:spring/default-instance.xml
4、创建example目录,并修改instance.properties:
canal.instance.mysql.slaveid = 1235
#之前的canal slaveid是1234,保证slaveid不重复即可
canal.instance.master.address = 172.18.0.6:3306
注意: 两台机器上的instance目录的名字需要保证完全一致,ha模式是依赖于instance name进行管理,同时必须都选择default-instance.xml配置。
启动两个不同容器的canal,启动后,可以通过tail -100f logs/example/example.log查看启动日志,只会看到一台机器上出现了启动成功的日志。
比如我这里启动成功的是 172.18.0.4:
查看一下zookeeper中的节点信息,也可以知道当前工作的节点为172.18.0.4:11111:
[zk: localhost:2181(connected) 15] get /otter/canal/destinations/example/running
{"active":true,"address":"172.18.0.4:11111","cid":1}客户端链接, 消费数据
可以通过指定zookeeper地址和canal的instance name,canal client会自动从zookeeper中的running节点获取当前服务的工作节点,然后与其建立链接:
[zk: localhost:2181(connected) 0] get /otter/canal/destinations/example/running
{"active":true,"address":"172.18.0.4:11111","cid":1}对应的客户端编码可以使用如下形式,上文中的canalconfig.java中的canalhaconnector就是一个ha连接:
canalconnector connector = canalconnectors.newclusterconnector("172.18.0.3:2181", "example", "", "");链接成功后,canal server会记录当前正在工作的canal client信息,比如客户端ip,链接的端口信息等(聪明的你,应该也可以发现,canal client也可以支持ha功能):
[zk: localhost:2181(connected) 4] get /otter/canal/destinations/example/1001/running
{"active":true,"address":"192.168.124.5:59887","clientid":1001}数据消费成功后,canal server会在zookeeper中记录下当前最后一次消费成功的binlog位点(下次你重启client时,会从这最后一个位点继续进行消费):
[zk: localhost:2181(connected) 5] get /otter/canal/destinations/example/1001/cursor

{"@type":"com.alibaba.otter.canal.protocol.position.logposition","identity":{"slaveid":-1,"sourceaddress":{"address":"mysql.mynetwork","port":3306}},"postion":{"included":false,"journalname":"binlog.000004","position":2169,"timestamp":1562672817000}}停止正在工作的172.18.0.4的canal server:
docker exec -it canal-server bash
cd canal-server/bin
sh stop.sh
这时172.18.0.8会立马启动example instance,提供新的数据服务:
[zk: localhost:2181(connected) 19] get /otter/canal/destinations/example/running
{"active":true,"address":"172.18.0.8:11111","cid":1}与此同时,客户端也会随着canal server的切换,通过获取zookeeper中的最新地址,与新的canal server建立链接,继续消费数据,整个过程自动完成。
异常与总结
elasticsearch-head无法访问elasticsearch
es与es-head是两个独立的进程,当es-head访问es服务时,会存在一个跨域问题。所以我们需要修改es的配置文件,增加一些配置项来解决这个问题,如下:
[root@localhost /usr/local/elasticsearch-head-master]# cd ../elasticsearch-5.5.2/config/
[root@localhost /usr/local/elasticsearch-5.5.2/config]# vim elasticsearch.yml
# 文件末尾加上如下配置
http.cors.enabled: true
http.cors.allow-origin: "*"
修改完配置文件后需重启es服务。
elasticsearch-head查询报406 not acceptable
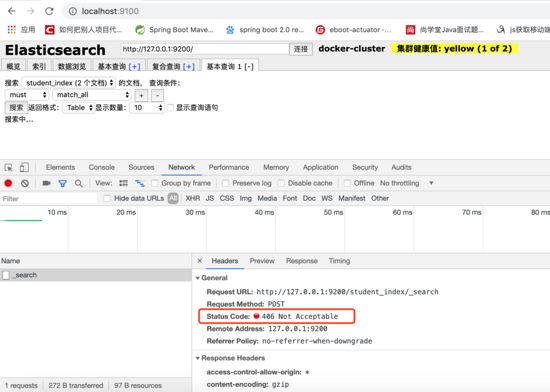
解决方法:
1、进入head安装目录;
2、cd _site/
3、编辑vendor.js 共有两处
#6886行 contenttype: "application/x-www-form-urlencoded
改成 contenttype: "application/json;charset=utf-8"
 #7574行 var inspectdata = s.contenttype === "application/x-www-form-urlencoded" &&
改成 var inspectdata = s.contenttype === "application/json;charset=utf-8" &&
使用elasticsearch-rest-high-level-client报org.elasticsearch.action.index.indexrequest.ifseqno
#pom中除了加入依赖
<dependency>
<groupid>org.elasticsearch.client</groupid>
<artifactid>elasticsearch-rest-high-level-client</artifactid>
<version>7.1.1</version>
</dependency>
#还需加入
<dependency>
<groupid>org.elasticsearch</groupid>
<artifactid>elasticsearch</artifactid>
<version>7.1.1</version>
</dependency>
相关参考: 。
为什么elasticsearch要在7.x版本不能使用type?
参考: 为什么elasticsearch要在7.x版本去掉type?
使用spring-data-elasticsearch.jar报org.elasticsearch.client.transport.nonodeavailableexception
由于本文使用的是elasticsearch7.x以上的版本,目前spring-data-elasticsearch底层采用es官方transportclient,而es官方计划放弃transportclient,工具以es官方推荐的resthighlevelclient进行调用请求。 可参考 resthighlevelclient api 。
设置docker容器开启启动
如果创建时未指定 --restart=always ,可通过update 命令
docker update --restart=always [containerid]
docker for mac network host模式不生效
host模式是为了性能,但是这却对docker的隔离性造成了破坏,导致安全性降低。 在性能场景下,可以用--netwokr host开启host模式,但需要注意的是,如果你用windows或mac本地启动容器的话,会遇到host模式失效的问题。原因是host模式只支持linux宿主机。
参见官方文档: 。
客户端连接zookeeper报authenticate using sasl(unknow error)

zookeeper.jar is inconsistent with the zookeeper version in dokcer
zookeeper.jar uses the version before 3.4.6 Version
This error means that zookeeper, as an external application, needs to apply for resources from the system. When applying for resources, it needs to pass authentication, and sasl is an authentication method. We want to find a way to circumvent it. Passed SASL certification. Avoid waiting and improve efficiency.
Add system.setproperty("zookeeper.sasl.client", "false"); to the project code, If it is a spring boot project, you can add application.propertiesAddzookeeper.sasl.client=false.
Reference: increased cpu usage by unnecessary sasl checks.
If you change the version of zookeeper.jar that canal.client.jar depends on
Download the official source code of canal to the local git clone, and then modify the information in the pom.xml file under the client module. zookeeper content, and then re-mvn install:
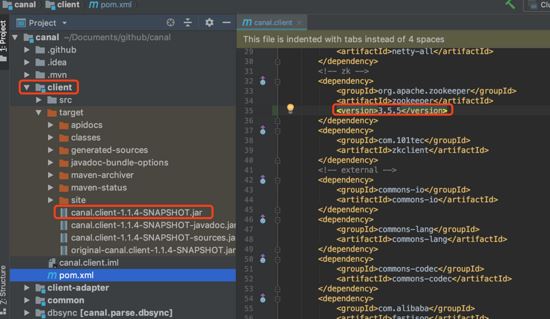
Replace the package your project depends on with the package just produced by mvn install:
The above is the detailed content of How to implement MySQL real-time incremental data transmission function based on Docker and Canal. For more information, please follow other related articles on the PHP Chinese website!

Hot AI Tools

Undresser.AI Undress
AI-powered app for creating realistic nude photos

AI Clothes Remover
Online AI tool for removing clothes from photos.

Undress AI Tool
Undress images for free

Clothoff.io
AI clothes remover

AI Hentai Generator
Generate AI Hentai for free.

Hot Article
Hot Tools

Notepad++7.3.1
Easy-to-use and free code editor

SublimeText3 Chinese version
Chinese version, very easy to use

Zend Studio 13.0.1
Powerful PHP integrated development environment

Dreamweaver CS6
Visual web development tools

SublimeText3 Mac version
God-level code editing software (SublimeText3)
Hot Topics


 How to use MySQL backup and restore in PHP?
Jun 03, 2024 pm 12:19 PM
How to use MySQL backup and restore in PHP?
Jun 03, 2024 pm 12:19 PM
Backing up and restoring a MySQL database in PHP can be achieved by following these steps: Back up the database: Use the mysqldump command to dump the database into a SQL file. Restore database: Use the mysql command to restore the database from SQL files.
 How to optimize MySQL query performance in PHP?
Jun 03, 2024 pm 08:11 PM
How to optimize MySQL query performance in PHP?
Jun 03, 2024 pm 08:11 PM
MySQL query performance can be optimized by building indexes that reduce lookup time from linear complexity to logarithmic complexity. Use PreparedStatements to prevent SQL injection and improve query performance. Limit query results and reduce the amount of data processed by the server. Optimize join queries, including using appropriate join types, creating indexes, and considering using subqueries. Analyze queries to identify bottlenecks; use caching to reduce database load; optimize PHP code to minimize overhead.
 How to insert data into a MySQL table using PHP?
Jun 02, 2024 pm 02:26 PM
How to insert data into a MySQL table using PHP?
Jun 02, 2024 pm 02:26 PM
How to insert data into MySQL table? Connect to the database: Use mysqli to establish a connection to the database. Prepare the SQL query: Write an INSERT statement to specify the columns and values to be inserted. Execute query: Use the query() method to execute the insertion query. If successful, a confirmation message will be output.
 How to create a MySQL table using PHP?
Jun 04, 2024 pm 01:57 PM
How to create a MySQL table using PHP?
Jun 04, 2024 pm 01:57 PM
Creating a MySQL table using PHP requires the following steps: Connect to the database. Create the database if it does not exist. Select a database. Create table. Execute the query. Close the connection.
 How to use MySQL stored procedures in PHP?
Jun 02, 2024 pm 02:13 PM
How to use MySQL stored procedures in PHP?
Jun 02, 2024 pm 02:13 PM
To use MySQL stored procedures in PHP: Use PDO or the MySQLi extension to connect to a MySQL database. Prepare the statement to call the stored procedure. Execute the stored procedure. Process the result set (if the stored procedure returns results). Close the database connection.
 Pi Node Teaching: What is a Pi Node? How to install and set up Pi Node?
Mar 05, 2025 pm 05:57 PM
Pi Node Teaching: What is a Pi Node? How to install and set up Pi Node?
Mar 05, 2025 pm 05:57 PM
Detailed explanation and installation guide for PiNetwork nodes This article will introduce the PiNetwork ecosystem in detail - Pi nodes, a key role in the PiNetwork ecosystem, and provide complete steps for installation and configuration. After the launch of the PiNetwork blockchain test network, Pi nodes have become an important part of many pioneers actively participating in the testing, preparing for the upcoming main network release. If you don’t know PiNetwork yet, please refer to what is Picoin? What is the price for listing? Pi usage, mining and security analysis. What is PiNetwork? The PiNetwork project started in 2019 and owns its exclusive cryptocurrency Pi Coin. The project aims to create a one that everyone can participate
 How to fix mysql_native_password not loaded errors on MySQL 8.4
Dec 09, 2024 am 11:42 AM
How to fix mysql_native_password not loaded errors on MySQL 8.4
Dec 09, 2024 am 11:42 AM
One of the major changes introduced in MySQL 8.4 (the latest LTS release as of 2024) is that the "MySQL Native Password" plugin is no longer enabled by default. Further, MySQL 9.0 removes this plugin completely. This change affects PHP and other app
 How to install deepseek
Feb 19, 2025 pm 05:48 PM
How to install deepseek
Feb 19, 2025 pm 05:48 PM
There are many ways to install DeepSeek, including: compile from source (for experienced developers) using precompiled packages (for Windows users) using Docker containers (for most convenient, no need to worry about compatibility) No matter which method you choose, Please read the official documents carefully and prepare them fully to avoid unnecessary trouble.
