

How SpringBoot integrates Spring Cache to implement Redis caching

1. Introduction
Spring Cache is a framework that implements annotation-based caching function. You only need to simply add an annotation to implement caching. Function.
Spring Cache provides a layer of abstraction, and the bottom layer can switch different cache implementations.
Specifically, different caching technologies are unified through the CacheManager interface.
CacheManager is an abstract interface for various caching technologies provided by Spring. This is the default caching technology and is cached in Map. This also means that when the service hangs up, the cached data will be gone.
Different CacheManagers need to be implemented for different caching technologies
| CacheManager | Description |
|---|---|
| EhCacheCacheManager | Use EhCache as caching technology |
| GuavaCacheManager | Use Google's GuavaCache as caching technology |
| RedisCacheManager | Use Redis as caching technology |
2. Common annotations
In the Spring Boot project, To use caching technology, you only need to import the dependency package of the relevant caching technology into the project, and use @EnableCaching on the startup class to enable caching support. For example, to use Redis as the caching technology, you only need to import the maven coordinates of Spring data Redis. Commonly used annotations are as follows:
| Annotation | Explanation |
|---|---|
| @ EnableCaching | Enable cache annotation function |
| @Cacheable | Before the method is executed, spring first checks whether there is data in the cache. If there is data, it directly Return cached data; if there is no data, call the method and put the method return value in the cache |
| @CachePut | Put the method return value in the cache |
| @CacheEvict | Delete one or more pieces of data from the cache |
2.1, @EnableCaching
The main function of this annotation is to enable the cache annotation function and make other Spring Cache annotations effective. The method of use is also very simple, just add it directly above the startup class of the project.
@Slf4j
@SpringBootApplication
@EnableCaching
public class CacheDemoApplication {
    public static void main(String[] args) {
        SpringApplication.run(CacheDemoApplication.class, args);
        log.info("项目启动成功...");
    }
}2.2, @Cacheable
@Cacheable annotation is mainly to check whether there is data in the cache before executing the method. If there is data, the cached data is returned directly; if there is no data, the method is called and the method return value is placed in the cache.
Parameter transfer in annotations mainly uses **SpEL (Spring Expression Language)** to obtain and transfer data, which is somewhat similar to EL expressions in JSP. Commonly used methods are as follows:
"#p0": Get the first parameter in the parameter list. The "#p" is a fixed writing method, 0 is the subscript, representing the first one;
"#root.args[0]": Get the first parameter in the method . Among them, 0 is the subscript, which represents the first one.
"#user.id": Get the id attribute of parameter user. Note that the user here must be consistent with the parameter name in the parameter list
"#result.id": Get the id attribute in the return value.
From Spring Cache source code: Spring Expression Language (SpEL) expression used for making the method
There are several commonly used in the @Cacheable annotation The attributes can be set on demand:
value: The name of the cache. There can be multiple keys under each cache name
key: Cache key.
condition: condition judgment, cache the data when the condition is met. It is worth noting that this parameter is invalid in Redis
The parameter " unless" can be used in Redis as a conditional statement to avoid caching data if a certain condition is met.
/**
 * @description 通过id获取用户信息
 * @author xBaozi
 * @date 14:23 2022/7/3
 **/
@Cacheable(value = "userCache", key = "#id", unless = "#result == null")
@GetMapping("/{id}")
public User getById(@PathVariable Long id) {
    User user = userService.getById(id);
    return user;
}2.3、@CachePut
@CachPut The annotation is mainly to put the return value of the method into the cache. SpEL is also used to obtain data here. Commonly used attributes are as follows:
value: The name of the cache. There can be multiple keys under each cache name
-
key: cached key.
condition: condition judgment, cache the data when the condition is met. It is worth noting that this parameter is invalid in Redis
The parameter " unless" can be used in Redis as a conditional statement to avoid caching data if a certain condition is met.
/**
 * @description 新增用户信息并返回保存的信息
 * @author xBaozi
 * @date 14:38 2022/7/3
 **/
@CachePut(value = "userCache", key = "#user.id")
@PostMapping
public User save(User user) {
    userService.save(user);
    return user;
}2.4、@CacheEvict
@CacheeEvict Mainly deletes one or more pieces of data from the cache. SpEL is also used to obtain data. Commonly used attributes are as follows:
value: the name of the cache, below each cache name There can be multiple keys
key: cached key.
condition: condition judgment, cache the data when the condition is met. It is worth noting that this parameter is invalid in Redis
The parameter " unless" can be used in Redis as a conditional statement to avoid caching data if a certain condition is met.
/**
 * @description 更新用户信息
 * @author xBaozi
 * @date 14:41 2022/7/3
 **/
@CacheEvict(value = "userCache", key = "#result.id")
@PutMapping
public User update(User user) {
    userService.updateById(user);
    return user;
}3. Use Redis as a caching product
because Spring's default caching technology cannot persist cache data. Even if the service hangs up, the cache will also hang up, so you need to use Redis for operation (in fact, it is also because you have learned Redis)
The previous SpringBoot integrated Redis cache verification code It records some basic operations of Redis.
3.1, coordinate import
Import maven coordinates: spring-boot-starter-data-redis, spring-boot-starter-cache
<!--Spring Data Redis-->
<dependency>
    <groupId>org.springframework.boot</groupId>
    <artifactId>spring-boot-starter-data-redis</artifactId>
</dependency>
<!--Spring Cache-->
<dependency>
    <groupId>org.springframework.boot</groupId>
    <artifactId>spring-boot-starter-cache</artifactId>
</dependency>3.2, yml configuration
spring:
redis:
host: localhost
port: 6379
password: 123456
database: 0
cache:
redis:
Time-to-live: 1800000 # Set the cache validity period
3.3. Enable the annotation function
Add it to the startup classcom/itheima/CacheDemoApplication.java @EnableCaching annotation, enable cache annotation function
@Slf4j
@SpringBootApplication
@ServletComponentScan
@EnableCaching
public class ReggieApplication {
    public static void main(String[] args) {
        SpringApplication.run(ReggieApplication.class, args);
        log.info("springBoot项目启动成功……");
    }
}3.4. When using @Cacheable
, you need to be reminded that when using cache, the return value must implement the Serializable serialization interface, otherwise it will be thrown mistake.
This is because in the NoSql database, there is no data structure corresponding to our Java basic type, so when storing in the NoSql database, we must serialize the object, and at the same time during network transmission we It should be noted that the serialVersionUID of the javabean in the two applications must be consistent, otherwise deserialization cannot be performed normally.
/**
 * @description 新增套餐信息
 * @author xBaozi
 * @date 17:55 2022/5/13
 * @param setmealDto    需要新增套餐的数据
 **/
@CacheEvict(value = "setmealCache",allEntries = true)
@PostMapping
public Result<String> save(@RequestBody SetmealDto setmealDto) {
    log.info("套餐信息为{}", setmealDto);
    setmealService.saveWithDish(setmealDto);
    return Result.success("套餐" + setmealDto.getName() + "新增成功");
}3.5. Use @CacheEvict
The new attribute is called allEntries, which is a Boolean type used to indicate whether all elements in the cache need to be cleared. The default is false, which means it is not needed. If allEntries is set to true, Spring Cache will not consider the specified key. Sometimes it is more efficient to clear and cache all elements at once rather than clearing them one by one.
/**
 * @description 更新套餐信息并更新其关联的菜品
 * @author xBaozi
 * @date 11:28 2022/5/14
 * @param setmealDto    需要更新的套餐信息
 **/
@CacheEvict(value = "setmealCache",allEntries = true)
@PutMapping
public Result<String> updateWithDish(@RequestBody SetmealDto setmealDto) {
    log.info(setmealDto.toString());
    setmealService.updateWithDish(setmealDto);
    return Result.success("套餐修改成功");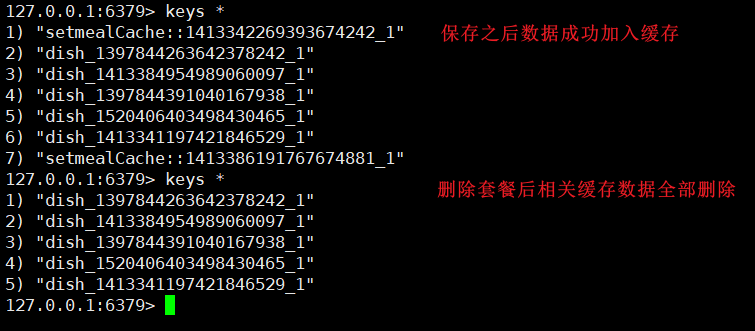
}4、测试
代码编写完成之后,重启工程,然后访问后台管理系统,对套餐数据进行新增以及删除,而后观察Redis中的数据发现写的代码是能正常跑到!成功!
The above is the detailed content of How SpringBoot integrates Spring Cache to implement Redis caching. For more information, please follow other related articles on the PHP Chinese website!

Hot AI Tools

Undresser.AI Undress
AI-powered app for creating realistic nude photos

AI Clothes Remover
Online AI tool for removing clothes from photos.

Undress AI Tool
Undress images for free

Clothoff.io
AI clothes remover

AI Hentai Generator
Generate AI Hentai for free.

Hot Article
Hot Tools

Notepad++7.3.1
Easy-to-use and free code editor

SublimeText3 Chinese version
Chinese version, very easy to use

Zend Studio 13.0.1
Powerful PHP integrated development environment

Dreamweaver CS6
Visual web development tools

SublimeText3 Mac version
God-level code editing software (SublimeText3)
Hot Topics
 1386
1386
 52
52

 How to build the redis cluster mode
Apr 10, 2025 pm 10:15 PM
How to build the redis cluster mode
Apr 10, 2025 pm 10:15 PM
Redis cluster mode deploys Redis instances to multiple servers through sharding, improving scalability and availability. The construction steps are as follows: Create odd Redis instances with different ports; Create 3 sentinel instances, monitor Redis instances and failover; configure sentinel configuration files, add monitoring Redis instance information and failover settings; configure Redis instance configuration files, enable cluster mode and specify the cluster information file path; create nodes.conf file, containing information of each Redis instance; start the cluster, execute the create command to create a cluster and specify the number of replicas; log in to the cluster to execute the CLUSTER INFO command to verify the cluster status; make
 How to clear redis data
Apr 10, 2025 pm 10:06 PM
How to clear redis data
Apr 10, 2025 pm 10:06 PM
How to clear Redis data: Use the FLUSHALL command to clear all key values. Use the FLUSHDB command to clear the key value of the currently selected database. Use SELECT to switch databases, and then use FLUSHDB to clear multiple databases. Use the DEL command to delete a specific key. Use the redis-cli tool to clear the data.
 How to use the redis command
Apr 10, 2025 pm 08:45 PM
How to use the redis command
Apr 10, 2025 pm 08:45 PM
Using the Redis directive requires the following steps: Open the Redis client. Enter the command (verb key value). Provides the required parameters (varies from instruction to instruction). Press Enter to execute the command. Redis returns a response indicating the result of the operation (usually OK or -ERR).
 How to read redis queue
Apr 10, 2025 pm 10:12 PM
How to read redis queue
Apr 10, 2025 pm 10:12 PM
To read a queue from Redis, you need to get the queue name, read the elements using the LPOP command, and process the empty queue. The specific steps are as follows: Get the queue name: name it with the prefix of "queue:" such as "queue:my-queue". Use the LPOP command: Eject the element from the head of the queue and return its value, such as LPOP queue:my-queue. Processing empty queues: If the queue is empty, LPOP returns nil, and you can check whether the queue exists before reading the element.
 How to use redis lock
Apr 10, 2025 pm 08:39 PM
How to use redis lock
Apr 10, 2025 pm 08:39 PM
Using Redis to lock operations requires obtaining the lock through the SETNX command, and then using the EXPIRE command to set the expiration time. The specific steps are: (1) Use the SETNX command to try to set a key-value pair; (2) Use the EXPIRE command to set the expiration time for the lock; (3) Use the DEL command to delete the lock when the lock is no longer needed.
 How to read the source code of redis
Apr 10, 2025 pm 08:27 PM
How to read the source code of redis
Apr 10, 2025 pm 08:27 PM
The best way to understand Redis source code is to go step by step: get familiar with the basics of Redis. Select a specific module or function as the starting point. Start with the entry point of the module or function and view the code line by line. View the code through the function call chain. Be familiar with the underlying data structures used by Redis. Identify the algorithm used by Redis.
 How to make message middleware for redis
Apr 10, 2025 pm 07:51 PM
How to make message middleware for redis
Apr 10, 2025 pm 07:51 PM
Redis, as a message middleware, supports production-consumption models, can persist messages and ensure reliable delivery. Using Redis as the message middleware enables low latency, reliable and scalable messaging.
 How to start the server with redis
Apr 10, 2025 pm 08:12 PM
How to start the server with redis
Apr 10, 2025 pm 08:12 PM
The steps to start a Redis server include: Install Redis according to the operating system. Start the Redis service via redis-server (Linux/macOS) or redis-server.exe (Windows). Use the redis-cli ping (Linux/macOS) or redis-cli.exe ping (Windows) command to check the service status. Use a Redis client, such as redis-cli, Python, or Node.js, to access the server.
