

How to build a redis cluster under centos

Essential tools:
redis-3.0.0.tar
redis-3.0.0.gem (ruby and redis interface)
Analysis:
First of all, the number of clusters requires a base number. Here is a simple redis cluster (6 redis instances for clustering).
Operates on one server, so only 6 different port numbers are required. They are: 7001, 7002, 7003, 7004, 7005, 7006.
Steps:
1. Upload redis-3.0.0.tar to the server (specify your own software directory), and decompress redis-3.0.0.tar.
2. Install the c language environment (after installing centos, it comes with the c language environment)
yum install gcc-c++
3. Enter the redis-3.0.0 directory
make
4. Install redis to the /usr/local/redis directory
make install prefix=/usr/local/redis
5. Check whether the installation is successful (the bin directory appears)

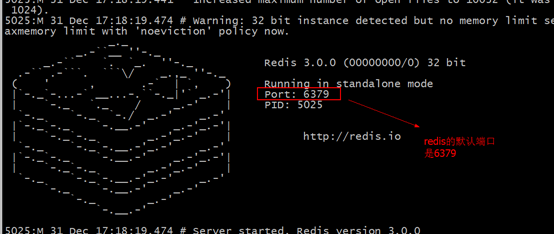
6. Start redis on the front end ( Enter the bin directory in the picture above)
./redis-server (open)
./redis-cli shutdown (close)
7. Backend startup
You need to copy the redis.conf file in the redis decompressed source package (under the redis-3.0.0 directory) to the bin directory
Modify redis.conf file, change daemonize to yes first use vim redis.conf
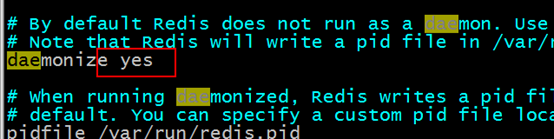
Use the command backend to start redis
Execute in the bin directory./redis-server redis.conf
Check whether the startup is successful

How to close the backend startup:
./redis-cli shutdown
The above is a separate redis installation, then Come down and build a cluster!
Install ruby
yum install ruby
yum install rubygems
Upload the following files to the linux system
redis-3.0.0.gem (ruby and redis interface)
Enter the directory and execute: gem install redis-3.0.0.gem
Copy the following files in the src directory under the redis-3.0.0 package to /usr/local/ redis/redis-cluster/
Prerequisite: Create a new redis-cluster directory first

Building a cluster requires at least 3 hosts. If each host If you configure another slave machine, at least 6 machines are required.
The port design is as follows: 7001-7006
Step 1: Copy a 7001 machine
Enter the /usr/local/redis/ directory and execute cp bin ./redis- cluster/7001 –r
Step 2: If persistent files exist, delete
rm -rf appendonly.aof dump.rdb
Step 3: Set cluster parameters

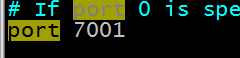
Step 4: Modify the port
Step 5: Copy the 7002-7006 machine
Give me the directory structure of the desktop system:
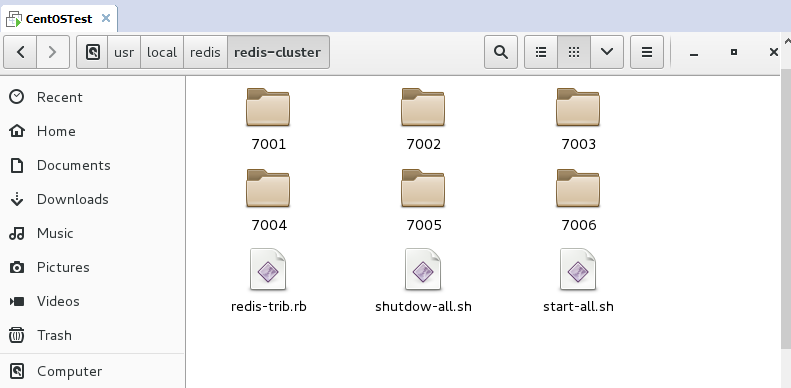
Next, set up one-click to start all redis or close the redis group:
First, create a new file. You can use vim to open a file that does not exist, and then The save exists. (The start-all.sh and shutdown-all.sh in the picture above are the ones I created)
start-all.sh:
cd 7001
./redis-server redis.conf
cd ..
cd 7002
./redis-server redis.conf
cd ..
cd 7003
./redis-server redis.conf
cd ..
cd 7004
./redis-server redis.conf
cd ..
cd 7005
./redis-server redis.conf
cd ..
cd 7006
./redis-server redis.conf
cd ..
shutdow-all.sh:
cd 7001
./redis-cli -p 7001 shutdown
cd ..
cd 7002
./redis-cli -p 7002 shutdown
cd ..
cd 7003
./redis-cli -p 7003 shutdown
cd ..
cd 7004
./redis-cli -p 7004 shutdown
cd ..
cd 7005
./redis-cli -p 7005 shutdown
cd ..
cd 7006
./redis-cli -p 7006 shutdown
cd ..
Next modify the permissions of those two files and set them as startable script files
chmod u+x start-all.sh

chmod u+x shutdown-all.sh
Next use ruby to connect these clusters for management
/redis-trib.rb create --replicas 1 192.168.78.133:7001 192.168.78.133:7002 192.168.78.133:7003 192.168.78.133:7004 192.168.78.133:7005 192.168.78.133: 7006
appears:
connecting to node 192.168.242.137:7001: ok
connecting to node 192.168.242.137:7002: ok
connecting to node 192.168.242.137:7003: ok
connecting to node 192.168.242.137:7004: ok
connecting to node 192.168.242.137:7005: ok
connecting to node 192.168.242.137:7006: ok
>>> performing hash slots allocation on 6 nodes...
using 3 masters:
192.168.242.137:7001
192.168.242.137:7002
192.168.242.137:7003
adding replica 192.168.242.137:7004 to 192.168.242.137:7001
adding replica 192.168.242.137:7005 to 192.168.242.137:7002
adding replica 192.168.242.137:7006 to 192.168.242.137:7003
m: 8240cd0fe6d6f842faa42b0174fe7c5ddcf7ae24 192.168.242.137:7001
  slots:0-5460 (5461 slots) master
m: 4f52a974f64343fd9f1ee0388490b3c0647a4db7 192.168.242.137:7002
  slots:5461-10922 (5462 slots) master
m: cb7c5def8f61df2016b38972396a8d1f349208c2 192.168.242.137:7003
  slots:10923-16383 (5461 slots) master
s: 66adf006fed43b3b5e499ce2ff1949a756504a16 192.168.242.137:7004
  replicates 8240cd0fe6d6f842faa42b0174fe7c5ddcf7ae24
s: cbb0c9bc4b27dd85511a7ef2d01bec90e692793b 192.168.242.137:7005
  replicates 4f52a974f64343fd9f1ee0388490b3c0647a4db7
s: a908736eadd1cd06e86fdff8b2749a6f46b38c00 192.168.242.137:7006
  replicates cb7c5def8f61df2016b38972396a8d1f349208c2
can i set the above configuration? (type 'yes' to accept): yes
>>> nodes configuration updated
>>> assign a different config epoch to each node
>>> sending cluster meet messages to join the cluster
waiting for the cluster to join..
>>> performing cluster check (using node 192.168.242.137:7001)
m: 8240cd0fe6d6f842faa42b0174fe7c5ddcf7ae24 192.168.242.137:7001
  slots:0-5460 (5461 slots) master
m: 4f52a974f64343fd9f1ee0388490b3c0647a4db7 192.168.242.137:7002
  slots:5461-10922 (5462 slots) master
m: cb7c5def8f61df2016b38972396a8d1f349208c2 192.168.242.137:7003
  slots:10923-16383 (5461 slots) master
m: 66adf006fed43b3b5e499ce2ff1949a756504a16 192.168.242.137:7004
  slots: (0 slots) master
  replicates 8240cd0fe6d6f842faa42b0174fe7c5ddcf7ae24
m: cbb0c9bc4b27dd85511a7ef2d01bec90e692793b 192.168.242.137:7005
  slots: (0 slots) master
  replicates 4f52a974f64343fd9f1ee0388490b3c0647a4db7
m: a908736eadd1cd06e86fdff8b2749a6f46b38c00 192.168.242.137:7006
  slots: (0 slots) master
  replicates cb7c5def8f61df2016b38972396a8d1f349208c2
[ok] all nodes agree about slots configuration.
>>> check for open slots...
>>> check slots coverage...
[ok] all 16384 slots covered.
It means success!
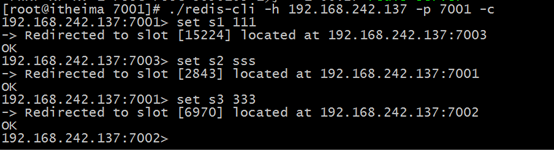
Test it, enter the 7001 directory and execute: ./redis-cli -h 192.168.242.137 -p 7001 –c
The above is the detailed content of How to build a redis cluster under centos. For more information, please follow other related articles on the PHP Chinese website!

Hot AI Tools

Undresser.AI Undress
AI-powered app for creating realistic nude photos

AI Clothes Remover
Online AI tool for removing clothes from photos.

Undress AI Tool
Undress images for free

Clothoff.io
AI clothes remover

Video Face Swap
Swap faces in any video effortlessly with our completely free AI face swap tool!

Hot Article
Hot Tools

Notepad++7.3.1
Easy-to-use and free code editor

SublimeText3 Chinese version
Chinese version, very easy to use

Zend Studio 13.0.1
Powerful PHP integrated development environment

Dreamweaver CS6
Visual web development tools

SublimeText3 Mac version
God-level code editing software (SublimeText3)
Hot Topics
 1387
1387
 52
52

 How to optimize CentOS HDFS configuration
Apr 14, 2025 pm 07:15 PM
How to optimize CentOS HDFS configuration
Apr 14, 2025 pm 07:15 PM
Improve HDFS performance on CentOS: A comprehensive optimization guide to optimize HDFS (Hadoop distributed file system) on CentOS requires comprehensive consideration of hardware, system configuration and network settings. This article provides a series of optimization strategies to help you improve HDFS performance. 1. Hardware upgrade and selection resource expansion: Increase the CPU, memory and storage capacity of the server as much as possible. High-performance hardware: adopts high-performance network cards and switches to improve network throughput. 2. System configuration fine-tuning kernel parameter adjustment: Modify /etc/sysctl.conf file to optimize kernel parameters such as TCP connection number, file handle number and memory management. For example, adjust TCP connection status and buffer size
 Centos stops maintenance 2024
Apr 14, 2025 pm 08:39 PM
Centos stops maintenance 2024
Apr 14, 2025 pm 08:39 PM
CentOS will be shut down in 2024 because its upstream distribution, RHEL 8, has been shut down. This shutdown will affect the CentOS 8 system, preventing it from continuing to receive updates. Users should plan for migration, and recommended options include CentOS Stream, AlmaLinux, and Rocky Linux to keep the system safe and stable.
 How to check CentOS HDFS configuration
Apr 14, 2025 pm 07:21 PM
How to check CentOS HDFS configuration
Apr 14, 2025 pm 07:21 PM
Complete Guide to Checking HDFS Configuration in CentOS Systems This article will guide you how to effectively check the configuration and running status of HDFS on CentOS systems. The following steps will help you fully understand the setup and operation of HDFS. Verify Hadoop environment variable: First, make sure the Hadoop environment variable is set correctly. In the terminal, execute the following command to verify that Hadoop is installed and configured correctly: hadoopversion Check HDFS configuration file: The core configuration file of HDFS is located in the /etc/hadoop/conf/ directory, where core-site.xml and hdfs-site.xml are crucial. use
 Centos configuration IP address
Apr 14, 2025 pm 09:06 PM
Centos configuration IP address
Apr 14, 2025 pm 09:06 PM
Steps to configure IP address in CentOS: View the current network configuration: ip addr Edit the network configuration file: sudo vi /etc/sysconfig/network-scripts/ifcfg-eth0 Change IP address: Edit IPADDR= Line changes the subnet mask and gateway (optional): Edit NETMASK= and GATEWAY= Lines Restart the network service: sudo systemctl restart network verification IP address: ip addr
 Centos shutdown command line
Apr 14, 2025 pm 09:12 PM
Centos shutdown command line
Apr 14, 2025 pm 09:12 PM
The CentOS shutdown command is shutdown, and the syntax is shutdown [Options] Time [Information]. Options include: -h Stop the system immediately; -P Turn off the power after shutdown; -r restart; -t Waiting time. Times can be specified as immediate (now), minutes ( minutes), or a specific time (hh:mm). Added information can be displayed in system messages.
 What steps are required to configure CentOS in HDFS
Apr 14, 2025 pm 06:42 PM
What steps are required to configure CentOS in HDFS
Apr 14, 2025 pm 06:42 PM
Building a Hadoop Distributed File System (HDFS) on a CentOS system requires multiple steps. This article provides a brief configuration guide. 1. Prepare to install JDK in the early stage: Install JavaDevelopmentKit (JDK) on all nodes, and the version must be compatible with Hadoop. The installation package can be downloaded from the Oracle official website. Environment variable configuration: Edit /etc/profile file, set Java and Hadoop environment variables, so that the system can find the installation path of JDK and Hadoop. 2. Security configuration: SSH password-free login to generate SSH key: Use the ssh-keygen command on each node
 Centos install mysql
Apr 14, 2025 pm 08:09 PM
Centos install mysql
Apr 14, 2025 pm 08:09 PM
Installing MySQL on CentOS involves the following steps: Adding the appropriate MySQL yum source. Execute the yum install mysql-server command to install the MySQL server. Use the mysql_secure_installation command to make security settings, such as setting the root user password. Customize the MySQL configuration file as needed. Tune MySQL parameters and optimize databases for performance.
 What are the common misunderstandings in CentOS HDFS configuration?
Apr 14, 2025 pm 07:12 PM
What are the common misunderstandings in CentOS HDFS configuration?
Apr 14, 2025 pm 07:12 PM
Common problems and solutions for Hadoop Distributed File System (HDFS) configuration under CentOS When building a HadoopHDFS cluster on CentOS, some common misconfigurations may lead to performance degradation, data loss and even the cluster cannot start. This article summarizes these common problems and their solutions to help you avoid these pitfalls and ensure the stability and efficient operation of your HDFS cluster. Rack-aware configuration error: Problem: Rack-aware information is not configured correctly, resulting in uneven distribution of data block replicas and increasing network load. Solution: Double check the rack-aware configuration in the hdfs-site.xml file and use hdfsdfsadmin-printTopo
