
 Operation and Maintenance
Nginx
How to dynamically generate configuration through nginx+confd in docker
Operation and Maintenance
Nginx
How to dynamically generate configuration through nginx+confd in docker
How to dynamically generate configuration through nginx+confd in docker

When we have more and more projects, manually going to the server to modify the nginx configuration is very troublesome and may go wrong. We can implement a set of solutions to avoid errors and reduce cumbersome processes through nginx confd Configuration Center.
First go directly to the dockerfile of nginx confd
FROM nginx:1.21.6
# 拷贝confd二进制可执行文件 https://github.com/kelseyhightower/confd/releases/tag/v0.16.0
COPY ./confd-0.16.0-linux-amd64 /usr/local/bin/confd
# 拷贝wait-for脚本 https://github.com/Eficode/wait-for
COPY ./wait-for /
# 安装nc支持wait-for脚本
RUN apt-get update \
  && DEBIAN_FRONTEND=noninteractive apt-get install -y \
    net-tools \
  && apt-get clean \
  && rm -rf /var/lib/apt/lists/*
RUN apt-get update \
  && DEBIAN_FRONTEND=noninteractive apt-get install -y \
    netcat \
  && apt-get clean \
  && rm -rf /var/lib/apt/lists/*
# 创建配置文件目录
RUN mkdir -p /etc/confd/conf.d \
# 给可执行权限
&& chmod +x /usr/local/bin/confd \
&& chmod 777 /wait-for \
# 使用脚本启动多进程
&& echo "#!/bin/bash" >> start.sh \
&& echo "nohup /usr/local/bin/confd -config-file /etc/confd/conf/confd.toml &" >> start.sh \
&& echo "nginx -g 'daemon off;'" >> start.sh \
&& chmod 664 ./start.sh
CMD ["bash", "start.sh"]If you don’t want to generate it yourself, you can use:
https://hub.docker.com/repository/docker/ lablelan/nginx-confd
Docker-compose is used here to demonstrate how to use nginx confd etcd etcdkeeper to graphically modify the nginx configuration
version: '2'
networks:
  app-tier:
    driver: bridge
    ipam:
      driver: default
      config:
        - subnet: 172.22.0.0/16
services:
  Etcd:
    image: 'bitnami/etcd:3.5.2'
    environment:
      - ALLOW_NONE_AUTHENTICATION=yes
      - ETCD_ADVERTISE_CLIENT_URLS=http://etcd:2379
    ports:
      - 2379:2379
      - 2380:2380
    networks:
      app-tier:
        ipv4_address: 172.22.0.2
  EtcdKeeper:
    image: 'deltaprojects/etcdkeeper:latest'
      - 8000:8080
        ipv4_address: 172.22.0.3
  Nginx:
    image: 'lablelan/nginx-confd'
    command: sh -c '/wait-for Etcd:2379 -- bash start.sh'
    depends_on:
      - Etcd
    volumes:
      - "./confd.toml:/etc/confd/conf/confd.toml"
      - "./nginx.tmpl:/etc/confd/templates/nginx.tmpl"
      - "./myapp-nginx.toml:/etc/confd/conf.d/myapp-nginx.toml"
      - "./nginx.conf:/etc/nginx/nginx.conf"
      - "./conf.d:/etc/nginx/conf.d"
      - 80:80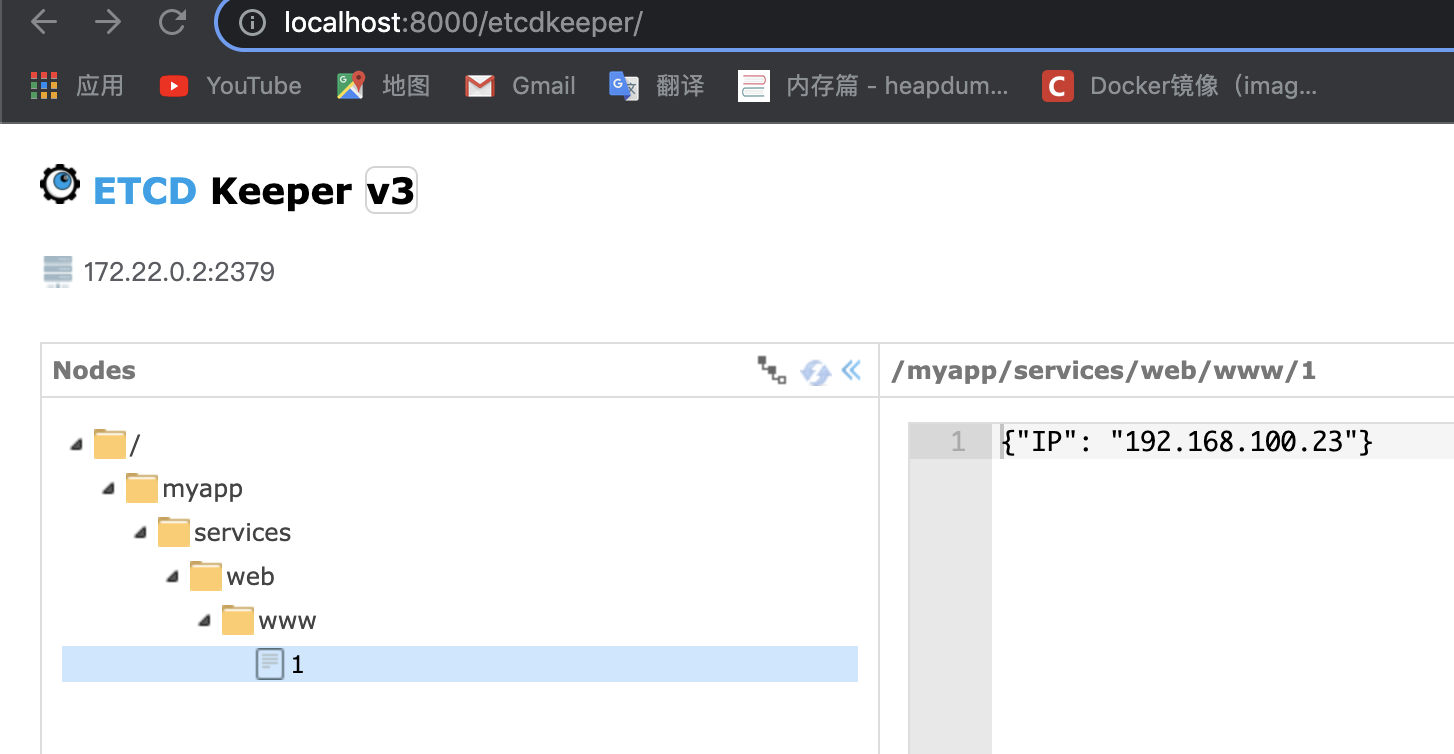
ipv4_address: 172.22.0.4After startup, when /myapp is created or updated through etcdkeeper /services/web/www/1 will dynamically generate nginx configuration (port 80 forwards port 8080) and take effect automatically. The IP configured here is the intranet IP and does not use 127.0.0.1, because the service does not run on the nginx container (note that my local hosts for www.lablelan.com are set to 127.0.0.1)
The service running on port 8080 here is a simple demo service (nodejs). If you need it, you can get it from gitee
https://gitee.com/lablelan/amis-demo
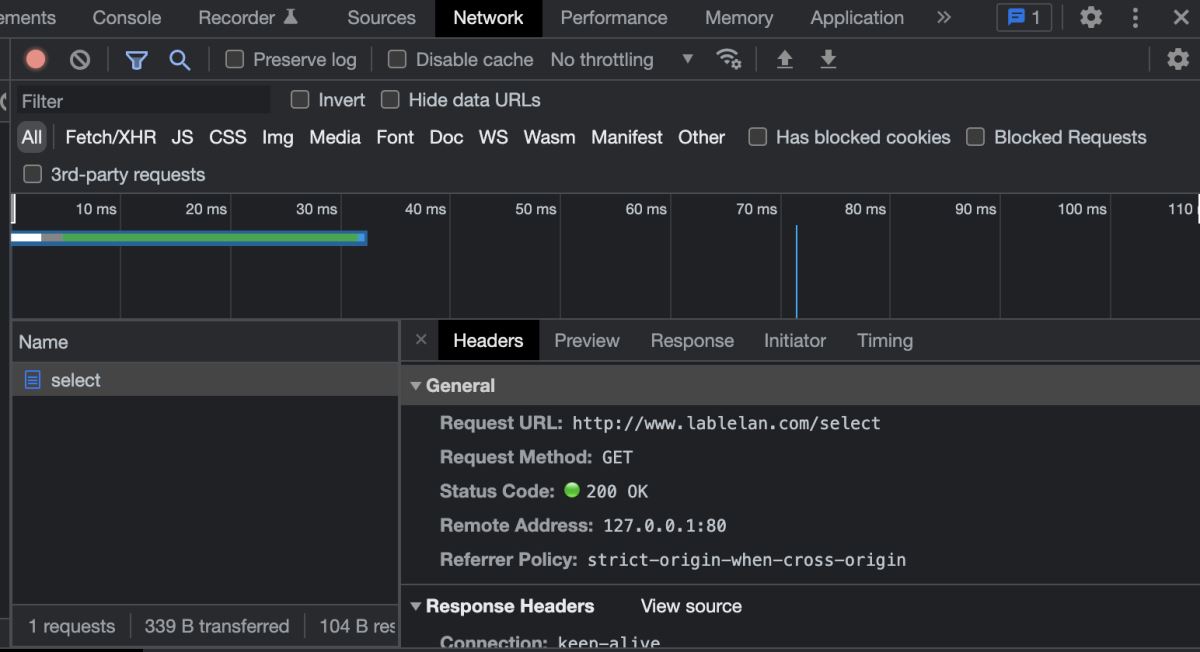
After configuring etcd, we can see that accessing http://www.lablelan.com/select has returned successfully
This may not be the case This does not reflect the practicality of this solution. In fact, we can realize the service discovery function by registering the current service information to etcd in the business code, so that the nginx configuration can be dynamically generated to avoid manual modification of the nginx configuration and reduce errors.
The above is the detailed content of How to dynamically generate configuration through nginx+confd in docker. For more information, please follow other related articles on the PHP Chinese website!

Hot AI Tools

Undresser.AI Undress
AI-powered app for creating realistic nude photos

AI Clothes Remover
Online AI tool for removing clothes from photos.

Undress AI Tool
Undress images for free

Clothoff.io
AI clothes remover

AI Hentai Generator
Generate AI Hentai for free.

Hot Article
Hot Tools

Notepad++7.3.1
Easy-to-use and free code editor

SublimeText3 Chinese version
Chinese version, very easy to use

Zend Studio 13.0.1
Powerful PHP integrated development environment

Dreamweaver CS6
Visual web development tools

SublimeText3 Mac version
God-level code editing software (SublimeText3)
Hot Topics
 1378
1378
 52
52

 How to change the docker image source in China
Apr 15, 2025 am 11:30 AM
How to change the docker image source in China
Apr 15, 2025 am 11:30 AM
You can switch to the domestic mirror source. The steps are as follows: 1. Edit the configuration file /etc/docker/daemon.json and add the mirror source address; 2. After saving and exiting, restart the Docker service sudo systemctl restart docker to improve the image download speed and stability.
 How to use docker desktop
Apr 15, 2025 am 11:45 AM
How to use docker desktop
Apr 15, 2025 am 11:45 AM
How to use Docker Desktop? Docker Desktop is a tool for running Docker containers on local machines. The steps to use include: 1. Install Docker Desktop; 2. Start Docker Desktop; 3. Create Docker image (using Dockerfile); 4. Build Docker image (using docker build); 5. Run Docker container (using docker run).
 How to create a mirror in docker
Apr 15, 2025 am 11:27 AM
How to create a mirror in docker
Apr 15, 2025 am 11:27 AM
Steps to create a Docker image: Write a Dockerfile that contains the build instructions. Build the image in the terminal, using the docker build command. Tag the image and assign names and tags using the docker tag command.
 How to read the docker version
Apr 15, 2025 am 11:51 AM
How to read the docker version
Apr 15, 2025 am 11:51 AM
To get the Docker version, you can perform the following steps: Run the Docker command "docker --version" to view the client and server versions. For Mac or Windows, you can also view version information through the Version tab of the Docker Desktop GUI or the About Docker Desktop menu.
 How to build a private repository by docker
Apr 15, 2025 am 11:06 AM
How to build a private repository by docker
Apr 15, 2025 am 11:06 AM
You can build Docker private repositories to securely store and manage container images, providing strict control and security. The steps include: creating a repository, granting access, deploying a repository, pushing an image, and pulling an image. Advantages include security, version control, reduced network traffic and customization.
 How to call docker lnmp
Apr 15, 2025 am 11:15 AM
How to call docker lnmp
Apr 15, 2025 am 11:15 AM
Docker LNMP container call steps: Run the container: docker run -d --name lnmp-container -p 80:80 -p 443:443 lnmp-stack to get the container IP: docker inspect lnmp-container | grep IPAddress access website: http://<Container IP>/index.phpSSH access: docker exec -it lnmp-container bash access MySQL: mysql -u roo
 How to run the docker command
Apr 15, 2025 am 11:24 AM
How to run the docker command
Apr 15, 2025 am 11:24 AM
How to run Docker commands? Install Docker and start the daemon. Common Docker commands: docker images: display image docker ps: display container docker run: run container docker stop: stop container docker rm: delete container interact with container using Docker command: docker exec: execute command docker attach: attach console docker logs: display log docker commit: commit change to mirror stop Docker daemon: sudo systemctl stop doc
 How to save docker image
Apr 15, 2025 am 11:54 AM
How to save docker image
Apr 15, 2025 am 11:54 AM
To save the image in Docker, you can use the docker commit command to create a new image, containing the current state of the specified container, syntax: docker commit [Options] Container ID Image name. To save the image to the repository, you can use the docker push command, syntax: docker push image name [: tag]. To import saved images, you can use the docker pull command, syntax: docker pull image name [: tag].
