

How to implement simple WeChat right-swipe deletion logic in Vue3

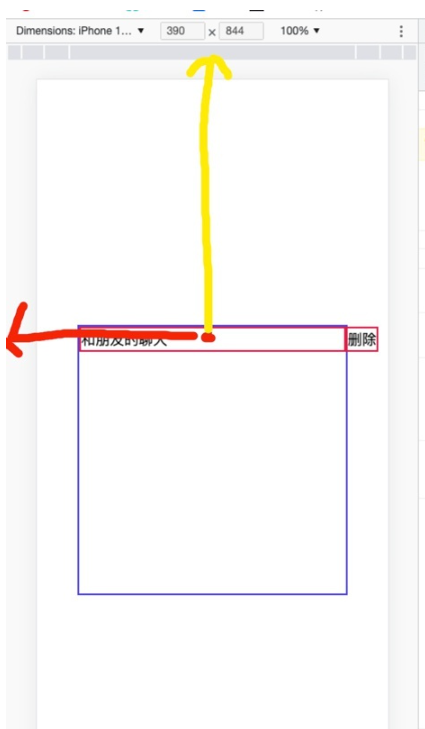
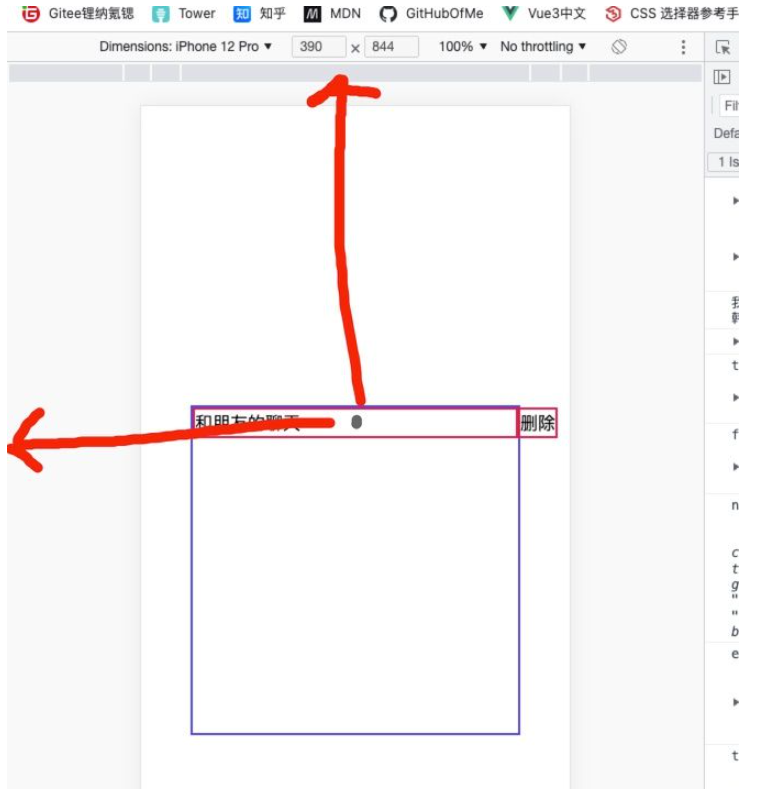
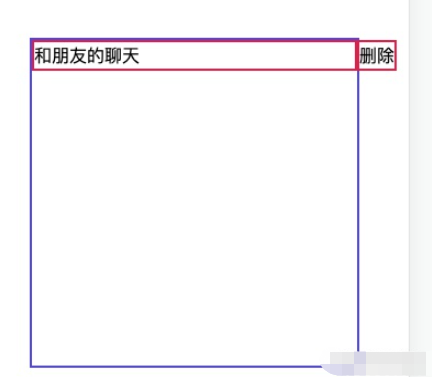
1. Build a simple page
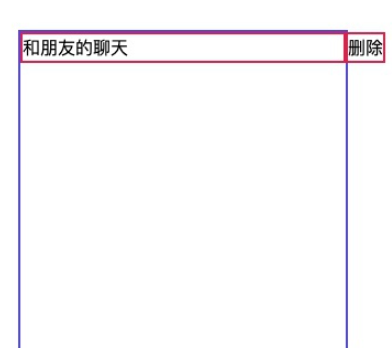
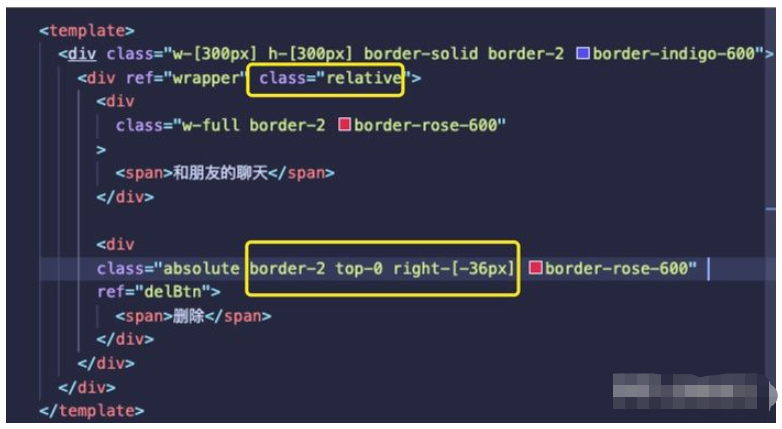
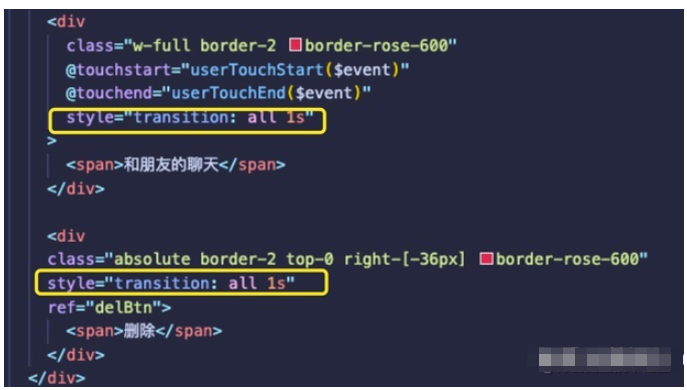
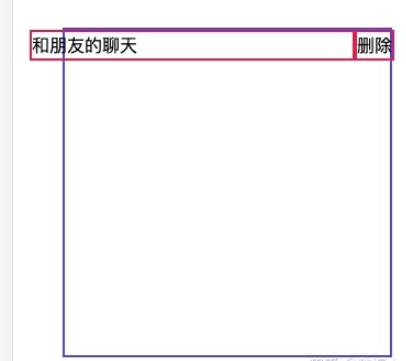
The corresponding code, the interface uses tailwindCSS, the code is very simple, it is ordinary positioning, the key The positioning is outlined in yellow. The value of right is the width of divdelete. Other styles will not be described in detail here.
2. Preconditions
Let’s sort out the ideas first.
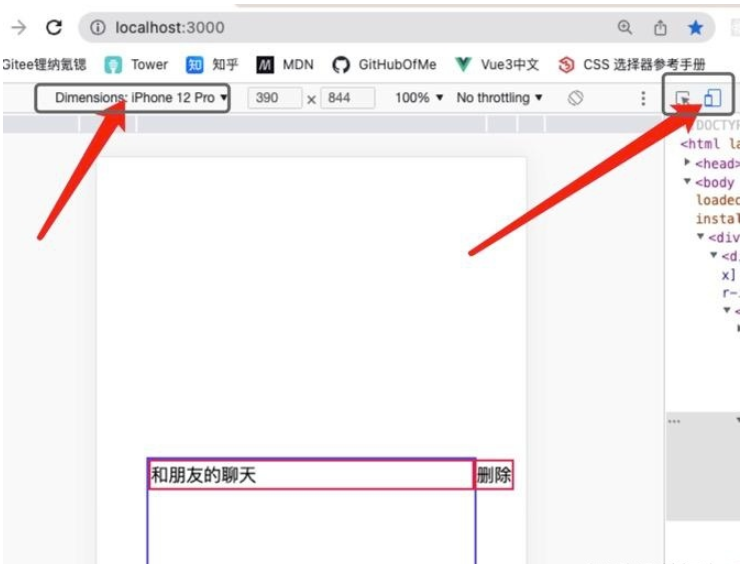
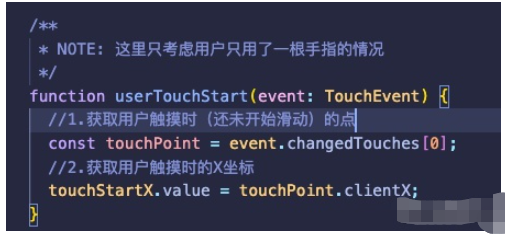
First of all, we need to label the Delete button component with ref, because we will need to use the instance of this div later. (wrapperref is just to optimize the code, we don’t need it for the time being) Here we need to use the TouchEvent event, we test it in the browser developer tools , you need to adjust the adaptive mode to the mobile phone to see the effect.
We bind the two native events @touchstart and @touchend to and friends On this div. Don't be confused here, these two events are the same as the @click event, they are js native events. It is not our own custom event. When it is detected that the user presses = on the screen, $event will be automatically passed to the relative function parameter.

3. Design touchstart function
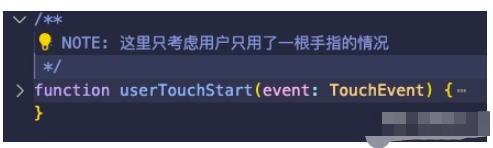
Before that, I would like to explain my NOTE: Why should we consider the situation where the user only uses one finger?
First let us print what properties the event event object passed over has.
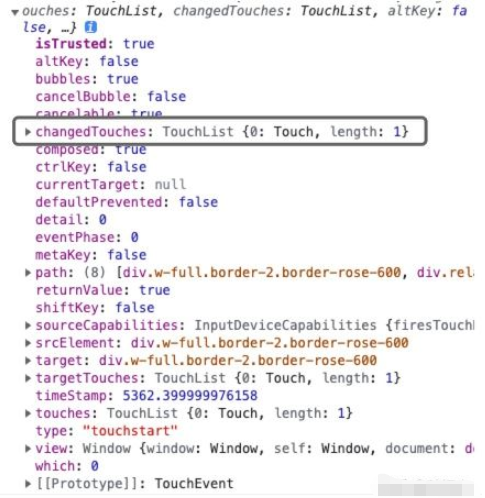
The most critical attribute here is this changedTouches attribute, its value is an array. Let’s first look at how MDN explains this attribute.
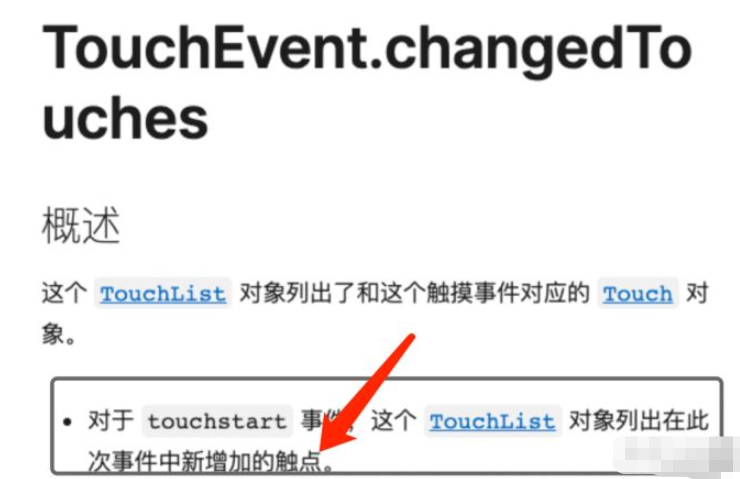
A bit abstract, right? Let me explain what this nonsense actually means.
First we need to understand why this property is an array. When our fingers touch the screen, the browser will capture how many fingers you have touched the screen at this time. We can make some different judgments based on this value. The simplest example is, assuming that the array changedTouches.length is 1, it means that I only touched the screen with one finger, then I can judge when designing the function
if(changedTouches.length>0 && changedTOuches.length<2)
{
TODO...
}and I will You can perform corresponding finger operations based on how many fingers the user touches. Anyone who has used a touchpad knows that two fingers, single finger, three fingers, etc. all correspond to different events. In fact, you can understand why this property is designed as an array.
Here we only consider the situation where the user touches the screen and slides with only one finger.
Corresponding to the code below, we have obtained the point when the user first touches the screen. Here we need to look at what attributes this touchPoint has.
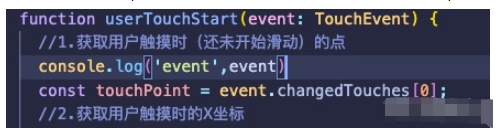
#The most critical attribute of this object is the one circled.

Additional skills supplement clientX and clientY
Let’s first look at how MDN explains it.
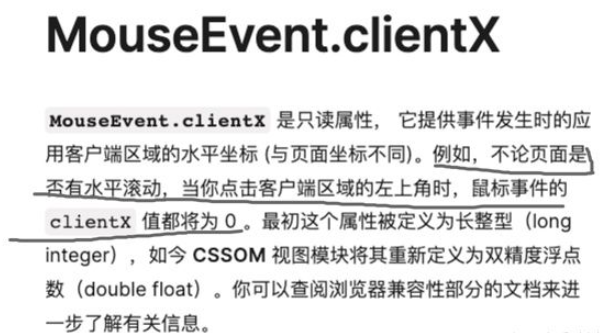
Here we need to focus on understanding this sentence, Be sure to understand this-->regardless of whether the page scrolls horizontally (vertical scrolling corresponds to clientY)
Here we use pictures to talk. The point with the red arrow here represents the coordinates of the point we get when the user touches it , and the distance pointed by the yellow arrow is clientX .
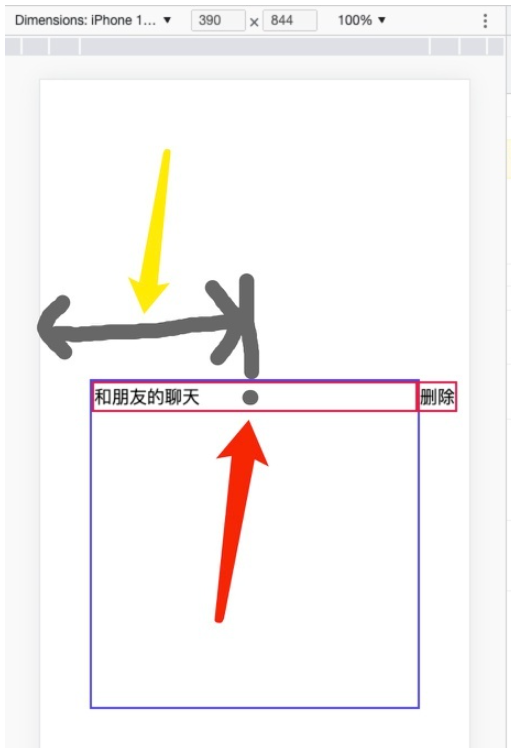
And clientYNeedless to say, it’s just this distance

tips: The distance here is relative to the coordinates of the upper left corner (0, 0), which is the default rule during design
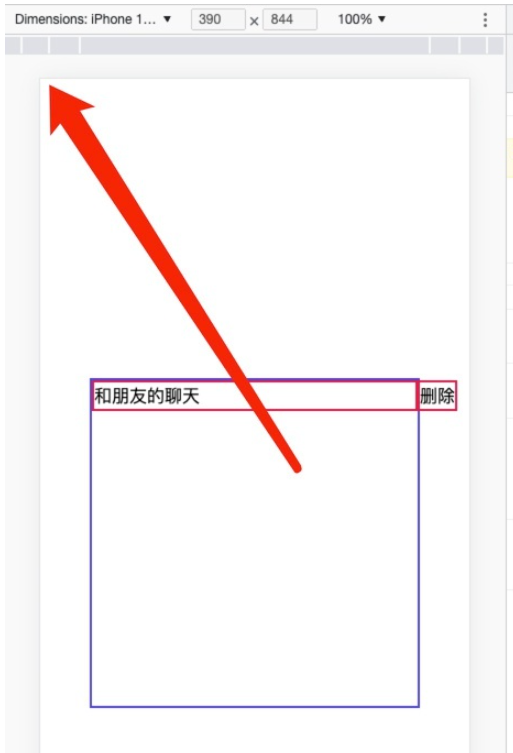
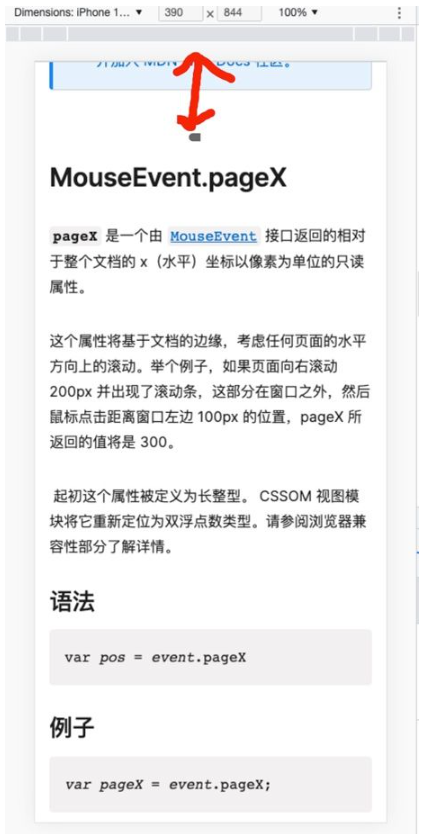
pageX and pageY
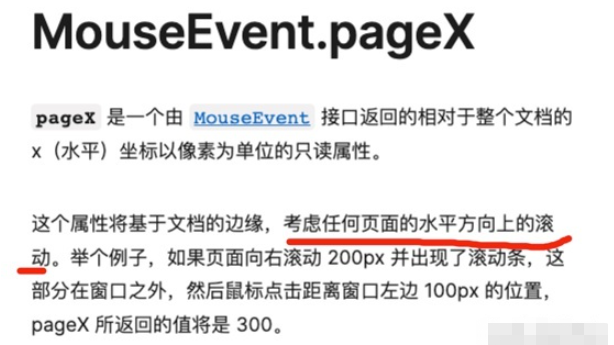
Although we don’t use these two currently, we will expand on them here. Let’s look at MDN’s explanation first.
Here we still focus on understanding the two words scrolling. Because this is the most core difference from clientX.
Since I cannot display this page, I intercepted a page from MDN as an example.
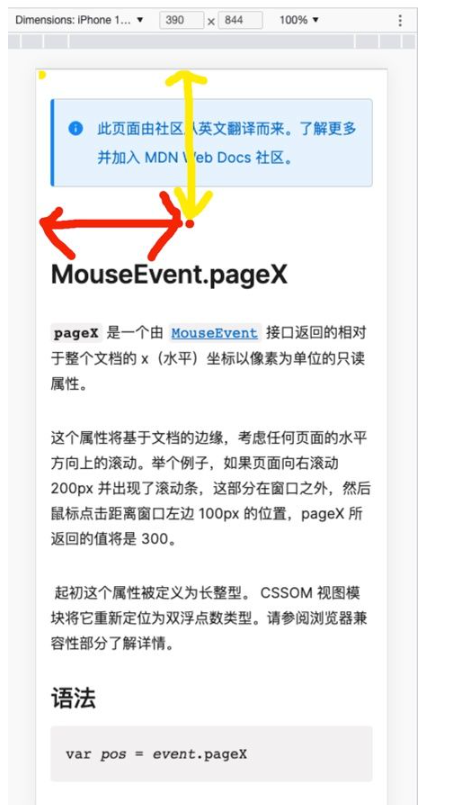
This is the initial interface. It can be seen here that our pageX and pageY are the same as our clientX and clienY are exactly the same, because the starting point is the upper left corner of the page, and the page has not yet scrolled.
But once we scroll down a certain distance, let's say we scroll down 200px.
At this time, the starting point of our pageY is still the starting point of our previous page, not just the distance of the red line above! That is to say, the actual pageY is equal to the red line distance of 200px (because we have not offset to the X axis, pageX is still the original value).
If you understand clientY, you can actually know that at this time pageY=clientY 200px
screenX and screenY
These two properties are basically not used in daily development. Here is a brief introduction.
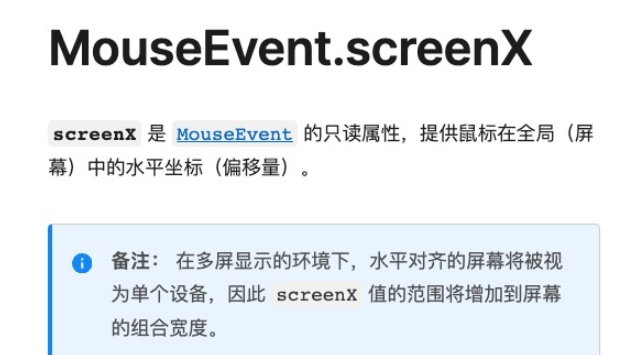
The diagram represents it as follows.
When my screen gets bigger:
ok, we already know the relevant pre-knowledge. Here you can get the value of clientX when the user clicks as a mark.

4. Design the touchend function
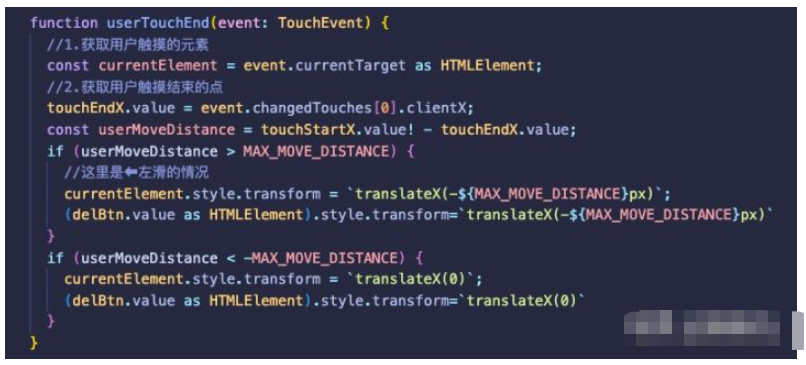
First put the total code, and then We explain it step by step.
First we need to get the specific div touched by the user. Because in the end it's what's going to slide.

Then, just like the touchStart event, when the user touches and releases, an array data changedTouches will also be recorded.


It’s easy to understand, touchStartX-touchEndX you can figure out how far the user has slid ?
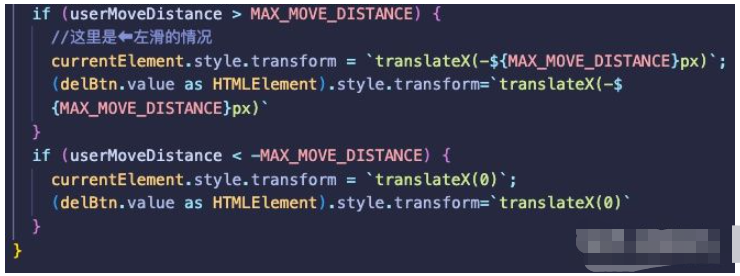
We need a threshold here, which is used to see if the user really wants to slide to the left with this touch and bring up the delete button for operation? In human terms, maybe the user just tapped the screen?
So here we need to simply judge whether the distance the user moved is greater than the threshold we specified. If it is greater, then it is judged that the user has performed this operation. If not, the sliding event is ignored.

Make judgments and perform operations
#The above is just to directly operate the dom to achieve the function, we can be more elegant To solve this mobile problem, readers need to bring their own thinking to achieve it.
5. Add excessive animation
Successfully realized~
##Thinking questions:
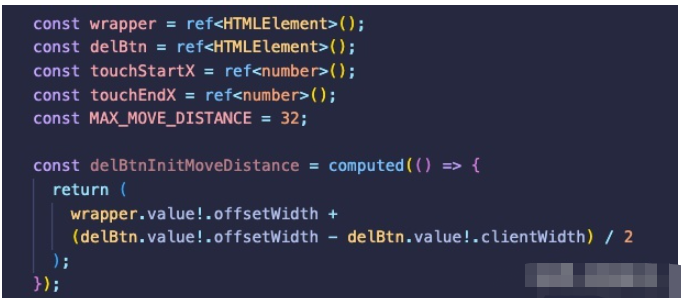
delBtnInitMoveDistance means the distance that the delete button initially moved. Can you tell me what the calculated value is? Why can code be optimized?
The above is the detailed content of How to implement simple WeChat right-swipe deletion logic in Vue3. For more information, please follow other related articles on the PHP Chinese website!

Hot AI Tools

Undresser.AI Undress
AI-powered app for creating realistic nude photos

AI Clothes Remover
Online AI tool for removing clothes from photos.

Undress AI Tool
Undress images for free

Clothoff.io
AI clothes remover

Video Face Swap
Swap faces in any video effortlessly with our completely free AI face swap tool!

Hot Article
Hot Tools

Notepad++7.3.1
Easy-to-use and free code editor

SublimeText3 Chinese version
Chinese version, very easy to use

Zend Studio 13.0.1
Powerful PHP integrated development environment

Dreamweaver CS6
Visual web development tools

SublimeText3 Mac version
God-level code editing software (SublimeText3)
Hot Topics
 1387
1387
 52
52

 How to use tinymce in vue3 project
May 19, 2023 pm 08:40 PM
How to use tinymce in vue3 project
May 19, 2023 pm 08:40 PM
tinymce is a fully functional rich text editor plug-in, but introducing tinymce into vue is not as smooth as other Vue rich text plug-ins. tinymce itself is not suitable for Vue, and @tinymce/tinymce-vue needs to be introduced, and It is a foreign rich text plug-in and has not passed the Chinese version. You need to download the translation package from its official website (you may need to bypass the firewall). 1. Install related dependencies npminstalltinymce-Snpminstall@tinymce/tinymce-vue-S2. Download the Chinese package 3. Introduce the skin and Chinese package. Create a new tinymce folder in the project public folder and download the
 vue3+vite: How to solve the error when using require to dynamically import images in src
May 21, 2023 pm 03:16 PM
vue3+vite: How to solve the error when using require to dynamically import images in src
May 21, 2023 pm 03:16 PM
vue3+vite:src uses require to dynamically import images and error reports and solutions. vue3+vite dynamically imports multiple images. If vue3 is using typescript development, require will introduce image errors. requireisnotdefined cannot be used like vue2 such as imgUrl:require(' .../assets/test.png') is imported because typescript does not support require, so import is used. Here is how to solve it: use awaitimport
 How to refresh partial content of the page in Vue3
May 26, 2023 pm 05:31 PM
How to refresh partial content of the page in Vue3
May 26, 2023 pm 05:31 PM
To achieve partial refresh of the page, we only need to implement the re-rendering of the local component (dom). In Vue, the easiest way to achieve this effect is to use the v-if directive. In Vue2, in addition to using the v-if instruction to re-render the local dom, we can also create a new blank component. When we need to refresh the local page, jump to this blank component page, and then jump back in the beforeRouteEnter guard in the blank component. original page. As shown in the figure below, how to click the refresh button in Vue3.X to reload the DOM within the red box and display the corresponding loading status. Since the guard in the component in the scriptsetup syntax in Vue3.X only has o
 How Vue3 parses markdown and implements code highlighting
May 20, 2023 pm 04:16 PM
How Vue3 parses markdown and implements code highlighting
May 20, 2023 pm 04:16 PM
Vue implements the blog front-end and needs to implement markdown parsing. If there is code, it needs to implement code highlighting. There are many markdown parsing libraries for Vue, such as markdown-it, vue-markdown-loader, marked, vue-markdown, etc. These libraries are all very similar. Marked is used here, and highlight.js is used as the code highlighting library. The specific implementation steps are as follows: 1. Install dependent libraries. Open the command window under the vue project and enter the following command npminstallmarked-save//marked to convert markdown into htmlnpmins
 How to select an avatar and crop it in Vue3
May 29, 2023 am 10:22 AM
How to select an avatar and crop it in Vue3
May 29, 2023 am 10:22 AM
The final effect is to install the VueCropper component yarnaddvue-cropper@next. The above installation value is for Vue3. If it is Vue2 or you want to use other methods to reference, please visit its official npm address: official tutorial. It is also very simple to reference and use it in a component. You only need to introduce the corresponding component and its style file. I do not reference it globally here, but only introduce import{userInfoByRequest}from'../js/api' in my component file. import{VueCropper}from'vue-cropper&
 How to solve the problem that after the vue3 project is packaged and published to the server, the access page displays blank
May 17, 2023 am 08:19 AM
How to solve the problem that after the vue3 project is packaged and published to the server, the access page displays blank
May 17, 2023 am 08:19 AM
After the vue3 project is packaged and published to the server, the access page displays blank 1. The publicPath in the vue.config.js file is processed as follows: const{defineConfig}=require('@vue/cli-service') module.exports=defineConfig({publicPath :process.env.NODE_ENV==='production'?'./':'/&
 How to use Vue3 reusable components
May 20, 2023 pm 07:25 PM
How to use Vue3 reusable components
May 20, 2023 pm 07:25 PM
Preface Whether it is vue or react, when we encounter multiple repeated codes, we will think about how to reuse these codes instead of filling a file with a bunch of redundant codes. In fact, both vue and react can achieve reuse by extracting components, but if you encounter some small code fragments and you don’t want to extract another file, in comparison, react can be used in the same Declare the corresponding widget in the file, or implement it through renderfunction, such as: constDemo:FC=({msg})=>{returndemomsgis{msg}}constApp:FC=()=>{return(
 How to use vue3+ts+axios+pinia to achieve senseless refresh
May 25, 2023 pm 03:37 PM
How to use vue3+ts+axios+pinia to achieve senseless refresh
May 25, 2023 pm 03:37 PM
vue3+ts+axios+pinia realizes senseless refresh 1. First download aiXos and pinianpmipinia in the project--savenpminstallaxios--save2. Encapsulate axios request-----Download js-cookienpmiJS-cookie-s//Introduce aixosimporttype{AxiosRequestConfig ,AxiosResponse}from"axios";importaxiosfrom'axios';import{ElMess
