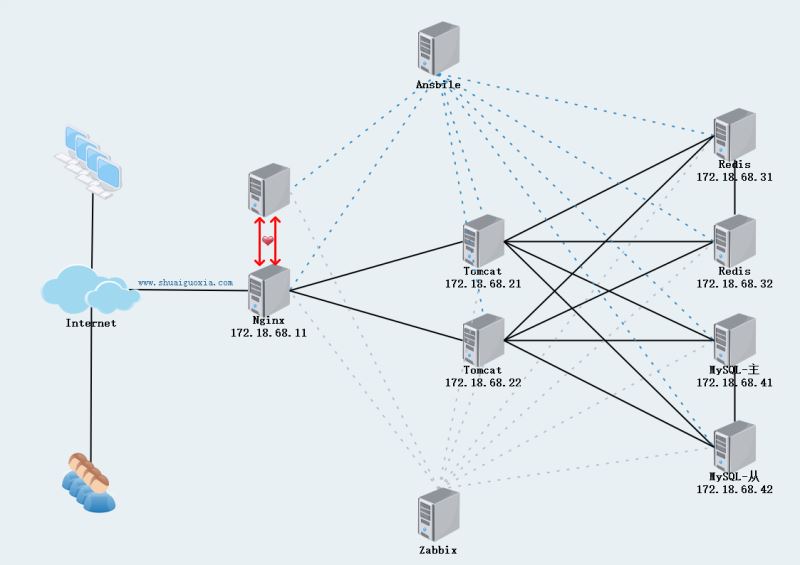
How to implement persistent sessions through Nginx+Tomcat+Redis
Deployment environment
centos7
nginx1.10.2
tomcat7.0
redis3.2.3
mariadb 5.5.44
Required packages
commons-pool2-2.2.jar
jedis-2.5.2.jar
tomcat-redis-session- manager-2.0.0.jar
solo blog

##1. nginx server configuration
Preparation before installation
ntpdate 172.18.0.1iptables -f
yum install nginx
upstream tomcatservers: Create a back-end server group, append
inside the server. Note: The ellipses are other default parameters. If there is no special need, just press the default
vim /etc/nginx/nginx.conf
http {
...
upstream tomcatservers {
 server 172.18.68.21:8080;
 server 172.18.68.22:8080;
 }
...
server {
...
 location / {
  proxy_pass http://tomcatservers;
  }
...
}
}
systemctl start nginxCheck the port
When starting the server, check whether port 80 is listening normally
ss -ntl
Two tomcats The server configuration is exactly the same. Repeat the following steps on both hosts
ntpdate 172.18.0.1
iptables -fyum install tomcat
.war package is copied to the webapps directory After restarting tomcat, tomcat will automatically decompress its files
cp solo-2.4.1.war /usr/share/tomcat/webapps/
systemctl restart tomcat
serverhost as the domain name or IP of the front-end load balancing, if static appears after the deployment is completed When resources cannot be loaded, there is usually something wrong here.
cd /usr/share/tomcat/webapps/solo-2.4/web-inf/classes
vim latke.properties
 #### server ####
 # 配置协议
 serverscheme=http
 # 配置客户端访问站点时的域名或ip,也就是前端nginx的域名
 serverhost=www.shuaiguoxia.com
 # 使用的端口
 serverport=80
The h2 runtime part is used by solo by default. After manually commenting it out, uncomment the mysql runtime part.
Set the username and password of mysql, and then change 172.18.68.41 to the ip address of mysql (main).
#### h2 runtime ####
#runtimedatabase=h2
#jdbc.username=root
#jdbc.password=
#jdbc.driver=org.h2.driver
#jdbc.url=jdbc:h2:~/solo_h2/db
#jdbc.pool=h2
#
#### mysql runtime ####
runtimedatabase=mysql
jdbc.username=root      # 用户名
jdbc.password=123456     # 密码
jdbc.driver=com.mysql.jdbc.driver
jdbc.url=jdbc:mysql://172.18.68.41:3306/solo?useunicode=yes&characterencoding=utf8
jdbc.pool=druid
Tomcat connection reids requires 3 software packages:
commons-pool2-2.2.jar
jedis-2.5.2.jar
tomcat-redis-session-manager-2.0.0.jar
Download address
Copy the required jar package to /usr/share/tomcat/lib/
cp commons-pool2-2.2.jar /usr/share/tomcat/lib/
cp jedis-2.5.2.jar
cp tomcat-redis-session-manager-2.0.0.jar
Modify the contest.xml file and add the following two lines to the file.
ip is the redisip address, and the port is the port that redis listens on
vim /etc/tomcat/context.xml
#
 <valve classname="com.orangefunction.tomcat.redissessions.redissessionhandlervalve" />
 <manager classname="com.orangefunction.tomcat.redissessions.redissessionmanager"
 host="172.18.68.31"
 port="6379"
 database="0"
 maxinactiveinterval="60" />
systemctl restart tomcat
There are two redis servers, one master and one slave. Only the configuration files are different, the other processes are the same.
ntpdate 172.18.0.1
iptables -f
yum install redis
The master node only configures the ip, listening port, and connection password
vim /etc/redis.conf
bind 0.0.0.0       # 监听所有ip
port 6379        # 设定监听的端口
requirepass 123456      # 设定连接的密码
Set the slave node as read-only
bind 0.0.0.0       # 监听所有ip
slaveof 172.18.68.31 6379    # 设定主节点的ip+端口
masterauth 123456      # 主节点的连接密码
slave-read-only yes      # 从节点为只读
shell > redis-cli -h 172.18.68.32  # 连接从服务器redis
127.0.0.1:6379> info replication   # 查看主从复制状态信息
# replication
role:slave
master_host:172.18.68.31     # 主节点ip
master_port:6379       # 主节点的端口
master_link_status:up     # up为主从同步正常
master_last_io_seconds_ago:9
master_sync_in_progress:0
slave_repl_offset:1420
slave_priority:100
slave_read_only:1
connected_slaves:0
master_repl_offset:0
repl_backlog_active:0
repl_backlog_size:1048576
repl_backlog_first_byte_offset:0
repl_backlog_histlen:0
There are two mysql servers, one master and one slave. Only the configuration files are different, the other processes are the same.
ntpdate 172.18.0.1
iptables -f yum install mariadb
#
#
#运行初始化脚本对mysql进行
cd /usr/local/mysql/bin
mysql_secure_installation #mysql初始化脚本,以下为每一项的翻译
先回车
是否设置root密码
输入密码
确认密码
是否设置匿名用户
是否允许root远程登录
删除test数据库
现在是否生效
Master-slave synchronization must enable binary logs, and there are two points in modifying the configuration file.
1.server-id must not conflict
2.Create an authorized user on the main server to give the user replication permissions.
shell > vim /etc/my.cnf
server-id=1           #节点id
log-bin=mysql-bin         #指定二进制日志前缀
relay-log=mysql-relay-bin       #指定relaylog日志前缀
replicate-wild-ignore-table=mysql.%     #排除要复制的表
replicate-wild-ignore-table=test.%
replicate-wild-ignore-table=information_schema.%
Create an authorized user on the main server row so that the slave server has permission to copy the main server data. Authorized users should match the law of least privilege, and the more precise the IP addresses allowed to connect, the better.
musql > grant replication slave on *.* to
 'slave_user'@'10.0.0.67' identified by '123456';
Mysql master-slave configuration is only different in server-id
shell > vim /etc/my.cnf
server-id=2           #节点id
log-bin=mysql-bin         #指定二进制日志前缀
relay-log=mysql-relay-bin       #指定relaylog日志前缀
replicate-wild-ignore-table=mysql.%     #排除要复制的表
replicate-wild-ignore-table=test.%
replicate-wild-ignore-table=information_schema.%
When connecting to the slave server Mysql command line configuration, configure the IP, user name and password of the master node. The most important ones are master_log_file and master_log_pos. These two items are the results of
query on the master node, and they must be the same as the query results on the master node.
# 在mysql主服务器中查询结果
mariadb [(none)]> show master status\g;
*************************** 1. row ***************************
  file: master-log.000003
  position: 18893845
  binlog_do_db:
  binlog_ignore_db:
mysql > change master to
master_host='10.0.0.66',
master_user='slave_user',
master_password='123456',
master_log_file='mysql-bin.000001',
master_log_pos=106;`
View the master-slave in the slave server Synchronization situation. The yes in the last two lines indicates that the master-slave synchronization is successful. You can also query and verify the master-slave synchronization status by querying tables, libraries, and even data.
mariadb [(none)]> show slave status\g;
*************************** 1. row ***************************
   slave_io_state: waiting for master to send event
    master_host: 172.18.68.41
    master_user: slave-user
    master_port: 3306
   connect_retry: 60
   master_log_file: master-log.000002
  read_master_log_pos: 245
   relay_log_file: mysql-relay-bin.000002
   relay_log_pos: 530
 relay_master_log_file: master-log.000002
   slave_io_running: yes
slave_sql_running: yesDeployment completed
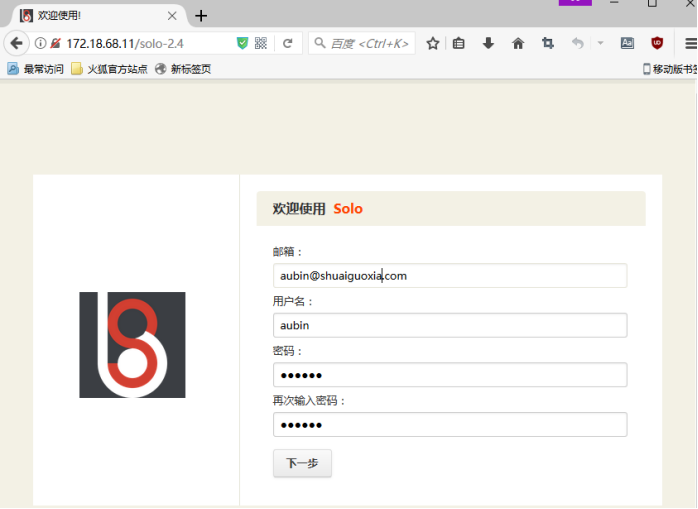
You can access the deployed solo blog by accessing 172.18.68.11/solo-2.4 through the browser. When you enter for the first time, you will be asked to register a user password, which is the administrator. account password.
 No matter how nginx is scheduled, tomcat can save the client's session in redis. You can use the redis management software of windwos to see that there is session information in both the redis master and slave databases.
The above is the detailed content of How to implement persistent sessions through Nginx+Tomcat+Redis. For more information, please follow other related articles on the PHP Chinese website!

Hot AI Tools

Undresser.AI Undress
AI-powered app for creating realistic nude photos

AI Clothes Remover
Online AI tool for removing clothes from photos.

Undress AI Tool
Undress images for free

Clothoff.io
AI clothes remover

Video Face Swap
Swap faces in any video effortlessly with our completely free AI face swap tool!

Hot Article

Hot Tools

Notepad++7.3.1
Easy-to-use and free code editor

SublimeText3 Chinese version
Chinese version, very easy to use

Zend Studio 13.0.1
Powerful PHP integrated development environment

Dreamweaver CS6
Visual web development tools

SublimeText3 Mac version
God-level code editing software (SublimeText3)

Hot Topics
 1387
1387
 52
52
 How to start nginx server
Apr 14, 2025 pm 12:27 PM
Starting an Nginx server requires different steps according to different operating systems: Linux/Unix system: Install the Nginx package (for example, using apt-get or yum). Use systemctl to start an Nginx service (for example, sudo systemctl start nginx). Windows system: Download and install Windows binary files. Start Nginx using the nginx.exe executable (for example, nginx.exe -c conf\nginx.conf). No matter which operating system you use, you can access the server IP
 How to check the name of the docker container
Apr 15, 2025 pm 12:21 PM
You can query the Docker container name by following the steps: List all containers (docker ps). Filter the container list (using the grep command). Gets the container name (located in the "NAMES" column).
 How to run nginx apache
Apr 14, 2025 pm 12:33 PM
To get Nginx to run Apache, you need to: 1. Install Nginx and Apache; 2. Configure the Nginx agent; 3. Start Nginx and Apache; 4. Test the configuration to ensure that you can see Apache content after accessing the domain name. In addition, you need to pay attention to other matters such as port number matching, virtual host configuration, and SSL/TLS settings.
 How to check whether nginx is started
Apr 14, 2025 pm 01:03 PM
How to confirm whether Nginx is started: 1. Use the command line: systemctl status nginx (Linux/Unix), netstat -ano | findstr 80 (Windows); 2. Check whether port 80 is open; 3. Check the Nginx startup message in the system log; 4. Use third-party tools, such as Nagios, Zabbix, and Icinga.
 How to create a mirror in docker
Apr 15, 2025 am 11:27 AM
Steps to create a Docker image: Write a Dockerfile that contains the build instructions. Build the image in the terminal, using the docker build command. Tag the image and assign names and tags using the docker tag command.
 How to start containers by docker
Apr 15, 2025 pm 12:27 PM
Docker container startup steps: Pull the container image: Run "docker pull [mirror name]". Create a container: Use "docker create [options] [mirror name] [commands and parameters]". Start the container: Execute "docker start [Container name or ID]". Check container status: Verify that the container is running with "docker ps".
 How to check whether nginx is started?
Apr 14, 2025 pm 12:48 PM
In Linux, use the following command to check whether Nginx is started: systemctl status nginx judges based on the command output: If "Active: active (running)" is displayed, Nginx is started. If "Active: inactive (dead)" is displayed, Nginx is stopped.


