

How to deal with common errors during MySQL installation


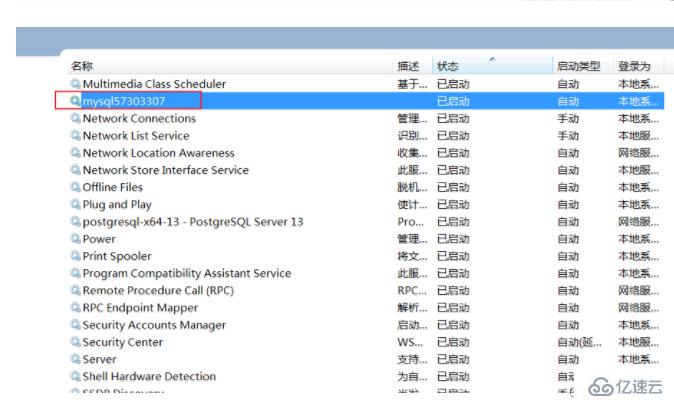
1. Unable to start processing, error 1053
Windows cannot start the Mysql service Error 1053: The service did not respond to the startup or control request in a timely manner
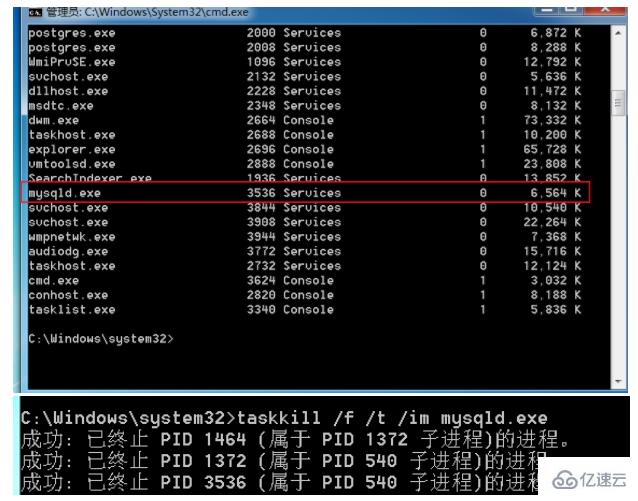
1.1 End the process
Processing method:
1. Type tasklist on the command line to view the process
2. Kill the process according to the process name
taskkill /f /t /im process name

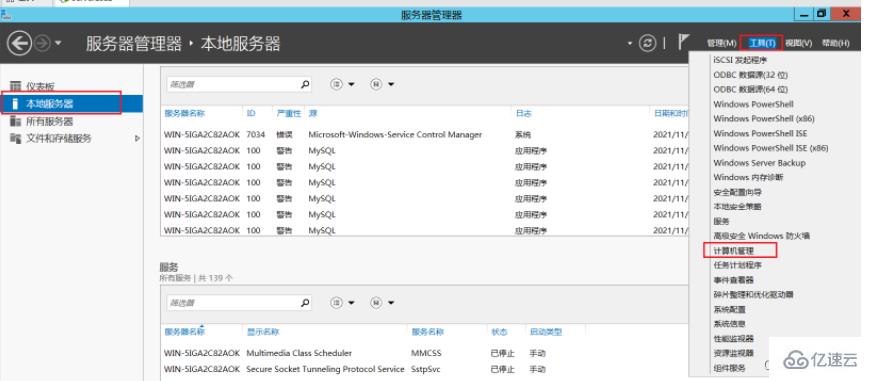
1.2 Change network service
Server2012 location
Other win7 and win10 operating systems
1), Computer->Management->Local Users and Groups->Group, double-click, the effect is as follows:
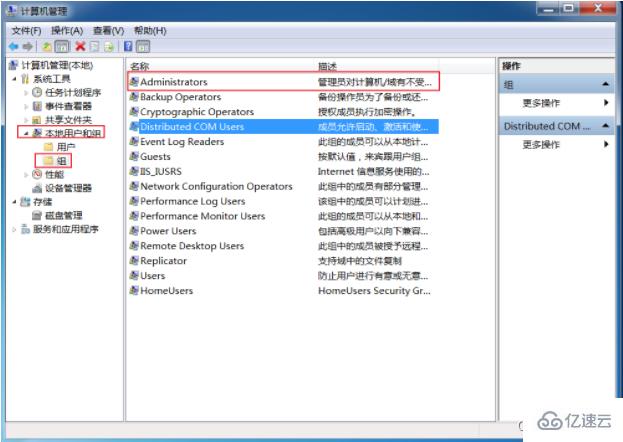
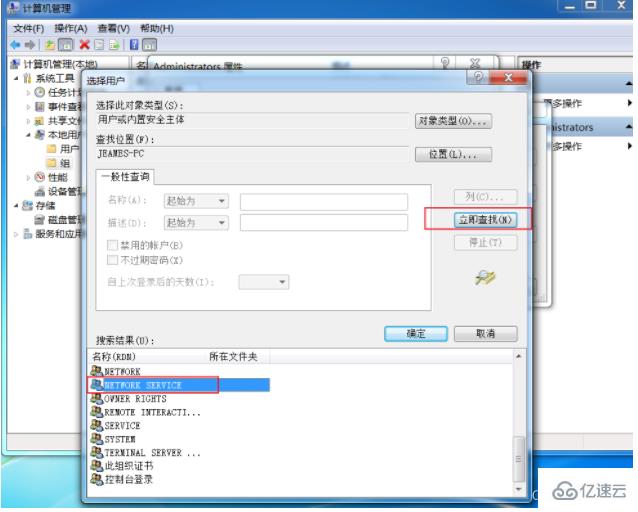
(2) Double-click Administrators, click Add, and then click Advanced
(3) Add NETWORK SERVICE to the Administrators group

Remember here, just reinstall Mysql, perform the 2-step operation again (delete the original Mysql file, just reinstall them all)Another pitfall is that if it still cannot be started, remember to turn on the service Windows Installer
Windows Installer is a general software distribution method used to install software.
By default, the service is started manually and needs to be opened in service management.
Right-click Start - Run - Enter "services.msc" - Windows Installer - Start

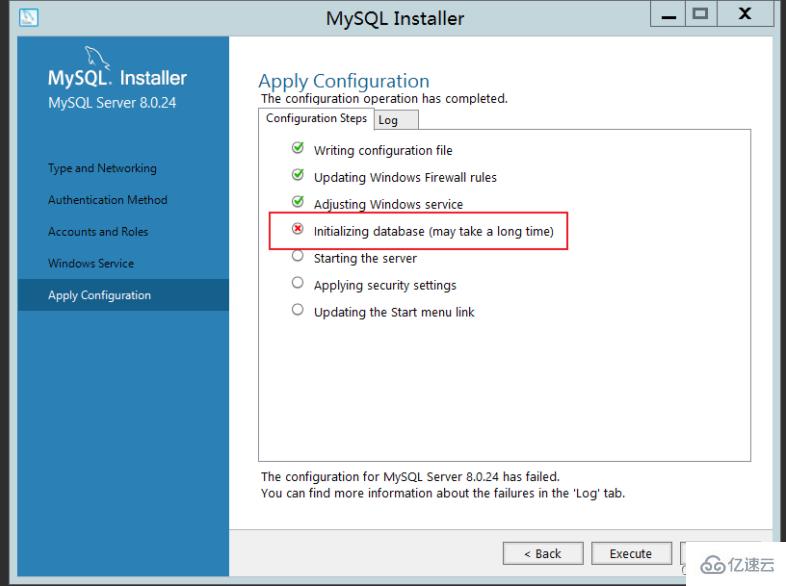
Beginning configuration step: Writing configuration fileSaving my.ini configuration file...
Saved my.ini configuration file.
Ended configuration step: Writing configuration fileBeginning configuration step: Updating Windows Firewall rules

Adding a Windows Firewall rule for MySQL80 on port 3306.
Attempting to add a Windows Firewall rule with command: netsh.exe advfirewall firewall add rule name="Port 3306" protocol=TCP localport=3306 dir=in action=allow
确定。

Successfully added the Windows Firewall rule.
Adding a Windows Firewall rule for MySQL80 on port 33060.
Attempting to add a Windows Firewall rule with command: netsh.exe advfirewall firewall add rule name="Port 33060" protocol=TCP localport=33060 dir=in action=allow
确定。

Successfully added the Windows Firewall rule.
Ended configuration step: Updating Windows Firewall rules

Beginning configuration step: Adjusting Windows serviceAttempting to grant Network Service require filesystem permissions.
Granted permissions.
Adding new serviceNew service added
Ended configuration step: Adjusting Windows serviceBeginning configuration step: Initializing database (may take a long time)Attempting to run MySQL Server with --initialize-insecure option...
Starting process for MySQL Server 8.0.24...
Starting process with command: C:\Program Files\MySQL\MySQL Server 8.0\bin\mysqld.exe --defaults-file="C:\ProgramData\MySQL\MySQL Server 8.0\my.ini" --console --initialize-insecure=on --lower-case-table-names=1...
Process for mysqld, with ID 2572, was run successfully and exited with code -1073741515.
Failed to start process for MySQL Server 8.0.24.
Database initialization failed.
Ended configuration step: Initializing database (may take a long time)
 Install VC_redist.x86 and execute OK
 Enter gpedit. msc, open policy management
 It works normally after enabling certificate update
The openssl version provided by Centos7 by default is 1.0.2. Some php extensions or other software depend on versions 1.1 or above. If you pass If it is low, an error will be reportedlibssl.so.1.1: cannot open shared object file: No such file or directory
There are also errors consistent with the above when executing openssl version. This is because the location of the openssl library is incorrect or not installed. Problems with versions 1.1 and above
If you want to upgrade the openssl version, you need to compile it manually. The error solution is very simple, just install it correctly.
Let’s talk about the specific compilation and installation steps using Centos7 as an example
–openssl version confirmation[root@jeames ~]# openssl version
OpenSSL 1.0.1e-fips 11 Feb 2013
–Compile openssl
tar - xvf openssl-1.1.1g.tar.gz
cd openssl-1.1.1g
./config shared --openssldir=/usr/local/openssl --prefix=/usr/local/openssl
make && make install
–Configuration
After the compilation is completed, use openssl version to check the current openssl version number.
You will find that it is still 1.0.2, so some additional configuration work needs to be done here.
[root@jeames openssl-1.1.1g]# more /etc/ld.so.conf
include ld.so.conf.d/*.conf
[root@jeames openssl-1.1.1g ]# echo “/usr/local/lib64/” >> /etc/ld.so.conf
[root@jeames openssl-1.1.1g]# ldconfig
Use openssl version again to verify the version ,
If it doesn’t work, you can try the following methods,
Execute them in sequence (first back up the old version, then create a soft connection from the installation location of the new version)
mv /usr/bin/openssl /usr/bin/openssl .old
ln -s /usr/local/openssl/bin/openssl /usr/bin/openssl
ln -s /usr/local/openssl/include/openssl /usr/include/openssl
echo "/usr/local/openssl/lib" >> /etc/ld.so.conf
ldconfig -v
4. Unable to log in after MySQL8 is installed
The first method:
1. Use the command to edit the /etc/my.cnf configuration file, namely: vim /etc/my.cnf or vi /etc/my.cnf
2. In Add skip-grant-tables under [mysqld], then save and exit
3. Restart the mysql service: service mysqld restart
4. Change the root user name
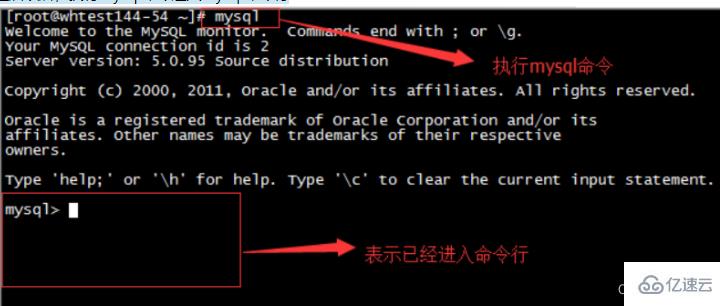
After restarting, execute the mysql command to enter the mysql command line
5. Modify the root user password. Note here that sometimes it will report that modification is not allowed. Just flush privileges first and then execute it.
update mysql.user set authentication_string=password('root') where user='root' ; --5.7 version
flush privileges;
6. Comment out skip-grant-tables in /etc/my.cnf, and then restart mysql, that is: service mysqld restart
Okay, here's the thing You can log in with the new root password!
The second method:
Under the mysql8 system, the following method applies (full path)
G:\mysql-8.0 .23-winx64\bin\mysqld --datadir=G:\mysql-8.0.23-winx64\data80323308 --console --skip-grant-tables --shared-memory

Then open another window and execute the following command
cd G:\mysql-8.0.23-winx64\bin
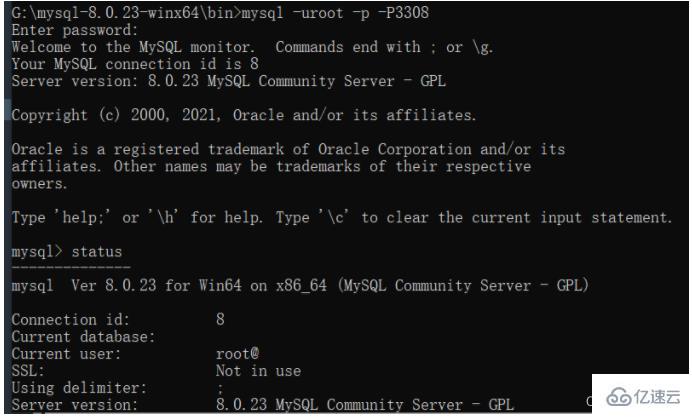
mysql> select user,host,authentication_string from mysql.user;
mysql> delete from mysql.user where user='root' ;
mysql> flush privileges; --Remember to refresh, If the prompt cannot be created
mysql> create user root@'%' identified with mysql_native_password by 'root';
mysql> grant all on . to root@'%' with grant option;
mysql> flush privileges;
mysql> drop user 'root'@'localhost';
mysql> flush privileges;
mysql> create user root@'localhost' identified with mysql_native_password by 'root';
mysql> grant all on . to root@'localhost' with grant option;
mysql> flush privileges;
The above is the detailed content of How to deal with common errors during MySQL installation. For more information, please follow other related articles on the PHP Chinese website!

Hot AI Tools

Undresser.AI Undress
AI-powered app for creating realistic nude photos

AI Clothes Remover
Online AI tool for removing clothes from photos.

Undress AI Tool
Undress images for free

Clothoff.io
AI clothes remover

AI Hentai Generator
Generate AI Hentai for free.

Hot Article
Hot Tools

Notepad++7.3.1
Easy-to-use and free code editor

SublimeText3 Chinese version
Chinese version, very easy to use

Zend Studio 13.0.1
Powerful PHP integrated development environment

Dreamweaver CS6
Visual web development tools

SublimeText3 Mac version
God-level code editing software (SublimeText3)
Hot Topics


 PHP's big data structure processing skills
May 08, 2024 am 10:24 AM
PHP's big data structure processing skills
May 08, 2024 am 10:24 AM
Big data structure processing skills: Chunking: Break down the data set and process it in chunks to reduce memory consumption. Generator: Generate data items one by one without loading the entire data set, suitable for unlimited data sets. Streaming: Read files or query results line by line, suitable for large files or remote data. External storage: For very large data sets, store the data in a database or NoSQL.
 How to use MySQL backup and restore in PHP?
Jun 03, 2024 pm 12:19 PM
How to use MySQL backup and restore in PHP?
Jun 03, 2024 pm 12:19 PM
Backing up and restoring a MySQL database in PHP can be achieved by following these steps: Back up the database: Use the mysqldump command to dump the database into a SQL file. Restore database: Use the mysql command to restore the database from SQL files.
 How to optimize MySQL query performance in PHP?
Jun 03, 2024 pm 08:11 PM
How to optimize MySQL query performance in PHP?
Jun 03, 2024 pm 08:11 PM
MySQL query performance can be optimized by building indexes that reduce lookup time from linear complexity to logarithmic complexity. Use PreparedStatements to prevent SQL injection and improve query performance. Limit query results and reduce the amount of data processed by the server. Optimize join queries, including using appropriate join types, creating indexes, and considering using subqueries. Analyze queries to identify bottlenecks; use caching to reduce database load; optimize PHP code to minimize overhead.
 How to insert data into a MySQL table using PHP?
Jun 02, 2024 pm 02:26 PM
How to insert data into a MySQL table using PHP?
Jun 02, 2024 pm 02:26 PM
How to insert data into MySQL table? Connect to the database: Use mysqli to establish a connection to the database. Prepare the SQL query: Write an INSERT statement to specify the columns and values to be inserted. Execute query: Use the query() method to execute the insertion query. If successful, a confirmation message will be output.
 How to create a MySQL table using PHP?
Jun 04, 2024 pm 01:57 PM
How to create a MySQL table using PHP?
Jun 04, 2024 pm 01:57 PM
Creating a MySQL table using PHP requires the following steps: Connect to the database. Create the database if it does not exist. Select a database. Create table. Execute the query. Close the connection.
 How to use MySQL stored procedures in PHP?
Jun 02, 2024 pm 02:13 PM
How to use MySQL stored procedures in PHP?
Jun 02, 2024 pm 02:13 PM
To use MySQL stored procedures in PHP: Use PDO or the MySQLi extension to connect to a MySQL database. Prepare the statement to call the stored procedure. Execute the stored procedure. Process the result set (if the stored procedure returns results). Close the database connection.
 How to fix mysql_native_password not loaded errors on MySQL 8.4
Dec 09, 2024 am 11:42 AM
How to fix mysql_native_password not loaded errors on MySQL 8.4
Dec 09, 2024 am 11:42 AM
One of the major changes introduced in MySQL 8.4 (the latest LTS release as of 2024) is that the "MySQL Native Password" plugin is no longer enabled by default. Further, MySQL 9.0 removes this plugin completely. This change affects PHP and other app
 The difference between oracle database and mysql
May 10, 2024 am 01:54 AM
The difference between oracle database and mysql
May 10, 2024 am 01:54 AM
Oracle database and MySQL are both databases based on the relational model, but Oracle is superior in terms of compatibility, scalability, data types and security; while MySQL focuses on speed and flexibility and is more suitable for small to medium-sized data sets. . ① Oracle provides a wide range of data types, ② provides advanced security features, ③ is suitable for enterprise-level applications; ① MySQL supports NoSQL data types, ② has fewer security measures, and ③ is suitable for small to medium-sized applications.
