

How to implement firewall NAT control analysis

one. NAT classification
NAT No-pat: Similar to Cisco's dynamic conversion, it only converts the source IP address and network address, but does not convert the port. It is a many-to-many conversion and cannot save public IP addresses, so it is less used
NAPT: (Network Address and Port Translation) is similar to Cisco's PAT conversion. NAPT converts the source address of the packet and also converts the source port.
Output interface address: (Easy-IP) The conversion method is simple and similar to NAPT The same, that is, converting the source address and source port, which is a many-to-one conversion
Smart NAT (intelligent conversion): NAPT conversion by reserving a public network address
Triple NAT: with source IP address, source A kind of conversion related to du port and protocol type
2, black hole routing
Loop and invalid ARP problems in the source address conversion scenario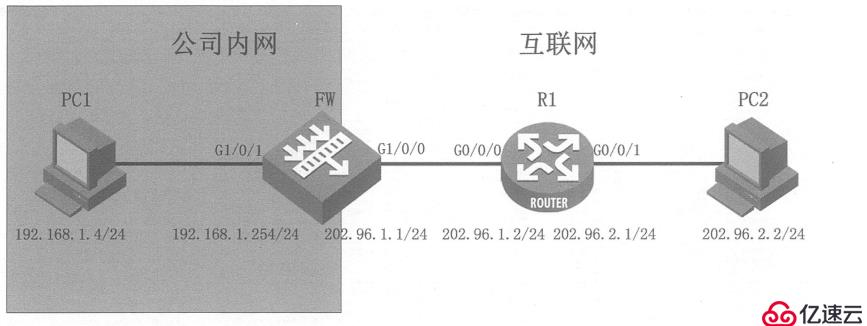

Three, Server-map table
Solve FTP data transmission problems through Server-map table
The session table records connection information, including connection status
Application of Server-map in NAT

The forward entry carries port information, which is used to allow external users to access 202.96.1.10 directly through the Server -map table for target address translation
The reverse entry does not carry port information, and the target address is arbitrary. It is used to enable the server to access the Internet. The prerequisite is that it must be the TCP protocol.
Four, NAT reporting Processing flow of the article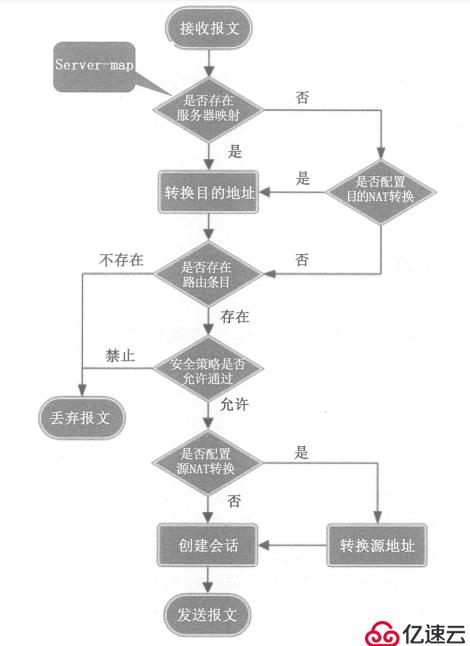
NAT configuration (three methods)
(1)NAT No-pat
Go one way Default route
Configure security policy
Configure NAT address group. In the address group, the address corresponds to the public IP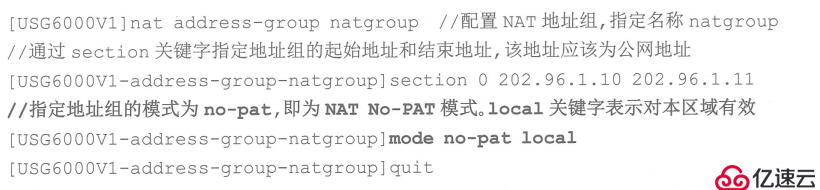
Configure NAT policy
Configure black hole routing for the converted global address (address in the NAT address group) 
Verify the NAT configuration. Use PC1 to ping PC2 on the external network, and you can view the session table![] 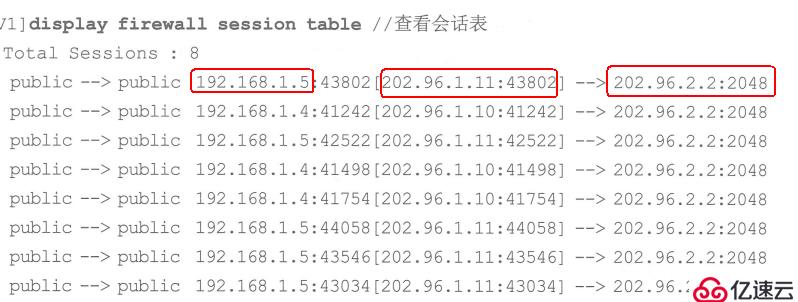
The three red boxes represent the source address, converted address, and accessed address
You can also view the Server-map table

(2) NAPT configuration
Still as shown above, redo NAPT
Configure IP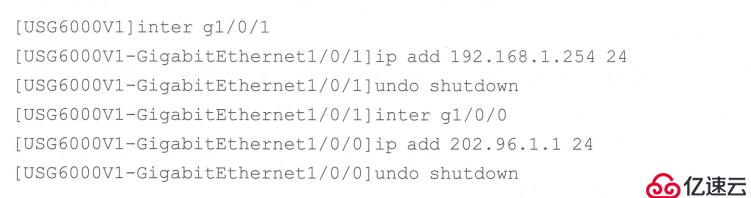

Configure security policy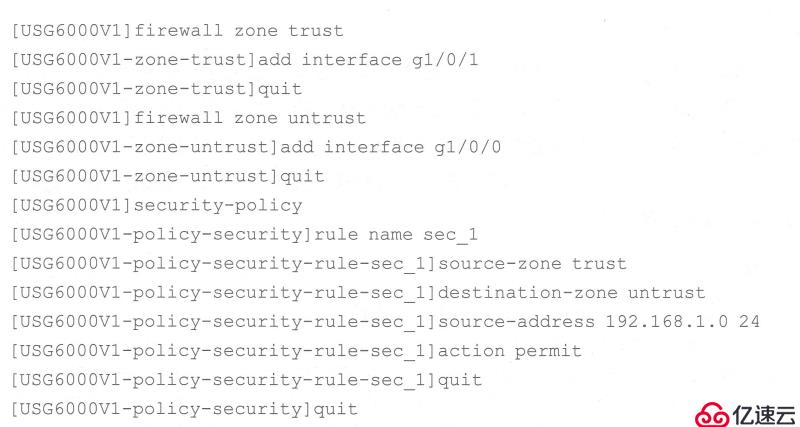
Configure NAT address group, the address group corresponds to the public network IP
Configure NAT policy
Configure routing black hole
Verification As a result, PC1 is used to ping the external network PC2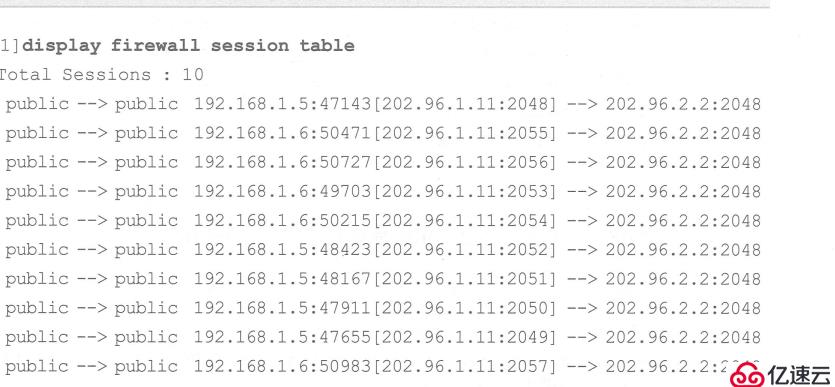

(3) The outbound interface address (Easy-IP) is to use the g0/0/1 interface of the R1 router to access PC2 (reconfigure )
Configure IP
Configure security policy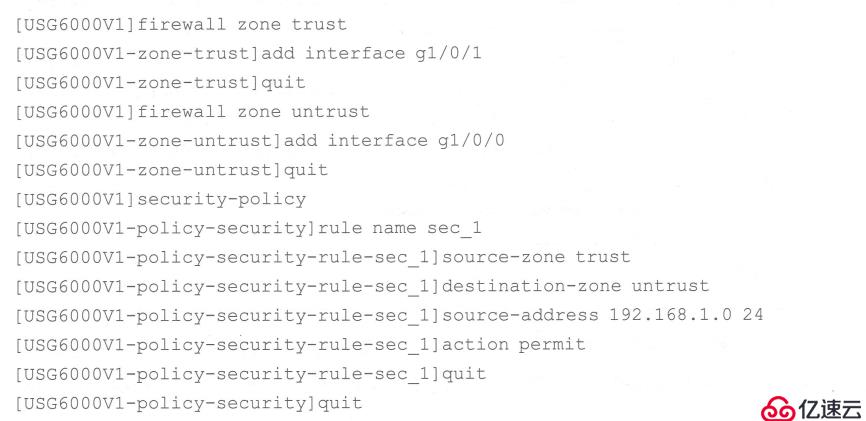
Configure NAT policy
Verification can be found, both It is the converted R1 router g0/0/1 interface IP to access 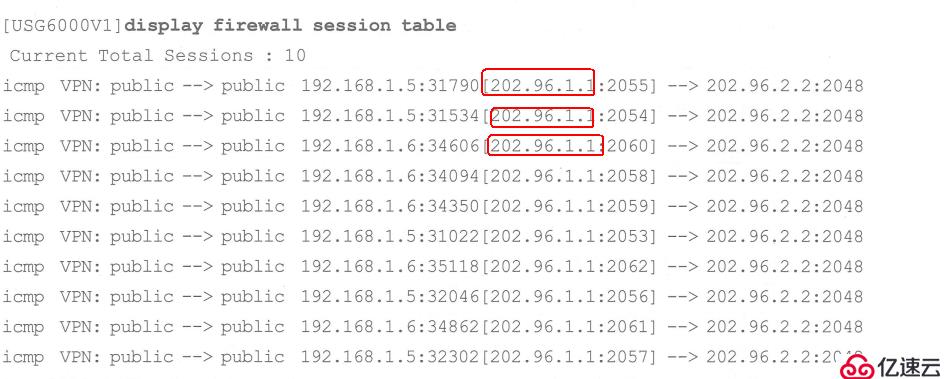
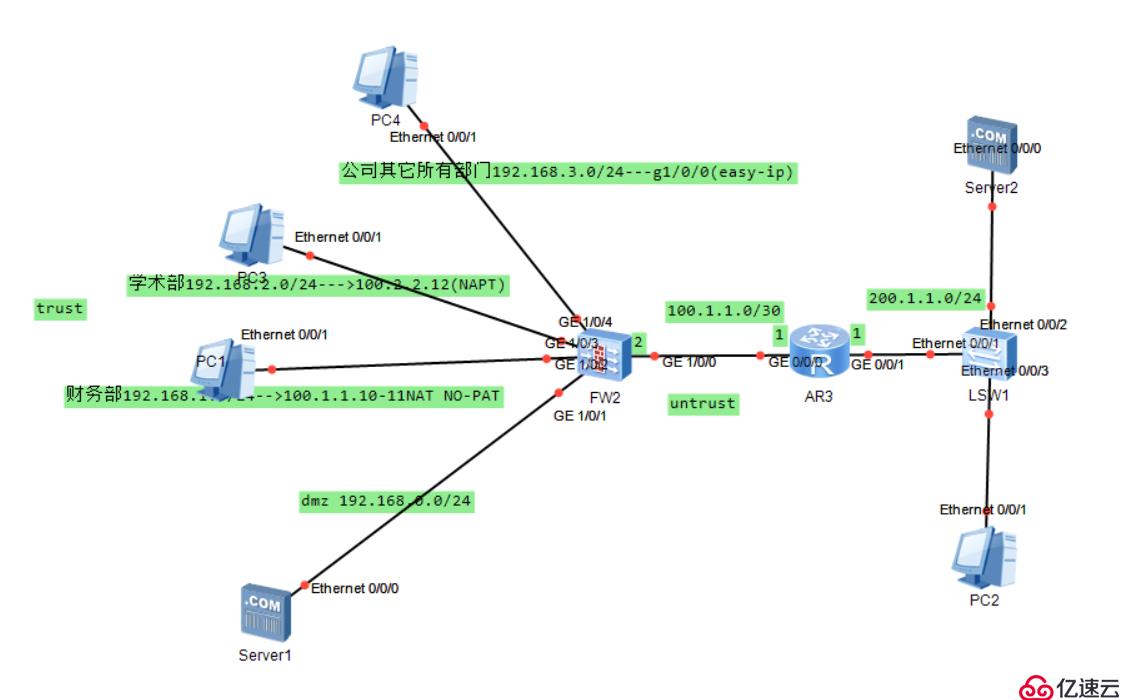
Five, comprehensive case
requirements:
The financial host passes no- pat accesses the internet (using 100.2.2.10-11)
The academic department host accesses the internet through napt (using 100.2.2.12)
Others in the company The department accesses the internet through g1/0/0
Configure natserver to publish the server in dmz (using 100.2.2.9)

1. The financial host accesses the internet through no-pat
1. Configure network parameters and Route
[USG6000V1] int g1/0/2
[USG6000V1-GigabitEthernet1/0/2] ip add 192.168.1.1 24
[USG6000V1-GigabitEthernet1/0/2] undo sh
Info: Interface GigabitEthernet1/0/2 is not shutdown.
[USG6000V1-GigabitEthernet1/0/2] quit
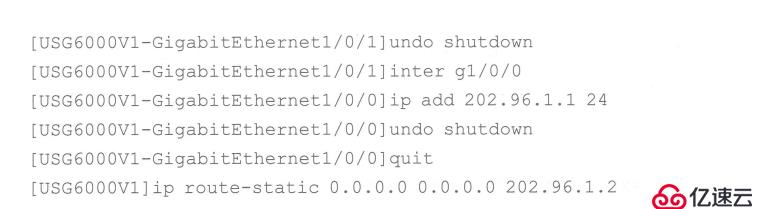
[USG6000V1] int g1/0/0
[USG6000V1-GigabitEthernet1/0/0] ip add 100.1 .1.2 30
[USG6000V1-GigabitEthernet1/0/0] undo sh
[USG6000V1-GigabitEthernet1/0/0] quit
[USG6000V1] i proute-static 0.0.0.0 0.0.0.0 100.1.1.1
2. Configure security policy
[USG6000V1] firewall zone trust
[USG6000V1-zone-trust] add int g1/0/2
[USG6000V1-zone-trust] quit
[USG6000V1] firewall zone untrust
[USG6000V1-zone-untrust] add int g1/0/0
[USG6000V1-zone-untrust] quit
[USG6000V1] security-policy
[USG6000V1-policy-security] rule name sec_1
[USG6000V1-policy-security-rule-sec_1] source-address 192.168.1.0 24
[USG6000V1-policy-security-rule-sec_1] destination-zone untrust
[USG6000V1-policy- security-rule-sec_1] action permit
3. Configure the nat address group. The addresses in the address pool correspond to the public network address
[USG6000V1-policy-security] quit
[USG6000V1] nat address-group natgroup
[USG6000V1-address-group-natgroup] section 0 100.2.2.10 100.2.2.11
[USG6000V1-address-group-natgroup] mode no-pat local
[USG6000V1-address-group-natgroup]
4. Configure nat policy
[USG6000V1] nat-policy
[USG6000V1-policy-nat] rule name natpolicy
[USG6000V1-policy-nat-rule-natpolicy] source-address 192.168.1.0 24
[USG6000V1-policy-nat-rule-natpolicy] destination-zone untrust
[USG6000V1-policy-nat-rule-natpolicy] action nat address-group natgroup
[USG6000V1-policy-nat- rule -natpolicy] quit
[USG6000V1-policy-nat] quit
5. Configure blackhole routing for the translated global address
[USG6000V1] ip route-static 100.2.2.10 32 null 0
[USG6000V1 ] ip route-static 100.2.2.11 32 null 0
6.Configure r1 (isp)sys
Enter system view, return user view with Ctrl Z.
[Huawei] sysname r1
[r1] undo info ena
[r1] int g0/0/0
[r1-GigabitEthernet0/0/0] ip add 100.1.1.1 30
[r1-GigabitEthernet0/0/ 0] int g0/0/1
[r1-GigabitEthernet0/0/1] ip add 200.1.1.1 24
[r1-GigabitEthernet0/0/1] undo sh
[r1-GigabitEthernet0/0/ 1] quit
[r1] ip route-static 100.2.2.8 29 100.1.1.2
7. Test: access the internet server from the financial client
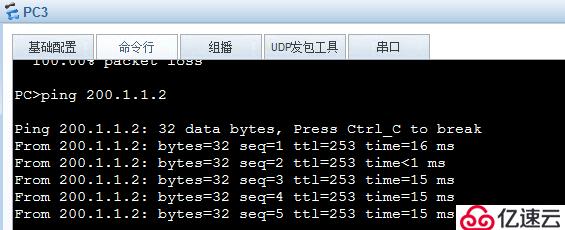
2. Academic Department The host accesses the internet through napt (using 100.2.2.12)
1. Configure network parameters
[USG6000V1] int g1/0/3
[USG6000V1-GigabitEthernet1/0/3] ip add 192.168. 2.1 24
[USG6000V1-GigabitEthernet1/0/3] quit
[USG6000V1] firewall zone trust
[USG6000V1-zone-trust] add int g1/0/3
[USG6000V1-zone-trust ]q uit
2. Configure security policy
[USG6000V1] security-policy
[USG6000V1-policy-security-rule-sec_2] source-address 192.168.2.0 24
[USG6000V1-policy-security -rule-sec_2] destination-zone untrust
[USG6000V1-policy-security-rule-sec_2] action permit
[USG6000V1-policy-security-rule-sec_2] quit
3. Configure nat address group
[USG6000V1] nat address-group natgroup_2.0
[USG6000V1-address-group-natgroup_2.0] section 0 100.2.2.12 100.2.2.12
[USG6000V1-address-group-natgroup_2.0] mode pat
[USG6000V1-address-group-natgroup_2.0] quit
4. Configure nat policy
[USG6000V1] nat-policy
[USG6000V1-policy-nat] rule name natpolicy_2.0
[USG6000V1-policy-nat-rule-natpolicy_2.0] source-address 192.168.2.0 24
[USG6000V1-policy-nat-rule-natpolicy_2.0] destination-zone untrust
[USG6000V1-policy-nat- rule-natpolicy_2.0] action nat address-group natgroup_2.0
[USG6000V1-policy-nat-rule-natpolicy_2.0] quit
[USG6000V1-policy-nat] quit
5. After conversion Global address, configure black hole routing
[USG6000V1] ip route-static 100.2.2.12 32 null 0
6. Verify nat configuration
.
3. Outbound interface address ( easy-ip) enables other departments of the company to access the internet through g1/0/0
1. Configure network parameters
[USG6000V1] int g1/0/4
[USG6000V1-GigabitEthernet1/ 0/4] ip add 192.168.3.1 24
[USG6000V1-GigabitEthernet1/0/4] quit
[USG6000V1] firewall zone trust
[USG6000V1-zone-trust] add int g1/0/4
[USG6000V1-zone-trust]
2. Configure security policy
[USG6000V1] security-policy
[USG6000V1-policy-security] rule name sec_3
[USG6000V1-policy-security-rule-sec_3] source-address 192.168.3.0 24
[USG6000V1-policy-security-rule-sec_3] destination-zone untrust
[USG6000V1-policy-security-rule-sec_3] action permit
[USG6000V1-policy-security-rule-sec_3] quit
[USG6000V1-policy-security] quit
3. Configure nat policy
[USG6000V1] nat-policy
[USG6000V1 -policy-nat] rule name natpolicy_3.0
[USG6000V1-policy-nat-rule-natpolicy_3.0] source-address 192.168.3.0 24
[USG6000V1-policy-nat-rule-natpolicy_3.0] destination -zone untrust
[USG6000V1-policy-nat-rule-natpolicy_3.0] action nat easy-ip
[USG6000V1-policy-nat-rule-natpolicy_3.0] quit
[USG6000V1-policy-nat ] quit
4. Verify easy-ip
1) Ping test
4. Configure natserver to publish the server in dmz (use 100.2.2.9)
1. Configure network parameters
[USG6000V1-GigabitEthernet1/0/0] int g1/0/1
[USG6000V1-GigabitEthernet1/0/1] ip add 192.168.0.1 24
[USG6000V1-GigabitEthernet1/ 0/1] quit
[USG6000V1] firewall zone dmz
[USG6000V1-zone-dmz] add int g1/0/1
[USG6000V1-zone-dmz] quit
2. Configure security policy
[USG6000V1] security-policy
[USG6000V1-policy-security] rule name sec_4
[USG6000V1-policy-security-rule-sec_4] source-zone untrust
[USG6000V1-policy-security- rule-sec_4] destination-address 192.168.0.0 24
[USG6000V1-policy-security-rule-sec_4] action permit
[USG6000V1-policy-security] quit
3. Configure ftp application layer detection (this The step can be omitted, it is enabled by default)
[USG6000V1] firewall inter trust untrust
[USG6000V1-interzone-trust-untrust] detect ftp
[USG6000V1-interzone-trust-untrust] quit
4. Configure nat server
[USG6000V1] nat server natserver global 100.2.2.9 inside 192.168.0.2
5. Configure black hole routing
[USG6000V1] ip route-static 100.2.2.9 32 null 0
6. Verify
1) Access the server in dmz on the internet host


The above is the detailed content of How to implement firewall NAT control analysis. For more information, please follow other related articles on the PHP Chinese website!

Hot AI Tools

Undresser.AI Undress
AI-powered app for creating realistic nude photos

AI Clothes Remover
Online AI tool for removing clothes from photos.

Undress AI Tool
Undress images for free

Clothoff.io
AI clothes remover

AI Hentai Generator
Generate AI Hentai for free.

Hot Article
Hot Tools

Notepad++7.3.1
Easy-to-use and free code editor

SublimeText3 Chinese version
Chinese version, very easy to use

Zend Studio 13.0.1
Powerful PHP integrated development environment

Dreamweaver CS6
Visual web development tools

SublimeText3 Mac version
God-level code editing software (SublimeText3)
Hot Topics
 1378
1378
 52
52

 How to fix 'Error: 0x80070185, Cloud operation was unsuccessful” in OneDrive
May 16, 2023 pm 04:26 PM
How to fix 'Error: 0x80070185, Cloud operation was unsuccessful” in OneDrive
May 16, 2023 pm 04:26 PM
OneDrive is a popular cloud storage application provided by Microsoft. Most of us use OneDrive to store our files, folders, documents, etc. But some users complained that when they try to access shared files on OneDrive, it gives an error stating “Error: 0x80070185, Cloud operation was unsuccessful”. Therefore, they cannot perform any operations on OneDrive such as copying files, pasting, downloading shared files, etc. Nowadays, it is necessary to use these operations in our daily work. This error can be easily solved and for this we have some methods that we can apply and try to solve the problem. let's start! Method 1 – Sign out and sign back in to OneDrive app steps
 NAT Boost vs. Qos for games; which one is better?
Feb 19, 2024 pm 07:00 PM
NAT Boost vs. Qos for games; which one is better?
Feb 19, 2024 pm 07:00 PM
In today's situation where almost all games are online, it is not advisable to ignore the optimization of home network. Almost all routers are equipped with NATBoost and QoS features designed to enhance users' gaming experience. This article will explore the definition, advantages and disadvantages of NATBoost and QoS. NATBoost vs. Qos for games; which one is better? NATBoost, also known as Network Address Translation Boost, is a feature built into routers that improves their performance. It's especially important for gaming because it helps reduce network latency, which is the time it takes for data to be transferred between the gaming device and the server. By optimizing the data processing method within the router, NATBoost achieves faster data processing speed and lower latency, thus changing the
 8 Big Fixes if Grammarly Not Working on Windows 10 Browser
May 05, 2023 pm 02:16 PM
8 Big Fixes if Grammarly Not Working on Windows 10 Browser
May 05, 2023 pm 02:16 PM
If you have syntax issues on your Windows 10 or 11 PC, this article will help you solve the problem. Grammarly is one of the most popular typing assistants for fixing grammar, spelling, clarity, and more. It has become an essential part of writing professionals. However, if it doesn't work properly, it can be a very frustrating experience. Many Windows users have reported that this tool does not work well on their computers. We did an in-depth analysis and found the cause and solution of this problem. Why doesn't Grammarly work on my PC? Grammarly on PC may not work properly due to several common reasons. It includes the following
 Win11 firewall advanced settings gray solution
Dec 24, 2023 pm 07:53 PM
Win11 firewall advanced settings gray solution
Dec 24, 2023 pm 07:53 PM
When setting up the firewall, many friends found that their win11 firewall advanced settings were grayed out and unable to be clicked. This may be caused by not adding a control unit, or by not opening the advanced settings in the correct way. Let’s take a look at how to solve it. Win11 firewall advanced settings gray method one: 1. First, click the start menu below, search and open "Control Panel" at the top 2. Then open "Windows Defender Firewall" 3. After entering, you can open "Advanced Settings" in the left column . Method 2: 1. If the above method cannot be opened, you can right-click "Start Menu" and open "Run" 2. Then enter "mmc" and press Enter to confirm opening. 3. After opening, click on the upper left
 Fix: Windows 11 Firewall blocks printer
May 01, 2023 pm 08:28 PM
Fix: Windows 11 Firewall blocks printer
May 01, 2023 pm 08:28 PM
Firewalls monitor network traffic and can block network connections for certain programs and hardware. Windows 11 includes its own Windows Defender Firewall, which may block printers from accessing the web. Therefore, affected users cannot use their Brother printers when the firewall blocks it. Keep in mind that this issue affects other brands as well, but today we’ll show you how to fix it. Why is my Brother printer blocked by the firewall? There are several causes for this issue, and you will most likely need to open certain ports before your printer can access the network. Printer software can also cause problems, so be sure to update it as well as your printer driver. Read on to learn how
 How to enable or disable firewall on Alpine Linux?
Feb 21, 2024 pm 12:45 PM
How to enable or disable firewall on Alpine Linux?
Feb 21, 2024 pm 12:45 PM
On AlpineLinux, you can use the iptables tool to configure and manage firewall rules. Here are the basic steps to enable or disable the firewall on AlpineLinux: Check the firewall status: sudoiptables -L If the output shows rules (for example, there are some INPUT, OUTPUT, or FORWARD rules), the firewall is enabled. If the output is empty, the firewall is currently disabled. Enable firewall: sudoiptables-PINPUTACCEPTsudoiptables-POUTPUTACCEPTsudoiptables-PFORWARDAC
 Resolve error code 0xc004f074 when activating Windows 11.
May 08, 2023 pm 07:10 PM
Resolve error code 0xc004f074 when activating Windows 11.
May 08, 2023 pm 07:10 PM
After installing the latest operating system on your PC, activating your copy of Windows 11 is the main job. Not only does it unlock the true potential of the Windows 11 operating system, but it also gets rid of the annoying "Activate your Windows 11" message. However, for some users, Windows 11 activation error 0xc004f074 hinders the smooth progress of activation. This bug apparently prevents users from activating Windows 11 and forces them to use an operating system with limited functionality. Windows 11 activation error code 0xc004f074 is related to the Key Management Service. You will encounter this problem when KMS is unavailable. Okay, that's it for this tutorial
 How to remove the firewall logo on the Win10 desktop icon?
Jan 01, 2024 pm 12:21 PM
How to remove the firewall logo on the Win10 desktop icon?
Jan 01, 2024 pm 12:21 PM
Many friends who use win10 system find that there is a firewall logo on the icon on the computer desktop. What is going on? This makes many friends with obsessive-compulsive disorder particularly uncomfortable. In fact, we only need to open the control panel and click " It can be solved by changing "Change User Account Control Settings". Let's take a look at the specific tutorial. How to cancel the firewall logo on the desktop icon in Windows 10 1. First, right-click the Start menu button next to the computer startup screen, and then select the Control Panel function from the pop-up menu. 2. Then select the "User Account" option and select the "Change User Account Control Settings" item from the new interface that appears. 3. After adjusting the slider in the window to the bottom, click Confirm to exit.
