How Docker uses nginx to build a tomcat cluster
First create the tomcat folder. In order to facilitate the configuration of docker, I will create it directly in the root directory. Step 1: Create the folder: publish the folder
mkdir -p /docker/tomcat/webapp8081

mkdir -p /docker/tomcat/webapp8082

mkdir -p /docker/tomcat/webapp8083
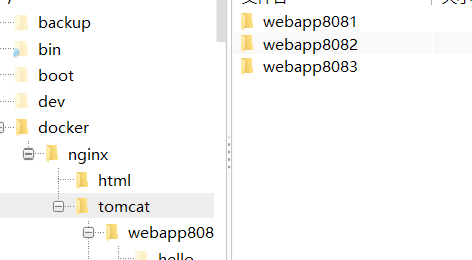
Step 2: Create a tomcat container (the port can be changed according to your actual situation)
docker run -d --name tomcat8081 -p 8081:8080 -v /docker/tomcat/webapp8081:/usr/local/tomcat/webapps/ tomcat
docker run -d --name tomcat8082 -p 8082:8080 -v /docker/tomcat/webapp8082:/usr/local/tomcat/webapps/ tomcat
docker run -d --name tomcat8083 -p 8083:8080 -v /docker/tomcat/webapp8083:/usr/local/tomcat/webapps/ tomcat
After the creation is completed, use the docker ps command to check whether the creation is successful and use

Step 3: Check tomcat’s ip. Use the command to query. Only the first example is used.
docker inspect tomcat8081
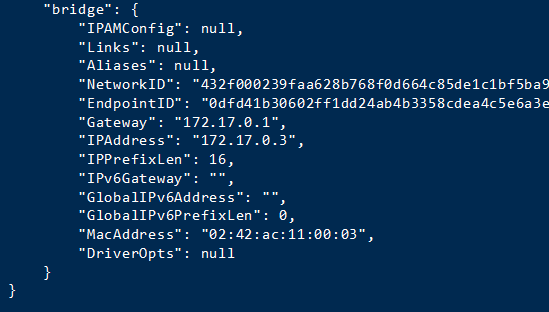
Step 4: In order to facilitate testing, I will not upload the war package here, and directly create a hello/index.html file in it
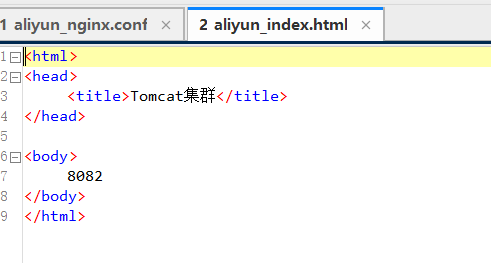
Note: If nginx is docker The container must use the tomact container ip, otherwise it will not be connected.
First download the official version of nginx from the official website
Official website:
Click download on the right navigation bar to enter the download Select the corresponding version in the interface to download. I will use nginx-1.6.2.tar
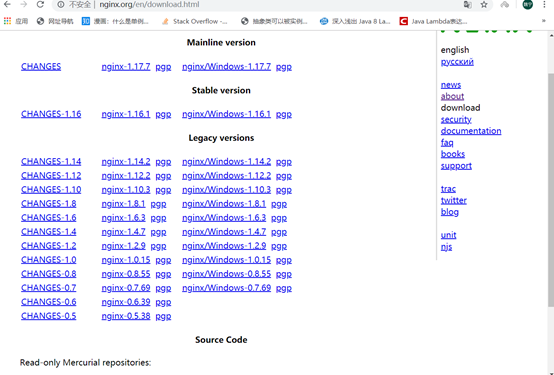
After the download is completed, put the file in a custom folder. Here I will Place it in /usr/local/tools/nginx-1.6.2

Use this command to decompress nginx:
tar vxf nginx-1.6 .2.tar.gz
After decompression is completed, I return to the root directory and create a host folder in the root directory. The purpose is to create files so that nginx can be mounted (you can also Customized)
Create the host folder here
mkdir -p /docker/nginx/
vim /docker/nginx/nginx.conf
mkdir -p /docker/nginx/html
Copy the index.html 50x.html in the html folder in negix you decompressed to the /docker/nginx/html folder
Here is a negix conf file. If you add annotations, the format may change. Remember to delete the annotations.
nginx.conf:
user root;
worker_processes 2; #Set your number of threads here
#error_log logs/error.log;
#error_log logs/error.log notice;
#error_log logs/error.log info;
#pid logs/nginx.pid;
events {
worker_connections 1024; #最大连接数量
}
http {
include mime.types;
default_type application/octet-stream;
upstream mytomcat{
server 172.17.0.3:8080 weight=10;
# 另外mytomcat 这里名字和下方的名字保持一致 这里需要和你的tomcat ip保持一致
server 172.17.0.4:8080 weight=50;
server 172.17.0.5:8080 weight=10;
}
#log_format main '$remote_addr - $remote_user [$time_local] "$request" '
# '$status $body_bytes_sent "$http_referer" '
# '"$http_user_agent" "$http_x_forwarded_for"';
#access_log logs/access.log main;
sendfile on;
#tcp_nopush on;
#keepalive_timeout 0;
keepalive_timeout 65;
#gzip on;
server {
listen 80;
server_name mytomcat;
#charset koi8-r;
#access_log logs/host.access.log main;
location / {
# root html;
# index index.html index.htm;
proxy_connect_timeout 50;
proxy_read_timeout 10;
proxy_send_timeout 20;
proxy_pass http://mytomcat;
}
#error_page 404 /404.html;
# redirect server error pages to the static page /50x.html
#
error_page 500 502 503 504 /50x.html;
location = /50x.html {
root html;
}
# proxy the php scripts to apache listening on 127.0.0.1:80
#
#location ~ \.php$ {
# proxy_pass http://127.0.0.1;
#}
# pass the php scripts to fastcgi server listening on 127.0.0.1:9000
#
#location ~ \.php$ {
# root html;
# fastcgi_pass 127.0.0.1:9000;
# fastcgi_index index.php;
# fastcgi_param script_filename /scripts$fastcgi_script_name;
# include fastcgi_params;
#}
# deny access to .htaccess files, if apache's document root
# concurs with nginx's one
#
#location ~ /\.ht {
# deny all;
#}
}
# another virtual host using mix of ip-, name-, and port-based configuration
#
#server {
# listen 8000;
# listen somename:8080;
# server_name somename alias another.alias;
# location / {
# root html;
# index index.html index.htm;
# }
#}
# https server
#
#server {
# listen 443 ssl;
# server_name localhost;
# ssl_certificate cert.pem;
# ssl_certificate_key cert.key;
# ssl_session_cache shared:ssl:1m;
# ssl_session_timeout 5m;
# ssl_ciphers high:!anull:!md5;
# ssl_prefer_server_ciphers on;
# location / {
# root html;
# index index.html index.htm;
# }
#}
}Use docker to start
Create and run the container
81:Yes The port for external network access can be modified according to the actual situation
/docker/nginx/nginx.conf The local host file
/etc/nginx/nginx.conf The decompressed directory (it can also be used without Change)
/docker/nginx/html Local host file
/usr/share/nginx/html Unzipped directory
docker run -d --name nginx81 -p 81:80 -v /docker/nginx/nginx.conf:/etc/nginx/nginx.conf -v /docker/nginx/html:/usr/share/nginx/html nginx
Test
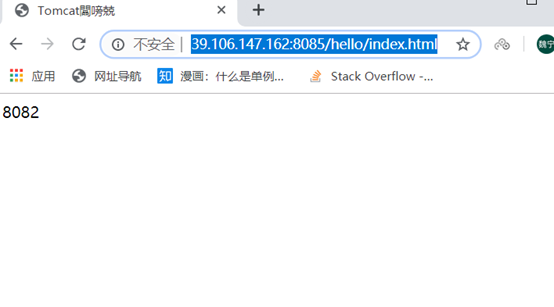
http ://39.106.147.162:8085/hello/index.html What I configure here is port 8085
Direct access
The above is the detailed content of How Docker uses nginx to build a tomcat cluster. For more information, please follow other related articles on the PHP Chinese website!

Hot AI Tools

Undresser.AI Undress
AI-powered app for creating realistic nude photos

AI Clothes Remover
Online AI tool for removing clothes from photos.

Undress AI Tool
Undress images for free

Clothoff.io
AI clothes remover

AI Hentai Generator
Generate AI Hentai for free.

Hot Article

Hot Tools

Notepad++7.3.1
Easy-to-use and free code editor

SublimeText3 Chinese version
Chinese version, very easy to use

Zend Studio 13.0.1
Powerful PHP integrated development environment

Dreamweaver CS6
Visual web development tools

SublimeText3 Mac version
God-level code editing software (SublimeText3)

Hot Topics
 Pi Node Teaching: What is a Pi Node? How to install and set up Pi Node?
Mar 05, 2025 pm 05:57 PM
Detailed explanation and installation guide for PiNetwork nodes This article will introduce the PiNetwork ecosystem in detail - Pi nodes, a key role in the PiNetwork ecosystem, and provide complete steps for installation and configuration. After the launch of the PiNetwork blockchain test network, Pi nodes have become an important part of many pioneers actively participating in the testing, preparing for the upcoming main network release. If you don’t know PiNetwork yet, please refer to what is Picoin? What is the price for listing? Pi usage, mining and security analysis. What is PiNetwork? The PiNetwork project started in 2019 and owns its exclusive cryptocurrency Pi Coin. The project aims to create a one that everyone can participate
 Agile development and operation of PHP microservice containerization
May 08, 2024 pm 02:21 PM
Answer: PHP microservices are deployed with HelmCharts for agile development and containerized with DockerContainer for isolation and scalability. Detailed description: Use HelmCharts to automatically deploy PHP microservices to achieve agile development. Docker images allow for rapid iteration and version control of microservices. The DockerContainer standard isolates microservices, and Kubernetes manages the availability and scalability of the containers. Use Prometheus and Grafana to monitor microservice performance and health, and create alarms and automatic repair mechanisms.
 How to install deepseek
Feb 19, 2025 pm 05:48 PM
There are many ways to install DeepSeek, including: compile from source (for experienced developers) using precompiled packages (for Windows users) using Docker containers (for most convenient, no need to worry about compatibility) No matter which method you choose, Please read the official documents carefully and prepare them fully to avoid unnecessary trouble.
 How to use PHP CI/CD to iterate quickly?
May 08, 2024 pm 10:15 PM
Answer: Use PHPCI/CD to achieve rapid iteration, including setting up CI/CD pipelines, automated testing and deployment processes. Set up a CI/CD pipeline: Select a CI/CD tool, configure the code repository, and define the build pipeline. Automated testing: Write unit and integration tests and use testing frameworks to simplify testing. Practical case: Using TravisCI: install TravisCI, define the pipeline, enable the pipeline, and view the results. Implement continuous delivery: select deployment tools, define deployment pipelines, and automate deployment. Benefits: Improve development efficiency, reduce errors, and shorten delivery time.
 Deploy JavaEE applications using Docker Containers
Jun 05, 2024 pm 08:29 PM
Deploy Java EE applications using Docker containers: Create a Dockerfile to define the image, build the image, run the container and map the port, and then access the application in the browser. Sample JavaEE application: REST API interacts with database, accessible on localhost after deployment via Docker.
 How to install Docker extension in vscode Steps to install Docker extension in vscode
May 09, 2024 pm 03:25 PM
1. First, after opening the interface, click the extension icon button on the left 2. Then, find the search bar location in the opened extension page 3. Then, enter the word Docker with the mouse to find the extension plug-in 4. Finally, select the target plug-in and click the right Just click the install button in the lower corner
 PHP microservice containerized monitoring and log management practice
May 08, 2024 pm 12:06 PM
PHP microservice containerized monitoring and log management monitoring: Use Prometheus and Grafana to monitor resource usage, number of requests, and latency. Log management: Use ELKStack (ElasticSearch, Logstash, Kibana) to collect, parse and visualize logs. Deploy the Filebeat agent to send logs to ElasticSearch.
 Questions and Answers on PHP Enterprise Application Microservice Architecture Design
May 07, 2024 am 09:36 AM
Microservice architecture uses PHP frameworks (such as Symfony and Laravel) to implement microservices and follows RESTful principles and standard data formats to design APIs. Microservices communicate via message queues, HTTP requests, or gRPC, and use tools such as Prometheus and ELKStack for monitoring and troubleshooting.


