
 Operation and Maintenance
Nginx
How to configure the dynamic and static separation of Nginx and Apache or Tomcat
Operation and Maintenance
Nginx
How to configure the dynamic and static separation of Nginx and Apache or Tomcat
How to configure the dynamic and static separation of Nginx and Apache or Tomcat

1、nginx和apache的动静分离配置:
把下面配置放到nginx配置文件相应的server { }里面,如果使用其他端口号,改一下就行:
#所有php的动态页面均交由apache处理
location ~ \.(php)?$ {
proxy_set_header host $host;
proxy_set_header x-real-ip $remote_addr;
proxy_set_header x-forwarded-for $proxy_add_x_forwarded_for;
proxy_pass http://127.0.0.1:88;
}#所有静态文件由nginx直接读取不经过apache
location ~ .*\.(htm|html|gif|jpg|jpeg|png|bmp|swf|ioc|rar|zip|txt|flv|mid|doc|ppt|pdf|xls|mp3|wma)$
{ expires 15d; }
location ~ .*\.(js|css)?$
{ expires 1h; }如果之前设置了fastcgi的,把下面的配置注释掉:
# pass the php scripts to fastcgi server listening on 127.0.0.1:9000
#
#location ~ \.php$ {
# root /var/www/html;
# fastcgi_pass 127.0.0.1:9000;
# fastcgi_index index.php;
# include fastcgi.conf;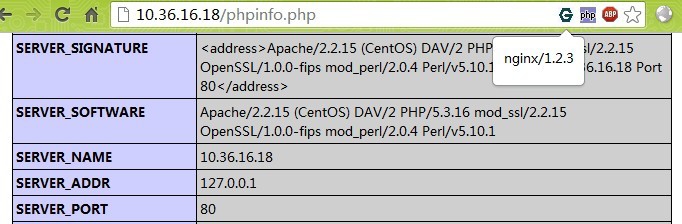
#}重启nginx就生效,如图所示,标头显示nginx,phpinfo里面显示是apache,说明动静分离生效。
2.niginx和tomcat的动静分离配置:
#主配置文件配置
[root@localhost ~]# vi /usr/local/nginx/conf/nginx.conf
user nginx;
worker_processes 1;
error_log logs/error.log;
pid    logs/nginx.pid;
events {
  worker_connections 1024;
}
http {
  include    mime.types;
  default_type application/octet-stream;
  #日志格式定义
  log_format main '$remote_addr - $remote_user[$time_local] "$request" '
           '$status $body_bytes_sent"$http_referer" '
           '"$http_user_agent" "$http_x_forwarded_for"';
  access_log logs/access.log main;
  sendfile    on;
  keepalive_timeout 65;
  #gzip压缩功能设置
  gzip on;
  gzip_min_length 1k;
  gzip_buffers  4 16k;
  gzip_http_version 1.0;
  gzip_comp_level 2;
  gzip_types text/plain application/x-javascripttext/css application/xml;
  gzip_vary on;
  server {
    listen    80;
    server_name www.test.com;
    location / {
  #jsp网站程序根目录,一般nginx与tomcat在同一个目录
      root /usr/local/tomcat/webapps/root;
      index index.html index.jsp index.html;
    }
    location ~ .*.jsp$ {
    index index.jsp;
    proxy_pass http://127.0.0.1:8080;  #来自jsp请求交给tomcat处理
    proxy_redirect off;
    proxy_set_header host $host;  #后端的web服务器可以通过x-forwarded-for获取用户真实ip
    proxy_set_header x-real-ip $remote_addr;
    proxy_set_header x-forwarded-for $proxy_add_x_forwarded_for;
    client_max_body_size 10m;  #允许客户端请求的最大单文件字节数
    client_body_buffer_size 128k; #缓冲区代理缓冲用户端请求的最大字节数
    proxy_connect_timeout 90;  #nginx跟后端服务器连接超时时间(代理连接超时)
    proxy_read_timeout 90;   #连接成功后,后端服务器响应时间(代理接收超时)
    proxy_buffer_size 4k;    #设置代理服务器(nginx)保存用户头信息的缓冲区大小
    proxy_buffers 6 32k;    #proxy_buffers缓冲区,网页平均在32k以下的话,这样设置
    proxy_busy_buffers_size 64k;#高负荷下缓冲大小(proxy_buffers*2)
    proxy_temp_file_write_size 64k; #设定缓存文件夹大小,大于这个值,将从upstream服务器传
    }
    location ~ .*\.(gif|jpg|png|bmp|swf)$  #由nginx处理静态页面
    {
    expires 30d;  #使用expires缓存模块,缓存到客户端30天
    }
    location ~ .*\.( jsp|js|css)?$
    {
    expires 1d;
    }
    error_page 404       /404.html;  #错误页面
    error_page  500 502 503 504 /50x.html;
    location = /50x.html {
      root  html;
    }
}#编写nginx启动、停止、重启等sysv管理脚本,方便使用
[root@localhost ~]# vi /etc/init.d/nginx
#!/bin/bash
# chkconfig: 345 99 20
# description: nginx servicecontrol script
prog="/usr/local/nginx/sbin/nginx"
pidf="/usr/local/nginx/logs/nginx.pid"
case "$1" in
start)
$prog
echo "nginx servicestart success."
;;
stop)
kill -s quit $(cat $pidf)
echo "nginx service stopsuccess."
;;
restart)
$0 stop
$0 start
;;
reload)
kill -s hup $(cat $pidf)
echo"reload nginx configsuccess."
;;
*)
echo "usage: $0{start|stop|restart|reload}"
exit 1
esac[root@localhost ~]# chmod +x /etc/init.d/nginx [root@localhost ~]# service nginx restart [root@localhost ~]# chkconfig --add nginx [root@localhost ~]# chkconfig nginx on
The above is the detailed content of How to configure the dynamic and static separation of Nginx and Apache or Tomcat. For more information, please follow other related articles on the PHP Chinese website!

Hot AI Tools

Undresser.AI Undress
AI-powered app for creating realistic nude photos

AI Clothes Remover
Online AI tool for removing clothes from photos.

Undress AI Tool
Undress images for free

Clothoff.io
AI clothes remover

Video Face Swap
Swap faces in any video effortlessly with our completely free AI face swap tool!

Hot Article
Hot Tools

Notepad++7.3.1
Easy-to-use and free code editor

SublimeText3 Chinese version
Chinese version, very easy to use

Zend Studio 13.0.1
Powerful PHP integrated development environment

Dreamweaver CS6
Visual web development tools

SublimeText3 Mac version
God-level code editing software (SublimeText3)
Hot Topics
 1387
1387
 52
52

 How to configure cloud server domain name in nginx
Apr 14, 2025 pm 12:18 PM
How to configure cloud server domain name in nginx
Apr 14, 2025 pm 12:18 PM
How to configure an Nginx domain name on a cloud server: Create an A record pointing to the public IP address of the cloud server. Add virtual host blocks in the Nginx configuration file, specifying the listening port, domain name, and website root directory. Restart Nginx to apply the changes. Access the domain name test configuration. Other notes: Install the SSL certificate to enable HTTPS, ensure that the firewall allows port 80 traffic, and wait for DNS resolution to take effect.
 How to start nginx server
Apr 14, 2025 pm 12:27 PM
How to start nginx server
Apr 14, 2025 pm 12:27 PM
Starting an Nginx server requires different steps according to different operating systems: Linux/Unix system: Install the Nginx package (for example, using apt-get or yum). Use systemctl to start an Nginx service (for example, sudo systemctl start nginx). Windows system: Download and install Windows binary files. Start Nginx using the nginx.exe executable (for example, nginx.exe -c conf\nginx.conf). No matter which operating system you use, you can access the server IP
 How to check nginx version
Apr 14, 2025 am 11:57 AM
How to check nginx version
Apr 14, 2025 am 11:57 AM
The methods that can query the Nginx version are: use the nginx -v command; view the version directive in the nginx.conf file; open the Nginx error page and view the page title.
 How to check the name of the docker container
Apr 15, 2025 pm 12:21 PM
How to check the name of the docker container
Apr 15, 2025 pm 12:21 PM
You can query the Docker container name by following the steps: List all containers (docker ps). Filter the container list (using the grep command). Gets the container name (located in the "NAMES" column).
 How to run nginx apache
Apr 14, 2025 pm 12:33 PM
How to run nginx apache
Apr 14, 2025 pm 12:33 PM
To get Nginx to run Apache, you need to: 1. Install Nginx and Apache; 2. Configure the Nginx agent; 3. Start Nginx and Apache; 4. Test the configuration to ensure that you can see Apache content after accessing the domain name. In addition, you need to pay attention to other matters such as port number matching, virtual host configuration, and SSL/TLS settings.
 How to check whether nginx is started
Apr 14, 2025 pm 01:03 PM
How to check whether nginx is started
Apr 14, 2025 pm 01:03 PM
How to confirm whether Nginx is started: 1. Use the command line: systemctl status nginx (Linux/Unix), netstat -ano | findstr 80 (Windows); 2. Check whether port 80 is open; 3. Check the Nginx startup message in the system log; 4. Use third-party tools, such as Nagios, Zabbix, and Icinga.
 How to solve CentOS system failure
Apr 14, 2025 pm 01:57 PM
How to solve CentOS system failure
Apr 14, 2025 pm 01:57 PM
There are many ways to solve CentOS system failures. Here are some common steps and techniques: 1. Check the log file /var/log/messages: system log, which contains various system events. /var/log/secure: Security-related logs, such as SSH login attempts. /var/log/httpd/error_log: If you use the Apache server, there will be an error message here. 2. Use the diagnostic tool dmesg: display the contents of the kernel ring buffer, which helps understand hardware and driver questions
 How to create a mirror in docker
Apr 15, 2025 am 11:27 AM
How to create a mirror in docker
Apr 15, 2025 am 11:27 AM
Steps to create a Docker image: Write a Dockerfile that contains the build instructions. Build the image in the terminal, using the docker build command. Tag the image and assign names and tags using the docker tag command.
