

How to use the automatic expiration mechanism in Redis

Automatic expiration mechanism in Redis
Implementation requirements: processing automatic cancellation of expired orders, for example, automatically changing the order status if the order is not paid for 30 minutes
1. Use Redis Key to automatically expire the event Notification
2. Check after 30 minutes using a scheduled task
3. Check according to every minute rotation
CREATE TABLE `order_number` (
  `id` int(11) NOT NULL AUTO_INCREMENT,
  `order_name` varchar(255) DEFAULT NULL,
  `order_status` int(11) DEFAULT NULL,
  `order_token` varchar(255) DEFAULT NULL,
  `order_id` varchar(255) DEFAULT NULL,
  PRIMARY KEY (`id`)
) ENGINE=InnoDB AUTO_INCREMENT=20 DEFAULT CHARSET=utf8;
1. Use the Redis Key automatic expiration mechanism
When our key expires , we can execute our client callback listening method.
Requires configuration in Redis:
1. Open the redis.conf configuration file
vi redis.conf

2. Find notify in the configuration file -keyspace-events
/notify-keyspace-events
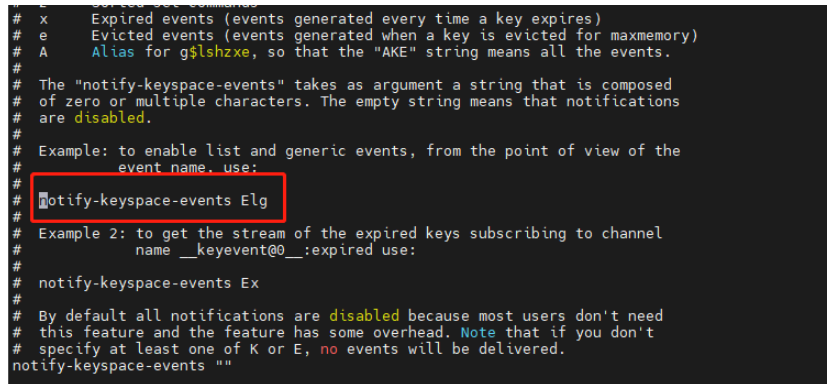
3. Modify to notify-keyspace-events Ex
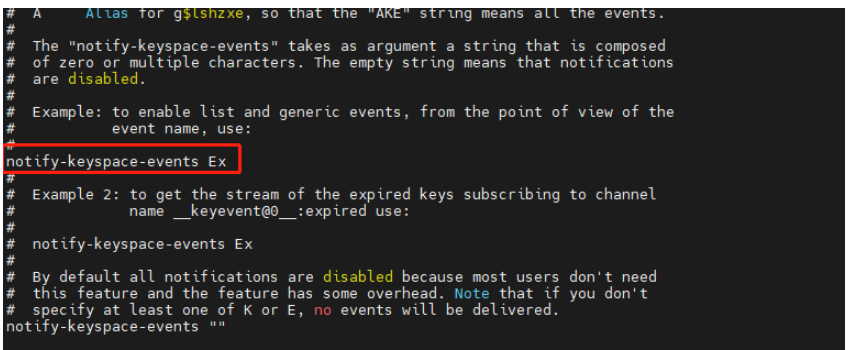
4. Restart redis

@Configuration
public class RedisListenerConfig {
    @Bean
    RedisMessageListenerContainer container(RedisConnectionFactory connectionFactory) {
        RedisMessageListenerContainer container = new RedisMessageListenerContainer();
        container.setConnectionFactory(connectionFactory);
        return container;
    }
}
Copy after login@Component
public class RedisKeyExpirationListener extends KeyExpirationEventMessageListener {
public RedisKeyExpirationListener(RedisMessageListenerContainer listenerContainer) {
super(listenerContainer);
}
@Resource
private OrderMapper orderMapper;
/**
* 待支付
*/
private static final Integer ORDER_STAYPAY = 0;
/**
* 失效
*/
private static final Integer ORDER_INVALID = 2;
/**
* 使用该方法监听 当我们的key失效的时候执行该方法
*
* @param message
* @param pattern
*/
@Override
public void onMessage(Message message, byte[] pattern) {
String expiraKey = message.toString();
System.out.println("该key:expiraKey:" + expiraKey + "失效啦~");
// 前缀判断 orderToken
OrderEntity orderNumber = orderMapper.getOrderNumber(expiraKey);
if (orderNumber == null) {
return;
}
// 获取订单状态
Integer orderStatus = orderNumber.getOrderStatus();
// 如果该订单状态为待支付的情况下,直接将该订单修改为已经超时
if (orderStatus.equals(ORDER_STAYPAY)) {
orderMapper.updateOrderStatus(expiraKey, ORDER_INVALID);
// 库存加上1
}
}
}Copy after login@RestController
public class MemberController {
@Autowired
private UserMapper userMapper;
/**
*
* @return
*/
@RequestMapping("/getListMember")
@Cacheable(cacheNames = "member", key = "'getListMember'")
public List<MemberEntity> getListMember() {
return userMapper.findMemberAll();
}
}Copy after login@Data
public class OrderEntity {
private Long id;
private String orderName;
/**
* 0 待支付 1 已经支付
*/
private Integer orderStatus;
private String orderToken;
private String orderId;
public OrderEntity(Long id, String orderName, String orderId, String orderToken) {
this.id = id;
this.orderName = orderName;
this.orderId = orderId;
this.orderToken = orderToken;
}
}Copy after loginpublic interface OrderMapper {
@Insert("insert into order_number values (null,#{orderName},0,#{orderToken},#{orderId})")
int insertOrder(OrderEntity OrderEntity);
@Select("SELECT ID AS ID ,order_name AS ORDERNAME ,order_status AS orderstatus,order_token as ordertoken,order_id as orderid FROM order_number\n" +
"where order_token=#{orderToken};")
OrderEntity getOrderNumber(String orderToken);
@Update("\n" +
"\n" +
"update order_number set order_status=#{orderStatus} where order_token=#{orderToken};")
int updateOrderStatus(String orderToken, Integer orderStatus);
}Copy after login1. Access the addOrder interface
@Configuration
public class RedisListenerConfig {
@Bean
RedisMessageListenerContainer container(RedisConnectionFactory connectionFactory) {
RedisMessageListenerContainer container = new RedisMessageListenerContainer();
container.setConnectionFactory(connectionFactory);
return container;
}
}@Component
public class RedisKeyExpirationListener extends KeyExpirationEventMessageListener {
public RedisKeyExpirationListener(RedisMessageListenerContainer listenerContainer) {
super(listenerContainer);
}
@Resource
private OrderMapper orderMapper;
/**
* 待支付
*/
private static final Integer ORDER_STAYPAY = 0;
/**
* 失效
*/
private static final Integer ORDER_INVALID = 2;
/**
* 使用该方法监听 当我们的key失效的时候执行该方法
*
* @param message
* @param pattern
*/
@Override
public void onMessage(Message message, byte[] pattern) {
String expiraKey = message.toString();
System.out.println("该key:expiraKey:" + expiraKey + "失效啦~");
// 前缀判断 orderToken
OrderEntity orderNumber = orderMapper.getOrderNumber(expiraKey);
if (orderNumber == null) {
return;
}
// 获取订单状态
Integer orderStatus = orderNumber.getOrderStatus();
// 如果该订单状态为待支付的情况下,直接将该订单修改为已经超时
if (orderStatus.equals(ORDER_STAYPAY)) {
orderMapper.updateOrderStatus(expiraKey, ORDER_INVALID);
// 库存加上1
}
}
}@RestController
public class MemberController {
@Autowired
private UserMapper userMapper;
/**
*
* @return
*/
@RequestMapping("/getListMember")
@Cacheable(cacheNames = "member", key = "'getListMember'")
public List<MemberEntity> getListMember() {
return userMapper.findMemberAll();
}
}@Data
public class OrderEntity {
private Long id;
private String orderName;
/**
* 0 待支付 1 已经支付
*/
private Integer orderStatus;
private String orderToken;
private String orderId;
public OrderEntity(Long id, String orderName, String orderId, String orderToken) {
this.id = id;
this.orderName = orderName;
this.orderId = orderId;
this.orderToken = orderToken;
}
}public interface OrderMapper {
@Insert("insert into order_number values (null,#{orderName},0,#{orderToken},#{orderId})")
int insertOrder(OrderEntity OrderEntity);
@Select("SELECT ID AS ID ,order_name AS ORDERNAME ,order_status AS orderstatus,order_token as ordertoken,order_id as orderid FROM order_number\n" +
"where order_token=#{orderToken};")
OrderEntity getOrderNumber(String orderToken);
@Update("\n" +
"\n" +
"update order_number set order_status=#{orderStatus} where order_token=#{orderToken};")
int updateOrderStatus(String orderToken, Integer orderStatus);
}
 ##3. Redis expires after 10 seconds and executes the callback mechanism
 4. Check the database again, the status has been modified
The above is the detailed content of How to use the automatic expiration mechanism in Redis. For more information, please follow other related articles on the PHP Chinese website!

Hot AI Tools

Undresser.AI Undress
AI-powered app for creating realistic nude photos

AI Clothes Remover
Online AI tool for removing clothes from photos.

Undress AI Tool
Undress images for free

Clothoff.io
AI clothes remover

Video Face Swap
Swap faces in any video effortlessly with our completely free AI face swap tool!

Hot Article
Hot Tools

Notepad++7.3.1
Easy-to-use and free code editor

SublimeText3 Chinese version
Chinese version, very easy to use

Zend Studio 13.0.1
Powerful PHP integrated development environment

Dreamweaver CS6
Visual web development tools

SublimeText3 Mac version
God-level code editing software (SublimeText3)
Hot Topics
 1390
1390
 52
52

 How to build the redis cluster mode
Apr 10, 2025 pm 10:15 PM
How to build the redis cluster mode
Apr 10, 2025 pm 10:15 PM
Redis cluster mode deploys Redis instances to multiple servers through sharding, improving scalability and availability. The construction steps are as follows: Create odd Redis instances with different ports; Create 3 sentinel instances, monitor Redis instances and failover; configure sentinel configuration files, add monitoring Redis instance information and failover settings; configure Redis instance configuration files, enable cluster mode and specify the cluster information file path; create nodes.conf file, containing information of each Redis instance; start the cluster, execute the create command to create a cluster and specify the number of replicas; log in to the cluster to execute the CLUSTER INFO command to verify the cluster status; make
 How to clear redis data
Apr 10, 2025 pm 10:06 PM
How to clear redis data
Apr 10, 2025 pm 10:06 PM
How to clear Redis data: Use the FLUSHALL command to clear all key values. Use the FLUSHDB command to clear the key value of the currently selected database. Use SELECT to switch databases, and then use FLUSHDB to clear multiple databases. Use the DEL command to delete a specific key. Use the redis-cli tool to clear the data.
 How to read redis queue
Apr 10, 2025 pm 10:12 PM
How to read redis queue
Apr 10, 2025 pm 10:12 PM
To read a queue from Redis, you need to get the queue name, read the elements using the LPOP command, and process the empty queue. The specific steps are as follows: Get the queue name: name it with the prefix of "queue:" such as "queue:my-queue". Use the LPOP command: Eject the element from the head of the queue and return its value, such as LPOP queue:my-queue. Processing empty queues: If the queue is empty, LPOP returns nil, and you can check whether the queue exists before reading the element.
 How to use the redis command
Apr 10, 2025 pm 08:45 PM
How to use the redis command
Apr 10, 2025 pm 08:45 PM
Using the Redis directive requires the following steps: Open the Redis client. Enter the command (verb key value). Provides the required parameters (varies from instruction to instruction). Press Enter to execute the command. Redis returns a response indicating the result of the operation (usually OK or -ERR).
 How to use redis lock
Apr 10, 2025 pm 08:39 PM
How to use redis lock
Apr 10, 2025 pm 08:39 PM
Using Redis to lock operations requires obtaining the lock through the SETNX command, and then using the EXPIRE command to set the expiration time. The specific steps are: (1) Use the SETNX command to try to set a key-value pair; (2) Use the EXPIRE command to set the expiration time for the lock; (3) Use the DEL command to delete the lock when the lock is no longer needed.
 How to read the source code of redis
Apr 10, 2025 pm 08:27 PM
How to read the source code of redis
Apr 10, 2025 pm 08:27 PM
The best way to understand Redis source code is to go step by step: get familiar with the basics of Redis. Select a specific module or function as the starting point. Start with the entry point of the module or function and view the code line by line. View the code through the function call chain. Be familiar with the underlying data structures used by Redis. Identify the algorithm used by Redis.
 How to solve data loss with redis
Apr 10, 2025 pm 08:24 PM
How to solve data loss with redis
Apr 10, 2025 pm 08:24 PM
Redis data loss causes include memory failures, power outages, human errors, and hardware failures. The solutions are: 1. Store data to disk with RDB or AOF persistence; 2. Copy to multiple servers for high availability; 3. HA with Redis Sentinel or Redis Cluster; 4. Create snapshots to back up data; 5. Implement best practices such as persistence, replication, snapshots, monitoring, and security measures.
 How to use the redis command line
Apr 10, 2025 pm 10:18 PM
How to use the redis command line
Apr 10, 2025 pm 10:18 PM
Use the Redis command line tool (redis-cli) to manage and operate Redis through the following steps: Connect to the server, specify the address and port. Send commands to the server using the command name and parameters. Use the HELP command to view help information for a specific command. Use the QUIT command to exit the command line tool.
