How to stop pop-ups on Windows 11
Pop-ups and interruptions can be annoying when you're working or trying to focus on a piece of content. While mobile devices only have a DND toggle, what about Windows? Can you stop pop-ups on Windows 11? Let’s find out!
Can you stop pop-ups on Windows 11?
Yes, not at all. While you can get rid of most pop-ups in Windows 11, some confirmation pop-ups and security notifications cannot be bypassed. Furthermore, there is no reliable way to get rid of all pop-ups with a single click. On Windows 11, getting rid of pop-ups requires closing specific types of pop-ups. Luckily, we’ve compiled a list of all the notifications and alerts you need to turn off to get rid of pop-ups on Windows 11. Here’s what you can do.
8 Ways to Stop Pop-ups on Windows 11: Step-by-Step Tutorial
To stop pop-ups on Windows 11, you can choose to turn off notifications, enable focus mode, or disable alerts. Each of these methods has its advantages and disadvantages. We recommend that you choose the one that best suits your current needs and requirements.
Method 1: Disable all app notifications
By default, native applications as well as applications installed on your computer have full permissions to push notifications and every time there is an event that requires notification Will annoy you all the time. Here's how to turn off app notifications completely:
Press Windows i to open Settings. Click "System" to select the same from the left sidebar.
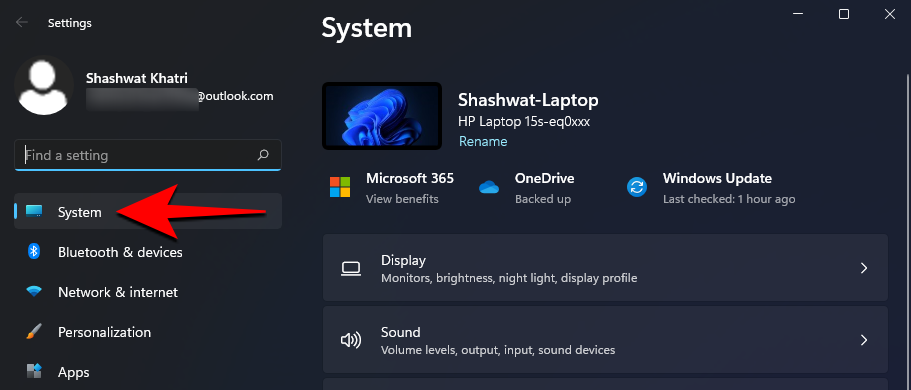
On the right, click Notifications.
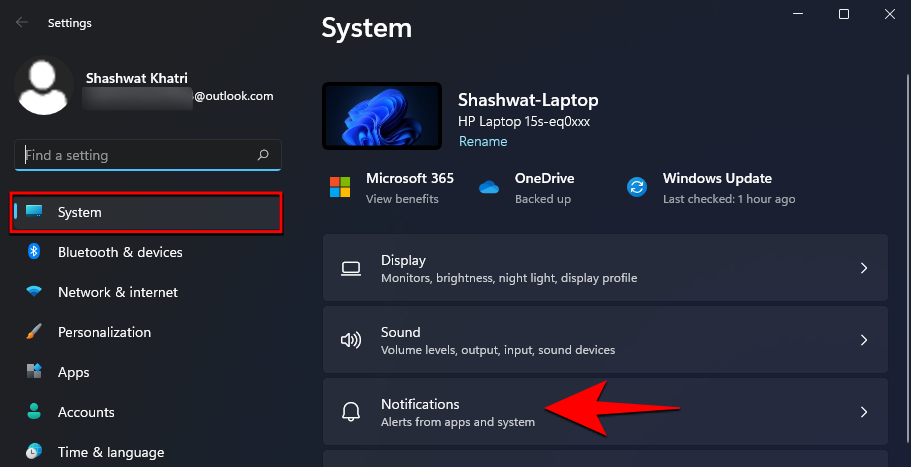
Turn off the "Notifications" switch at the top.
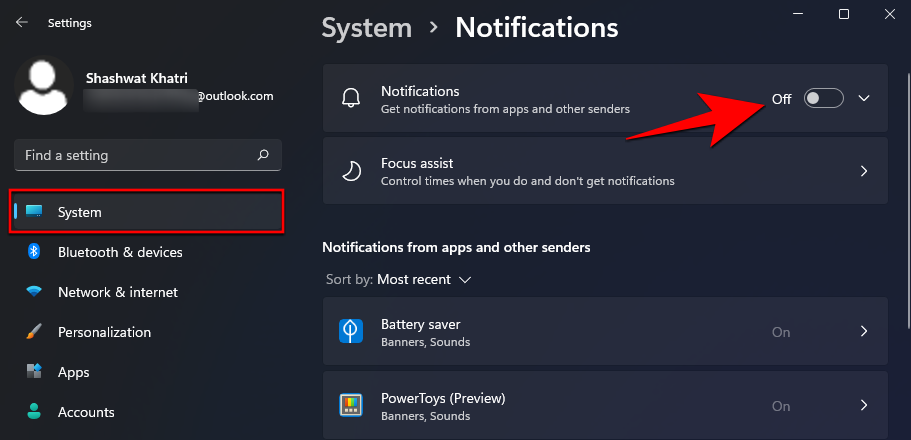
Doing this will ensure that you do not receive any notifications from the apps and programs installed on your device.
Method 2: Use Focus Assist
Windows 10 first introduced Focus Assist. This new Do Not Disturb allows you to customize how notifications are suppressed on your PC. Since then, Focus Assist has gone through many changes, including new and improved Focus sessions currently being tested in the Windows Insider program channel.
You can use our comprehensive post (linked below) to configure Focus Assist to meet your current needs. With custom focus assist mode, you can block all unwanted pop-ups while ensuring you don't miss important notifications.
Method 3: Disable other Windows 11 notifications
Now let’s turn off notifications for other Microsoft apps and default Windows apps that may interrupt your workflow. Please follow the sections below to get started.
3.1 – Turn off Tips and Suggestions
Windows Tips and Suggestions can also produce annoying pop-ups. While useful for early use, these quickly become obsolete. Here's how to turn them off:
Press Windows iOpen the Settings app and make sure System is selected on your left.

Click "Notifications" on the right.

Scroll down to the bottom and uncheck the "Give suggestions on how to set up my device" and "Get tips and suggestions as I use Windows" boxes.

3.2 – Turn off OEM app notifications
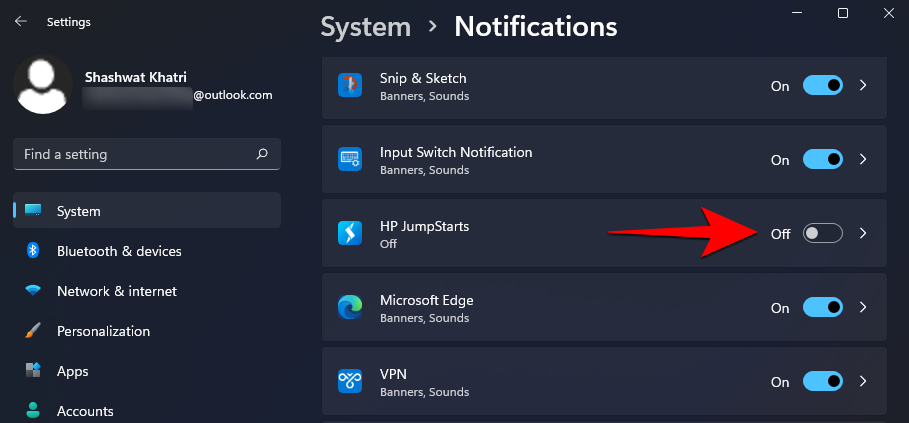
If you don’t want to miss out on important updates by turning off notifications from your app completely, you may want to at least stop them from coming to you Applications installed by the PC manufacturer get pop-ups. Computer manufacturers such as Dell or HP can access notifications through their applications for the purpose of displaying ads and other potentially unwanted pop-ups. However, there is a quick fix for this annoyance:
Press Windows i to open the Settings app. Make sure "System" is selected in the left sidebar.

On the right, click Notifications.

Now, uncheck the pre-installed applications on your OEM computer.
3.3 – Turn off sync provider notifications
Ads and pop-ups don’t just appear in the system tray. Microsoft is also pushing ads for its sync providers in File Explorer, primarily to get you to subscribe to its Office and OneDrive services.
Not only are these suggestions annoying, they also waste valuable space. Here's how to disable them:
Open File Explorer.
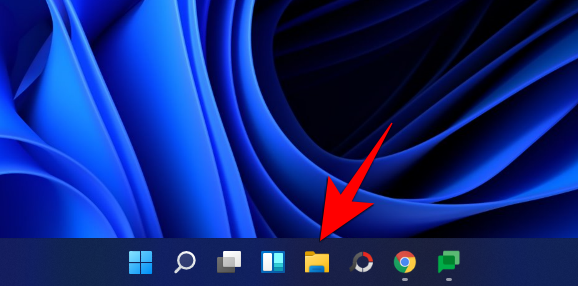
Then click the ellipsis button in the top toolbar.
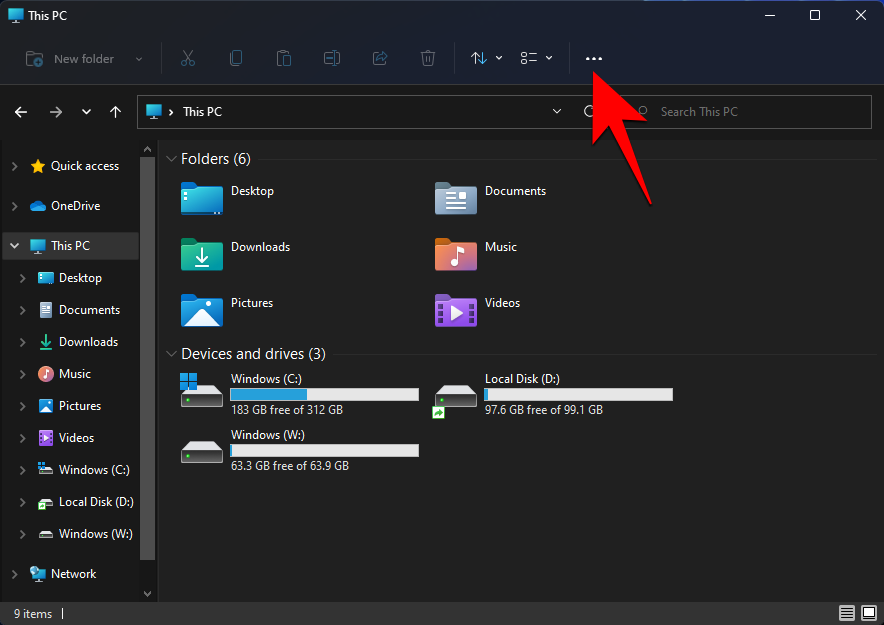
Select "Options".
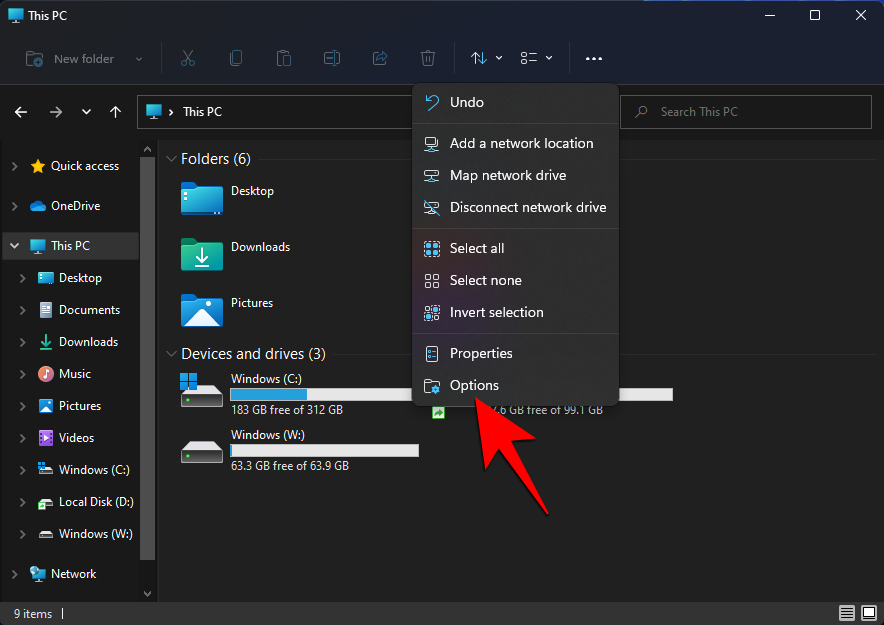
Click and switch to the View tab.
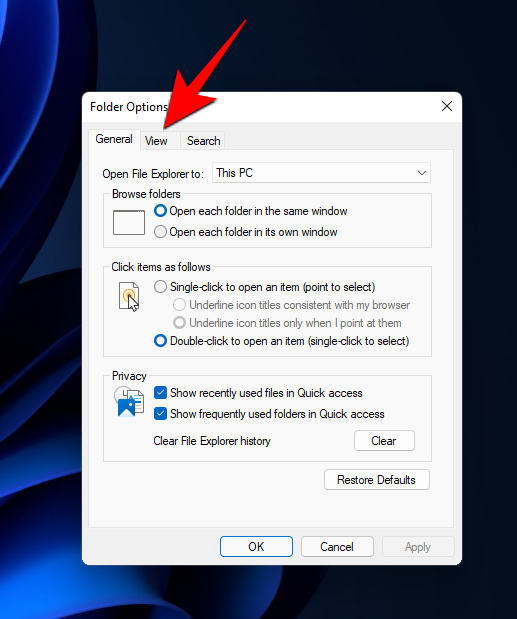
Now, under Advanced Settings, scroll down and uncheck “Show sync provider notifications”.
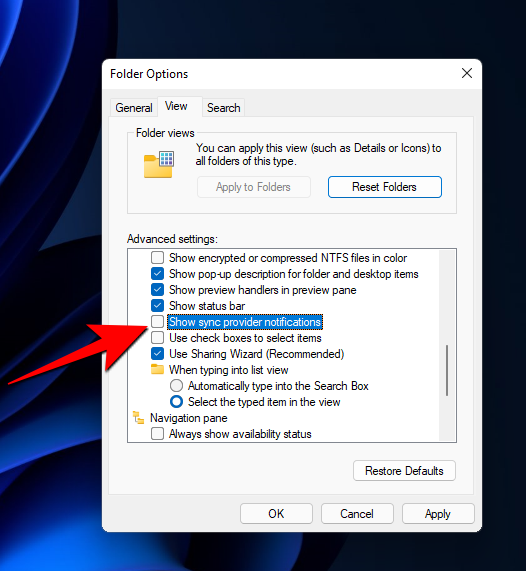
Click OK.
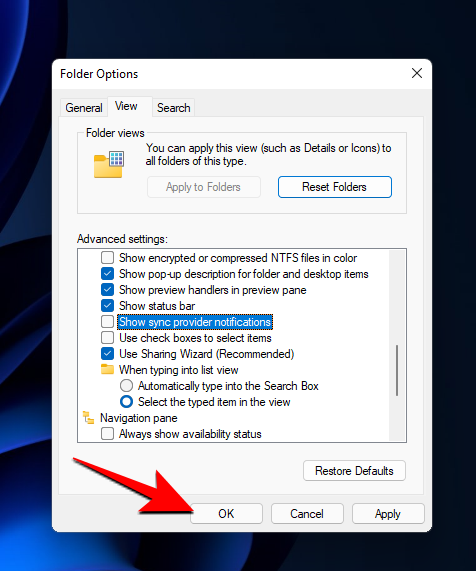
This will prevent any ads from showing up in File Explorer.
3.4 – Turn off access to your advertising ID
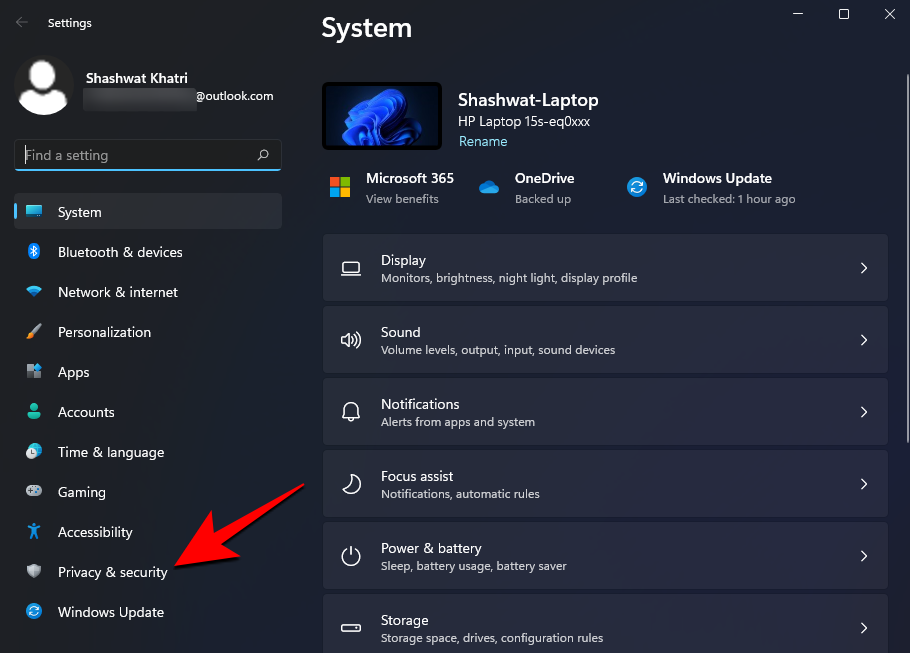
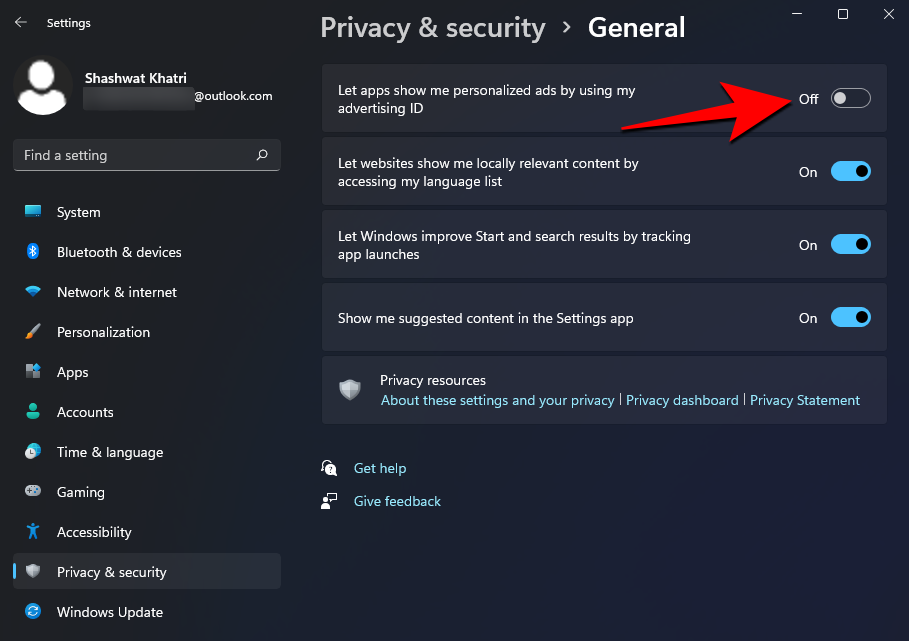
Press Windows i to open Settings. Then click "Privacy & Security" in the left panel.
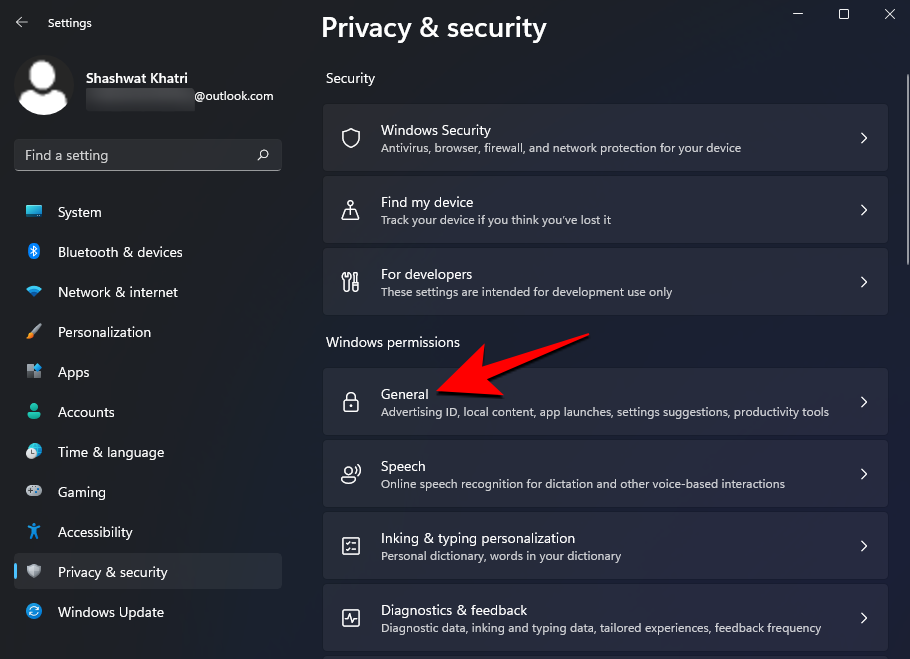
On the right, under Windows Permissions, click General.
Now, turn off "Let apps use my advertising ID to show me personalized ads."
Method 4: Disable pop-ups in your browser
Pop-ups have been a prominent annoyance in browsers since the early days of the internet. Modern browsers come with built-in pop-up blockers and ad blockers that you can use to block pop-ups and ads.
4.1 – For Microsoft Edge
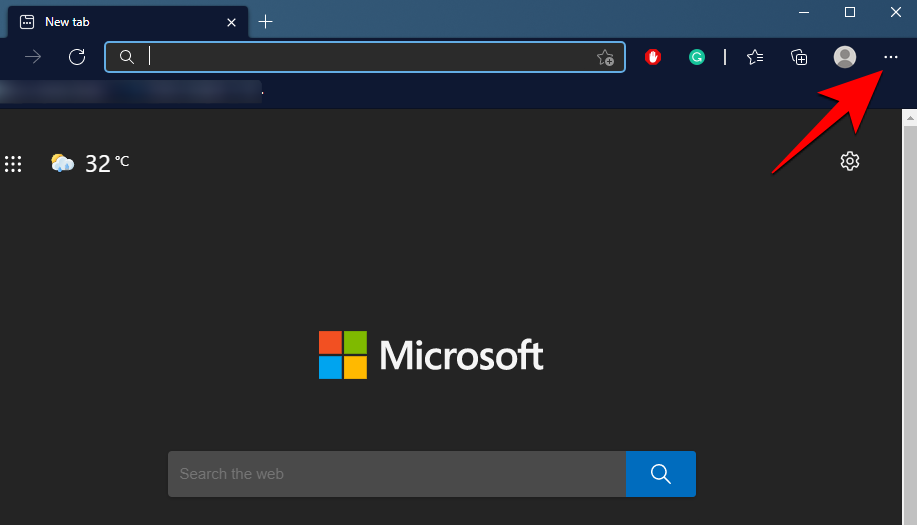
Open Microsoft Edge and click the three-dot menu icon in the upper right corner of the screen.
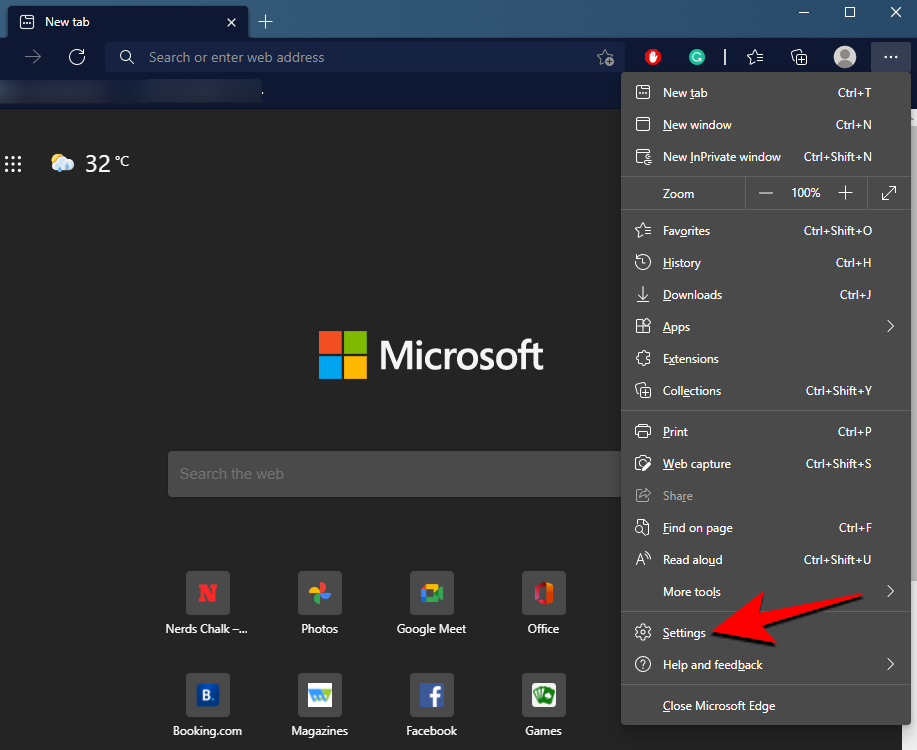
Click "Settings".
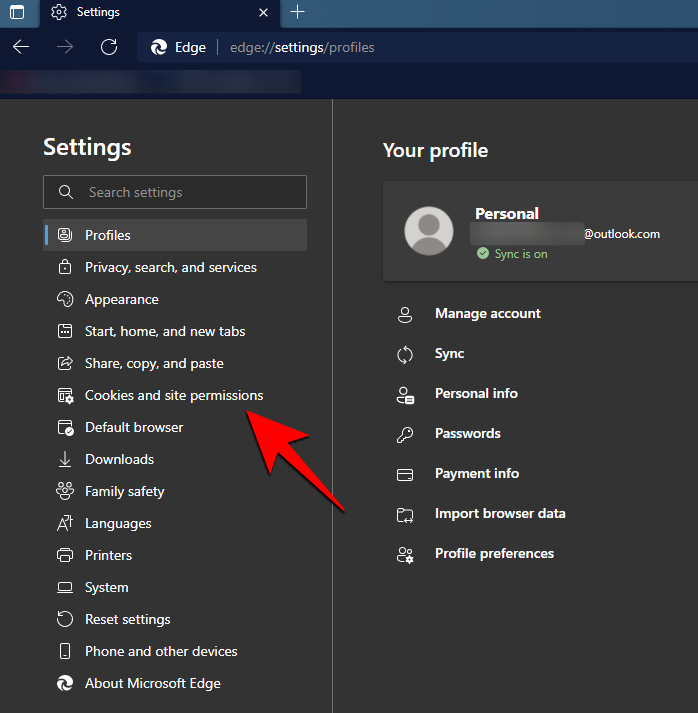
In the left panel, click "Cookies and Site Permissions."
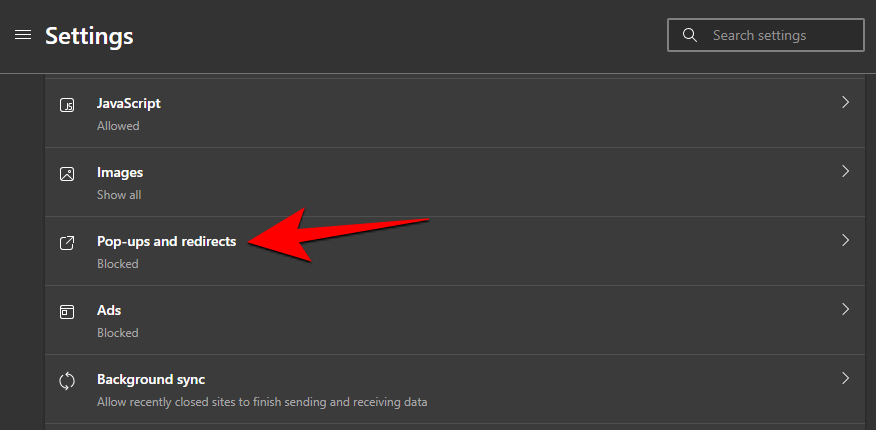
Then scroll down and find “Pop-ups and Redirects” and click on it.
Turn on the toggle switch for "Block (recommended)".
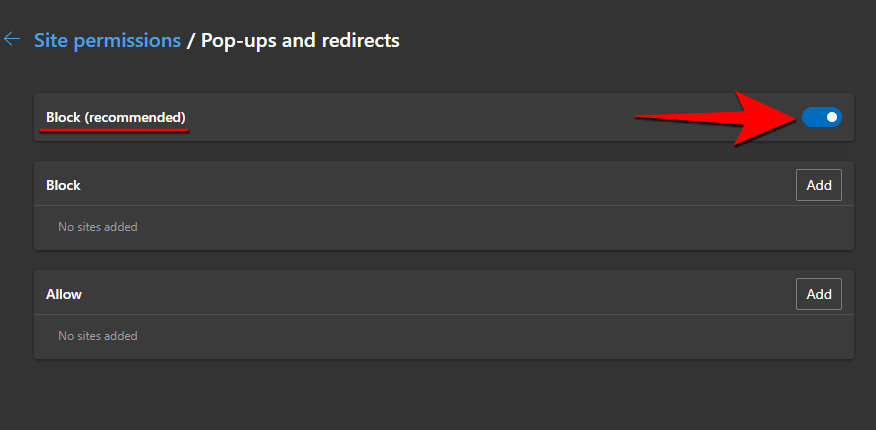
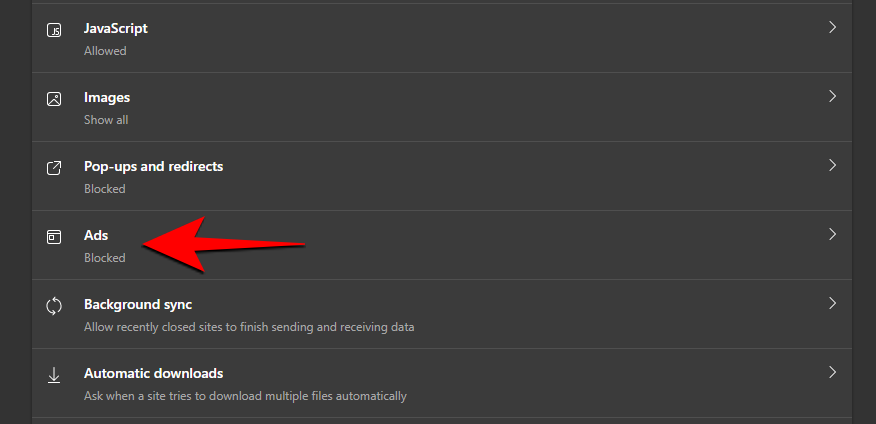
You will no longer receive any annoying pop-ups. Alternatively, if you wish to turn off intrusive or misleading ads, you can return to the "Cookies and Site Permissions" page and select "Advertising."
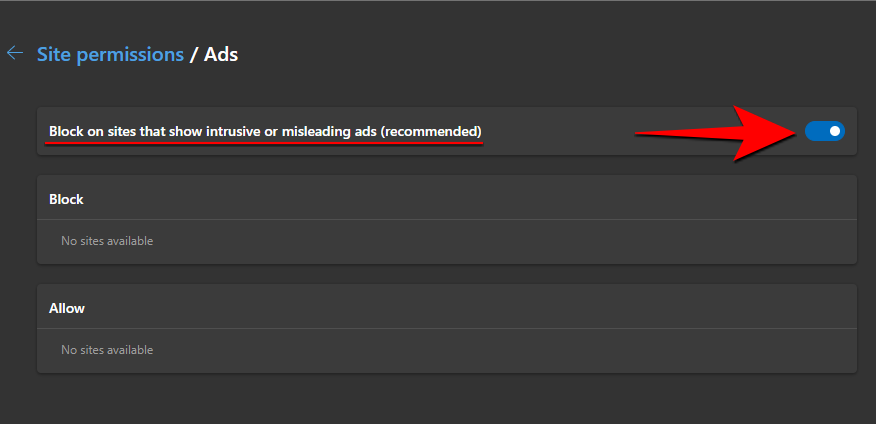
Here, you can also toggle the option "Turn on" the "Block sites that display intrusive or misleading ads" option.
In addition to this, Microsoft Edge also has a handy “Prevent Tracking” feature that minimizes data tracking and blocks pop-ups related to it. Here's how you can turn it on:
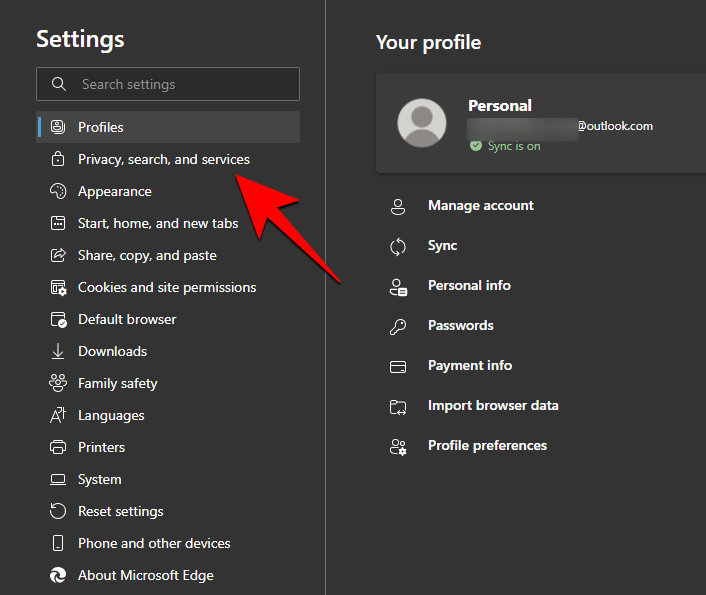
In the Settings menu, click Privacy, Search & Services.
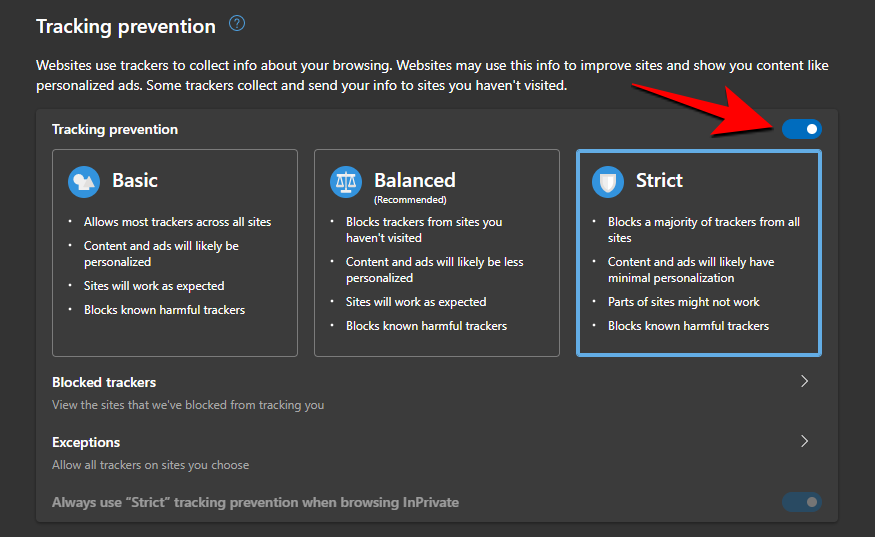
Now, make sure Tracking Prevention is turned on.
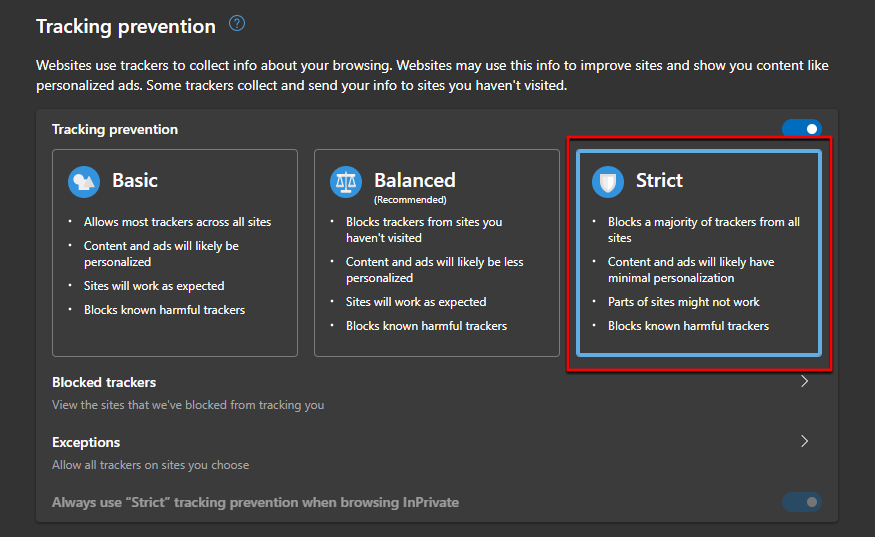
Then click "Strict" to ensure that all websites' trackers are blocked.
4.2 – For Google Chrome
Open Google Chrome and click on the “three dots” menu icon in the upper right corner.
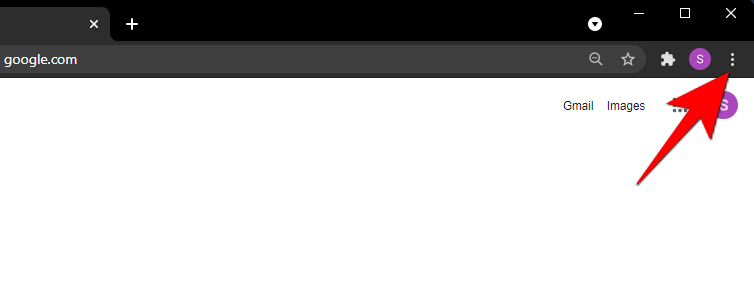
Then click "Settings".
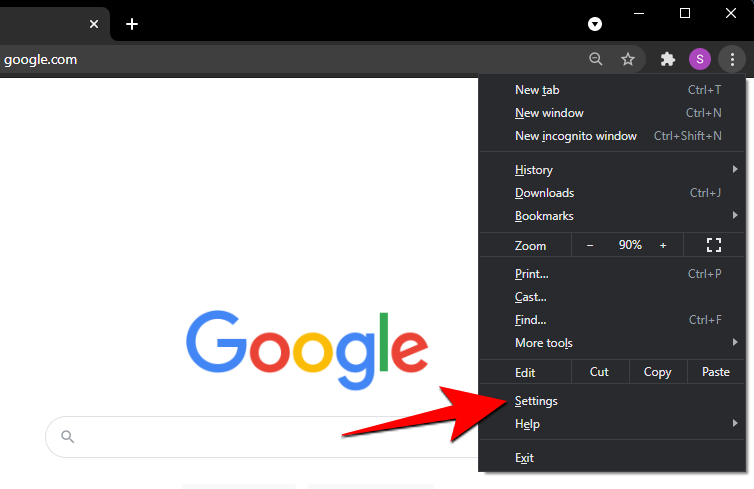
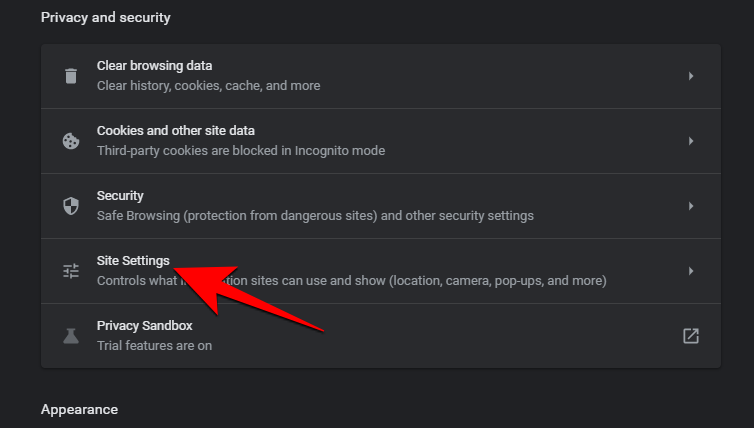
Under Privacy & Security, click Site Settings.
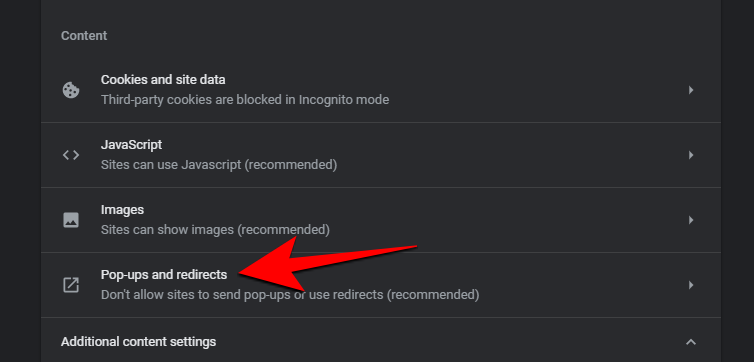
Now scroll down and find “Pop-ups and Redirects” and click on it.
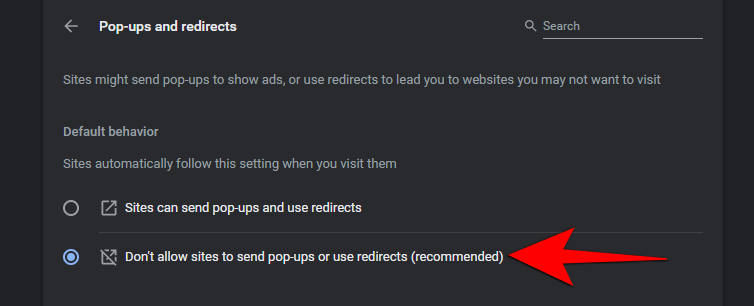
Here, click “Do not allow sites to send pop-ups or use redirects.”
Method 5: Disable all notifications using Group Policy Editor
By editing Group Policy, you can disable notifications if your PC is running Windows 11 versions are compatible. To use Group Policy Editor to work on your PC, you must have Windows 11 Pro or higher. Please follow the steps below to help you through the process.
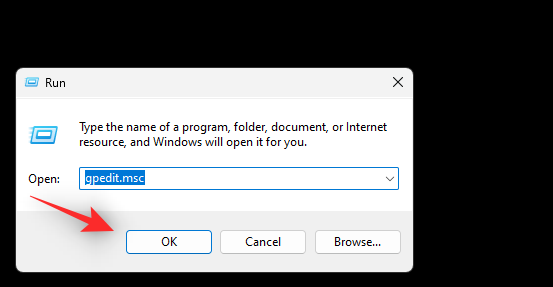
Press Windows R keyboard, enter the following, and then press Enter keyboard.
gpedit.msc
Now use the left sidebar to navigate to the following path.
User Configuration > Administrative Templates > Start menu and Taskbar
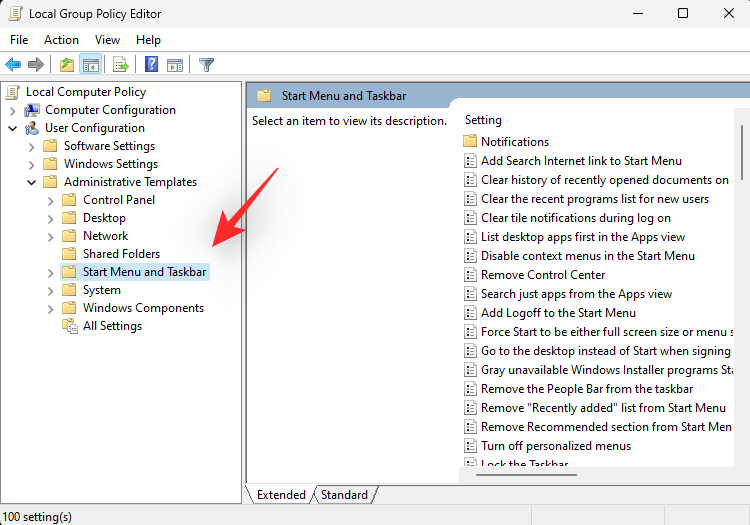
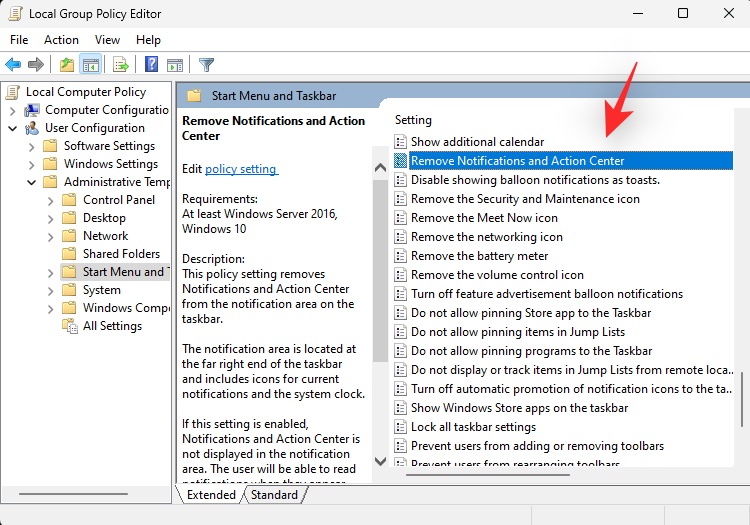
Look for the entry named "Remove Notification and Action Center", Then double-click the entry.
Click "Enable".
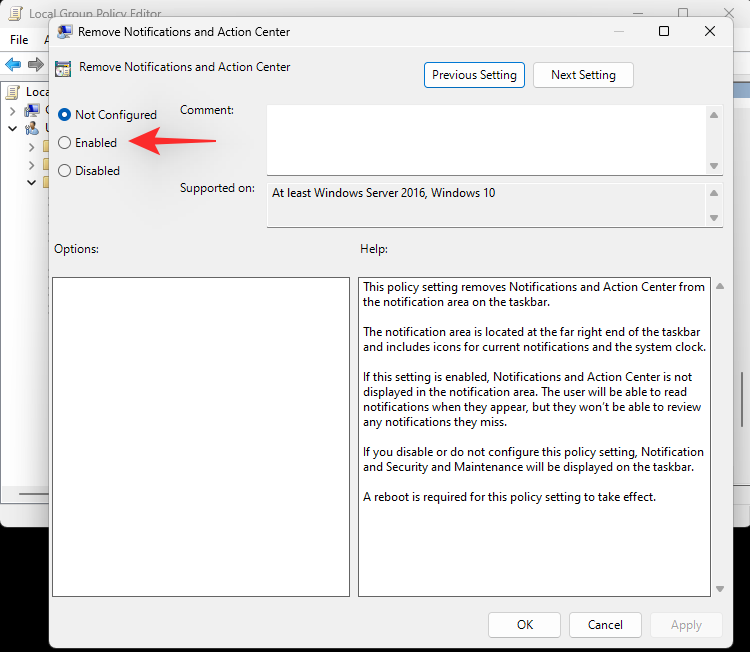
Click "OK".
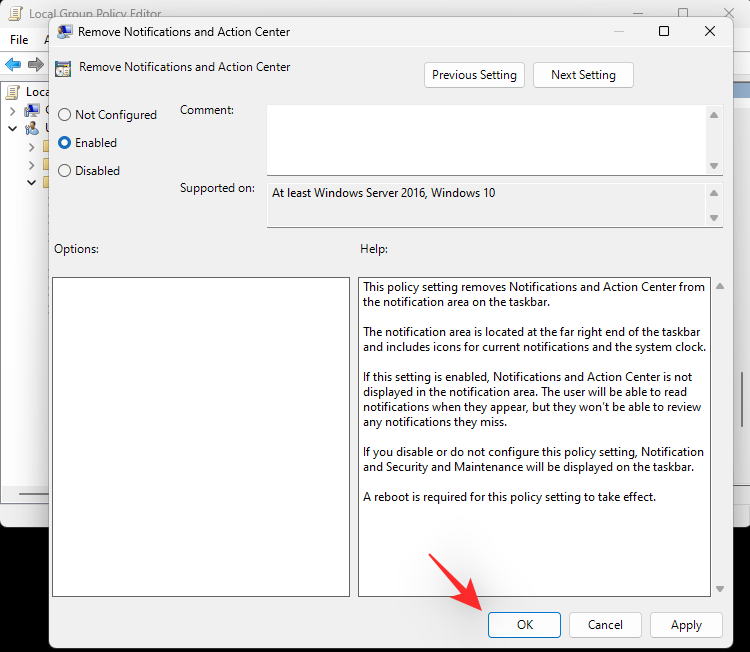
Now navigate to the following path.
User Configuration > Administrative Templates > Start menu and Taskbar > Notifications
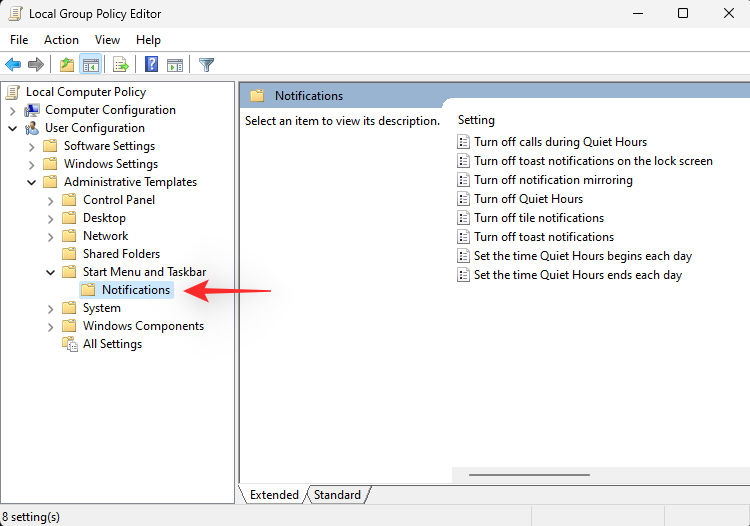
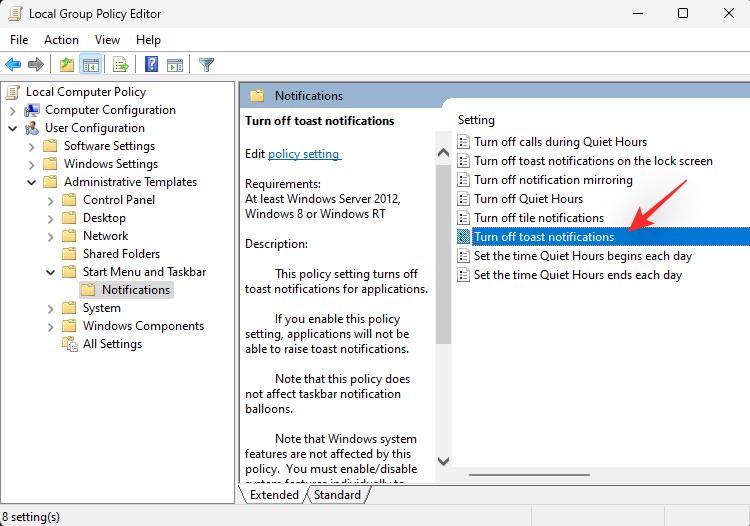
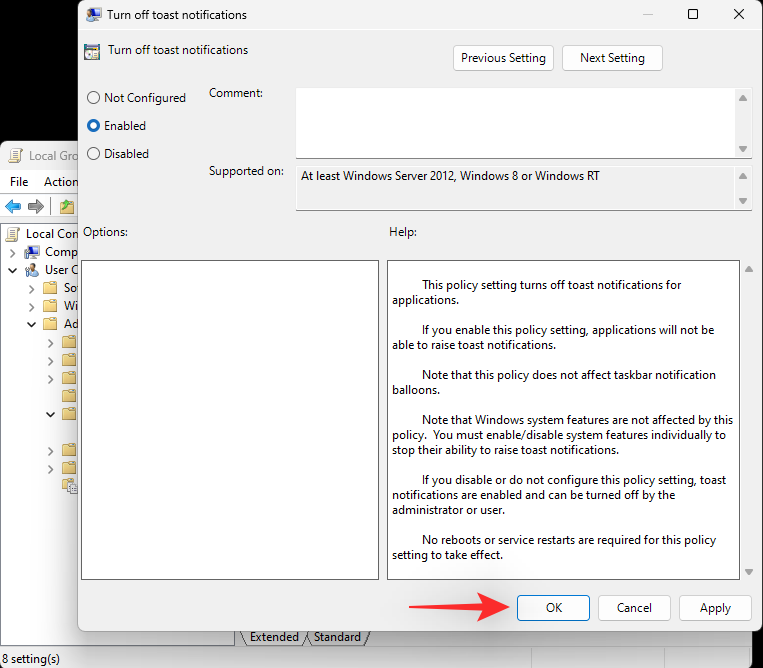
Double-click "Close toast notification".
Click and select Enable.
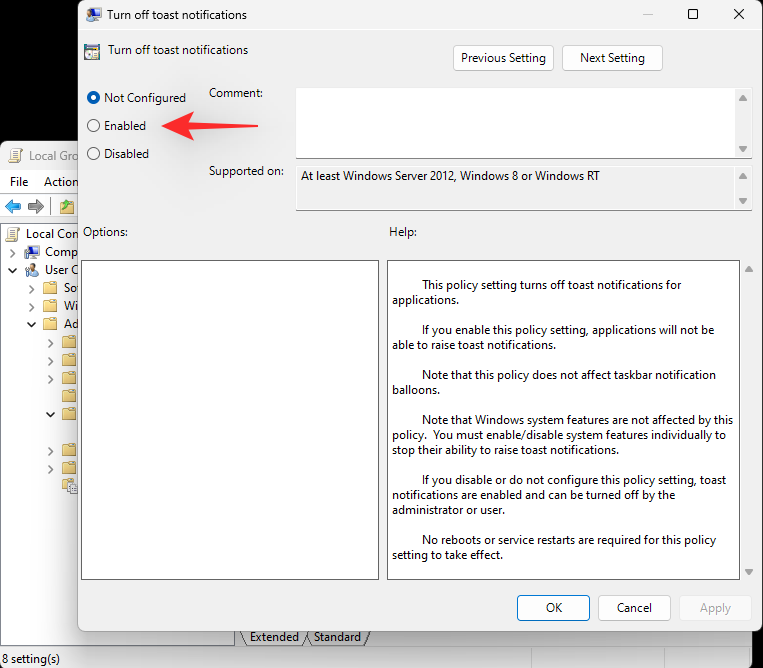
Now click OK to save your changes.
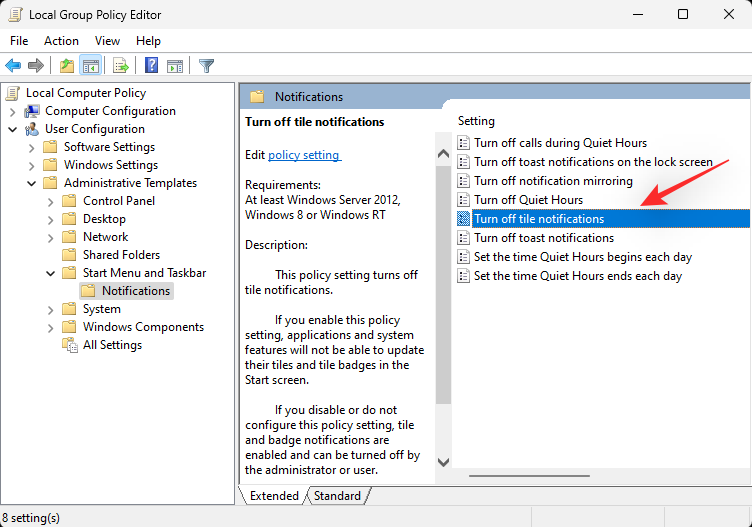
Similarly, double-click "Close Tile Notifications".
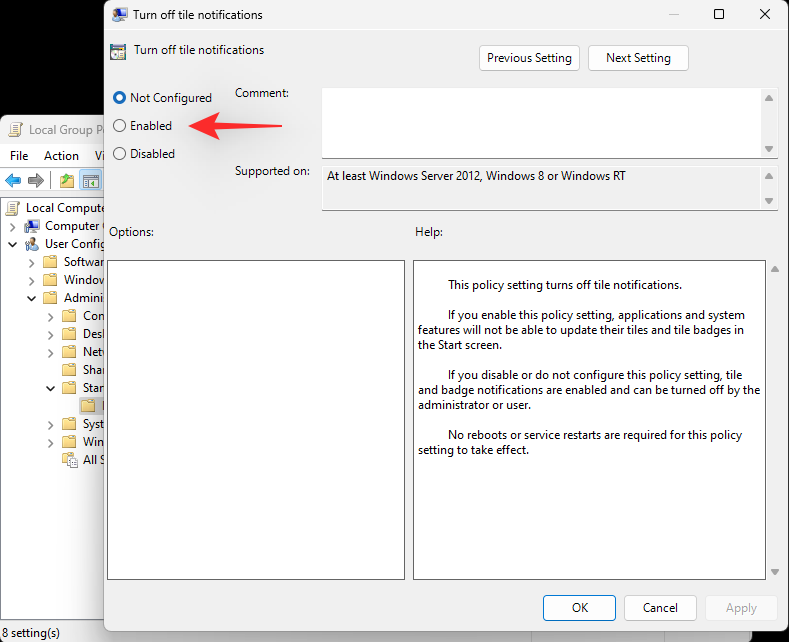
Select "Enable".
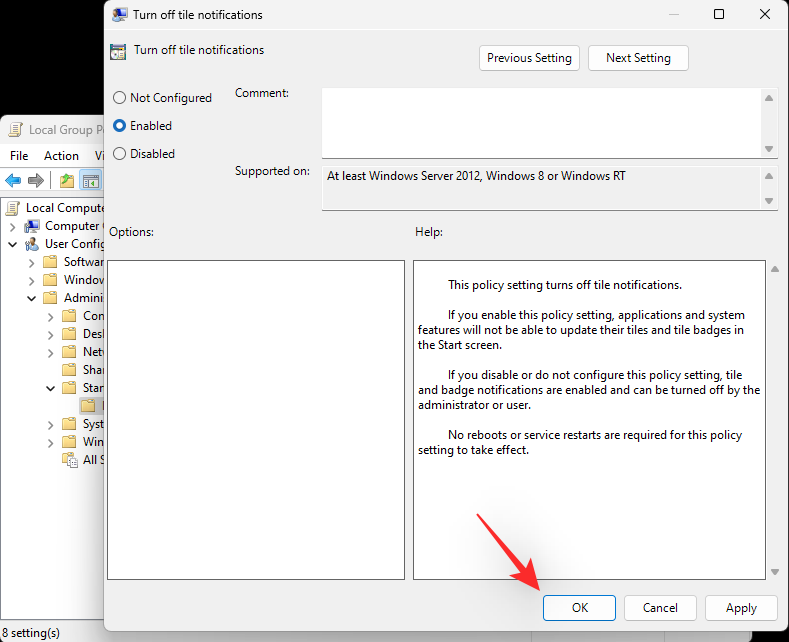
Click "OK".
Now restart your PC and you will find that all notifications on your system have been disabled. Unfortunately, the same drawback is that Action Center is now disabled on your system as well. To access these settings, you can use a third-party widget on your desktop or access them from the Settings app.
Method 6: Use Registry Editor to disable all Notifications and Action Center
If you are using Windows 11 Home Edition, then you can utilize Registry Editor to completely disable all notifications and action centers on your system notify. Please follow the steps below to help you through the process.
NOTE: Just like the Group Policy Editor, these changes will also disable the Action Center on the system. You can use a third-party widget on your desktop to restore quick access functionality or access these options directly from the Settings app.
Press Windows R keyboard, enter the following, and then press Enter keyboard.
regedit
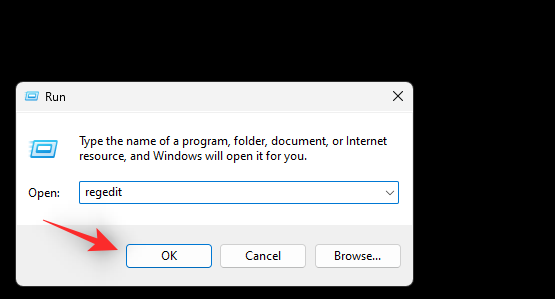
Now use the left sidebar to navigate to the following path. You can also copy and paste the same content in the address bar at the top of the screen.
HKEY_CURRENT_USER\SOFTWARE\Policies\Microsoft\Windows
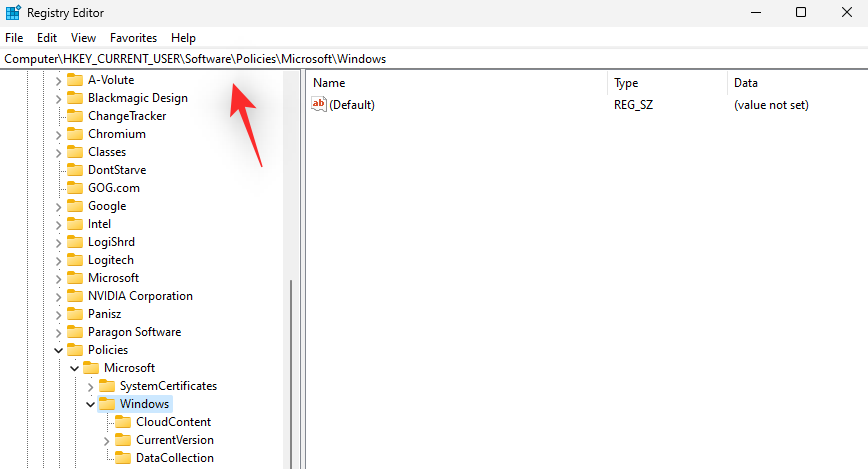
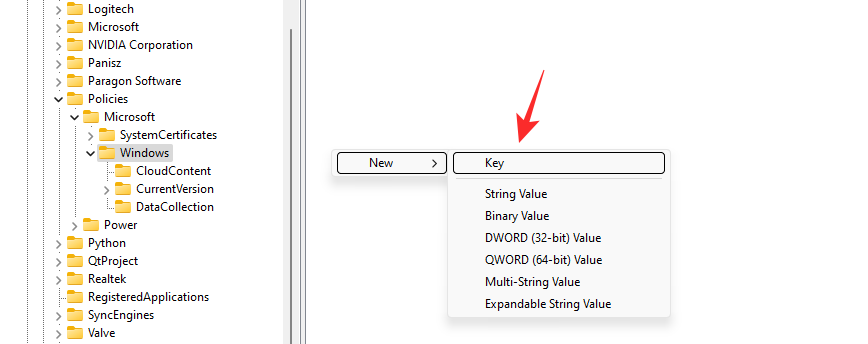
Now right click on the empty space and select New. Make sure "Windows" is selected in the sidebar.

Select "Key".
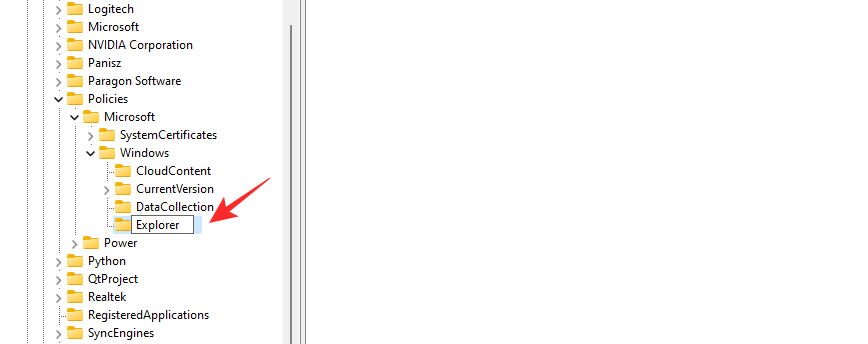
Name the new key "Explorer".
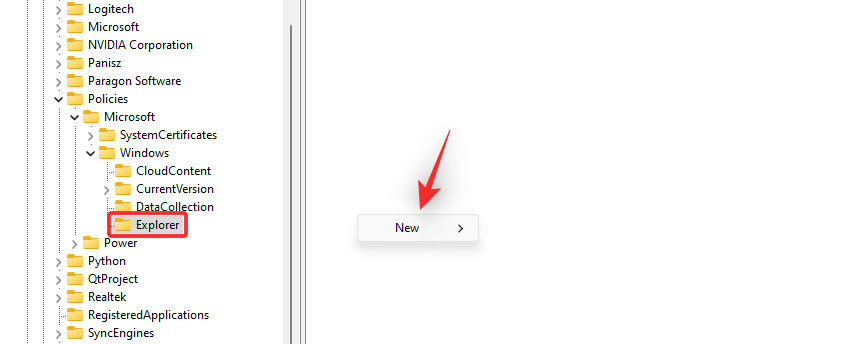
Click and select the new key in the left sidebar. Now right-click on the empty space on the right and select New.
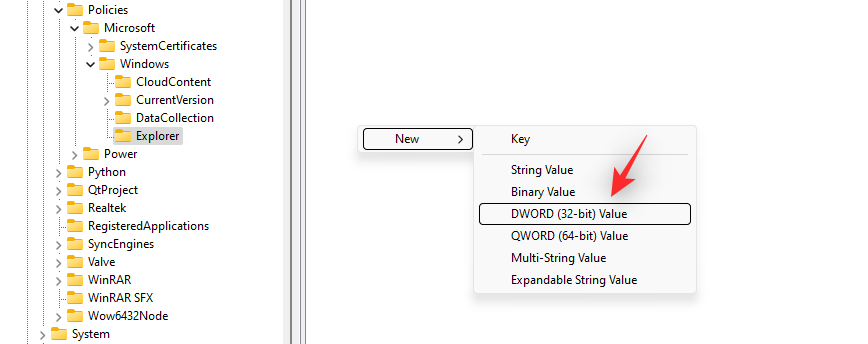
Now select "DWORD (32-bit) Value".
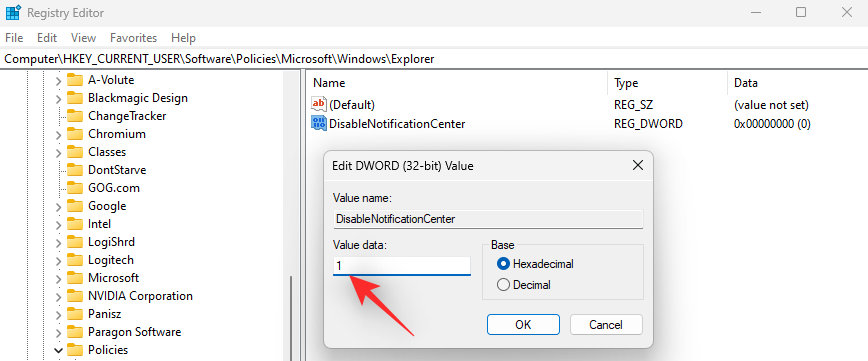
Name the new DWORD value as follows.
DisableNotificationCenter

Double click on the same and set its "Value Data:" to 1.
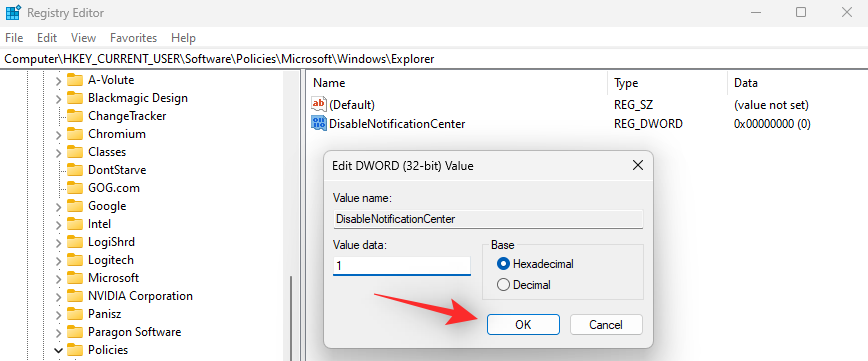
Click "OK" when finished.
#Close Registry Editor and restart your PC for good results. After restarting, Notifications and Action Center will be disabled on your PC.
Method 7: Disable notifications for an app directly from the notification popup
You can disable notifications for the app in question using the current notification itself. Let's take a look at the process.
Click on the lower right corner of the taskbar and look for related notifications.
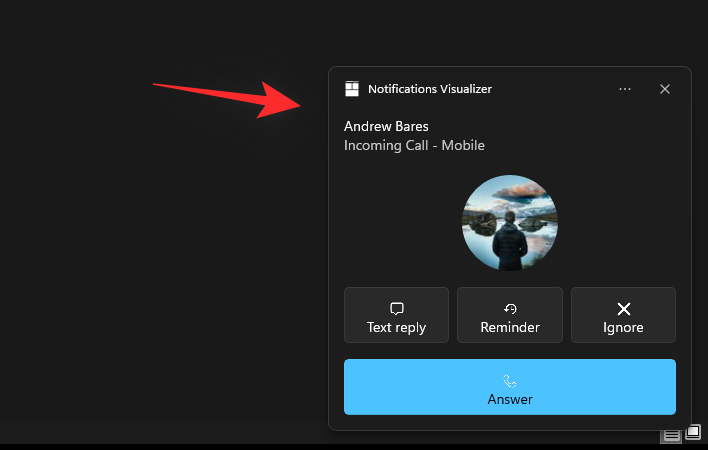
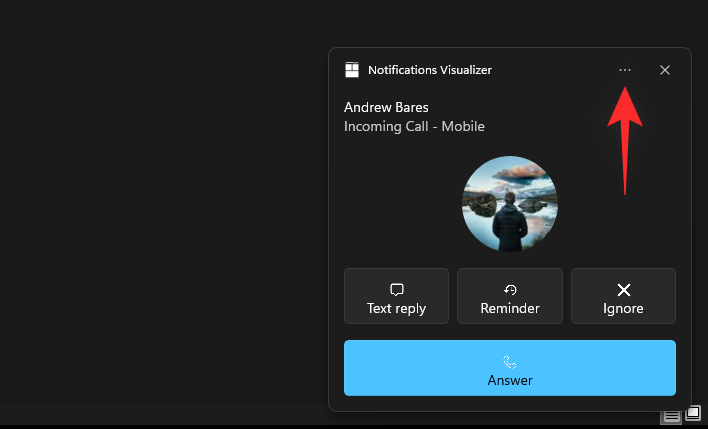
Once found, click on the "three dots" menu icon.
Now click on “Turn off all notifications for [ABCD] app” where [ABCD] is the name of your app.
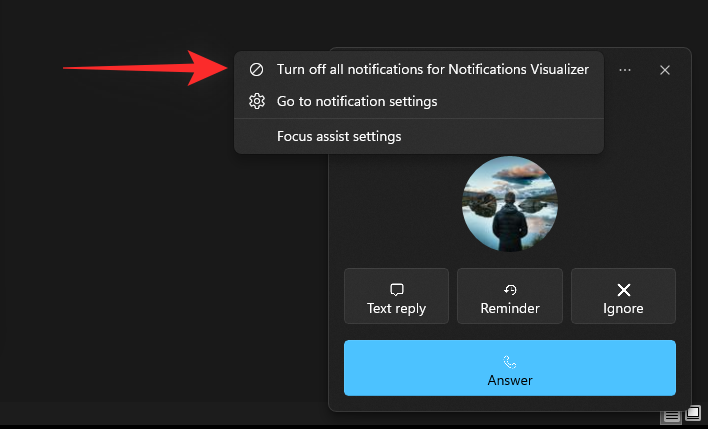
That's it! All notifications for the relevant app will now be disabled on your system.
Method 8: Use Registry Editor to disable toast notifications
You can also create a registry value to manually disable the Action Center on your system.
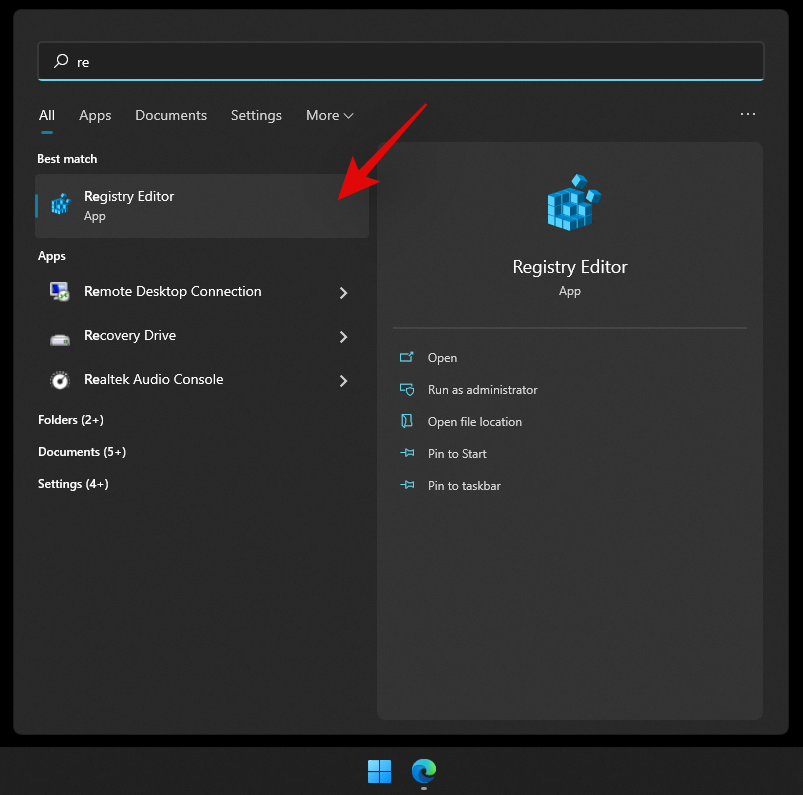
Press Windows S and search for "Regedit". Once the app appears in your search results, click and launch the app.
Now navigate to the following directory.
HKEY_CURRENT_USER\Software\Microsoft\Windows\CurrentVersion\PushNotifications

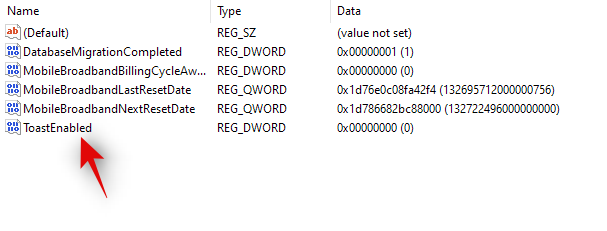
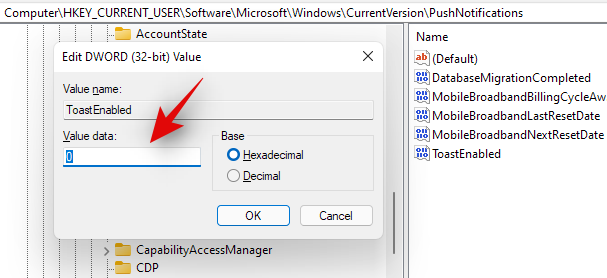
- 0: Enter "0" to disable notifications.
- 1: Enter "1" to enable notifications.
That's it! Notifications will now be disabled on your system.
FAQ
These frequently asked questions are related to disabling notifications on Windows 11 and can help you quickly stay up to date.
What if I just want to disable pop-ups but not notifications?
If you want to selectively disable certain notifications without losing important system updates, then you can use Focus Assist in Windows 11. To disable pop-ups and ensure you receive important system update notifications, you can customize and prioritize notifications.
Can I re-enable notifications on my device?
No matter which method you follow in the tutorial above, you can easily re-enable notifications on your device. You can easily undo all methods used and revert modifications to re-enable notifications on your system.
What are the disadvantages of disabling notifications on Windows 11?
Here are some disadvantages of disabling notifications on Windows 11 PC.
- Lost system updates
- Lost security notifications
- No push notifications
- No third-party app updates
You'll also lose any custom third-party apps that might manage your notifications. Apps like your phone and other mobile device apps will also end up being useless since their prominent function is usually keeping up with mobile device notifications on your desktop.
Can I turn off notifications for a specific app?
You can follow method 3 in the tutorial to disable individual app notifications on desktop devices in the OEM apps section.
Can I automate focus mode based on my daily routine?
Yes, Focus Assist allows you to define custom times and automate Focus' functions on your Windows 11 PC. You can find out more about this in this comprehensive article of ours.
The above is the detailed content of How to stop pop-ups on Windows 11. For more information, please follow other related articles on the PHP Chinese website!

Hot AI Tools

Undresser.AI Undress
AI-powered app for creating realistic nude photos

AI Clothes Remover
Online AI tool for removing clothes from photos.

Undress AI Tool
Undress images for free

Clothoff.io
AI clothes remover

AI Hentai Generator
Generate AI Hentai for free.

Hot Article

Hot Tools

Notepad++7.3.1
Easy-to-use and free code editor

SublimeText3 Chinese version
Chinese version, very easy to use

Zend Studio 13.0.1
Powerful PHP integrated development environment

Dreamweaver CS6
Visual web development tools

SublimeText3 Mac version
God-level code editing software (SublimeText3)

Hot Topics
 How to update the latest version of Bybit Exchange? Will there be any impact if it is not updated?
Feb 21, 2025 pm 10:54 PM
The way to update ByBit exchanges varies by platform and device: Mobile: Check for updates and install in the app store. Desktop Client: Check for updates in the Help menu and install automatically. Web page: You need to manually access the official website for updates. Failure to update the exchange can lead to security vulnerabilities, functional limitations, compatibility issues and reduced transaction execution efficiency.
 deepseek web version entrance deepseek official website entrance
Feb 19, 2025 pm 04:54 PM
DeepSeek is a powerful intelligent search and analysis tool that provides two access methods: web version and official website. The web version is convenient and efficient, and can be used without installation; the official website provides comprehensive product information, download resources and support services. Whether individuals or corporate users, they can easily obtain and analyze massive data through DeepSeek to improve work efficiency, assist decision-making and promote innovation.
 Pi Node Teaching: What is a Pi Node? How to install and set up Pi Node?
Mar 05, 2025 pm 05:57 PM
Detailed explanation and installation guide for PiNetwork nodes This article will introduce the PiNetwork ecosystem in detail - Pi nodes, a key role in the PiNetwork ecosystem, and provide complete steps for installation and configuration. After the launch of the PiNetwork blockchain test network, Pi nodes have become an important part of many pioneers actively participating in the testing, preparing for the upcoming main network release. If you don’t know PiNetwork yet, please refer to what is Picoin? What is the price for listing? Pi usage, mining and security analysis. What is PiNetwork? The PiNetwork project started in 2019 and owns its exclusive cryptocurrency Pi Coin. The project aims to create a one that everyone can participate
 How to install deepseek
Feb 19, 2025 pm 05:48 PM
There are many ways to install DeepSeek, including: compile from source (for experienced developers) using precompiled packages (for Windows users) using Docker containers (for most convenient, no need to worry about compatibility) No matter which method you choose, Please read the official documents carefully and prepare them fully to avoid unnecessary trouble.
 Coinsuper exchange software channel official website entrance
Feb 21, 2025 pm 10:39 PM
The official website entrance of the Coinsuper Exchange: https://www.coinsuper.com. The client download channels are: Windows client, macOS client, and mobile (iOS/Android). Registration requires an email, mobile phone number and password, and you need to complete real-name authentication before you can trade. The platform provides a variety of digital asset transactions, including Bitcoin, Ethereum, etc., with the transaction fee rate of 0.1% for both orders and acceptors. Security safeguards include cold wallet storage, dual-factor verification, anti-money laundering and anti-terrorism financing measures, and with security public
 Ouyi okx installation package is directly included
Feb 21, 2025 pm 08:00 PM
Ouyi OKX, the world's leading digital asset exchange, has now launched an official installation package to provide a safe and convenient trading experience. The OKX installation package of Ouyi does not need to be accessed through a browser. It can directly install independent applications on the device, creating a stable and efficient trading platform for users. The installation process is simple and easy to understand. Users only need to download the latest version of the installation package and follow the prompts to complete the installation step by step.
 BITGet official website installation (2025 beginner's guide)
Feb 21, 2025 pm 08:42 PM
BITGet is a cryptocurrency exchange that provides a variety of trading services including spot trading, contract trading and derivatives. Founded in 2018, the exchange is headquartered in Singapore and is committed to providing users with a safe and reliable trading platform. BITGet offers a variety of trading pairs, including BTC/USDT, ETH/USDT and XRP/USDT. Additionally, the exchange has a reputation for security and liquidity and offers a variety of features such as premium order types, leveraged trading and 24/7 customer support.
 Get the gate.io installation package for free
Feb 21, 2025 pm 08:21 PM
Gate.io is a popular cryptocurrency exchange that users can use by downloading its installation package and installing it on their devices. The steps to obtain the installation package are as follows: Visit the official website of Gate.io, click "Download", select the corresponding operating system (Windows, Mac or Linux), and download the installation package to your computer. It is recommended to temporarily disable antivirus software or firewall during installation to ensure smooth installation. After completion, the user needs to create a Gate.io account to start using it.


