

What is the method for building a Mysql cluster with docker?

Docker basic instructions:
Update software package
yum -y update
Install docker virtual machine (centos 7)
yum install -y docker
Run, restart, and shut down docker Virtual machine
service docker start
service docker stop
Search image
docker search 镜像名称
Download image
docker pull 镜像名称
View image
docker images
Delete image
docker rmi 镜像名称
Run container
docker run 启动参数 镜像名称
View the container list
docker ps -a
When we want to use the java environment, we can do this:
搜索:
[root@vm_71_225_centos ~]# docker search java
index    name                          description                   stars   official  automated
docker.io  docker.io/node                     node.js is a javascript-based platform for...  5752   [ok]
docker.io  docker.io/tomcat                    apache tomcat is an open source implementa...  1891   [ok]
docker.io  docker.io/java                     java is a concurrent, class-based, and obj...  1745   [ok]
docker.io  docker.io/openjdk                   openjdk is an open-source implementation o...  1031   [ok]
下载:
[root@vm_71_225_centos ~]# docker pull docker.io/java
using default tag: latest
trying to pull repository docker.io/library/java ...
latest: pulling from docker.io/library/java
5040bd298390: downloading [=>                         ] 1.572 mb/51.36 mb
运行:
[root@vm_71_225_centos ~]# docker run -it --name myjava docker.io/java bash
root@25623e12b759:/# java


-i: 以交互模式运行容器,通常与 -t 同时使用;


-t: 为容器重新分配一个伪输入终端,通常与 -i 同时使用;
Install the pxc cluster (no mysql pxc cluster and replication here) The advantages and disadvantages of the cluster solution are explained. Here we choose the pxc cluster solution [multi-node backup and strong federation]):
Install the pxc image
docker pull percona/percona-xtradb-cluster
View the local image
[root@vm_71_225_centos ~]# docker images
repository                 tag         image id      created       size
docker.io/hello-world           latest       e38bc07ac18e    2 months ago    1.85 kb
docker.io/percona/percona-xtradb-cluster  latest       f1439de62087    3 months ago    413 mb
docker.io/java               latest       d23bdf5b1b1b    17 months ago    643 mb
docker.io/percona/percona-xtradb-cluster is too long, change the name:
[root@vm_71_225_centos ~]# docker tag percona/percona-xtradb-cluster pxc
[root@vm_71_225_centos ~]# docker images
repository                 tag         image id      created       size
docker.io/hello-world           latest       e38bc07ac18e    2 months ago    1.85 kb
docker.io/percona/percona-xtradb-cluster  latest       f1439de62087    3 months ago    413 mb
pxc                    latest       f1439de62087    3 months ago    413 mb
docker.io/java               latest       d23bdf5b1b1b    17 months ago    643 mb
Create net1 network segment:
docker network create --subnet=172.18.0.0/16 net1
Create five data volumes (pxc cannot be accessed directly The data of the host group machine, so create five docker data volumes)
docker volume create v1
docker volume create v2
docker volume create v3
docker volume create v4
docker volume create v5
Check the data volume location:
[root@vm_71_225_centos code]# docker inspect v1
[
  {
    "driver": "local",
    "labels": {},
    "mountpoint": "/var/lib/docker/volumes/v1/_data",
    "name": "v1",
    "options": {},
    "scope": "local"
  }
]Create a 5-node pxc cluster
#创建第1个mysql节点
docker run -d -p 3306:3306 -e mysql_root_password=abc123456 -e cluster_name=pxc -e xtrabackup_password=abc123456 -v v1:/var/lib/mysql -v backup:/data --privileged --name=node1 --net=net1 --ip 172.18.0.2 pxc
Wait for 2 minutes , then create a second node, and wait until the first node is instantiated before opening the second node instance, otherwise it will stop instantly
Create other nodes:
#创建第2个mysql节点
docker run -d -p 3307:3306 -e mysql_root_password=abc123456 -e cluster_name=pxc -e xtrabackup_password=abc123456 -e cluster_join=node1 -v v2:/var/lib/mysql -v backup:/data --privileged --name=node2 --net=net1 --ip 172.18.0.3 pxc
#创建第3个mysql节点
docker run -d -p 3308:3306 -e mysql_root_password=abc123456 -e cluster_name=pxc -e xtrabackup_password=abc123456 -e cluster_join=node1 -v v3:/var/lib/mysql --privileged --name=node3 --net=net1 --ip 172.18.0.4 pxc
#创建第4个mysql节点
docker run -d -p 3309:3306 -e mysql_root_password=abc123456 -e cluster_name=pxc -e xtrabackup_password=abc123456 -e cluster_join=node1 -v v4:/var/lib/mysql --privileged --name=node4 --net=net1 --ip 172.18.0.5 pxc
#创建第5个mysql节点
docker run -d -p 3310:3306 -e mysql_root_password=abc123456 -e cluster_name=pxc -e xtrabackup_password=abc123456 -e cluster_join=node1 -v v5:/var/lib/mysql -v backup:/data --privileged --name=node5 --net=net1 --ip 172.18.0.6 pxc
Test at any time Mysql node creates a database:
mysql -h 172.18.0.3 -uroot -pabc123456

mysql> create database test;
query ok, 1 row affected (0.03 sec)
Log in to other node databases and you can see that synchronization has been carried out to form a simple mysql cluster
Install haproxy for high availability and load balancing
Pull haproxy
docker pull haproxy
Write haproxy configuration file
vi /home/soft/haproxy.cfg
The configuration file is as follows:
global
  #工作目录
  chroot /usr/local/etc/haproxy
  #日志文件,使用rsyslog服务中local5日志设备(/var/log/local5),等级info
  log 127.0.0.1 local5 info
  #守护进程运行
  daemon

defaults
  log global
  mode  http
  #日志格式
  option httplog
  #日志中不记录负载均衡的心跳检测记录
  option dontlognull
  #连接超时(毫秒)
  timeout connect 5000
  #客户端超时(毫秒)
  timeout client 50000
  #服务器超时(毫秒)
  timeout server 50000

#监控界面
listen admin_stats
  #监控界面的访问的ip和端口
  bind 0.0.0.0:8888
  #访问协议
  mode    http
  #uri相对地址
  stats uri  /dbs
  #统计报告格式
  stats realm   global\ statistics
  #登陆帐户信息
  stats auth admin:abc123456
#数据库负载均衡
listen proxy-mysql
  #访问的ip和端口
  bind 0.0.0.0:3306
  #网络协议
  mode tcp
  #负载均衡算法(轮询算法)
  #轮询算法:roundrobin
  #权重算法:static-rr
  #最少连接算法:leastconn
  #请求源ip算法:source
  balance roundrobin
  #日志格式
  option tcplog
  #在mysql中创建一个没有权限的haproxy用户,密码为空。haproxy使用这个账户对mysql数据库心跳检测
  option mysql-check user haproxy
  server mysql_1 172.18.0.2:3306 check weight 1 maxconn 2000
  server mysql_2 172.18.0.3:3306 check weight 1 maxconn 2000
  server mysql_3 172.18.0.4:3306 check weight 1 maxconn 2000
  server mysql_4 172.18.0.5:3306 check weight 1 maxconn 2000
  server mysql_5 172.18.0.6:3306 check weight 1 maxconn 2000
  #使用keepalive检测死链
  option tcpka
Create the first haproxy load balancing server
Copy code The code is as follows:
docker run -it -d -p 4001:8888 -p 4002:3306 -v /home/soft/haproxy:/usr/local/etc/haproxy --name h1 --privileged --net=net1 --ip 172.18.0.7 haproxy
Enter the h1 container and start haproxy
docker exec -it h1 bash
haproxy -f /usr/local/etc/haproxy/haproxy.cfg
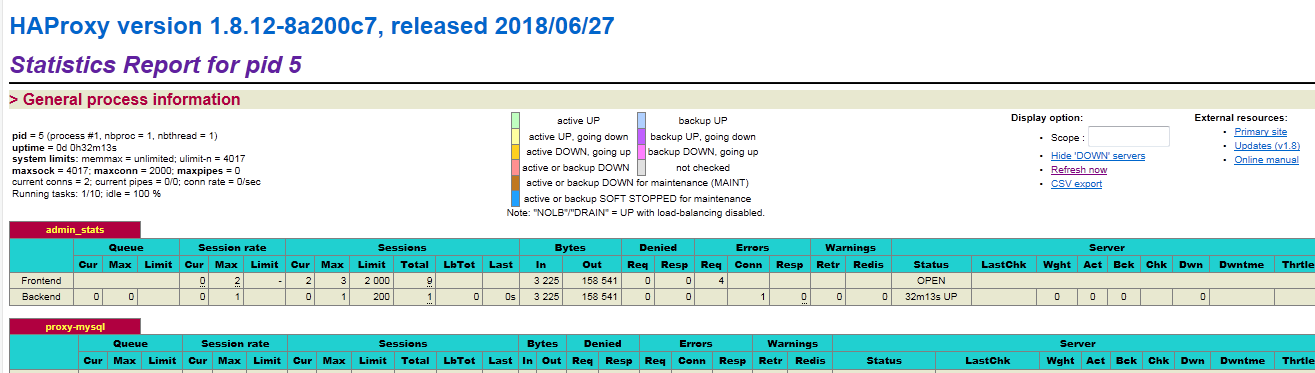
Check whether the startup is successful:
Visit http:// ip:4001/dbs
Install keepalive to achieve double-click hot backup
The above is the detailed content of What is the method for building a Mysql cluster with docker?. For more information, please follow other related articles on the PHP Chinese website!

Hot AI Tools

Undresser.AI Undress
AI-powered app for creating realistic nude photos

AI Clothes Remover
Online AI tool for removing clothes from photos.

Undress AI Tool
Undress images for free

Clothoff.io
AI clothes remover

AI Hentai Generator
Generate AI Hentai for free.

Hot Article
Hot Tools

Notepad++7.3.1
Easy-to-use and free code editor

SublimeText3 Chinese version
Chinese version, very easy to use

Zend Studio 13.0.1
Powerful PHP integrated development environment

Dreamweaver CS6
Visual web development tools

SublimeText3 Mac version
God-level code editing software (SublimeText3)
Hot Topics


 How to optimize MySQL query performance in PHP?
Jun 03, 2024 pm 08:11 PM
How to optimize MySQL query performance in PHP?
Jun 03, 2024 pm 08:11 PM
MySQL query performance can be optimized by building indexes that reduce lookup time from linear complexity to logarithmic complexity. Use PreparedStatements to prevent SQL injection and improve query performance. Limit query results and reduce the amount of data processed by the server. Optimize join queries, including using appropriate join types, creating indexes, and considering using subqueries. Analyze queries to identify bottlenecks; use caching to reduce database load; optimize PHP code to minimize overhead.
 How to use MySQL backup and restore in PHP?
Jun 03, 2024 pm 12:19 PM
How to use MySQL backup and restore in PHP?
Jun 03, 2024 pm 12:19 PM
Backing up and restoring a MySQL database in PHP can be achieved by following these steps: Back up the database: Use the mysqldump command to dump the database into a SQL file. Restore database: Use the mysql command to restore the database from SQL files.
 How to insert data into a MySQL table using PHP?
Jun 02, 2024 pm 02:26 PM
How to insert data into a MySQL table using PHP?
Jun 02, 2024 pm 02:26 PM
How to insert data into MySQL table? Connect to the database: Use mysqli to establish a connection to the database. Prepare the SQL query: Write an INSERT statement to specify the columns and values to be inserted. Execute query: Use the query() method to execute the insertion query. If successful, a confirmation message will be output.
 Pi Node Teaching: What is a Pi Node? How to install and set up Pi Node?
Mar 05, 2025 pm 05:57 PM
Pi Node Teaching: What is a Pi Node? How to install and set up Pi Node?
Mar 05, 2025 pm 05:57 PM
Detailed explanation and installation guide for PiNetwork nodes This article will introduce the PiNetwork ecosystem in detail - Pi nodes, a key role in the PiNetwork ecosystem, and provide complete steps for installation and configuration. After the launch of the PiNetwork blockchain test network, Pi nodes have become an important part of many pioneers actively participating in the testing, preparing for the upcoming main network release. If you don’t know PiNetwork yet, please refer to what is Picoin? What is the price for listing? Pi usage, mining and security analysis. What is PiNetwork? The PiNetwork project started in 2019 and owns its exclusive cryptocurrency Pi Coin. The project aims to create a one that everyone can participate
 How to fix mysql_native_password not loaded errors on MySQL 8.4
Dec 09, 2024 am 11:42 AM
How to fix mysql_native_password not loaded errors on MySQL 8.4
Dec 09, 2024 am 11:42 AM
One of the major changes introduced in MySQL 8.4 (the latest LTS release as of 2024) is that the "MySQL Native Password" plugin is no longer enabled by default. Further, MySQL 9.0 removes this plugin completely. This change affects PHP and other app
 How to install deepseek
Feb 19, 2025 pm 05:48 PM
How to install deepseek
Feb 19, 2025 pm 05:48 PM
There are many ways to install DeepSeek, including: compile from source (for experienced developers) using precompiled packages (for Windows users) using Docker containers (for most convenient, no need to worry about compatibility) No matter which method you choose, Please read the official documents carefully and prepare them fully to avoid unnecessary trouble.
 How to use MySQL stored procedures in PHP?
Jun 02, 2024 pm 02:13 PM
How to use MySQL stored procedures in PHP?
Jun 02, 2024 pm 02:13 PM
To use MySQL stored procedures in PHP: Use PDO or the MySQLi extension to connect to a MySQL database. Prepare the statement to call the stored procedure. Execute the stored procedure. Process the result set (if the stored procedure returns results). Close the database connection.
 How to create a MySQL table using PHP?
Jun 04, 2024 pm 01:57 PM
How to create a MySQL table using PHP?
Jun 04, 2024 pm 01:57 PM
Creating a MySQL table using PHP requires the following steps: Connect to the database. Create the database if it does not exist. Select a database. Create table. Execute the query. Close the connection.
