

How to deploy Web Application Firewall JXWAF

JXWAFOverview
JXWAF is an open source web application firewall that can be used to protect against SQL injection vulnerabilities, XSS vulnerabilities, command execution breaches, etc. Common OWASP attacks, CC attacks, etc., to avoid website data leakage and ensure website availability and security.
Functional features
1. Web application attack protection
Based on semantic recognition protection engine to defend against SQL injection, XSS attack, Webshell addition, Directory traversal extensions, command injection, scan protection, and more.
2. Intelligent protection against CC attacks
Controls the access frequency of a single source IP and provides comprehensive protection based on the number of accesses per unit time. The human-machine recognition algorithm specially developed for CC attack protection can intelligently switch protection modes according to business load, and is especially suitable for protecting against massive IP slow request attacks. By realizing automatic blocking and automatic unblocking, the IP addresses of malicious attacks can be managed without human intervention, which can effectively reduce operating costs.
3. Custom rule protection
Supports condition combinations of commonly used HTTP segments such as IP, URL, BODY, User-Agent, etc., and supports protection scenarios such as hotlink protection and website background protection.
4. IP black and white list
The difference between quickly adding a black and white list and adding an IP black and white list for custom rule protection is that the IP black and white list can be added in large quantities through hash matching, and has basically no impact on performance. Influence.
5. Regional ban
Banning is based on the country or region to which the IP belongs.
6. Interception page customization
You can customize the page to improve user experience.
Application Scenario
JXWAF is developed based on openresty (nginx lua) and supports cloud native deployment. Users can deploy JXWAF to Alibaba Cloud, Tencent Cloud or a server in a self-built computer room, that is, it can be used independently Deployment, you can also utilize the deployment, and use load balancing or dns to build a private cloud WAF deployment. Supports protection of HTTP, HTTPS, and HTTP2 traffic of the website, and supports deployment, embedded deployment, cloud WAF deployment, and partition deployment.
JXWAF can help you solve the following problems:
Prevent data leakage and avoid core data of the website caused by injection expansion, command execution interruption, etc. offset. CC attack protection, blocks malicious requests and ensures website availability. Business security protection.
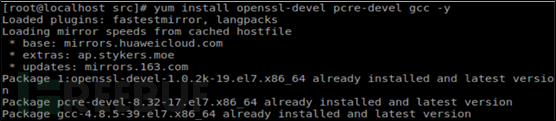
Step1:Install environment dependencies
Step2:Download openresty
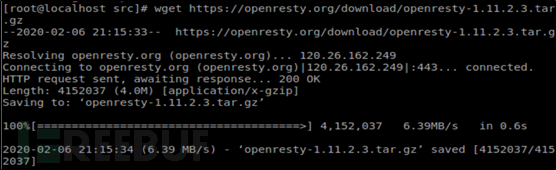
Step3:Unzip openresty

Step4:Switch to the openresty directory and view

#Step5:Compile and install openresty
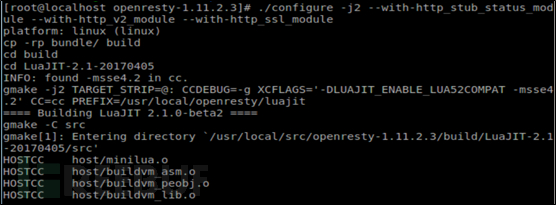
# #Step6:Compile and install

Edit configuration environment variables
 ##Step8:
Add configuration environment variables
 Step9:
Effective immediately
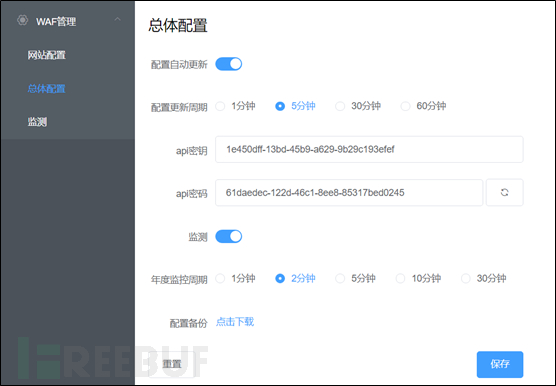
 ##Step10:WAF
##Step11: Switch to Under the jxwaf directory
Step12: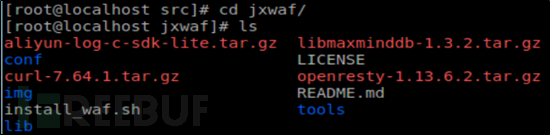 Give running permission
Step13: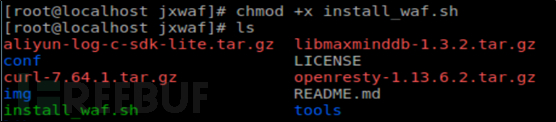 Run install.waf.sh installation script

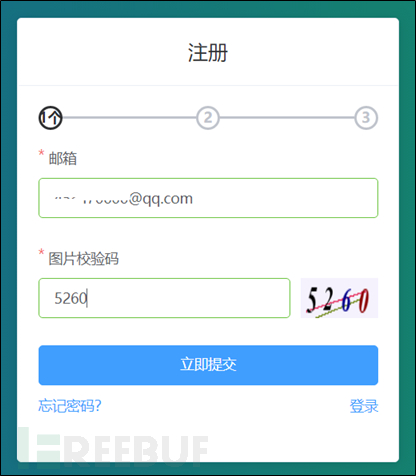
Step14:Openwww.jxwaf.comClick to log in, Then click Register and fill in the electronic fuel tank and picture verification code
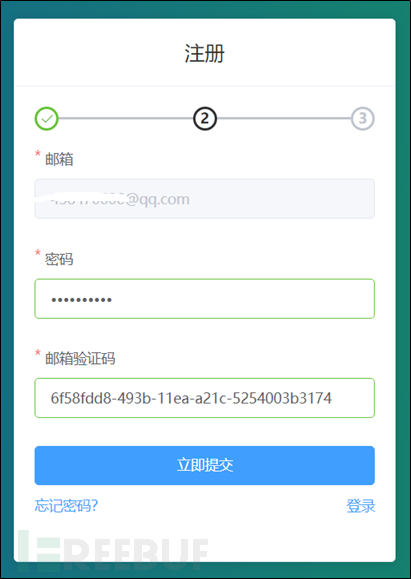
Step15:Fill in your email and password , and the verification code of the receiving email address
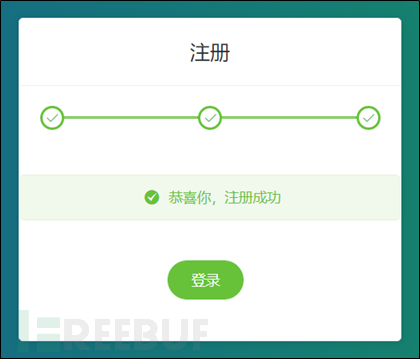
##Step16:Registration successful
Step17:Use the registered account to log in to the backend, Copy the api and email verification codes separately .
Switch to the tools directory

Configure the api key value and api password value

Run nginx
 ##S
##S
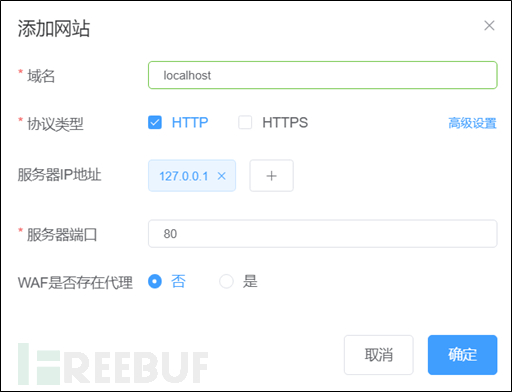
tep21:Enter the background to add the website domain name or IP address
 ##Step22:
##Through personal experience, installation and deployment on the local client, you first need to install the dependent installation package and web server nginx support, because this application firewall There are many modules that require their linkage. JXWAF is configured through the console or a script in the tools directory. Start openresty to reload the jxwaf management center to pull the latest rules configured by the user to complete the entire website protection process. 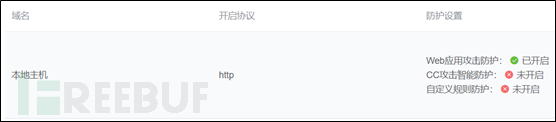
The above is the detailed content of How to deploy Web Application Firewall JXWAF. For more information, please follow other related articles on the PHP Chinese website!

Hot AI Tools

Undresser.AI Undress
AI-powered app for creating realistic nude photos

AI Clothes Remover
Online AI tool for removing clothes from photos.

Undress AI Tool
Undress images for free

Clothoff.io
AI clothes remover

AI Hentai Generator
Generate AI Hentai for free.

Hot Article
Hot Tools

Notepad++7.3.1
Easy-to-use and free code editor

SublimeText3 Chinese version
Chinese version, very easy to use

Zend Studio 13.0.1
Powerful PHP integrated development environment

Dreamweaver CS6
Visual web development tools

SublimeText3 Mac version
God-level code editing software (SublimeText3)
Hot Topics
 1376
1376
 52
52

 Win11 firewall advanced settings gray solution
Dec 24, 2023 pm 07:53 PM
Win11 firewall advanced settings gray solution
Dec 24, 2023 pm 07:53 PM
When setting up the firewall, many friends found that their win11 firewall advanced settings were grayed out and unable to be clicked. This may be caused by not adding a control unit, or by not opening the advanced settings in the correct way. Let’s take a look at how to solve it. Win11 firewall advanced settings gray method one: 1. First, click the start menu below, search and open "Control Panel" at the top 2. Then open "Windows Defender Firewall" 3. After entering, you can open "Advanced Settings" in the left column . Method 2: 1. If the above method cannot be opened, you can right-click "Start Menu" and open "Run" 2. Then enter "mmc" and press Enter to confirm opening. 3. After opening, click on the upper left
 How to enable or disable firewall on Alpine Linux?
Feb 21, 2024 pm 12:45 PM
How to enable or disable firewall on Alpine Linux?
Feb 21, 2024 pm 12:45 PM
On AlpineLinux, you can use the iptables tool to configure and manage firewall rules. Here are the basic steps to enable or disable the firewall on AlpineLinux: Check the firewall status: sudoiptables -L If the output shows rules (for example, there are some INPUT, OUTPUT, or FORWARD rules), the firewall is enabled. If the output is empty, the firewall is currently disabled. Enable firewall: sudoiptables-PINPUTACCEPTsudoiptables-POUTPUTACCEPTsudoiptables-PFORWARDAC
 How to remove the firewall logo on the Win10 desktop icon?
Jan 01, 2024 pm 12:21 PM
How to remove the firewall logo on the Win10 desktop icon?
Jan 01, 2024 pm 12:21 PM
Many friends who use win10 system find that there is a firewall logo on the icon on the computer desktop. What is going on? This makes many friends with obsessive-compulsive disorder particularly uncomfortable. In fact, we only need to open the control panel and click " It can be solved by changing "Change User Account Control Settings". Let's take a look at the specific tutorial. How to cancel the firewall logo on the desktop icon in Windows 10 1. First, right-click the Start menu button next to the computer startup screen, and then select the Control Panel function from the pop-up menu. 2. Then select the "User Account" option and select the "Change User Account Control Settings" item from the new interface that appears. 3. After adjusting the slider in the window to the bottom, click Confirm to exit.
 How to fix UFW status showing as inactive in Linux
Mar 20, 2024 pm 01:50 PM
How to fix UFW status showing as inactive in Linux
Mar 20, 2024 pm 01:50 PM
UFW, also known as Uncomplex Firewall, is adopted by many Linux distributions as their firewall system. UFW is designed to make it easy for novice users to manage firewall settings through both the command line interface and the graphical user interface. A UFW firewall is a system that monitors network traffic according to set rules to protect the network from network sniffing and other attacks. If you have UFW installed on your Linux system but its status shows as inactive, there could be several reasons. In this guide, I will share how to resolve the UFW firewall inactive issue on Linux systems. Why UFW Shows Inactive Status on Linux Why UFW Is Inactive by Default on Linux How to Inactive on Linux
 How to solve if Edge browser is blocked by firewall?
Mar 13, 2024 pm 07:10 PM
How to solve if Edge browser is blocked by firewall?
Mar 13, 2024 pm 07:10 PM
How to solve the problem that the Edge browser is blocked by the firewall? Edge browser is Microsoft's own browser. Some users found that this browser was blocked by the firewall during use. So what's going on? Let this site give users a detailed introduction on how to recover the Edge browser if it is blocked by the firewall. How to restore the Edge browser if it is blocked by the firewall? 1. Check the firewall settings: - Click the "Start" button on the Windows taskbar, and then open "Settings". -In the Settings window, select Update & Security. -exist
 Fix: Recording video in Snipping Tool does not work
Sep 17, 2023 pm 08:09 PM
Fix: Recording video in Snipping Tool does not work
Sep 17, 2023 pm 08:09 PM
While the concept behind the Snipping Tool in Windows 11 is great, one of its main features, recording video, is really disappointing. The screen recording feature is still relatively new, so it can be hard to get by with glitches. Nonetheless, let's take a look at the problem and try to find a solution. So why doesn’t the screenshot tool’s video recording function work? You may not have the latest version of Windows 11 installed. The snipping tool may be corrupted or corrupted. Third-party software such as antivirus software may prevent it from recording your screen. Your computer does not have enough RAM or hard drive space to store the screen recording. Viruses or malware on your computer interfere with the way programs work. How to get Snipping Tool to record my screen in Windows 11
 How to uninstall comodo firewall
Feb 29, 2024 pm 02:00 PM
How to uninstall comodo firewall
Feb 29, 2024 pm 02:00 PM
Due to compatibility issues, some friends may need to uninstall Comodo Firewall, but they cannot delete it no matter how hard they try. Even if they are uninstalled using the uninstall tool, they will only uninstall the registry, but the files are still there, so we can do this. First we open it with win+R, then deactivate the services inside, and then we just delete the folder. How to uninstall comodo firewall: 1. First we open win+R2, then we enter services.msc3, then we find the Windows Management Instrumentation service 4, then we right-click to stop 5, then we delete C:\WINDOWS\system32\
 How to enable administrative access from the cockpit web UI
Mar 20, 2024 pm 06:56 PM
How to enable administrative access from the cockpit web UI
Mar 20, 2024 pm 06:56 PM
Cockpit is a web-based graphical interface for Linux servers. It is mainly intended to make managing Linux servers easier for new/expert users. In this article, we will discuss Cockpit access modes and how to switch administrative access to Cockpit from CockpitWebUI. Content Topics: Cockpit Entry Modes Finding the Current Cockpit Access Mode Enable Administrative Access for Cockpit from CockpitWebUI Disabling Administrative Access for Cockpit from CockpitWebUI Conclusion Cockpit Entry Modes The cockpit has two access modes: Restricted Access: This is the default for the cockpit access mode. In this access mode you cannot access the web user from the cockpit
