

How to implement dual-machine hot backup with Nginx+Keepalived

一.keepalived
keepalived is a service software that ensures high availability of the cluster. The node with high priority in the network is the master responsible for responding to the vip's arp package and mapping the vip and mac addresses. The relationship tells other hosts in the network and will also send vrrp notifications to the network in the form of multicast to inform them of their priority. The backup node is only responsible for processing multicast packets sent by the master. When it finds that the master's priority is not as high as its own, or it does not receive the vrrp notification from the master, the backup node will switch itself to the master state.
2. Environment setup
Environment: qemu-kvm, client debian(9.4.0)
Virtual machine qemu-kvm installation: Introduction to virtualization technology qemu-kvm
1. Use temporary snapshots to create two virtual machines. The following operations need to be performed on both virtual machines.
faramita2016@linux-l9e6:~> qemu-kvm -cpu host -m 512 -hda vdisk.img -net nic -net bridge,br=br0 -snapshot -nographic
2. Set the virtual machine static ip
root@debian:~# cat /etc/network/interfaces
# the primary network interface
allow-hotplug ens3
#iface ens3 inet dhcp
iface ens3 inet static
address 10.0.0.3  // 设置ip
netmask 255.0.0.0
gateway 10.0.0.1
hwaddress ether 52:54:00:12:34:53  // 设置mac地址
3. Activate the network card ip
root@debian:~# ip addr del 10.0.0.8/8 dev ens3  // 删除客户机原有ip
root@debian:~# ifdown ens3
root@debian:~# ifup ens3
4. Install nginx and keepalived
root@debian:~# apt-get install -y nginx keepalived
5. Modify the /var/www/html/index.nginx-debian.html file and add the current virtual machine IP to mark the actual response server
root@debian:~# vi /var/www/html/index.nginx-debian.html
……
<h1 id="welcome-nbsp-to-nbsp-nginx-nbsp">welcome to nginx! 10.0.0.3</h1>
……

3. Software configuration
Primary node virtual machine (10.0.0.3), backup node virtual machine (10.0.0.4), virtual ip (10.0.0.100)
1. On the primary node virtual machine, edit the /etc/keepalived/keepalived.conf file
root@debian:~# cat /etc/keepalived/keepalived.conf
global_defs {
  router_id ri_1  // 标识当前keepalived节点
}

vrrp_script chk_nginx {
  script "/root/chk_nginx.sh"  // 定义监控脚本
  interval 2  // 执行监控脚本的闹中间隔时间
}

vrrp_instance vi_1 {
  state master  // 设置节点为主节点,节点的初始状态
  interface ens3  // 设置绑定虚拟ip的网络接口
  virtual_router_id 50  // vrrp组名,指明节点同属一个组
  priority 100  // 节点优先级,主节点应当高于备用节点
  advert_int 1  // 组播信息发送间隔

  #nopreempt  // 禁止抢占服务,只对备用节点生效,主节点根据priority优先级进行抢占,不受nopreempty控制

  authentication {
    auth_type pass  // 设置认证方式
    auth_pass 123456  // 密码
  }

  virtual_ipaddress {
    10.0.0.100/24  // 设置vip
  }

  track_script {  // 调用监控脚本
    chk_nginx
  }
}2. On the standby node virtual machine, edit the /etc/keepalived/keepalived.conf file, except the following items, Others are the same as the master node
state backup  // 设置节点为主节点,节点的初始状态
  priority 10  // 节点优先级
3. Execute on all nodes, create monitoring scripts, edit the /root/chk_nginx.sh file
root@debian:~# vi /root/chk_nginx.sh
#!/bin/bash
a=`ps -c nginx --no-header | wc -l`
if [ $a -eq 0 ]
then
  /etc/init.d/keepalived stop
fi
4. Verify service
1. Master node virtual machine, start nginx and keepalived services
root@debian:~# /etc/init.d/nginx start
root@debian:~# /etc/init.d/keepalived start
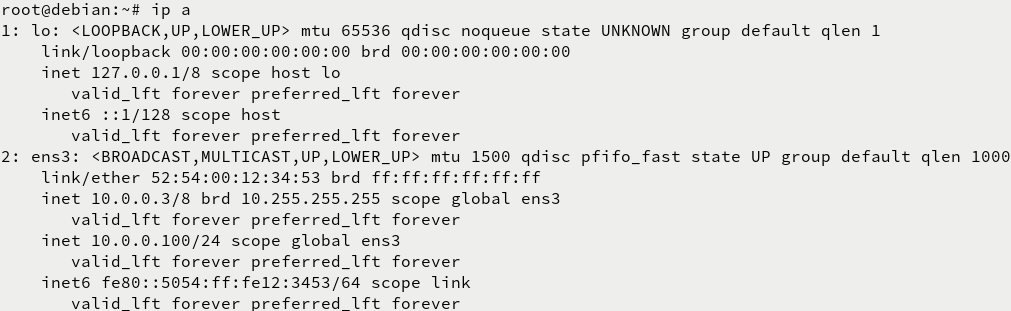
Execute the ip a command, the master node network card ens3 has been bound to vip (10.0 .0.100)
2. On the backup node virtual machine, start nginx and keepalived services
root@debian:~# /etc/init.d/nginx start
root@debian:~# /etc/init.d/keepalived start
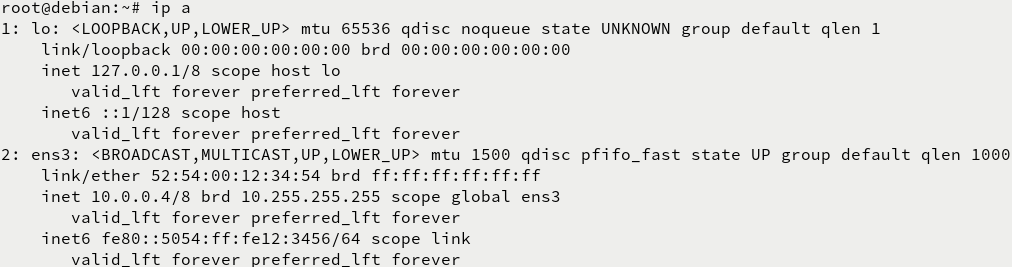
Execute the ip a command, the backup node network card ens3 Unbound vip (10.0.0.100)
3. The host browser accesses http://10.0.0.100

and 10.0 appears. 0.3 web page, indicating that the keepalived service has taken effect and vip has been bound to the main node
4. In the main node virtual machine, close the nginx service and simulate downtime
root@debian:~# /etc/init.d/nginx stop
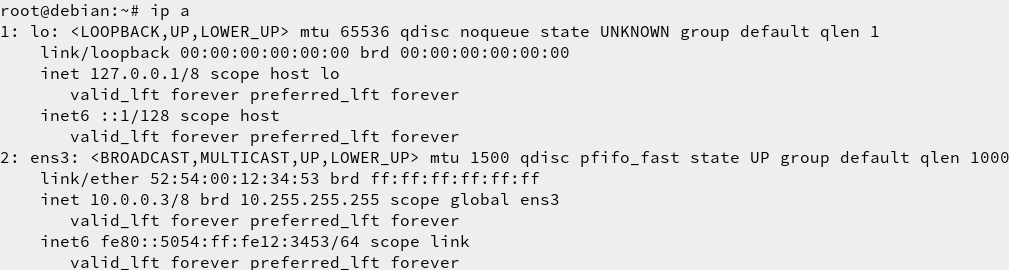
Execute the ip a command, the main node network card ens3 is not bound to vip (10.0.0.100)
5. On the backup node virtual machine, query the ip
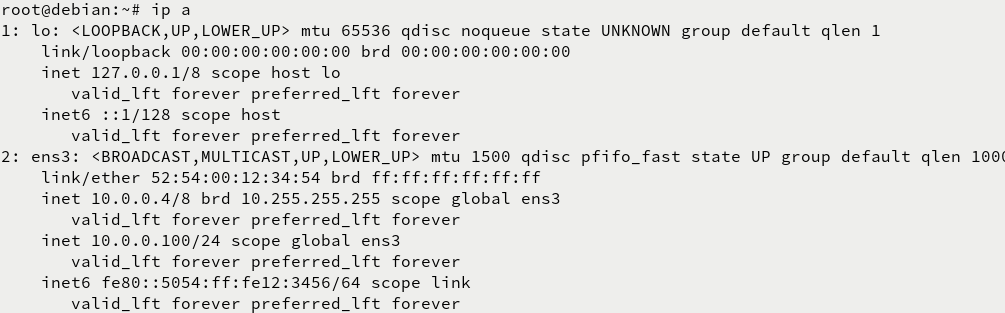
Execute the ip a command, and the backup node network card ens3 has been bound to vip (10.0.0.100)
6. The host browser accesses http://10.0.0.100

The 10.0.0.4 web page appears, indicating that the keepalived service has taken effect and the VIP has been bound to the backup node
The above is the detailed content of How to implement dual-machine hot backup with Nginx+Keepalived. For more information, please follow other related articles on the PHP Chinese website!

Hot AI Tools

Undresser.AI Undress
AI-powered app for creating realistic nude photos

AI Clothes Remover
Online AI tool for removing clothes from photos.

Undress AI Tool
Undress images for free

Clothoff.io
AI clothes remover

AI Hentai Generator
Generate AI Hentai for free.

Hot Article
Hot Tools

Notepad++7.3.1
Easy-to-use and free code editor

SublimeText3 Chinese version
Chinese version, very easy to use

Zend Studio 13.0.1
Powerful PHP integrated development environment

Dreamweaver CS6
Visual web development tools

SublimeText3 Mac version
God-level code editing software (SublimeText3)
Hot Topics
 1378
1378
 52
52

 How to check whether nginx is started
Apr 14, 2025 pm 01:03 PM
How to check whether nginx is started
Apr 14, 2025 pm 01:03 PM
How to confirm whether Nginx is started: 1. Use the command line: systemctl status nginx (Linux/Unix), netstat -ano | findstr 80 (Windows); 2. Check whether port 80 is open; 3. Check the Nginx startup message in the system log; 4. Use third-party tools, such as Nagios, Zabbix, and Icinga.
 How to configure nginx in Windows
Apr 14, 2025 pm 12:57 PM
How to configure nginx in Windows
Apr 14, 2025 pm 12:57 PM
How to configure Nginx in Windows? Install Nginx and create a virtual host configuration. Modify the main configuration file and include the virtual host configuration. Start or reload Nginx. Test the configuration and view the website. Selectively enable SSL and configure SSL certificates. Selectively set the firewall to allow port 80 and 443 traffic.
 How to start nginx in Linux
Apr 14, 2025 pm 12:51 PM
How to start nginx in Linux
Apr 14, 2025 pm 12:51 PM
Steps to start Nginx in Linux: Check whether Nginx is installed. Use systemctl start nginx to start the Nginx service. Use systemctl enable nginx to enable automatic startup of Nginx at system startup. Use systemctl status nginx to verify that the startup is successful. Visit http://localhost in a web browser to view the default welcome page.
 How to check whether nginx is started?
Apr 14, 2025 pm 12:48 PM
How to check whether nginx is started?
Apr 14, 2025 pm 12:48 PM
In Linux, use the following command to check whether Nginx is started: systemctl status nginx judges based on the command output: If "Active: active (running)" is displayed, Nginx is started. If "Active: inactive (dead)" is displayed, Nginx is stopped.
 How to solve nginx304 error
Apr 14, 2025 pm 12:45 PM
How to solve nginx304 error
Apr 14, 2025 pm 12:45 PM
Answer to the question: 304 Not Modified error indicates that the browser has cached the latest resource version of the client request. Solution: 1. Clear the browser cache; 2. Disable the browser cache; 3. Configure Nginx to allow client cache; 4. Check file permissions; 5. Check file hash; 6. Disable CDN or reverse proxy cache; 7. Restart Nginx.
 How to solve nginx403 error
Apr 14, 2025 pm 12:54 PM
How to solve nginx403 error
Apr 14, 2025 pm 12:54 PM
The server does not have permission to access the requested resource, resulting in a nginx 403 error. Solutions include: Check file permissions. Check the .htaccess configuration. Check nginx configuration. Configure SELinux permissions. Check the firewall rules. Troubleshoot other causes such as browser problems, server failures, or other possible errors.
 How to start nginx server
Apr 14, 2025 pm 12:27 PM
How to start nginx server
Apr 14, 2025 pm 12:27 PM
Starting an Nginx server requires different steps according to different operating systems: Linux/Unix system: Install the Nginx package (for example, using apt-get or yum). Use systemctl to start an Nginx service (for example, sudo systemctl start nginx). Windows system: Download and install Windows binary files. Start Nginx using the nginx.exe executable (for example, nginx.exe -c conf\nginx.conf). No matter which operating system you use, you can access the server IP
 How to solve nginx403
Apr 14, 2025 am 10:33 AM
How to solve nginx403
Apr 14, 2025 am 10:33 AM
How to fix Nginx 403 Forbidden error? Check file or directory permissions; 2. Check .htaccess file; 3. Check Nginx configuration file; 4. Restart Nginx. Other possible causes include firewall rules, SELinux settings, or application issues.
