
docker stop redis-node1 redis-node2 redis-node3

How to build a Redis cluster based on Docker

Environment: Docker (Redis:5.0.5 * 3)
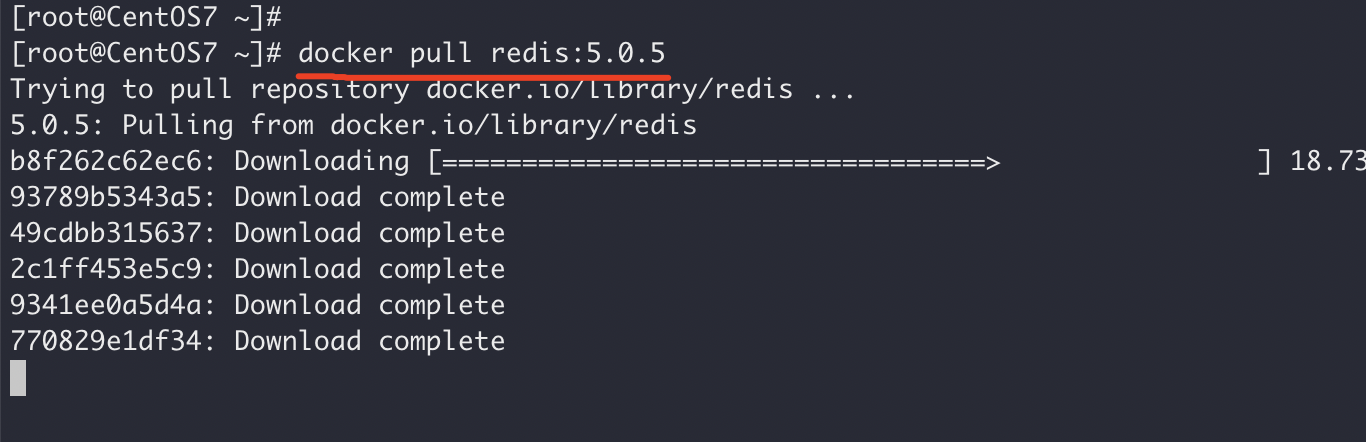
1. Pull the image
docker pull redis:5.0.5
2. Create a Redis container
Create three redis containers:
redis-node1:6379
- ##redis-node2:6380
- redis-node3:6381
docker create --name redis-node1 -v /data/redis-data/node1:/data -p 6379:6379 redis:5.0.5 --cluster-enabled yes --cluster-config-file nodes-node-1.conf

docker create --name redis-node2 -v /data/redis-data/node2:/data -p 6380:6379 redis:5.0.5 --cluster-enabled yes --cluster-config-file nodes-node-2.conf

docker create --name redis-node3 -v /data/redis-data/node3:/data -p 6381:6379 redis:5.0.5 --cluster-enabled yes --cluster-config-file nodes-node-3.conf

docker start:


Exited (1) 3 seconds ago, you can view it through docker logs:

chmod -R 777 /data

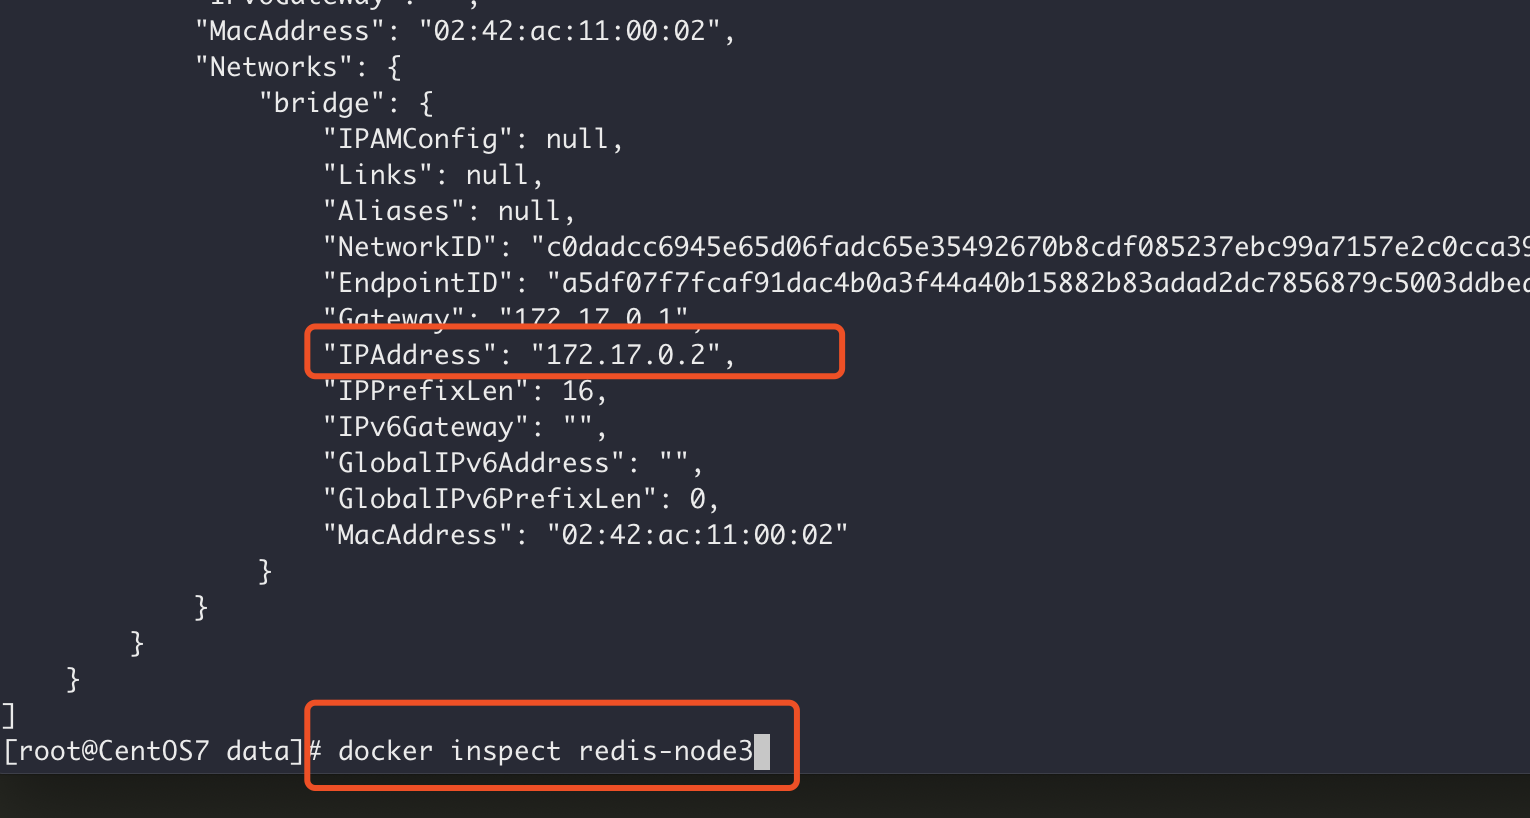
执行「docker inspect redis-node1」得到 redis-node1 ip 信息为:172.17.0.4
执行「docker inspect redis-node2」得到 redis-node2 ip 信息为:172.17.0.3
执行「docker inspect redis-node3」得到 redis-node3 ip 信息为:172.17.0.2
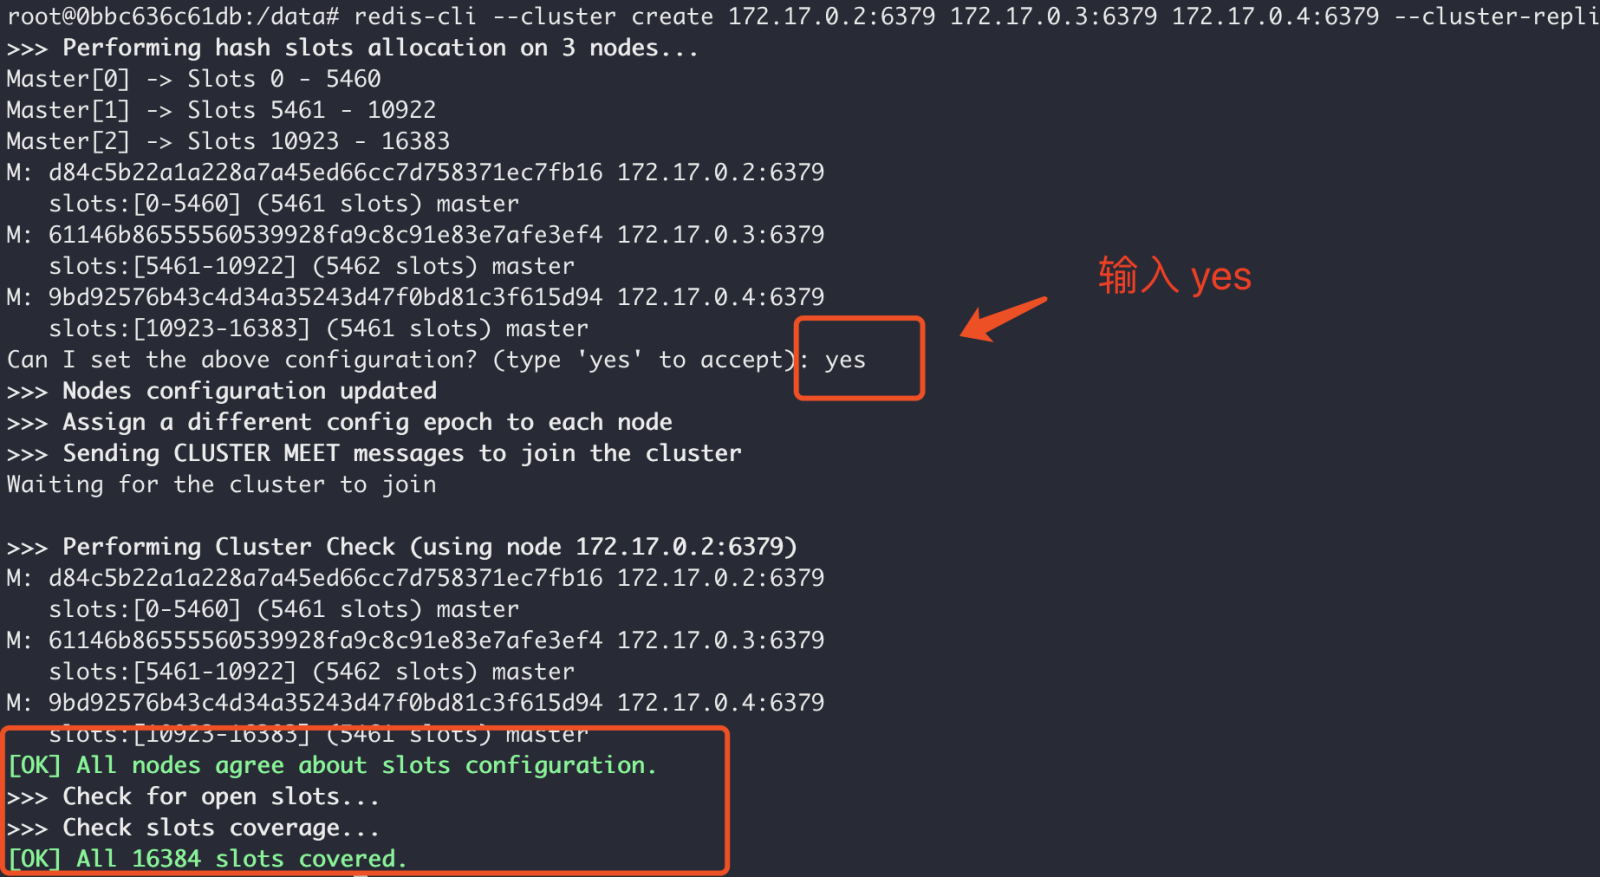
# 这里以进入 node1 为例
docker exec -it redis-node1 /bin/bash

# 接着执行组建集群命令(请根据自己的ip信息进行拼接)
redis-cli --cluster create 172.17.0.2:6379  172.17.0.3:6379  172.17.0.4:6379 --cluster-replicas 0
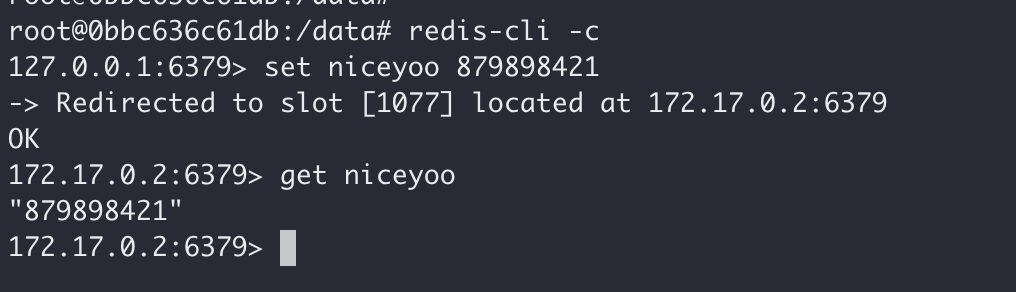
redis-cli -c command to connect to the cluster node, and then set the value. After the set value, it will automatically redirect to the 0.2 ip address, and then pass Get Get it. Successful acquisition proves that the cluster is valid.
ip address is assigned internally by the dock, such as: 172.17.0.2 etc. If the project using redis cluster is not on the same server as the cluster, then the project is You can't use the cluster because access is blocked.
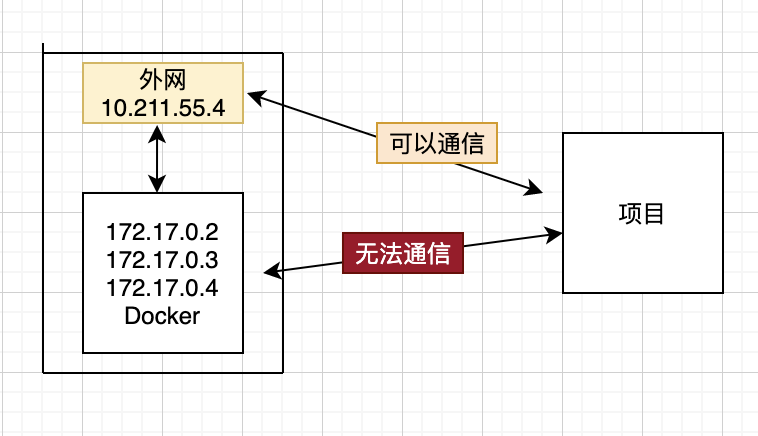
Docker use the host mode network connection type, Docker in Containers created using host mode do not have their own independent network namespace. They share a network space with the physical machine, and can then share all ports and IP of the physical machine. In this way This allows the public network to directly access the container. Although this method has security risks, no other feasible mode has been found yet.
host mode and re-create the container:
docker stop redis-node1 redis-node2 redis-node3
Copy after login
2. Delete The previously created container docker stop redis-node1 redis-node2 redis-node3
docker rm redis-node1 redis-node2 redis-node3

# 清空上面创建的配置文件
rm -rf /data/redis-data/node*
Copy after login
3. Re-create it based on the host mode docker rm redis-node1 redis-node2 redis-node3 # 清空上面创建的配置文件 rm -rf /data/redis-data/node*
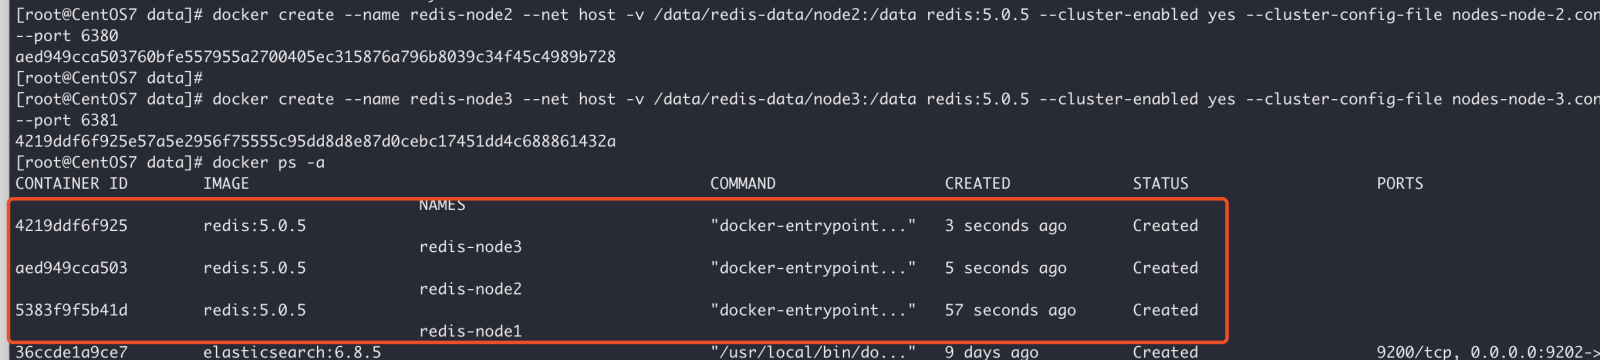
docker create --name redis-node1 --net host -v /data/redis-data/node1:/data redis:5.0.5 --cluster-enabled yes --cluster-config-file nodes-node-1.conf --port 6379

docker create --name redis-node2 --net host -v /data/redis-data/node2:/data redis:5.0.5 --cluster-enabled yes --cluster-config-file nodes-node-2.conf --port 6380

docker create --name redis-node3 --net host -v /data/redis-data/node3:/data redis:5.0.5 --cluster-enabled yes --cluster-config-file nodes-node-3.conf --port 6381
Copy after login
is different from the previous creation command. First, the docker create --name redis-node1 --net host -v /data/redis-data/node1:/data redis:5.0.5 --cluster-enabled yes --cluster-config-file nodes-node-1.conf --port 6379 docker create --name redis-node2 --net host -v /data/redis-data/node2:/data redis:5.0.5 --cluster-enabled yes --cluster-config-file nodes-node-2.conf --port 6380 docker create --name redis-node3 --net host -v /data/redis-data/node3:/data redis:5.0.5 --cluster-enabled yes --cluster-config-file nodes-node-3.conf --port 6381
--net network type is specified host, secondly, in this case, there is no need for port mapping, such as -p 6379:6379, because the container port service needs to be shared externally at this time, so you only need to specify the externally exposed port -p 6379, -p 6380, etc.
# 启动命令
docker start redis-node1 redis-node2 redis-node3
# 进入某一个容器
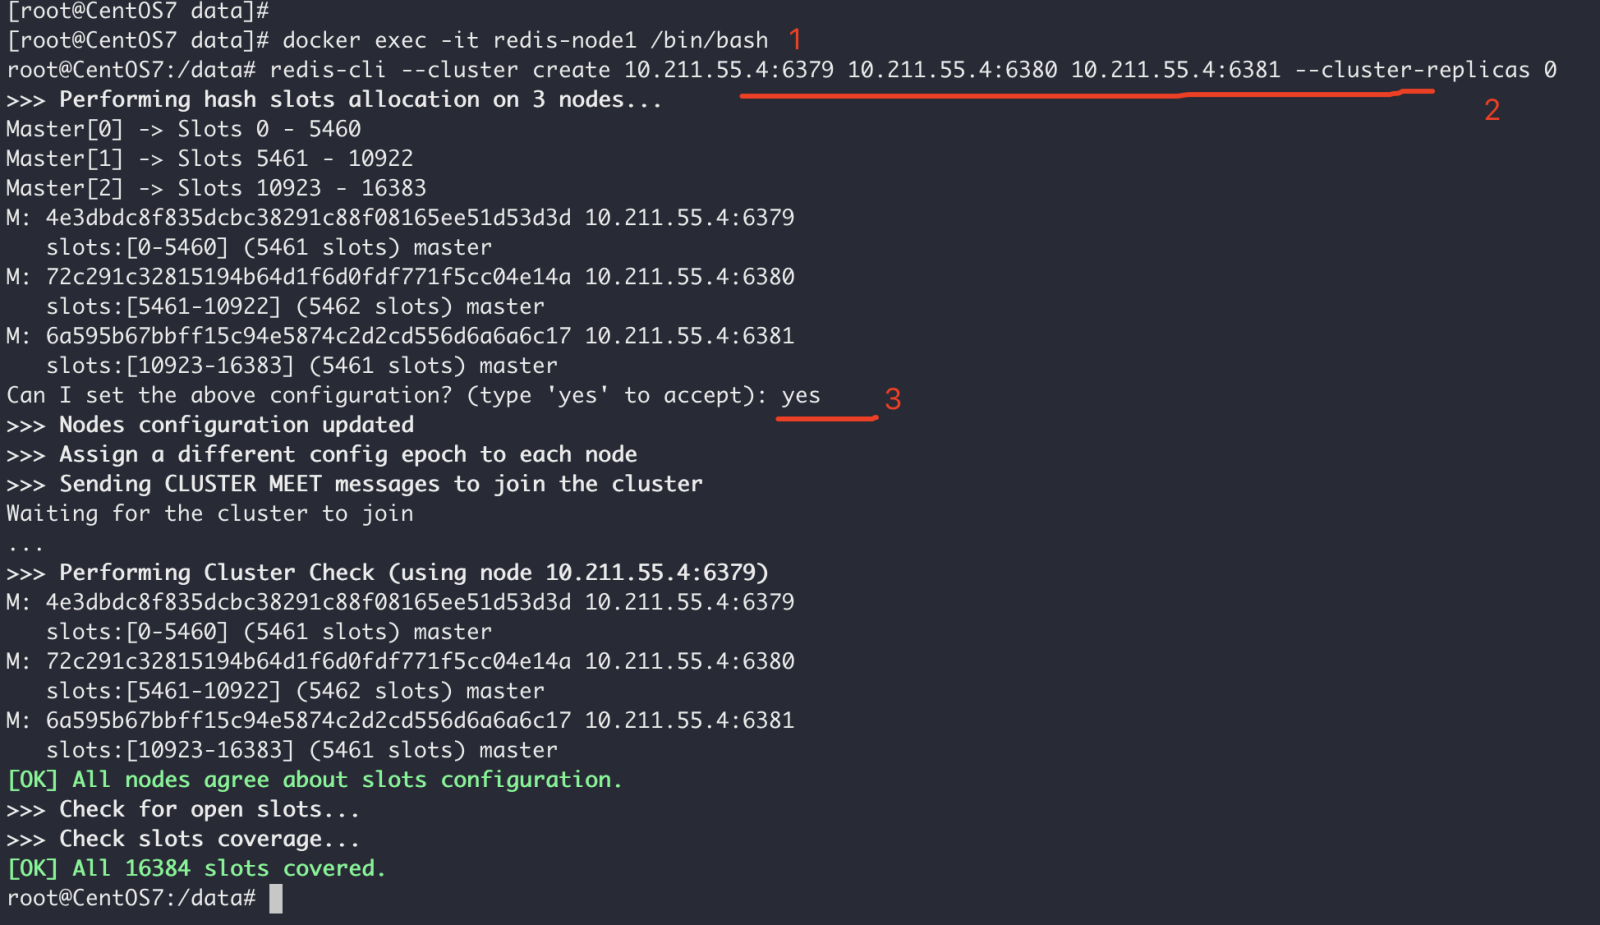
docker exec -it redis-node1 /bin/bash
# 组建集群,10.211.55.4为当前物理机的ip地址
redis-cli --cluster create 10.211.55.4:6379 10.211.55.4:6380 10.211.55.4:6381 --cluster-replicas 0
Copy after login
# 启动命令 docker start redis-node1 redis-node2 redis-node3 # 进入某一个容器 docker exec -it redis-node1 /bin/bash # 组建集群,10.211.55.4为当前物理机的ip地址 redis-cli --cluster create 10.211.55.4:6379 10.211.55.4:6380 10.211.55.4:6381 --cluster-replicas 0
root@CentOS7:/data# redis-cli
127.0.0.1:6379> cluster nodes
72c291c32815194b64d1f6d0fdf771f5cc04e14a 10.211.55.4:6380@16380 master - 0 1590905997358 2 connected 5461-10922
6a595b67bbff15c94e5874c2d2cd556d6a6a6c17 10.211.55.4:6381@16381 master - 0 1590905998362 3 connected 10923-16383
4e3dbdc8f835dcbc38291c88f08165ee51d53d3d 10.211.55.4:6379@16379 myself,master - 0 1590905997000 1 connected 0-5460
127.0.0.1:6379>
Copy after login
6. Test the cluster Use root@CentOS7:/data# redis-cli 127.0.0.1:6379> cluster nodes 72c291c32815194b64d1f6d0fdf771f5cc04e14a 10.211.55.4:6380@16380 master - 0 1590905997358 2 connected 5461-10922 6a595b67bbff15c94e5874c2d2cd556d6a6a6c17 10.211.55.4:6381@16381 master - 0 1590905998362 3 connected 10923-16383 4e3dbdc8f835dcbc38291c88f08165ee51d53d3d 10.211.55.4:6379@16379 myself,master - 0 1590905997000 1 connected 0-5460 127.0.0.1:6379>
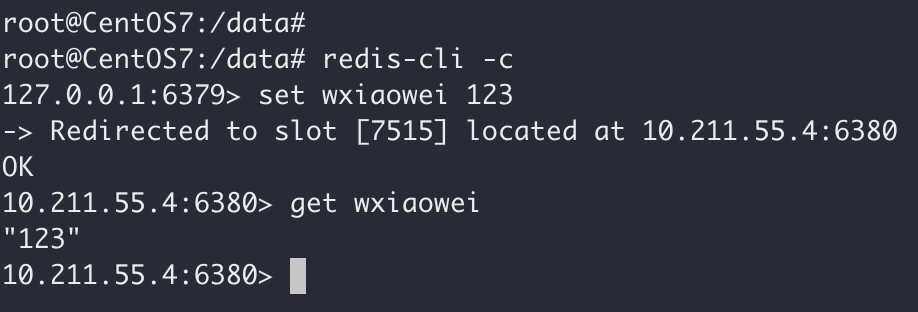
redis-cli -c to connect to the cluster, set a value, and then get the value from other nodes to see if it is successful:
root@CentOS7:/data# redis-cli -c
127.0.0.1:6379> set wxiaowei 123
-> Redirected to slot [7515] located at 10.211.55.4:6380
OK
10.211.55.4:6380> get wxiaowei
"123"
The above is the detailed content of How to build a Redis cluster based on Docker. For more information, please follow other related articles on the PHP Chinese website!

Hot AI Tools

Undresser.AI Undress
AI-powered app for creating realistic nude photos

AI Clothes Remover
Online AI tool for removing clothes from photos.

Undress AI Tool
Undress images for free

Clothoff.io
AI clothes remover

AI Hentai Generator
Generate AI Hentai for free.

Hot Article
Hot Tools

Notepad++7.3.1
Easy-to-use and free code editor

SublimeText3 Chinese version
Chinese version, very easy to use

Zend Studio 13.0.1
Powerful PHP integrated development environment

Dreamweaver CS6
Visual web development tools

SublimeText3 Mac version
God-level code editing software (SublimeText3)
Hot Topics


 Pi Node Teaching: What is a Pi Node? How to install and set up Pi Node?
Mar 05, 2025 pm 05:57 PM
Pi Node Teaching: What is a Pi Node? How to install and set up Pi Node?
Mar 05, 2025 pm 05:57 PM
Detailed explanation and installation guide for PiNetwork nodes This article will introduce the PiNetwork ecosystem in detail - Pi nodes, a key role in the PiNetwork ecosystem, and provide complete steps for installation and configuration. After the launch of the PiNetwork blockchain test network, Pi nodes have become an important part of many pioneers actively participating in the testing, preparing for the upcoming main network release. If you don’t know PiNetwork yet, please refer to what is Picoin? What is the price for listing? Pi usage, mining and security analysis. What is PiNetwork? The PiNetwork project started in 2019 and owns its exclusive cryptocurrency Pi Coin. The project aims to create a one that everyone can participate
 How to install deepseek
Feb 19, 2025 pm 05:48 PM
How to install deepseek
Feb 19, 2025 pm 05:48 PM
There are many ways to install DeepSeek, including: compile from source (for experienced developers) using precompiled packages (for Windows users) using Docker containers (for most convenient, no need to worry about compatibility) No matter which method you choose, Please read the official documents carefully and prepare them fully to avoid unnecessary trouble.
 Caching mechanism and application practice in PHP development
May 09, 2024 pm 01:30 PM
Caching mechanism and application practice in PHP development
May 09, 2024 pm 01:30 PM
In PHP development, the caching mechanism improves performance by temporarily storing frequently accessed data in memory or disk, thereby reducing the number of database accesses. Cache types mainly include memory, file and database cache. Caching can be implemented in PHP using built-in functions or third-party libraries, such as cache_get() and Memcache. Common practical applications include caching database query results to optimize query performance and caching page output to speed up rendering. The caching mechanism effectively improves website response speed, enhances user experience and reduces server load.
 Deploy JavaEE applications using Docker Containers
Jun 05, 2024 pm 08:29 PM
Deploy JavaEE applications using Docker Containers
Jun 05, 2024 pm 08:29 PM
Deploy Java EE applications using Docker containers: Create a Dockerfile to define the image, build the image, run the container and map the port, and then access the application in the browser. Sample JavaEE application: REST API interacts with database, accessible on localhost after deployment via Docker.
 How to upgrade Win11 English 21996 to Simplified Chinese 22000_How to upgrade Win11 English 21996 to Simplified Chinese 22000
May 08, 2024 pm 05:10 PM
How to upgrade Win11 English 21996 to Simplified Chinese 22000_How to upgrade Win11 English 21996 to Simplified Chinese 22000
May 08, 2024 pm 05:10 PM
First you need to set the system language to Simplified Chinese display and restart. Of course, if you have changed the display language to Simplified Chinese before, you can just skip this step. Next, start operating the registry, regedit.exe, directly navigate to HKEY_LOCAL_MACHINESYSTEMCurrentControlSetControlNlsLanguage in the left navigation bar or the upper address bar, and then modify the InstallLanguage key value and Default key value to 0804 (if you want to change it to English en-us, you need First set the system display language to en-us, restart the system and then change everything to 0409) You must restart the system at this point.
 How to use PHP CI/CD to iterate quickly?
May 08, 2024 pm 10:15 PM
How to use PHP CI/CD to iterate quickly?
May 08, 2024 pm 10:15 PM
Answer: Use PHPCI/CD to achieve rapid iteration, including setting up CI/CD pipelines, automated testing and deployment processes. Set up a CI/CD pipeline: Select a CI/CD tool, configure the code repository, and define the build pipeline. Automated testing: Write unit and integration tests and use testing frameworks to simplify testing. Practical case: Using TravisCI: install TravisCI, define the pipeline, enable the pipeline, and view the results. Implement continuous delivery: select deployment tools, define deployment pipelines, and automate deployment. Benefits: Improve development efficiency, reduce errors, and shorten delivery time.
 How to install Docker extension in vscode Steps to install Docker extension in vscode
May 09, 2024 pm 03:25 PM
How to install Docker extension in vscode Steps to install Docker extension in vscode
May 09, 2024 pm 03:25 PM
1. First, after opening the interface, click the extension icon button on the left 2. Then, find the search bar location in the opened extension page 3. Then, enter the word Docker with the mouse to find the extension plug-in 4. Finally, select the target plug-in and click the right Just click the install button in the lower corner
 How to Configure Consul KV Using Docker
Jan 10, 2025 pm 04:31 PM
How to Configure Consul KV Using Docker
Jan 10, 2025 pm 04:31 PM
Consul by HashiCorp is a versatile tool that serves multiple functions in a modern DevOps environment. It’s widely used for service discovery, health checks, load balancing, and, notably, as a distributed key-value (KV) store. The KV store in Consul is perfect for storing dynamic configuration data, feature flags, secrets, and metadata in a highly available, consistent manner across your infrastructure such that it can be dynamically accessed by services in a distributed system. Using Docker to configure Consul’s KV store allows for quick setup and isolated environments, making it ideal for testing and development.
