

What is the method to install MySQL8.0.32 on Centos7.9

Step one, download the compressed package
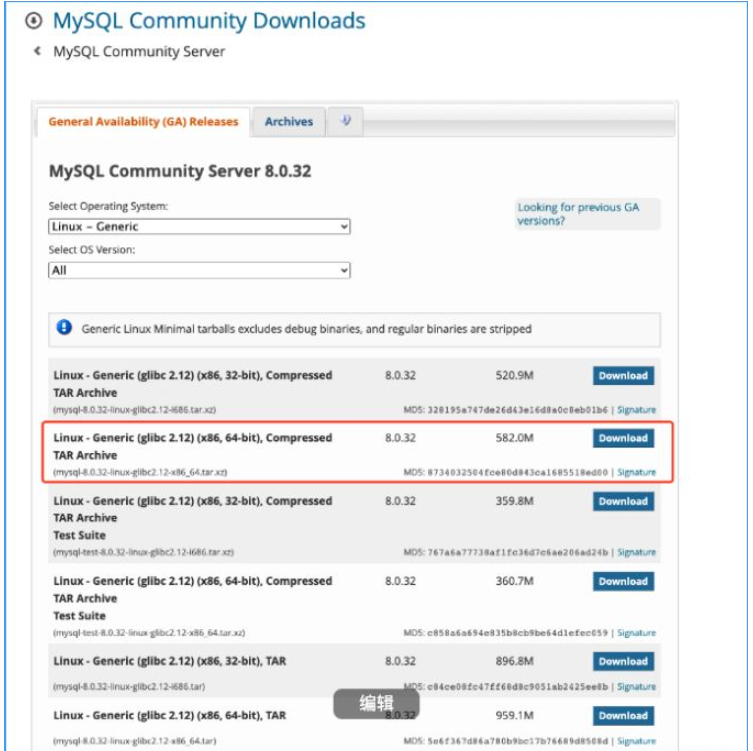
Download the community version of MySQL and download the corresponding version according to your needs, including the minimum installation version.
The second step is to decompress the compressed package and copy it to the installation directory.
Go to the folder where the compressed package is located and decompress it twice. Extract the xz file once and the tar file a second time.
xz -dv mysql-8.0.32-linux-glibc2.12-x86_64.tar.xz
tar -xvf mysql-8.0.32-linux-glibc2.12-x86_64.tar
Copy the decompressed file to the directory where you want to install it. I want to install MySQL to /usr/local/mysql, so run the following command and copy the decompressed file there
sudo cp -r mysql-8.0.32-linux-glibc2.12-x86_64/* /usr/local/mysql
Here we need to modify the permissions of the following installation directory. Since we use the mysql user to run the database, we need to change the owner of the installation directory to mysql. If the system does not have it, we need to add the mysql user and group. We only use mysql to run the program. Therefore, mysql is specified to prohibit login and increase security
sudo groupadd mysql
sudo useradd mysql -s /usr/sbin/nologin -g mysql
Modify the owner of the installation directory to mysql
chown -R mysql:mysql /usr/local/mysql/
The third step is to edit the configuration file
Edit the configuration file, we Place the configuration file in /etc/my.cnf
The configuration is as follows:
[client]
port=3306
# 端口
# mysqlx_port=33060
socket=/var/lib/mysql/mysql.sock
# mysqlx_socket=/var/lib/mysqlx.sock

[mysqld]
# skip-grant-tables
# mysql安装目录
basedir=/usr/local/mysql/
# mysql数据库目录
datadir=/var/lib/mysql/data/
port=3306
innodb_file_per_table=1
character-set-server=UTF8MB4
mysqlx_port=33060
socket = /var/lib/mysql/mysql.sock
# mysqlx_socket=/var/lib/mysql/mysqlx.sock

[mysqld_safe]
# 错误日志
log-error=/var/log/mysql/error.log
# pid文件
pid-file=/usr/local/mysql/mysqld.pid
tmpdir=/var/lib/mysql/mysql
The fourth step is to determine some related directories
Edit the file support-files/mysql. server, modify the relevant directories inside
Installation directory basedir=/usr/local/mysql
Configuration directory/etc/my.cnf
Database file directory datadir=/var /lib/mysql/data/
pid file pid-file=/usr/local/mysql/mysqld.pid
The fifth step, initialize the database
Initialize the database, Note that after successful initialization, the terminal will display the root account password, which must be saved
sudo ./bin/mysqld --defaults-file=/etc/my.cnf --user=mysql --initialize
Step 6. Start the database, connect and change the root password
sudo ./bin/mysqld --defaults-file=/etc/my.cnf --user=mysql
Connect to the database, change the root password
ALTER USER 'root'@'localhost' IDENTIFIED BY '你的密码';
The sixth step, protect the MySQL process
Create a daemon program to ensure that it can start automatically after the server is restarted. Run
sudo vim /etc/systemd/system/mysql.service
The content is as follows, where User and Group are mysql
[Unit]
Description=MySQL Server
Documentation=man:mysqld(8)
After=network.target
After=syslog.target

[Install]
WantedBy=multi-user.target

[Service]
User=mysql
Group=mysql
ExecStart=/usr/local/mysql/bin/mysqld --defaults-file=/etc/my.cnf
LimitNOFILE = 5000
#Restart=on-failure
#RestartPreventExitStatus=1
#PrivateTmp=false
# 使能
sudo systemctl enable mysql.service
# 启动
sudo systemctl start mysql.service
# 查看状态
sudo systemctl status mysql.service
Step 7, Verification
Restart the server to verify whether the mysql process is started
The above is the detailed content of What is the method to install MySQL8.0.32 on Centos7.9. For more information, please follow other related articles on the PHP Chinese website!

Hot AI Tools

Undresser.AI Undress
AI-powered app for creating realistic nude photos

AI Clothes Remover
Online AI tool for removing clothes from photos.

Undress AI Tool
Undress images for free

Clothoff.io
AI clothes remover

AI Hentai Generator
Generate AI Hentai for free.

Hot Article
Hot Tools

Notepad++7.3.1
Easy-to-use and free code editor

SublimeText3 Chinese version
Chinese version, very easy to use

Zend Studio 13.0.1
Powerful PHP integrated development environment

Dreamweaver CS6
Visual web development tools

SublimeText3 Mac version
God-level code editing software (SublimeText3)
Hot Topics
 1377
1377
 52
52

 MySQL: The Ease of Data Management for Beginners
Apr 09, 2025 am 12:07 AM
MySQL: The Ease of Data Management for Beginners
Apr 09, 2025 am 12:07 AM
MySQL is suitable for beginners because it is simple to install, powerful and easy to manage data. 1. Simple installation and configuration, suitable for a variety of operating systems. 2. Support basic operations such as creating databases and tables, inserting, querying, updating and deleting data. 3. Provide advanced functions such as JOIN operations and subqueries. 4. Performance can be improved through indexing, query optimization and table partitioning. 5. Support backup, recovery and security measures to ensure data security and consistency.
 Can I retrieve the database password in Navicat?
Apr 08, 2025 pm 09:51 PM
Can I retrieve the database password in Navicat?
Apr 08, 2025 pm 09:51 PM
Navicat itself does not store the database password, and can only retrieve the encrypted password. Solution: 1. Check the password manager; 2. Check Navicat's "Remember Password" function; 3. Reset the database password; 4. Contact the database administrator.
 MySQL: Simple Concepts for Easy Learning
Apr 10, 2025 am 09:29 AM
MySQL: Simple Concepts for Easy Learning
Apr 10, 2025 am 09:29 AM
MySQL is an open source relational database management system. 1) Create database and tables: Use the CREATEDATABASE and CREATETABLE commands. 2) Basic operations: INSERT, UPDATE, DELETE and SELECT. 3) Advanced operations: JOIN, subquery and transaction processing. 4) Debugging skills: Check syntax, data type and permissions. 5) Optimization suggestions: Use indexes, avoid SELECT* and use transactions.
 How to create navicat premium
Apr 09, 2025 am 07:09 AM
How to create navicat premium
Apr 09, 2025 am 07:09 AM
Create a database using Navicat Premium: Connect to the database server and enter the connection parameters. Right-click on the server and select Create Database. Enter the name of the new database and the specified character set and collation. Connect to the new database and create the table in the Object Browser. Right-click on the table and select Insert Data to insert the data.
 CentOS Interview Questions: Ace Your Linux System Administrator Interview
Apr 09, 2025 am 12:17 AM
CentOS Interview Questions: Ace Your Linux System Administrator Interview
Apr 09, 2025 am 12:17 AM
Frequently asked questions and answers to CentOS interview include: 1. Use the yum or dnf command to install software packages, such as sudoyumininstallnginx. 2. Manage users and groups through useradd and groupadd commands, such as sudouseradd-m-s/bin/bashnewuser. 3. Use firewalld to configure the firewall, such as sudofirewall-cmd--permanent-add-service=http. 4. Set automatic updates to use yum-cron, such as sudoyumininstallyum-cron and configure apply_updates=yes.
 MySQL and SQL: Essential Skills for Developers
Apr 10, 2025 am 09:30 AM
MySQL and SQL: Essential Skills for Developers
Apr 10, 2025 am 09:30 AM
MySQL and SQL are essential skills for developers. 1.MySQL is an open source relational database management system, and SQL is the standard language used to manage and operate databases. 2.MySQL supports multiple storage engines through efficient data storage and retrieval functions, and SQL completes complex data operations through simple statements. 3. Examples of usage include basic queries and advanced queries, such as filtering and sorting by condition. 4. Common errors include syntax errors and performance issues, which can be optimized by checking SQL statements and using EXPLAIN commands. 5. Performance optimization techniques include using indexes, avoiding full table scanning, optimizing JOIN operations and improving code readability.
 How to create a new connection to mysql in navicat
Apr 09, 2025 am 07:21 AM
How to create a new connection to mysql in navicat
Apr 09, 2025 am 07:21 AM
You can create a new MySQL connection in Navicat by following the steps: Open the application and select New Connection (Ctrl N). Select "MySQL" as the connection type. Enter the hostname/IP address, port, username, and password. (Optional) Configure advanced options. Save the connection and enter the connection name.
 How to execute sql in navicat
Apr 08, 2025 pm 11:42 PM
How to execute sql in navicat
Apr 08, 2025 pm 11:42 PM
Steps to perform SQL in Navicat: Connect to the database. Create a SQL Editor window. Write SQL queries or scripts. Click the Run button to execute a query or script. View the results (if the query is executed).
