
 Technology peripherals
AI
Artificial intelligence yolov7 target detection is deployed on ubuntu
Technology peripherals
AI
Artificial intelligence yolov7 target detection is deployed on ubuntu
Artificial intelligence yolov7 target detection is deployed on ubuntu

Today we introduce the deployment of object recognition yolov7 deployment on Ubuntu
1. A brief introduction to Anaconda
First of all, you need to download Anaconda to create a virtual environment, which is currently the most convenient
Creating a virtual environment does not affect other environments of the machine
1. Virtual environment management
1.1conda ‐version # Get the conda version
1.2 conda update conda #Upgrade conda
1.3conda env list (list virtual environment information)
<code>conda create -n <env_name> (创建虚拟环境)# 命令示例conda create -n py38 -yconda create -n py39 python=3.9 -y# 官方推荐使用这种方式conda create -n py39_2 -y && conda install -n py39_2 python=3.9 -y</env_name></code>
Specify the python version when creating the environment, and The results of installing the specified version of python after creating the environment are no different. So why does the official recommend using python=3.9 to specify the python
version when creating the environment? This is because if you want to use python in this virtual environment, you should download python3.9 at the beginning of creating the environment. Then other packages downloaded in this virtual environment will match the dependencies and constraints of python3.9. If you install python3.9 after installing many other packages, dealing with environmental dependencies will become more complicated, and may even lead to some subtle bugs
1.4conda activate
# Command example
conda activate py39
1.5conda deactivate
# Command example
conda deactivate
1.6conda remove -n
# Delete test virtual environment
conda remove -n test --all
conda env list
2. Channels management
2.1 List the channels configured in conda, according to the priority from low to high Level arrangement
conda config --get channels
2.2 Add channels, add domestic channels, which is what we often call adding domestic sources
<code>conda config --add channels https://mirrors.tuna.tsinghua.edu.cn/anaconda/pkgs/free/conda config --add channels https://mirrors.tuna.tsinghua.edu.cn/anaconda/cloud/conda-forge/conda config --add channels https://mirrors.tuna.tsinghua.edu.cn/anaconda/cloud/bioconda/</code>
2.3 Delete channels
<code>方法 1 (通过命令删除):# 首先查看 channelsconda config --get channels# 删除指定的 channelsconda config --remove channels https://mirrors.tuna.tsinghua.edu.cn/anaconda/cloud/bioconda/方法 2 (编辑 .condarc 文件删除想要删除 channels 对应的行)vi ~/.condarc</code>
2. Yolov7 deployment
1. conda create -n py python=3.8
Created successfully, enter the virtual environment
conda activate py
2. Download yolov7
You can rewrite this sentence as: "Use the following command to clone WongKinYiu YOLOv7 code base: git clone https://github.com/WongKinYiu/yolov7.git”
Directly download the compressed package https://github.com/WongKinYiu/yolov7.git
After the download is completed, enter the folder
cd yolov7
Install dependencies
pip install -r requirements.txt
Patiently wait for the dependency package to be installed successfully
3. Download the model file
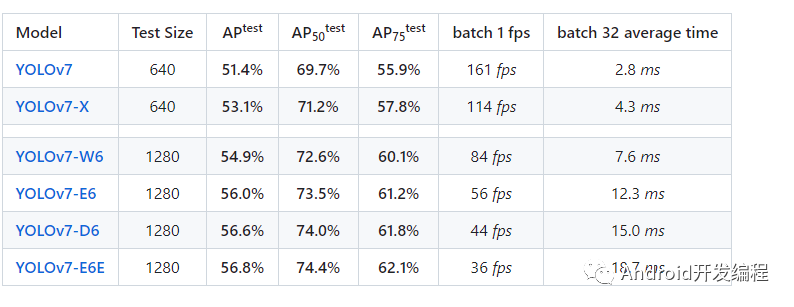
<code>https://github.com/WongKinYiu/yolov7/releases/download/v0.1/yolov7.pthttps://github.com/WongKinYiu/yolov7/releases/download/v0.1/yolov7x.pthttps://github.com/WongKinYiu/yolov7/releases/download/v0.1/yolov7-w6.pthttps://github.com/WongKinYiu/yolov7/releases/download/v0.1/yolov7-e6.pthttps://github.com/WongKinYiu/yolov7/releases/download/v0.1/yolov7-d6.pthttps://github.com/WongKinYiu/yolov7/releases/download/v0.1/yolov7-e6e.pt</code>
and then run
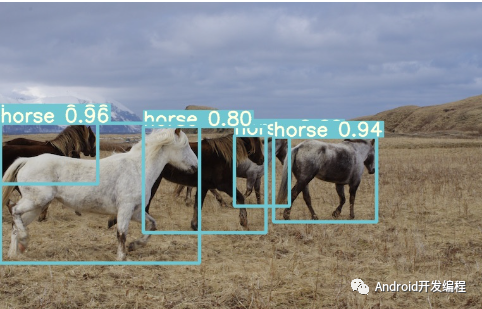
python detect.py --weights yolov7.pt -- conf 0.25 --img-size 640 --source inference/images/horses.jpg
See if there are other modules missing, just download them with pip separately
The above is the detailed content of Artificial intelligence yolov7 target detection is deployed on ubuntu. For more information, please follow other related articles on the PHP Chinese website!

Hot AI Tools

Undresser.AI Undress
AI-powered app for creating realistic nude photos

AI Clothes Remover
Online AI tool for removing clothes from photos.

Undress AI Tool
Undress images for free

Clothoff.io
AI clothes remover

AI Hentai Generator
Generate AI Hentai for free.

Hot Article
Hot Tools

Notepad++7.3.1
Easy-to-use and free code editor

SublimeText3 Chinese version
Chinese version, very easy to use

Zend Studio 13.0.1
Powerful PHP integrated development environment

Dreamweaver CS6
Visual web development tools

SublimeText3 Mac version
God-level code editing software (SublimeText3)
Hot Topics
 1378
1378
 52
52

 Python: Games, GUIs, and More
Apr 13, 2025 am 12:14 AM
Python: Games, GUIs, and More
Apr 13, 2025 am 12:14 AM
Python excels in gaming and GUI development. 1) Game development uses Pygame, providing drawing, audio and other functions, which are suitable for creating 2D games. 2) GUI development can choose Tkinter or PyQt. Tkinter is simple and easy to use, PyQt has rich functions and is suitable for professional development.
 PHP and Python: Comparing Two Popular Programming Languages
Apr 14, 2025 am 12:13 AM
PHP and Python: Comparing Two Popular Programming Languages
Apr 14, 2025 am 12:13 AM
PHP and Python each have their own advantages, and choose according to project requirements. 1.PHP is suitable for web development, especially for rapid development and maintenance of websites. 2. Python is suitable for data science, machine learning and artificial intelligence, with concise syntax and suitable for beginners.
 How debian readdir integrates with other tools
Apr 13, 2025 am 09:42 AM
How debian readdir integrates with other tools
Apr 13, 2025 am 09:42 AM
The readdir function in the Debian system is a system call used to read directory contents and is often used in C programming. This article will explain how to integrate readdir with other tools to enhance its functionality. Method 1: Combining C language program and pipeline First, write a C program to call the readdir function and output the result: #include#include#include#includeintmain(intargc,char*argv[]){DIR*dir;structdirent*entry;if(argc!=2){
 Python and Time: Making the Most of Your Study Time
Apr 14, 2025 am 12:02 AM
Python and Time: Making the Most of Your Study Time
Apr 14, 2025 am 12:02 AM
To maximize the efficiency of learning Python in a limited time, you can use Python's datetime, time, and schedule modules. 1. The datetime module is used to record and plan learning time. 2. The time module helps to set study and rest time. 3. The schedule module automatically arranges weekly learning tasks.
 Nginx SSL Certificate Update Debian Tutorial
Apr 13, 2025 am 07:21 AM
Nginx SSL Certificate Update Debian Tutorial
Apr 13, 2025 am 07:21 AM
This article will guide you on how to update your NginxSSL certificate on your Debian system. Step 1: Install Certbot First, make sure your system has certbot and python3-certbot-nginx packages installed. If not installed, please execute the following command: sudoapt-getupdatesudoapt-getinstallcertbotpython3-certbot-nginx Step 2: Obtain and configure the certificate Use the certbot command to obtain the Let'sEncrypt certificate and configure Nginx: sudocertbot--nginx Follow the prompts to select
 GitLab's plug-in development guide on Debian
Apr 13, 2025 am 08:24 AM
GitLab's plug-in development guide on Debian
Apr 13, 2025 am 08:24 AM
Developing a GitLab plugin on Debian requires some specific steps and knowledge. Here is a basic guide to help you get started with this process. Installing GitLab First, you need to install GitLab on your Debian system. You can refer to the official installation manual of GitLab. Get API access token Before performing API integration, you need to get GitLab's API access token first. Open the GitLab dashboard, find the "AccessTokens" option in the user settings, and generate a new access token. Will be generated
 How to configure HTTPS server in Debian OpenSSL
Apr 13, 2025 am 11:03 AM
How to configure HTTPS server in Debian OpenSSL
Apr 13, 2025 am 11:03 AM
Configuring an HTTPS server on a Debian system involves several steps, including installing the necessary software, generating an SSL certificate, and configuring a web server (such as Apache or Nginx) to use an SSL certificate. Here is a basic guide, assuming you are using an ApacheWeb server. 1. Install the necessary software First, make sure your system is up to date and install Apache and OpenSSL: sudoaptupdatesudoaptupgradesudoaptinsta
 What service is apache
Apr 13, 2025 pm 12:06 PM
What service is apache
Apr 13, 2025 pm 12:06 PM
Apache is the hero behind the Internet. It is not only a web server, but also a powerful platform that supports huge traffic and provides dynamic content. It provides extremely high flexibility through a modular design, allowing for the expansion of various functions as needed. However, modularity also presents configuration and performance challenges that require careful management. Apache is suitable for server scenarios that require highly customizable and meet complex needs.
