How to set the access_log log of nginx
nginx 日志主要有两条指令:1)log_format:用来设置日志格式;2)access_log:用来指定日志文件的存放路径、格式

log_format 日志格式
1、语法:
log_format name(格式名字) 格式样式(即想要得到什么样的日志内容) 示例:
1 |
|
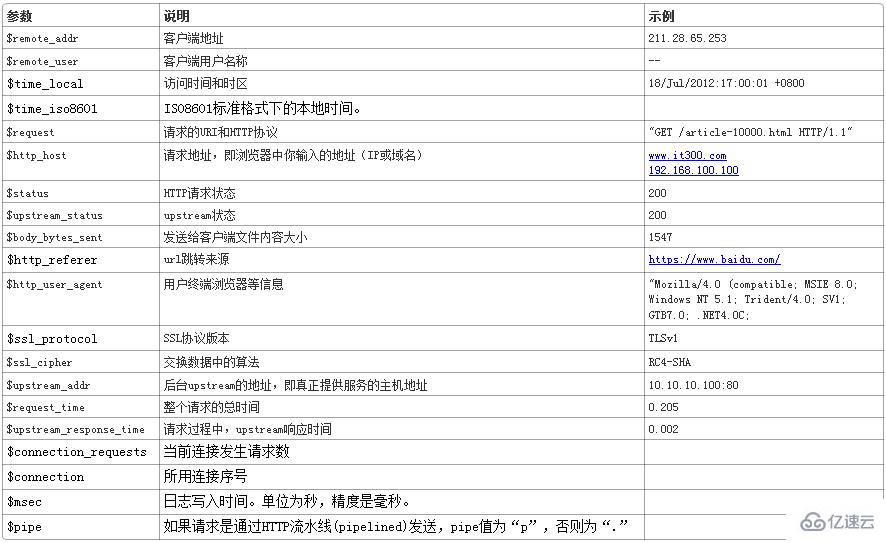
2、具体参数格式

3、x_forwarded_for:
通常web服务器放在反向代理的后面,这样就不能获取到客户的IP地址了,通过$remote_addr拿到的IP地址是反向代理服务器的iP地址。反向代理服务器在转发请求的http头信息中,可以增加x_forwarded_for信息,用以记录原有客户端的IP地址和原来客户端的请求的服务器地址。
注:在server中设置x_forwarded_for
1 |
|
access_log
用了log_format 指令设置了日志格式之后,需要用access_log指令指定日志文件的存放路径;
1、语法:
access_log path(存放路径) format (自定义日志名称) 示例:
1 |
|
2、设置刷盘策略:
1 |
|
buffer 满 32k 才刷盘;假如 buffer 不满 5s 钟强制刷盘。
注:一般log_format在全局设置,可以设置多个。access_log 可以在全局设置,但往往是定义在虚拟主机(server)中的location中。 例如:
1 2 3 4 5 6 7 8 9 10 11 12 13 |
|
3、其他:
1)error_log:
配置错误日志,例如上例。
2)open_log_file_cache:
对于每一条日志记录,都将是先打开文件,再写入日志,然后关闭。你可以使用open_log_file_cache来开启日志文件缓存(默认情况下是关闭的)。 语法:
1 |
|
参数注释如下:
max:设置缓存中的最大文件描述符数量,如果缓存被占满,采用LRU算法将描述符关闭。
inactive:设置存活时间,默认是10s
min_uses:设置在inactive时间段内,日志文件最少使用多少次后,该日志文件描述符记入缓存中,默认是1次
valid:设置检查频率,默认60s
1 |
|
3)日志分析:
通过对日志格式的定义,就可以使用常见的 Linux 命令行工具进行分析了:
查找访问频率最高的 URL 和次数:
1 |
|
查找当前日志文件 500 错误的访问:
1 |
|
查找当前日志文件 500 错误的数量: cat access.log | awk -F ‘^A’ ‘{if(0}’ | wc -l
查找某一分钟内 500 错误访问的数量:
1 |
|
查找耗时超过 1s 的慢请求:
1 |
|
假如只想查看某些位:
1 |
|
查找 502 错误最多的 URL:
1 |
|
查找 200 空白页
1 |
|
切割日志
Nginx 的日志都是写在一个文件当中的,不会自动地进行切割,如果访问量很大的话,将导致日志文件容量非常大,不便于管理和造成Nginx 日志写入效率低下等问题。因此,通常需要对access_log和error_log日志进行分割。 切割日志一般利用USR1信号让nginx产生新的日志。实例:
1 2 3 |
|
1、分析:
将上面的脚本放到crontab中,每小时执行一次(0 ),这样每小时会把当前日志重命名成一个新文件;然后发送USR1这个信号让Nginx 重新生成一个新的日志。(相当于备份日志)
将前7天的日志删除;
2、说明:
在没有执行kill -USR1 $pid之前,即便已经对文件执行了mv命令而改变了文件名称,nginx还是会向新命名的文件”*access.log.2016032623”照常写入日志数据的。原因在于:linux系统中,内核是根据文件描述符来找文件的。
3、logrotates:
使用系统自带的logrotates,也可以实现nginx的日志分割,查看其bash源码,发现也是发送USR1这个信号。
The above is the detailed content of How to set the access_log log of nginx. For more information, please follow other related articles on the PHP Chinese website!

Hot AI Tools

Undresser.AI Undress
AI-powered app for creating realistic nude photos

AI Clothes Remover
Online AI tool for removing clothes from photos.

Undress AI Tool
Undress images for free

Clothoff.io
AI clothes remover

AI Hentai Generator
Generate AI Hentai for free.

Hot Article

Hot Tools

Notepad++7.3.1
Easy-to-use and free code editor

SublimeText3 Chinese version
Chinese version, very easy to use

Zend Studio 13.0.1
Powerful PHP integrated development environment

Dreamweaver CS6
Visual web development tools

SublimeText3 Mac version
God-level code editing software (SublimeText3)

Hot Topics
 How to allow external network access to tomcat server
Apr 21, 2024 am 07:22 AM
To allow the Tomcat server to access the external network, you need to: modify the Tomcat configuration file to allow external connections. Add a firewall rule to allow access to the Tomcat server port. Create a DNS record pointing the domain name to the Tomcat server public IP. Optional: Use a reverse proxy to improve security and performance. Optional: Set up HTTPS for increased security.
 What are the nginx start and stop commands?
Apr 02, 2024 pm 08:45 PM
The start and stop commands of Nginx are nginx and nginx -s quit respectively. The start command starts the server directly, while the stop command gracefully shuts down the server, allowing all current requests to be processed. Other available stop signals include stop and reload.
 How to run thinkphp
Apr 09, 2024 pm 05:39 PM
Steps to run ThinkPHP Framework locally: Download and unzip ThinkPHP Framework to a local directory. Create a virtual host (optional) pointing to the ThinkPHP root directory. Configure database connection parameters. Start the web server. Initialize the ThinkPHP application. Access the ThinkPHP application URL and run it.
 Welcome to nginx!How to solve it?
Apr 17, 2024 am 05:12 AM
To solve the "Welcome to nginx!" error, you need to check the virtual host configuration, enable the virtual host, reload Nginx, if the virtual host configuration file cannot be found, create a default page and reload Nginx, then the error message will disappear and the website will be normal show.
 How to deploy nodejs project to server
Apr 21, 2024 am 04:40 AM
Server deployment steps for a Node.js project: Prepare the deployment environment: obtain server access, install Node.js, set up a Git repository. Build the application: Use npm run build to generate deployable code and dependencies. Upload code to the server: via Git or File Transfer Protocol. Install dependencies: SSH into the server and use npm install to install application dependencies. Start the application: Use a command such as node index.js to start the application, or use a process manager such as pm2. Configure a reverse proxy (optional): Use a reverse proxy such as Nginx or Apache to route traffic to your application
 How to register phpmyadmin
Apr 07, 2024 pm 02:45 PM
To register for phpMyAdmin, you need to first create a MySQL user and grant permissions to it, then download, install and configure phpMyAdmin, and finally log in to phpMyAdmin to manage the database.
 How to solve the problem of nginx when accessing the website
Apr 02, 2024 pm 08:39 PM
nginx appears when accessing a website. The reasons may be: server maintenance, busy server, browser cache, DNS issues, firewall blocking, website misconfiguration, network connection issues, or the website is down. Try the following solutions: wait for maintenance to end, visit during off-peak hours, clear your browser cache, flush your DNS cache, disable firewall or antivirus software, contact the site administrator, check your network connection, or use a search engine or web archive to find another copy of the site. If the problem persists, please contact the site administrator.
 How to communicate between docker containers
Apr 07, 2024 pm 06:24 PM
There are five methods for container communication in the Docker environment: shared network, Docker Compose, network proxy, shared volume, and message queue. Depending on your isolation and security needs, choose the most appropriate communication method, such as leveraging Docker Compose to simplify connections or using a network proxy to increase isolation.


