

How to install mysql default configuration file location in Linux

The solution is as follows:
1. Check the installation location of mysql through which mysqld command

2 .View the default path of the configuration file used by mysql through the /usr/local/mysql/bin/mysqld –verbose –help |grep -A 1 ‘Default options’ command. (Note that the red mark is the command passed in step 1. Obtained mysql installation directory path)

As shown in the above figure, we can see that the order and location of mysql reading configuration file paths, first check /etc/mysql /Does the my.cnf configuration file exist below? If not, we can get a configuration file under /etc. So where does the configuration file come from?
4. Get the my.cnf configuration file

As shown in the picture above, we first switch to the support-files directory of the mysql installation directory and view the following file information through the ll command
Through cp -r /usr /local/mysql/support-files/my-default.cnf /etc/ Copy the configuration file to /etc
Switch to the /etc directory and copy the file through mv my-default.cnf my.cnf Change the name
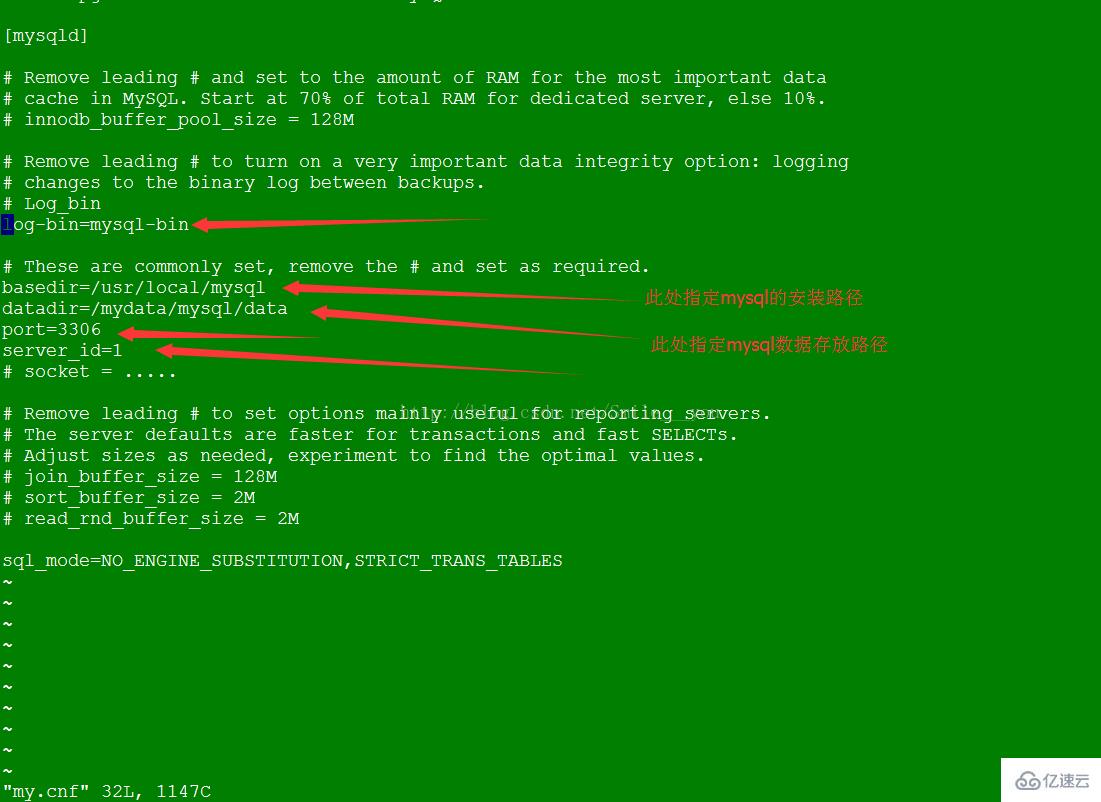
5. Edit my.cnf, specify the mysql installation path and the mysql data file storage path. The following figure also configures bin-log. When configuring bin-log, you need to specify server_id
6. At this point, our mysql configuration file has been sorted out. You can open bin-log and restart mysql to check whether the configuration takes effect. If it takes effect, the above configuration is successful. If it cannot be started after modifying my.cnf, you can check the error message as follows

The above is the detailed content of How to install mysql default configuration file location in Linux. For more information, please follow other related articles on the PHP Chinese website!

Hot AI Tools

Undresser.AI Undress
AI-powered app for creating realistic nude photos

AI Clothes Remover
Online AI tool for removing clothes from photos.

Undress AI Tool
Undress images for free

Clothoff.io
AI clothes remover

AI Hentai Generator
Generate AI Hentai for free.

Hot Article
Hot Tools

Notepad++7.3.1
Easy-to-use and free code editor

SublimeText3 Chinese version
Chinese version, very easy to use

Zend Studio 13.0.1
Powerful PHP integrated development environment

Dreamweaver CS6
Visual web development tools

SublimeText3 Mac version
God-level code editing software (SublimeText3)
Hot Topics
 1376
1376
 52
52

 MySQL: The Ease of Data Management for Beginners
Apr 09, 2025 am 12:07 AM
MySQL: The Ease of Data Management for Beginners
Apr 09, 2025 am 12:07 AM
MySQL is suitable for beginners because it is simple to install, powerful and easy to manage data. 1. Simple installation and configuration, suitable for a variety of operating systems. 2. Support basic operations such as creating databases and tables, inserting, querying, updating and deleting data. 3. Provide advanced functions such as JOIN operations and subqueries. 4. Performance can be improved through indexing, query optimization and table partitioning. 5. Support backup, recovery and security measures to ensure data security and consistency.
 How to create navicat premium
Apr 09, 2025 am 07:09 AM
How to create navicat premium
Apr 09, 2025 am 07:09 AM
Create a database using Navicat Premium: Connect to the database server and enter the connection parameters. Right-click on the server and select Create Database. Enter the name of the new database and the specified character set and collation. Connect to the new database and create the table in the Object Browser. Right-click on the table and select Insert Data to insert the data.
 What is the most use of Linux?
Apr 09, 2025 am 12:02 AM
What is the most use of Linux?
Apr 09, 2025 am 12:02 AM
Linux is widely used in servers, embedded systems and desktop environments. 1) In the server field, Linux has become an ideal choice for hosting websites, databases and applications due to its stability and security. 2) In embedded systems, Linux is popular for its high customization and efficiency. 3) In the desktop environment, Linux provides a variety of desktop environments to meet the needs of different users.
 CentOS Interview Questions: Ace Your Linux System Administrator Interview
Apr 09, 2025 am 12:17 AM
CentOS Interview Questions: Ace Your Linux System Administrator Interview
Apr 09, 2025 am 12:17 AM
Frequently asked questions and answers to CentOS interview include: 1. Use the yum or dnf command to install software packages, such as sudoyumininstallnginx. 2. Manage users and groups through useradd and groupadd commands, such as sudouseradd-m-s/bin/bashnewuser. 3. Use firewalld to configure the firewall, such as sudofirewall-cmd--permanent-add-service=http. 4. Set automatic updates to use yum-cron, such as sudoyumininstallyum-cron and configure apply_updates=yes.
 Navicat connects to database error code and solution
Apr 08, 2025 pm 11:06 PM
Navicat connects to database error code and solution
Apr 08, 2025 pm 11:06 PM
Common errors and solutions when connecting to databases: Username or password (Error 1045) Firewall blocks connection (Error 2003) Connection timeout (Error 10060) Unable to use socket connection (Error 1042) SSL connection error (Error 10055) Too many connection attempts result in the host being blocked (Error 1129) Database does not exist (Error 1049) No permission to connect to database (Error 1000)
 Navicat cannot connect to MySQL/MariaDB/PostgreSQL and other databases
Apr 08, 2025 pm 11:00 PM
Navicat cannot connect to MySQL/MariaDB/PostgreSQL and other databases
Apr 08, 2025 pm 11:00 PM
Common reasons why Navicat cannot connect to the database and its solutions: 1. Check the server's running status; 2. Check the connection information; 3. Adjust the firewall settings; 4. Configure remote access; 5. Troubleshoot network problems; 6. Check permissions; 7. Ensure version compatibility; 8. Troubleshoot other possibilities.
 How to create a new connection to mysql in navicat
Apr 09, 2025 am 07:21 AM
How to create a new connection to mysql in navicat
Apr 09, 2025 am 07:21 AM
You can create a new MySQL connection in Navicat by following the steps: Open the application and select New Connection (Ctrl N). Select "MySQL" as the connection type. Enter the hostname/IP address, port, username, and password. (Optional) Configure advanced options. Save the connection and enter the connection name.
 How to connect to local mysql in navicat
Apr 09, 2025 am 07:45 AM
How to connect to local mysql in navicat
Apr 09, 2025 am 07:45 AM
To connect to a local MySQL database using Navicat: Create a connection and set the connection name, host, port, username, and password. Test the connection to make sure the parameters are correct. Save the connection. Select a new connection from the connection list. Double-click the database you want to connect to.
