

How to configure Mysql multiple masters and one slave in Centos7

Business scenario:
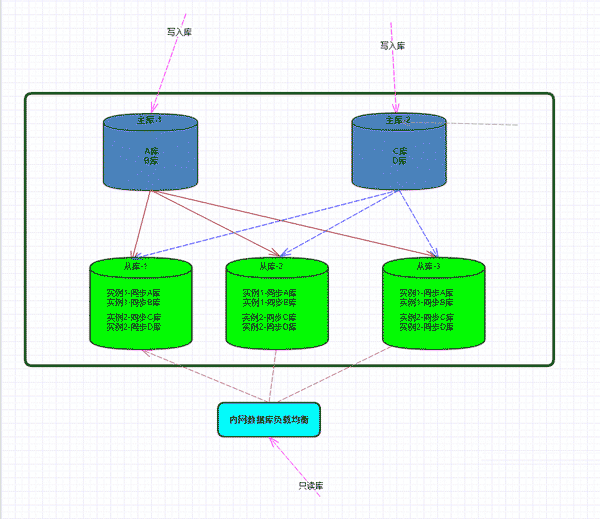
Several major businesses of the company have been independent and placed on different database servers, but one business needs to be associated with multiple business libraries for joint query statistics. . At this time, it is necessary to synchronize different business database data to a slave database for statistics. According to the mysql master-slave synchronization principle, the solution of multiple slaves and one master is used. The main library uses the innodb engine, and the slave library uses the myisam engine to open multiple instances and synchronize the data of multiple instances to the same directory, and access the data of other instances in one instance through flush tables.
Solution:
1. Use the innodb engine for the main database, and set sql_mode to no_auto_create_user
2. Open multiple instances from the slave library and combine multiple master libraries The data inside is synchronized to the same data directory through master-slave replication. Each instance of the slave library corresponds to a master library. Multiple instances use the same data directory.
3. Use the myisam engine from the database and close the default innodb engine from the database. The myisam engine can access tables of other instances in the same data directory.
4. Each instance of the slave library needs to execute flush tables to see the data changes in other instance tables. You can set the crontab task schedule to refresh the table on the first instance every minute so that the default instance connected to the program can see the table. real-time changes.
5. Set the sql_mode of both the main library and the slave library to no_auto_create_user. Only in this way can the SQL of the innodb engine of the main library be synchronized to the slave library to be executed successfully.
Scheme architecture diagram:
##Environment description:
Main Library-1: 192.168.1.1 Main library-2: 192.168.1.2
Slave library-3: 192.168.1.3
Slave library-3: 192.168.1.4
Slave library-3: 192.168. 1.5
Implementation steps: (mysql installation steps are not described here)
1. Main database configuration file. Multiple main database configuration files cannot be the same except server-id. it's the same.[root@masterdb01 ~]#cat /etc/my.cnf [client] port= 3306 socket= /tmp/mysql.sock [mysqld] port = 3306 basedir = /usr/local/mysql datadir = /data/mysql character-set-server = utf8mb4 default-storage-engine = innodb socket = /tmp/mysql.sock skip-name-resolv = 1 open_files_limit = 65535 back_log = 103 max_connections = 512 max_connect_errors = 100000 table_open_cache = 2048 tmp-table-size = 32m max-heap-table-size = 32m #query-cache-type = 0 query-cache-size = 0 external-locking = false max_allowed_packet = 32m sort_buffer_size = 2m join_buffer_size = 2m thread_cache_size = 51 query_cache_size = 32m tmp_table_size = 96m max_heap_table_size = 96m query_cache_type=1 log-error=/data/logs/mysqld.log slow_query_log = 1 slow_query_log_file = /data/logs/slow.log long_query_time = 0.1 # binary logging # server-id = 1 log-bin = /data/binlog/mysql-bin log-bin-index =/data/binlog/mysql-bin.index expire-logs-days = 14 sync_binlog = 1 binlog_cache_size = 4m max_binlog_cache_size = 8m max_binlog_size = 1024m log_slave_updates #binlog_format = row binlog_format = mixed //这里使用的混合模式复制 relay_log_recovery = 1 #不需要同步的表 replicate-wild-ignore-table=mydb.sp_counter #不需要同步的库 replicate-ignore-db = mysql,information_schema,performance_schema key_buffer_size = 32m read_buffer_size = 1m read_rnd_buffer_size = 16m bulk_insert_buffer_size = 64m myisam_sort_buffer_size = 128m myisam_max_sort_file_size = 10g myisam_repair_threads = 1 myisam_recover transaction_isolation = repeatable-read innodb_additional_mem_pool_size = 16m innodb_buffer_pool_size = 5734m innodb_buffer_pool_load_at_startup = 1 innodb_buffer_pool_dump_at_shutdown = 1 innodb_data_file_path = ibdata1:1024m:autoextend innodb_flush_log_at_trx_commit = 2 innodb_log_buffer_size = 32m innodb_log_file_size = 2g innodb_log_files_in_group = 2 innodb_io_capacity = 4000 innodb_io_capacity_max = 8000 innodb_max_dirty_pages_pct = 50 innodb_flush_method = o_direct innodb_file_format = barracuda innodb_file_format_max = barracuda innodb_lock_wait_timeout = 10 innodb_rollback_on_timeout = 1 innodb_print_all_deadlocks = 1 innodb_file_per_table = 1 innodb_locks_unsafe_for_binlog = 0 [mysqldump] quick max_allowed_packet = 32m
[root@slavedb01 ~]# cat /etc/my.cnf
[client]
port= 3306
socket= /tmp/mysql.sock
[mysqld_multi]
# 指定相关命令的路径
mysqld   = /usr/local/mysql/bin/mysqld_safe
mysqladmin = /usr/local/mysql/bin/mysqladmin
##复制主库1的数据##
[mysqld2]
port = 3306
basedir = /usr/local/mysql
datadir = /data/mysql
character-set-server = utf8mb4
#指定实例1的sock文件和pid文件
socket = /tmp/mysql.sock
pid-file=/data/mysql/mysql.pid
skip-name-resolv = 1
open_files_limit = 65535
back_log = 103
max_connections = 512
max_connect_errors = 100000
table_open_cache = 2048
tmp-table-size  = 32m
max-heap-table-size = 32m
query-cache-size = 0
external-locking = false
max_allowed_packet = 32m
sort_buffer_size = 2m
join_buffer_size = 2m
thread_cache_size = 51
query_cache_size = 32m
tmp_table_size = 96m
max_heap_table_size = 96m
query_cache_type=1
#指定第一个实例的错误日志和慢查询日志路径
log-error=/data/logs/mysqld.log
slow_query_log = 1
slow_query_log_file = /data/logs/slow.log
long_query_time = 0.1
# binary logging#
# 指定实例1的binlog和relaylog路径为/data/binlog目录
# 每个从库和每个实例的server_id不能一样。
server-id = 2
log-bin     = /data/binlog/mysql-bin
log-bin-index  =/data/binlog/mysql-bin.index
relay_log = /data/binlog/mysql-relay-bin
relay_log_index = /data/binlog/mysql-relay.index
master-info-file = /data/mysql/master.info
relay_log_info_file = /data/mysql/relay-log.info
read_only = 1
expire-logs-days = 14
sync_binlog = 1
#需要同步的库,如果不设置,默认同步所有库。
#replicate-do-db = xxx
#不需要同步的表
replicate-wild-ignore-table=mydb.sp_counter
#不需要同步的库
replicate-ignore-db = mysql,information_schema,performance_schema
binlog_cache_size = 4m
max_binlog_cache_size = 8m
max_binlog_size = 1024m
log_slave_updates =1
#binlog_format = row
binlog_format = mixed
relay_log_recovery = 1
key_buffer_size = 32m
read_buffer_size = 1m
read_rnd_buffer_size = 16m
bulk_insert_buffer_size = 64m
myisam_sort_buffer_size = 128m
myisam_max_sort_file_size = 10g
myisam_repair_threads = 1
myisam_recover
#设置默认引擎为myisam,下面这些参数一定要加上。
default-storage-engine=myisam
default-tmp-storage-engine=myisam
#关闭innodb引擎
skip-innodb
innodb = off
disable-innodb
#设置sql_mode模式为no_auto_create_user
sql_mode = no_auto_create_user
#关闭innodb引擎
loose-skip-innodb
loose-innodb-trx=0
loose-innodb-locks=0
loose-innodb-lock-waits=0
loose-innodb-cmp=0
loose-innodb-cmp-per-index=0
loose-innodb-cmp-per-index-reset=0
loose-innodb-cmp-reset=0
loose-innodb-cmpmem=0
loose-innodb-cmpmem-reset=0
loose-innodb-buffer-page=0
loose-innodb-buffer-page-lru=0
loose-innodb-buffer-pool-stats=0
loose-innodb-metrics=0
loose-innodb-ft-default-stopword=0
loose-innodb-ft-inserted=0
loose-innodb-ft-deleted=0
loose-innodb-ft-being-deleted=0
loose-innodb-ft-config=0
loose-innodb-ft-index-cache=0
loose-innodb-ft-index-table=0
loose-innodb-sys-tables=0
loose-innodb-sys-tablestats=0
loose-innodb-sys-indexes=0
loose-innodb-sys-columns=0
loose-innodb-sys-fields=0
loose-innodb-sys-foreign=0
loose-innodb-sys-foreign-cols=0


##复制主库2的数据##
[mysqld3]
port = 3307
basedir = /usr/local/mysql
datadir = /data/mysql
character-set-server = utf8mb4
#指定实例2的sock文件和pid文件
socket = /tmp/mysql3.sock
pid-file=/data/mysql/mysql3.pid
skip-name-resolv = 1
open_files_limit = 65535
back_log = 103
max_connections = 512
max_connect_errors = 100000
table_open_cache = 2048
tmp-table-size  = 32m
max-heap-table-size = 32m
query-cache-size = 0
external-locking = false
max_allowed_packet = 32m
sort_buffer_size = 2m
join_buffer_size = 2m
thread_cache_size = 51
query_cache_size = 32m
tmp_table_size = 96m
max_heap_table_size = 96m
query_cache_type=1
log-error=/data/logs/mysqld3.log
slow_query_log = 1
slow_query_log_file = /data/logs/slow3.log
long_query_time = 0.1
# binary logging #
# 这里一定要注意,不能把两个实例的binlog和relaylog放到同一个目录,
# 这里指定实例2的binlog日志为/data/binlog2目录
# 每个从库和每个实例的server_id不能一样。
server-id = 22
log-bin     = /data/binlog2/mysql-bin
log-bin-index  =/data/binlog2/mysql-bin.index
relay_log = /data/binlog2/mysql-relay-bin
relay_log_index = /data/binlog2/mysql-relay.index
master-info-file = /data/mysql/master3.info
relay_log_info_file = /data/mysql/relay-log3.info
read_only = 1
expire-logs-days = 14
sync_binlog = 1
#不需要复制的库
replicate-ignore-db = mysql,information_schema,performance_schema
binlog_cache_size = 4m
max_binlog_cache_size = 8m
max_binlog_size = 1024m
log_slave_updates =1
#binlog_format = row
binlog_format = mixed
relay_log_recovery = 1
key_buffer_size = 32m
read_buffer_size = 1m
read_rnd_buffer_size = 16m
bulk_insert_buffer_size = 64m
myisam_sort_buffer_size = 128m
myisam_max_sort_file_size = 10g
myisam_repair_threads = 1
myisam_recover
#设置默认引擎为myisam
default-storage-engine=myisam
default-tmp-storage-engine=myisam
#关闭innodb引擎
skip-innodb
innodb = off
disable-innodb
#设置sql_mode模式为no_auto_create_user
sql_mode = no_auto_create_user
#关闭innodb引擎,下面这些参数一定要加上。
loose-skip-innodb
loose-innodb-trx=0
loose-innodb-locks=0
loose-innodb-lock-waits=0
loose-innodb-cmp=0
loose-innodb-cmp-per-index=0
loose-innodb-cmp-per-index-reset=0
loose-innodb-cmp-reset=0
loose-innodb-cmpmem=0
loose-innodb-cmpmem-reset=0
loose-innodb-buffer-page=0
loose-innodb-buffer-page-lru=0
loose-innodb-buffer-pool-stats=0
loose-innodb-metrics=0
loose-innodb-ft-default-stopword=0
loose-innodb-ft-inserted=0
loose-innodb-ft-deleted=0
loose-innodb-ft-being-deleted=0
loose-innodb-ft-config=0
loose-innodb-ft-index-cache=0
loose-innodb-ft-index-table=0
loose-innodb-sys-tables=0
loose-innodb-sys-tablestats=0
loose-innodb-sys-indexes=0
loose-innodb-sys-columns=0
loose-innodb-sys-fields=0
loose-innodb-sys-foreign=0
loose-innodb-sys-foreign-cols=0
[mysqldump]
quick
max_allowed_packet = 32m
```
# cat /etc/init.d/mysqld
#other_args="$*"  # uncommon, but needed when called from an rpm upgrade action
      # expected: "--skip-networking --skip-grant-tables"
      # they are not checked here, intentionally, as it is the resposibility
      # of the "spec" file author to give correct arguments only.
#将上面默认的#other_args开启后改为
other_args="--sql-mode=no_auto_create_user"#主库 service mysqld start #开启从库的二个实例 /usr/local/mysql/bin/mysqld_multi start 2 /usr/local/mysql/bin/mysqld_multi start 3
#需要授权三个从库的ip可以同步
mysql> grant replication slave on *.* to rep@'192.168.1.3' identified by 'rep123';
mysql> grant replication slave on *.* to rep@'192.168.1.4' identified by 'rep123';
mysql> grant replication slave on *.* to rep@'192.168.1.5' identified by 'rep123';
mysql> flush privileges;
#进入第一个实例执行
$ mysql -s /tmp/mysql.sock
mysql> change master to master_host='192.168.1.1',master_user='rep',master_password='rep123',master_log_file='mysql-bin.000001',master_log_pos=112;

#进入第二个实例执行
$ mysql -s /tmp/mysql3.sock
mysql> change master to master_host='192.168.1.2',master_user='rep',master_password='rep123',master_log_file='mysql-bin.000001',master_log_pos=112;
# crontab -l
*/1 * * * * mysql -s /tmp/mysql.sock -e 'flush tables;'
Mysql5.6 pitfalls of multiple masters and one slave
1. The default engine of mysql5.6 is innodb. When synchronizing by default, you must turn off the no_engine_substitution parameter in the sql_mode mode of the master and slave. If you do not turn off the innodb synchronization to the sql on the slave database, the innodb engine will not be found and the synchronization will fail. 2. When multiple instances are enabled in mysql5.6, the my.cnf configuration file will be generated in the installation directory of your database (/usr/local/mysql/) when it is started for the first time. By default, it will take priority. Read the configuration file in the database installation directory. As a result, multiple instances do not take effect.The above is the detailed content of How to configure Mysql multiple masters and one slave in Centos7. For more information, please follow other related articles on the PHP Chinese website!

Hot AI Tools

Undresser.AI Undress
AI-powered app for creating realistic nude photos

AI Clothes Remover
Online AI tool for removing clothes from photos.

Undress AI Tool
Undress images for free

Clothoff.io
AI clothes remover

Video Face Swap
Swap faces in any video effortlessly with our completely free AI face swap tool!

Hot Article
Hot Tools

Notepad++7.3.1
Easy-to-use and free code editor

SublimeText3 Chinese version
Chinese version, very easy to use

Zend Studio 13.0.1
Powerful PHP integrated development environment

Dreamweaver CS6
Visual web development tools

SublimeText3 Mac version
God-level code editing software (SublimeText3)
Hot Topics
 1387
1387
 52
52

 How to open phpmyadmin
Apr 10, 2025 pm 10:51 PM
How to open phpmyadmin
Apr 10, 2025 pm 10:51 PM
You can open phpMyAdmin through the following steps: 1. Log in to the website control panel; 2. Find and click the phpMyAdmin icon; 3. Enter MySQL credentials; 4. Click "Login".
 MySQL: An Introduction to the World's Most Popular Database
Apr 12, 2025 am 12:18 AM
MySQL: An Introduction to the World's Most Popular Database
Apr 12, 2025 am 12:18 AM
MySQL is an open source relational database management system, mainly used to store and retrieve data quickly and reliably. Its working principle includes client requests, query resolution, execution of queries and return results. Examples of usage include creating tables, inserting and querying data, and advanced features such as JOIN operations. Common errors involve SQL syntax, data types, and permissions, and optimization suggestions include the use of indexes, optimized queries, and partitioning of tables.
 How to use single threaded redis
Apr 10, 2025 pm 07:12 PM
How to use single threaded redis
Apr 10, 2025 pm 07:12 PM
Redis uses a single threaded architecture to provide high performance, simplicity, and consistency. It utilizes I/O multiplexing, event loops, non-blocking I/O, and shared memory to improve concurrency, but with limitations of concurrency limitations, single point of failure, and unsuitable for write-intensive workloads.
 MySQL's Place: Databases and Programming
Apr 13, 2025 am 12:18 AM
MySQL's Place: Databases and Programming
Apr 13, 2025 am 12:18 AM
MySQL's position in databases and programming is very important. It is an open source relational database management system that is widely used in various application scenarios. 1) MySQL provides efficient data storage, organization and retrieval functions, supporting Web, mobile and enterprise-level systems. 2) It uses a client-server architecture, supports multiple storage engines and index optimization. 3) Basic usages include creating tables and inserting data, and advanced usages involve multi-table JOINs and complex queries. 4) Frequently asked questions such as SQL syntax errors and performance issues can be debugged through the EXPLAIN command and slow query log. 5) Performance optimization methods include rational use of indexes, optimized query and use of caches. Best practices include using transactions and PreparedStatemen
 Why Use MySQL? Benefits and Advantages
Apr 12, 2025 am 12:17 AM
Why Use MySQL? Benefits and Advantages
Apr 12, 2025 am 12:17 AM
MySQL is chosen for its performance, reliability, ease of use, and community support. 1.MySQL provides efficient data storage and retrieval functions, supporting multiple data types and advanced query operations. 2. Adopt client-server architecture and multiple storage engines to support transaction and query optimization. 3. Easy to use, supports a variety of operating systems and programming languages. 4. Have strong community support and provide rich resources and solutions.
 Monitor Redis Droplet with Redis Exporter Service
Apr 10, 2025 pm 01:36 PM
Monitor Redis Droplet with Redis Exporter Service
Apr 10, 2025 pm 01:36 PM
Effective monitoring of Redis databases is critical to maintaining optimal performance, identifying potential bottlenecks, and ensuring overall system reliability. Redis Exporter Service is a powerful utility designed to monitor Redis databases using Prometheus. This tutorial will guide you through the complete setup and configuration of Redis Exporter Service, ensuring you seamlessly build monitoring solutions. By studying this tutorial, you will achieve fully operational monitoring settings
 How to view sql database error
Apr 10, 2025 pm 12:09 PM
How to view sql database error
Apr 10, 2025 pm 12:09 PM
The methods for viewing SQL database errors are: 1. View error messages directly; 2. Use SHOW ERRORS and SHOW WARNINGS commands; 3. Access the error log; 4. Use error codes to find the cause of the error; 5. Check the database connection and query syntax; 6. Use debugging tools.
 How to connect to the database of apache
Apr 13, 2025 pm 01:03 PM
How to connect to the database of apache
Apr 13, 2025 pm 01:03 PM
Apache connects to a database requires the following steps: Install the database driver. Configure the web.xml file to create a connection pool. Create a JDBC data source and specify the connection settings. Use the JDBC API to access the database from Java code, including getting connections, creating statements, binding parameters, executing queries or updates, and processing results.
