Fix: DNS server not responding issue in Windows 11
When Windows users are unable to browse or load web pages on the browser on their system, they happen to think of all the factors that can cause this issue.
While many Windows users fix this issue on their systems, it throws an error message stating “DNS server is not responding” and users don’t know how to fix this issue to use a stable internet connection.
We have come up with a solution in this article which will surely solve this problem.
However, please try these solutions beforehand -
- Try restarting the router and check if this is causing the problem.
- Change browser application. That said, if you're using the Microsoft Edge browser, close it and open Google Chrome or Firefox to check if the browser app is causing the problem.
If the workaround doesn't help solve the problem, keep reading to see the solution.
Fix 1 – Modify DNS Server Address
Step 1: Open the Run command box by pressing the Win R keys simultaneously on your keyboard.
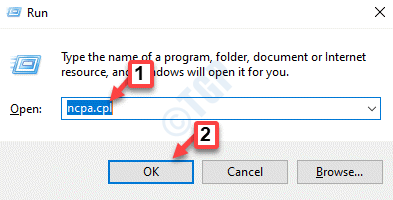
Step 2: Type ncpa.cpl in the Run box and click "OK" to open the "Network Connection "page.
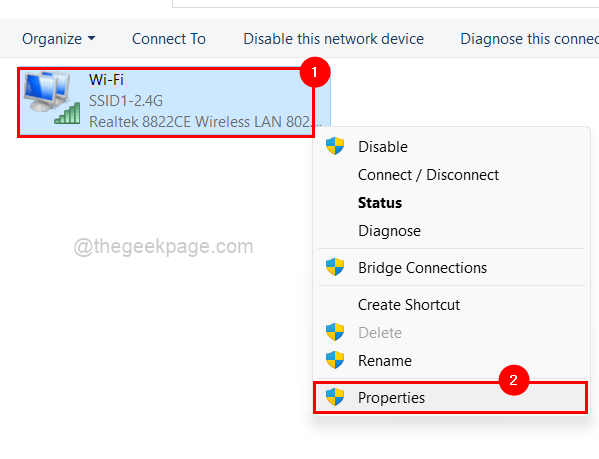
Step 3: On the Network Connections page, if you are using Wi-Fi to access the Internet, right-clickWi -Fi Adapter. Otherwise, if you are using a cable connection, right-click Ethernet.
Step 4: Select Properties from the context menu as shown below.
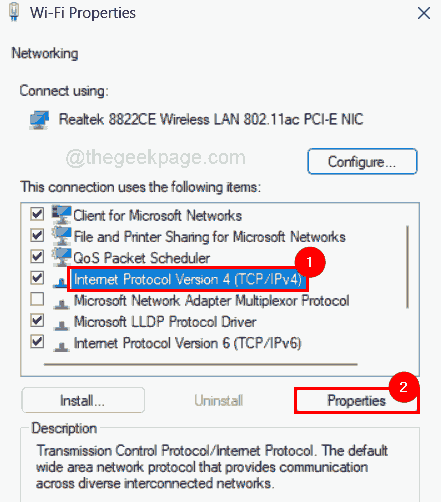
Step 5: Click Internet Protocol Version 4 (TCP/IPv4) from the items listed, and then click ## below it #Attribute, as shown in the figure below.
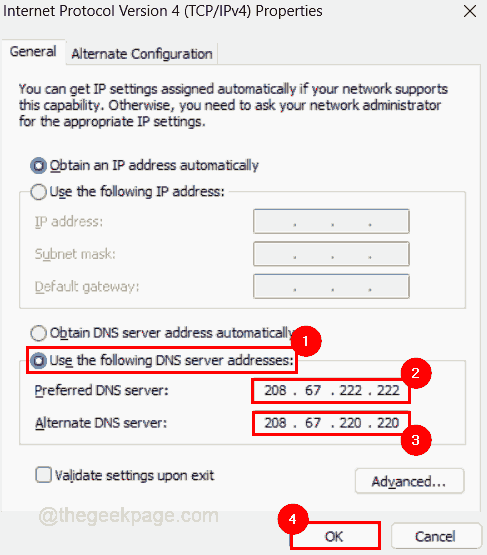
Use the following DNS server address radio button and enter the value 208. 67. 222. 222 in preferred DNS servers and 208. 67 . 220 . 220In Alternate DNS Server.
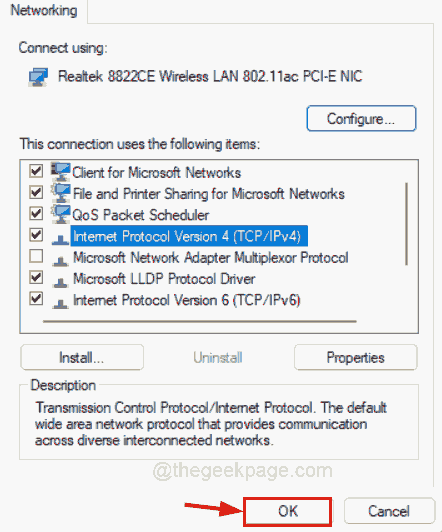
Step 7: Finally, click "OK" to make changes and close the properties window.
Step 8: You can also close the Wi-Fi Adapter Properties window by clicking OK.
Win A keys simultaneously to open the Action Center on the taskbar.
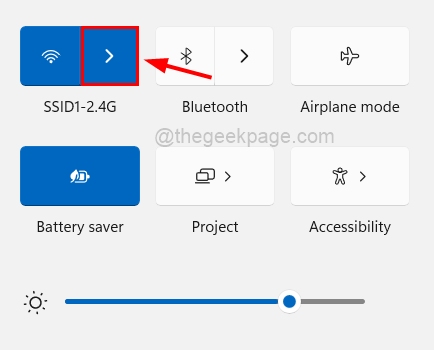
Step 11: Click theright arrow in the Wi-Fi option to view all available and connected connections as shown below.
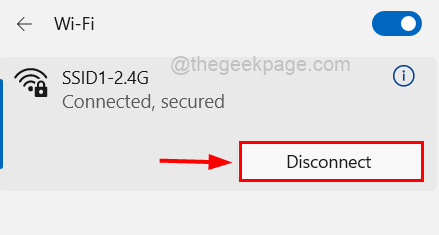
Disconnect to disconnect the existing Wi-Fi connection on your system.
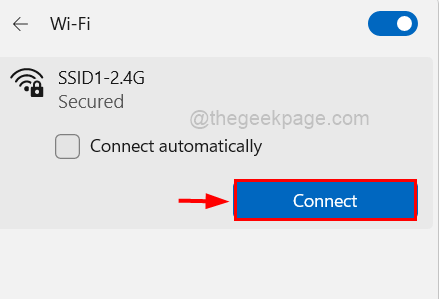
connect again.
Windows and R keys simultaneously to open the system The "Run" command box.
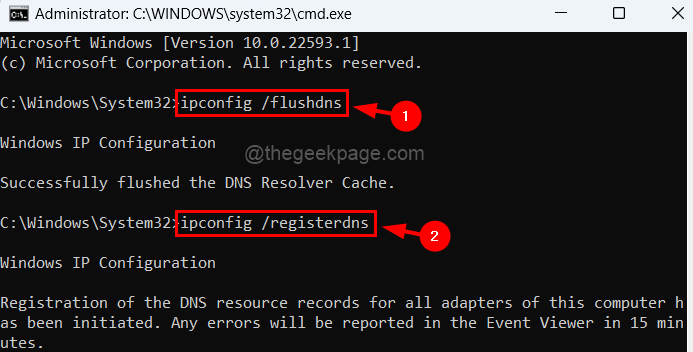
Step 2: Typecmd in the run text box, then press the CTRL SHIFT ENTER key at the same time to Open command prompt as administrator.
Note: When the screen prompt continues, accept the UAC window.
Step 3: After opening the command prompt window, execute the following commands in order to refresh the DNS cache, as shown below.ipconfig /flushdnsipconfig /registerdns
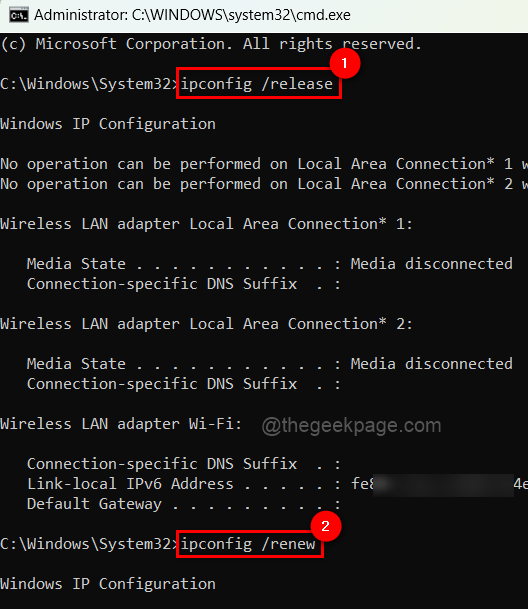
第4步:现在复制并粘贴命令并按Enter键执行它以释放和更新IP地址。
ipconfig /发布ipconfig /更新
第5步:完成后,关闭命令提示符窗口并重新启动系统一次,然后检查问题是否仍然存在。
修复 3 – 更新网络适配器驱动程序
注意:在继续之前,请从其制造商的网站下载最新版本的网络适配器驱动程序。
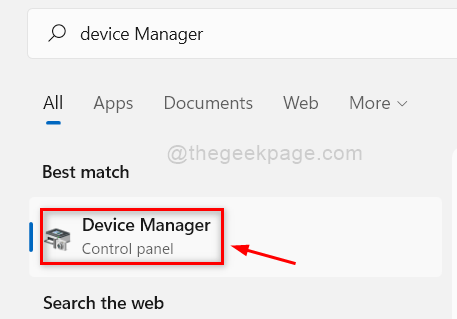
步骤 1:按键盘上的Windows键并键入设备管理器。
第 2 步:点击搜索结果中的设备管理器,如下所示。
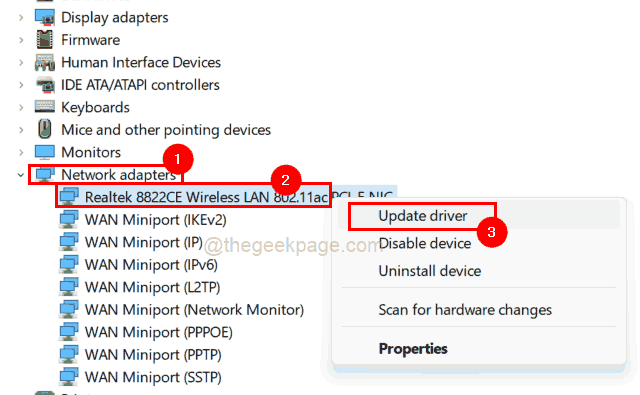
第 3 步:双击网络适配器选项将其展开。
第 4 步:稍后,右键单击网络适配器,然后从列表中单击更新驱动程序,如下所示。
第 5 步:出现更新窗口后,单击浏览我的计算机以查找驱动程序选项,然后浏览并选择系统上下载的网络适配器版本。
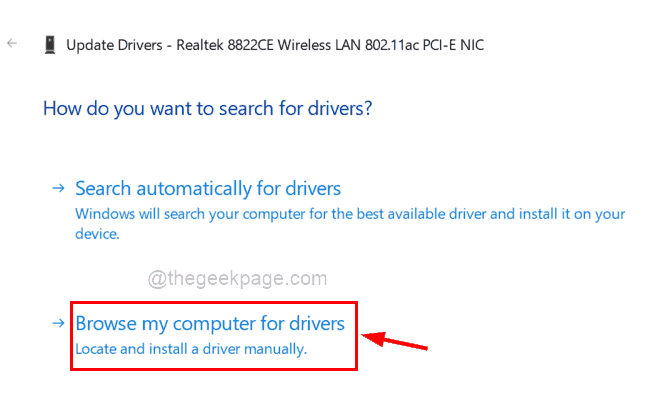
第 6 步:按照屏幕上的说明完成更新过程。
第 7 步:完成后,重新启动系统,然后查看问题是否已解决。
The above is the detailed content of Fix: DNS server not responding issue in Windows 11. For more information, please follow other related articles on the PHP Chinese website!

Hot AI Tools

Undresser.AI Undress
AI-powered app for creating realistic nude photos

AI Clothes Remover
Online AI tool for removing clothes from photos.

Undress AI Tool
Undress images for free

Clothoff.io
AI clothes remover

AI Hentai Generator
Generate AI Hentai for free.

Hot Article

Hot Tools

Notepad++7.3.1
Easy-to-use and free code editor

SublimeText3 Chinese version
Chinese version, very easy to use

Zend Studio 13.0.1
Powerful PHP integrated development environment

Dreamweaver CS6
Visual web development tools

SublimeText3 Mac version
God-level code editing software (SublimeText3)

Hot Topics
 Fix: ERR_ADDRESS_UNREACHABLE error in Google Chrome
May 15, 2023 pm 06:22 PM
Several Windows users have complained that when they try to access some websites on Google Chrome browser on their systems, they are unable to access the web pages. It also displays a message on the browser saying "The site cannot be reached" with error code ERR_ADDRESS_UNREACHABLE. There could be many potential reasons behind this issue, it could be due to website server issues, proxy server settings, unstable internet connection, etc. If you encounter similar problems, don't panic. After deeply analyzing the problem in this article, we got a bunch of solutions. Before proceeding, try the following workarounds: Try checking if the user is trying to access the site from other devices and there are no issues, then this
 What does Discord Do Not Disturb mean and how to use it?
Jun 03, 2023 pm 01:02 PM
If you have Discord Do Not Disturb enabled, you will not see any notifications on your app. This includes servers, group chats, and direct messages. Discord is a chat application that allows users to communicate through text, pictures, and video calls in games. It is designed to be a communication channel for gamers to chat and coordinate with each other in real time. DND settings allow you to disable all incoming messages you don't want to see. This is useful if you don't want to be disturbed by any messages while you are working. Additionally, you can also try the best Discord bots that can help you manage your guild while you are away. If you're wondering what Discord Do Not Disturb means and how to use it, this tutorial should help. D
 Error code 22: How to fix graphics device driver Try updating graphics driver or clearing CMOS
May 19, 2023 pm 01:43 PM
What does graphics device error code 22 mean and what causes it? When you encounter error code 22, you will always see the error message This device is disabled. (Code 22). You can view more details about this graphics device driver error code 22 by going to the Device Status area in the device properties. We also discussed Error code 11 in Windows 43. You can also check out our guide on how to fix graphics device error code 31 on your PC. Device is actually disabled: The device in question may throw you this error code 22 and is actually disabled. There are driver issues: Incompatible or corrupted driver files can also cause multiple issues with the device program. Drivers are not the most
 How to solve win11 DNS server error
Jan 10, 2024 pm 09:02 PM
We need to use the correct DNS when connecting to the Internet to access the Internet. In the same way, if we use the wrong dns settings, it will prompt a dns server error. At this time, we can try to solve the problem by selecting to automatically obtain dns in the network settings. Let’s take a look at the specific solutions. How to solve win11 network dns server error. Method 1: Reset DNS 1. First, click Start in the taskbar to enter, find and click the "Settings" icon button. 2. Then click the "Network & Internet" option command in the left column. 3. Then find the "Ethernet" option on the right and click to enter. 4. After that, click "Edit" in the DNS server assignment, and finally set DNS to "Automatic (D
 How to assign multiple IP addresses in one LAN card on Windows 10/11
May 30, 2023 am 11:25 AM
Sometimes it is necessary to assign multiple addresses to a single LAN card. For example, if you need to run multiple websites with unique IP addresses or bind applications to different IP addresses, etc. If you are thinking about how to assign multiple addresses to a single network interface card or LAN card, this article will help you achieve it. Follow the steps below till the end and it will be done. So let’s get started! Assign multiple IP addresses to one LAN card Step 1: Use the Windows+R keys together to open the run prompt and type ncpa.cpl, then press the Enter key to open the Network Connection window. Step 2: Right click on your network adapter Ethernet or WiFi option and click Properties. Step 3: From the Properties Window
 NVIDIA Setup Unable to Continue? 4 easy ways to fix it
Jun 03, 2023 am 09:52 AM
The NVIDIA installer cannot continue is an error message that prevents you from installing drivers for your graphics card. No matter how many times you try to install it on your computer, you'll almost certainly get the same message over and over again. Additionally, this error occurs with various drivers and Windows iterations, indicating multiple potential causes. That said, it doesn't exclude anyone, and troubleshooting the issue can be a frustrating experience for many users. Fortunately, there's a good chance that one (if not more) of the following methods will work for you, so read on to find out which one works best. Even if the driver installation fails, after you download and install the driver, an NVIDIA folder will be created in the partition where the operating system is installed. This is because it will be
 How to Fix Error Code 1132 in Zoom on Windows PC
May 30, 2023 am 11:08 AM
Zoom's video conferencing capabilities have made it popular among users while working from home. Many Zoom desktop client users have reported seeing error code 1132 along with an “Unknown error has occurred” message on their Windows PCs. Usually, this error code pops up when users try to log into their account and join any meeting in Zoom. In the error window, the user has the option to open a browser and join the meeting. However, some users reported that they were unable to open the meeting even on the browser. Windows firewall settings, outdated Zoom installation, or Zoom blacklisting your account could be some of the possible reasons for this error. Are you encountering an error code while using the Zoom app
![How to Fix iMessage Activation Error on iPhone [Solved]](https://img.php.cn/upload/article/000/465/014/168534860275610.png?x-oss-process=image/resize,m_fill,h_207,w_330) How to Fix iMessage Activation Error on iPhone [Solved]
May 29, 2023 pm 04:23 PM
How to Fix iMessage Activation Error on iPhone [Solved]
May 29, 2023 pm 04:23 PM
Many users have observed that they receive error messages while trying to activate iMessage on their iPhone. The error message they received is shown below. iMessage activation, an error occurred during activation. try again. Most of the iPhone users who have recently switched from Android to iPhone or those who have upgraded their iPhone to the latest model face such errors on their iPhone. This issue must occur on iPhone due to the following reasons. Problems with SIM card Weak internet connection or no data Date and time settings incorrectly iPhone with outdated iOS. There is a problem with Apple ID. If you also encounter the same problem with your iPhone, please don’t worry. You can read the following text


