

How spring boot integrates redis master-slave sentinel method

springboot integrates redis master-slave sentinel
One master, two slaves and three sentinel configuration
1, master:127.0.0.1:6379
2, slave1:127.0.0.1:6380
3, slave2:127.0.0.1:6381
4, sentinel1 :127.0.0.1:26379
5, sentinel2:127.0.0.1:26479
6, sentinel3:127.0.0.1:26579
7. Monitoring host name: mymaster
8. Attached is the configuration of sentinel1
port 26379
sentinel monitor mymaster 127.0.0.1 6379 2
sentinel down-after-milliseconds mymaster 5000
sentinel parallel-syncs mymaster 1
sentinel failover-timeout mymaster 15000
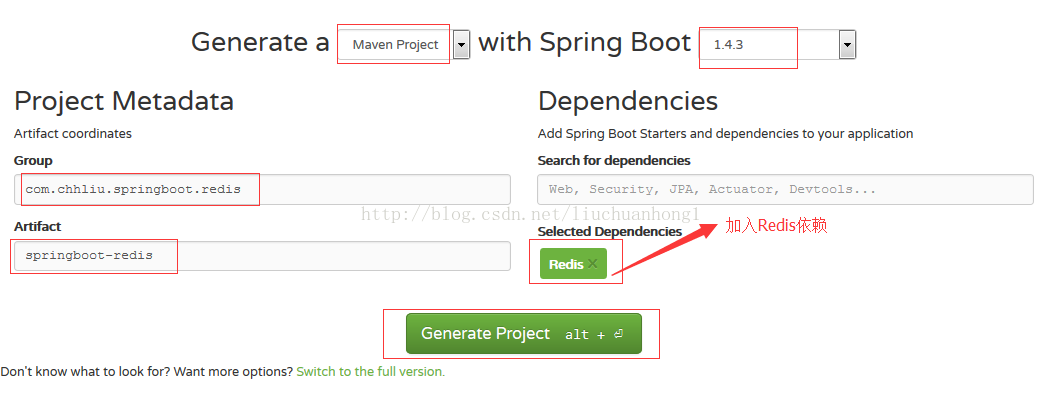
Create a new spring boot project and add Redis dependency
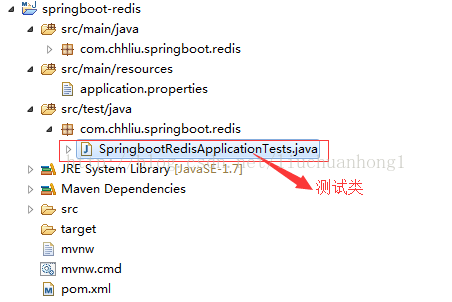
The project structure
is as follows:
pom The file is as follows:
<?xml version="1.0" encoding="UTF-8"?>
<project xmlns="http://maven.apache.org/POM/4.0.0" xmlns:xsi="http://www.w3.org/2001/XMLSchema-instance"
	xsi:schemaLocation="http://maven.apache.org/POM/4.0.0 http://maven.apache.org/xsd/maven-4.0.0.xsd">
	<modelVersion>4.0.0</modelVersion>

	<groupId>com.chhliu.springboot.redis</groupId>
	<artifactId>springboot-redis</artifactId>
	<version>0.0.1-SNAPSHOT</version>
	<packaging>jar</packaging>

	<name>springboot-redis</name>
	<description>Demo project for Spring Boot redis</description>

	<parent>
		<groupId>org.springframework.boot</groupId>
		<artifactId>spring-boot-starter-parent</artifactId>
		<version>1.4.3.RELEASE</version>
		<relativePath/> <!-- lookup parent from repository -->
	</parent>

	<properties>
		<project.build.sourceEncoding>UTF-8</project.build.sourceEncoding>
		<project.reporting.outputEncoding>UTF-8</project.reporting.outputEncoding>
		<java.version>1.7</java.version>
	</properties>

	<dependencies>
		<dependency>
			<groupId>org.springframework.boot</groupId>
			<artifactId>spring-boot-starter-data-redis</artifactId>
		</dependency>

		<dependency>
			<groupId>org.springframework.boot</groupId>
			<artifactId>spring-boot-starter-test</artifactId>
			<scope>test</scope>
		</dependency>
	</dependencies>

	<build>
		<plugins>
			<plugin>
				<groupId>org.springframework.boot</groupId>
				<artifactId>spring-boot-maven-plugin</artifactId>
			</plugin>
		</plugins>
	</build>
</project>
Modify the application.properties configuration file
Add the following content to the configuration file:
########################################################
###REDIS (RedisProperties) redis基本配置;
########################################################
# database name
spring.redis.database=0
# server host1 单机使用,对应服务器ip
#spring.redis.host=127.0.0.1
# server password 密码,如果没有设置可不配
#spring.redis.password=
#connection port  单机使用,对应端口号
#spring.redis.port=6379
# pool settings ...池配置
spring.redis.pool.max-idle=8
spring.redis.pool.min-idle=0
spring.redis.pool.max-active=8
spring.redis.pool.max-wait=-1
# name of Redis server  哨兵监听的Redis server的名称
spring.redis.sentinel.master=mymaster
# comma-separated list of host:port pairs  哨兵的配置列表
spring.redis.sentinel.nodes=127.0.0.1:26379,127.0.0.1:26479,127.0.0.1:26579
Create a new Redis service
package com.chhliu.springboot.redis;
import org.springframework.beans.factory.annotation.Autowired;
import org.springframework.data.redis.core.RedisTemplate;
import org.springframework.data.redis.core.StringRedisTemplate;
import org.springframework.stereotype.Service;

@Service("redisService")
public class RedisService {
	@Autowired //操作字符串的template,StringRedisTemplate是RedisTemplate的一个子集
	private StringRedisTemplate stringRedisTemplate;

	@Autowired  // RedisTemplate,可以进行所有的操作
        private RedisTemplate<Object,Object> redisTemplate;

	public void set(String key, String value){
		stringRedisTemplate.opsForValue().set(key, value);
	}

	public void set(Student s){
		redisTemplate.opsForValue().set(s.getId(), s);
	}

	public String get(String key){
		return stringRedisTemplate.opsForValue().get(key);
	}

	public Student getStudent(String key){
		return (Student) redisTemplate.opsForValue().get(key);
	}
}The dependent vo is as follows:
package com.chhliu.springboot.redis;
import java.io.Serializable;
public class Student implements Serializable{
	/**
	 *
	 */
	private static final long serialVersionUID = 1L;
	private String id;
	private String name;
	private String age;
	private String grade;
       // 省略getter,setter
	/**
	 * attention:
	 * Details:TODO
	 * @author chhliu
	 * 创建时间:2017-1-18 下午2:24:39
	 * @return
	 */
	@Override
	public String toString() {
		return "Student [id=" + id + ", name=" + name + ", age=" + age
				+ ", grade=" + grade + "]";
	}
}Test class
package com.chhliu.springboot.redis;
import org.junit.Test;
import org.junit.runner.RunWith;
import org.springframework.beans.factory.annotation.Autowired;
import org.springframework.boot.test.context.SpringBootTest;
import org.springframework.test.context.junit4.SpringRunner;

@RunWith(SpringRunner.class)
@SpringBootTest
public class SpringbootRedisApplicationTests {
	@Autowired
	private RedisService service;

	@Test
	public void contextLoads() {
		service.set("myname", "chhliu");
		Student s = new Student();
		s.setId("001");
		s.setName("chhliu");
		s.setGrade("一年级");
		s.setAge("28");
		service.set(s);

		String name = service.get("myname");
		System.out.println("name:"+name);

		Student stu = service.getStudent("001");
		System.out.println(stu);
	}
}Test result
name:chhliu
Student [id=001, name=chhliu, age=28, grade=first grade]
redis sentinel mode sentinel and springboot integration
Redis’ sentinel mode is an official high-availability solution, and the configuration is very simple.
Install Redis cluster
This article uses redis-5.0.5. Redis is installed in the /soft/redis directory. You need to create a new /soft/redis/data directory
Master node configuration
vim config/redis-6379.conf
# bind 127.0.0.1
port 6379
protected-mode no
daemonize yes
pidfile "/var/run/redis_6379.pid"
dir "/soft/redis/data"
dbfilename "dump-6379.rdb"
logfile "log-6379.log"
Slave node 1 configuration
vim config/redis-6380 .conf
# bind 127.0.0.1
port 6380
protected-mode no
daemonize yes
pidfile "/var/run/redis_6380.pid"
dir "/soft/redis/data"
dbfilename "dump-6380.rdb"
logfile "log-6380.log"

replicaof 192.168.4.176 6379
Configuration from node 2
vim config/redis-6381.conf
# bind 127.0.0.1
port 6381
protected-mode no
daemonize yes
pidfile "/var/run/redis_6381.pid"
dir "/soft/redis/data"
dbfilename "dump-6381.rdb"
logfile "log-6381.log"

replicaof 192.168.4.176 6379
Configuration instructions
# bind 127.0.0.1 Comment out this configuration so that other machines can connect to redis
protected-mode no Turn off the protected mode so that other machines can connect to redis
daemonize background Mode startup
The redis-v5 version uses replicaof to replace the old slaveof directive.
Start these 3 nodes and run them in the /soft/redis directory
redis-server config/redis-6379.conf
redis-server config/redis-6380.conf
redis-server config/redis-6381.conf
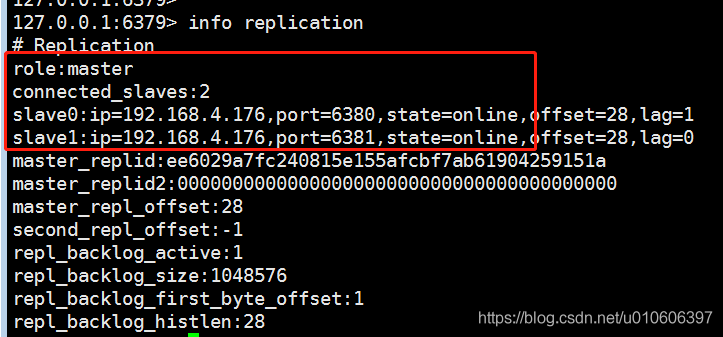
Open the master node client to see if the configuration is successful
redis-cli -p 6379
info replication
Configure 3 more sentinels to monitor the cluster
Sentinel node 1
vim config/redis-sentinel-26379.conf
port 26379
daemonize yes
pidfile "/var/run/redis-sentinel-26379.pid"
dir /tmp
logfile "log-sentinel-26379.log"
sentinel monitor mymaster 192.168.4.176 6379 2
sentinel down-after-milliseconds mymaster 30000
sentinel parallel-syncs mymaster 1
sentinel failover-timeout mymaster 180000
sentinel deny-scripts-reconfig yes
Sentinel Node 2
vim config/redis-sentinel-26380.conf
port 26380
daemonize yes
pidfile "/var/run/redis-sentinel-26380.pid"
dir /tmp
logfile "log-sentinel-26380.log"
sentinel monitor mymaster 192.168.4.176 6379 2
sentinel down-after-milliseconds mymaster 30000
sentinel parallel-syncs mymaster 1
sentinel failover-timeout mymaster 180000
sentinel deny-scripts-reconfig yes
Sentinel Node 3
vim config/redis -sentinel-26381.conf
port 26381
daemonize yes
pidfile "/var/run/redis-sentinel-26381.pid"
dir /tmp
logfile "log-sentinel-26381.log"
sentinel monitor mymaster 192.168.4.176 6379 2
sentinel down-after-milliseconds mymaster 30000
sentinel parallel-syncs mymaster 1
sentinel failover-timeout mymaster 180000
sentinel deny-scripts-reconfig yes
Configuration instructions
monitor mymaster 192.168.4.176 6379 2
The name of the Master host is mymaster, and the IP address is 192.168.4.176. The following 2 means that 2 sentinels think that the master is offline, so the master is offline. It is recommended to set it to the number of sentinel nodes/2 1
down-after-milliseconds
Send a ping request to the redis node, but no reply is received within the specified time. , it is considered that the node should be taken offline
parallel-syncs
When performing failover, the maximum number of slave nodes can synchronize the new master server at the same time.
Start Sentinel
redis-sentinel config/redis-sentinel-26379.conf
redis-sentinel config/redis-sentinel-26380.conf
redis-sentinel config/redis-sentinel-26381.conf
Configure spring-boot
Import dependencies in pom.xml
<dependency>
    <groupId>org.springframework.boot</groupId>
    <artifactId>spring-boot-starter-data-redis</artifactId>
</dependency>Add two lines to application.properties Configuration
# 使用哨兵模式不能加以下两行配置,其他配置可以加
# spring.redis.host=192.168.4.176
# spring.redis.port=6379

spring.redis.sentinel.master=mymaster
spring.redis.sentinel.nodes=192.168.4.176:26379, 192.168.4.176:26380, 192.168.4.176:26381
Write a test class to run
@RunWith(SpringRunner.class)
@SpringBootTest
public class Sentinel001 {
    @Autowired
    RedisTemplate redisTemplate;

    @Test
    public void test001() throws Exception{
        while (true){
            String key = "time:" + new Date().getTime();
            redisTemplate.opsForValue().set(key, new Date().getTime());
            TimeUnit.MILLISECONDS.sleep(100L);
            System.out.println(redisTemplate.opsForValue().get(key));
        }
    }
}Then kill the process of the master instance (redis with port number 6379)
ps -ef|grep redis
kill -9 11110
Observe the code editor console output, After a short period of time (about 50s), the program ran normally again
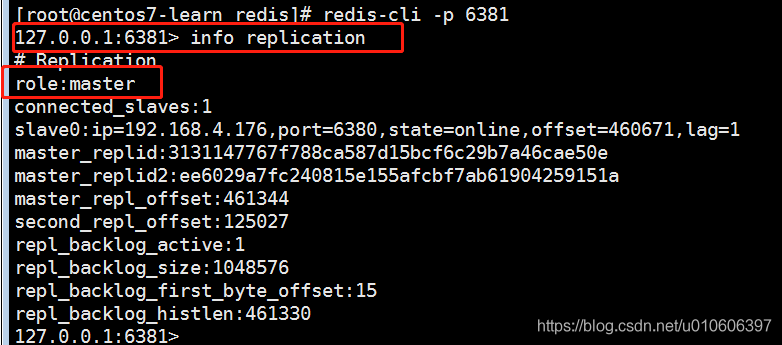
Executed info replication on nodes 6380 and 6381, and found that 6381 became the master node
Check the configuration files of 6380 and 6381
cat config/redis-6380.conf
replicaof 192.168.4.176 6381
replicaof 变成了192.168.4.176 6381,而不是刚开始配置时的192.168.4.176 6379
cat config/redis-6381.conf
replicaof 的配置被删除了
Restart the redis instance 6379
redis-server config/redis-6379.conf
6379 becomes the slave node of 6381
RedisTemplate currently does not support reading Write separation, so both read and write operations will be sent to the master node for processing, which is quite unpleasant. Run the above code and run the monitor on three redis clients and find that only the master will run the get and set commands, and the slave node will only run the set command.
The above is the detailed content of How spring boot integrates redis master-slave sentinel method. For more information, please follow other related articles on the PHP Chinese website!

Hot AI Tools

Undresser.AI Undress
AI-powered app for creating realistic nude photos

AI Clothes Remover
Online AI tool for removing clothes from photos.

Undress AI Tool
Undress images for free

Clothoff.io
AI clothes remover

AI Hentai Generator
Generate AI Hentai for free.

Hot Article
Hot Tools

Notepad++7.3.1
Easy-to-use and free code editor

SublimeText3 Chinese version
Chinese version, very easy to use

Zend Studio 13.0.1
Powerful PHP integrated development environment

Dreamweaver CS6
Visual web development tools

SublimeText3 Mac version
God-level code editing software (SublimeText3)
Hot Topics
 1378
1378
 52
52

 How to build the redis cluster mode
Apr 10, 2025 pm 10:15 PM
How to build the redis cluster mode
Apr 10, 2025 pm 10:15 PM
Redis cluster mode deploys Redis instances to multiple servers through sharding, improving scalability and availability. The construction steps are as follows: Create odd Redis instances with different ports; Create 3 sentinel instances, monitor Redis instances and failover; configure sentinel configuration files, add monitoring Redis instance information and failover settings; configure Redis instance configuration files, enable cluster mode and specify the cluster information file path; create nodes.conf file, containing information of each Redis instance; start the cluster, execute the create command to create a cluster and specify the number of replicas; log in to the cluster to execute the CLUSTER INFO command to verify the cluster status; make
 How to use the redis command
Apr 10, 2025 pm 08:45 PM
How to use the redis command
Apr 10, 2025 pm 08:45 PM
Using the Redis directive requires the following steps: Open the Redis client. Enter the command (verb key value). Provides the required parameters (varies from instruction to instruction). Press Enter to execute the command. Redis returns a response indicating the result of the operation (usually OK or -ERR).
 How to use single threaded redis
Apr 10, 2025 pm 07:12 PM
How to use single threaded redis
Apr 10, 2025 pm 07:12 PM
Redis uses a single threaded architecture to provide high performance, simplicity, and consistency. It utilizes I/O multiplexing, event loops, non-blocking I/O, and shared memory to improve concurrency, but with limitations of concurrency limitations, single point of failure, and unsuitable for write-intensive workloads.
 How to read the source code of redis
Apr 10, 2025 pm 08:27 PM
How to read the source code of redis
Apr 10, 2025 pm 08:27 PM
The best way to understand Redis source code is to go step by step: get familiar with the basics of Redis. Select a specific module or function as the starting point. Start with the entry point of the module or function and view the code line by line. View the code through the function call chain. Be familiar with the underlying data structures used by Redis. Identify the algorithm used by Redis.
 How to clear redis data
Apr 10, 2025 pm 10:06 PM
How to clear redis data
Apr 10, 2025 pm 10:06 PM
How to clear Redis data: Use the FLUSHALL command to clear all key values. Use the FLUSHDB command to clear the key value of the currently selected database. Use SELECT to switch databases, and then use FLUSHDB to clear multiple databases. Use the DEL command to delete a specific key. Use the redis-cli tool to clear the data.
 How to read redis queue
Apr 10, 2025 pm 10:12 PM
How to read redis queue
Apr 10, 2025 pm 10:12 PM
To read a queue from Redis, you need to get the queue name, read the elements using the LPOP command, and process the empty queue. The specific steps are as follows: Get the queue name: name it with the prefix of "queue:" such as "queue:my-queue". Use the LPOP command: Eject the element from the head of the queue and return its value, such as LPOP queue:my-queue. Processing empty queues: If the queue is empty, LPOP returns nil, and you can check whether the queue exists before reading the element.
 How to view all keys in redis
Apr 10, 2025 pm 07:15 PM
How to view all keys in redis
Apr 10, 2025 pm 07:15 PM
To view all keys in Redis, there are three ways: use the KEYS command to return all keys that match the specified pattern; use the SCAN command to iterate over the keys and return a set of keys; use the INFO command to get the total number of keys.
 How to start the server with redis
Apr 10, 2025 pm 08:12 PM
How to start the server with redis
Apr 10, 2025 pm 08:12 PM
The steps to start a Redis server include: Install Redis according to the operating system. Start the Redis service via redis-server (Linux/macOS) or redis-server.exe (Windows). Use the redis-cli ping (Linux/macOS) or redis-cli.exe ping (Windows) command to check the service status. Use a Redis client, such as redis-cli, Python, or Node.js, to access the server.
