

How to use zabbix to monitor multiple mysql


用到的主要工具: 宏(分为模板宏,主机宏,自动发现宏)
     主机宏格式:$MACRO   (直接就可以 填  值)
自动发现宏:#MACRO (需要配合 创建的 key 取值)大体架构
1.agent主机 — agent 主机创建 宏变量 $MYSQLPORT ,宏变量的值为 Discovery rules的 自动发现脚本参数 2.模板 — 模板里创建自动发现规则,靠的是自动发现脚本,得到自动发现宏变量。 3.监控项– 在Discovery rules 里创建监控项,监控项名称和key值里都有自动发现宏变量,会自动生成相关端口的监控项 4.客户端 脚本和键创建,来支持整个架构运行
搭建步骤
1.创建模板
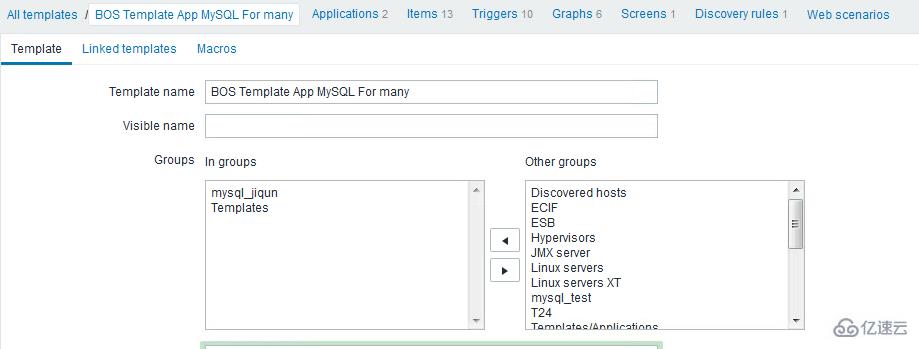
可以忽略这个模板的 items 和 triggers,因为它是默认的克隆 mysql 监控模板。 监控项都在 Discovery rules 里。
2.为模板添加 自动发现宏(自动发现宏声明的途径就是下图的脚本,脚本里只有生成固定的格式,zabbix就会认定他是 自动发现宏)
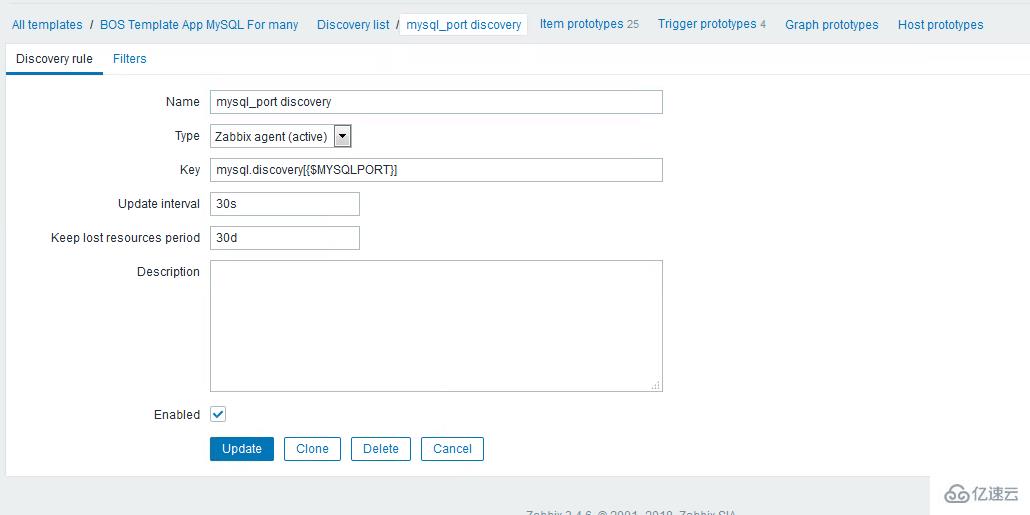
在上面的图中,mysql.discovery指的是获取自动发现宏的脚本,该脚本位于代理端。
后面的 为此脚本执行时带的参数,MYSQLPORT 是主机宏。
discovery rule 右边的 filters 是过滤规则的意思,比方你 只想取脚本里的 某某 自动发现宏,就可以在里面设置。 这里就只有一个自动发现宏,所有不做 配置。
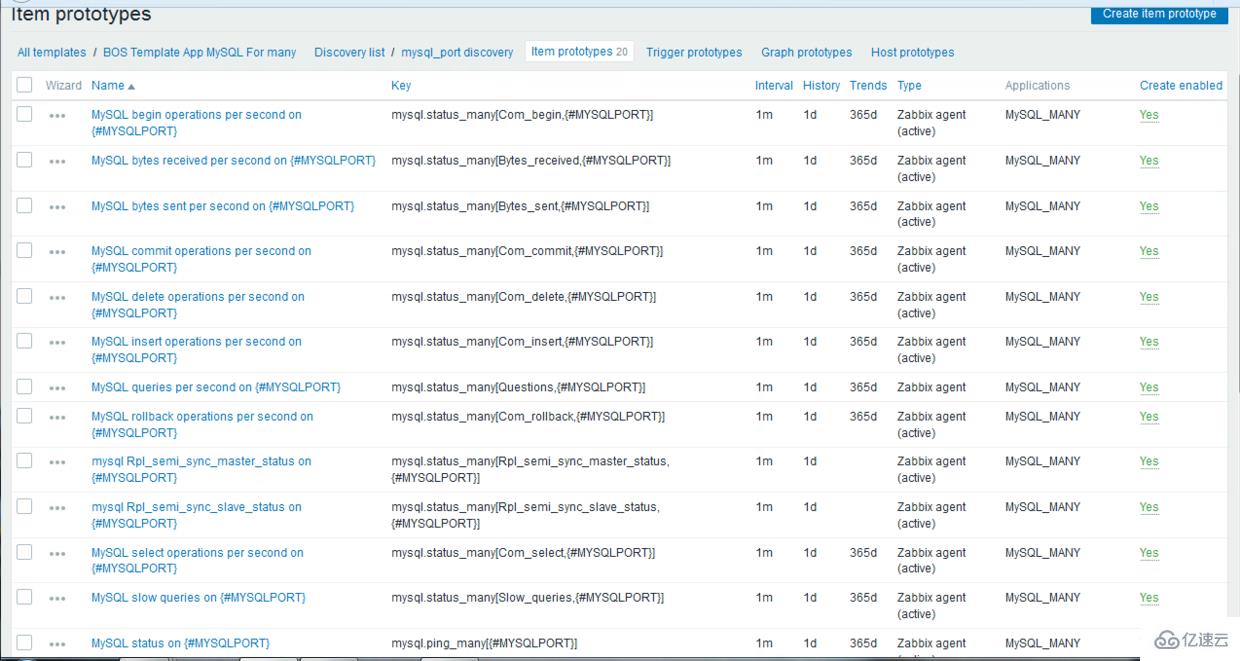
3.创建监控项(监控项和监控的脚本都是要改的,因为自动发现功能,至少脚本会多了一个参数)
4.创建 主机宏
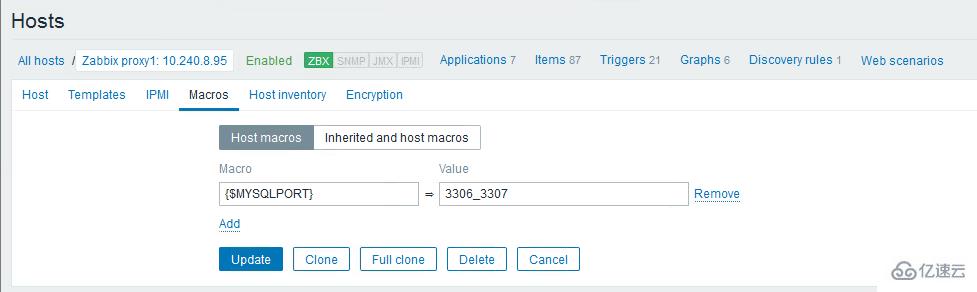
点开主机,添加主机宏,宏名称是 自动发现脚本里的 参数, 宏的值就是 此 主机上需要监控的端口。
这样就实现了 只要改动主机宏的 值,就可以改变主机宏的监控项。
脚本展示
1.discovery_mysql.sh 自动发现端口脚本 (网上抄的脚本做了修改)
res=`echo $1| sed "s/_/\n/g"`;
port=($res)printf '{\n'printf '\t"data":[\n'for key in ${!port[@]}do   if [[ "${#port[@]}" -gt 1 && "${key}" -ne "$((${#port[@]}-1))" ]];then       printf '\t {\n'       printf "\t\t\t\"{#MYSQLPORT}\":\"${port[${key}]}\"},\n" else [[ "${key}" -eq "((${#port[@]}-1))" ]]
printf '\t {\n' printf "\t\t\t\"{#MYSQLPORT}\":\"${port[${key}]}\"}\n"fidoneprintf '\t ]\n'printf '}\n'执行实例: 以_ 为分隔符,格式化输出 自动发现宏 ./discovery_mysql.sh 3306_3307_3308
{
             "data":[
             {
                               "{#MYSQLPORT}":"3306"},
             {
                               "{#MYSQLPORT}":"3307"},
             {
                               "{#MYSQLPORT}":"3308"}
             ]
}2.mysql_filestype.sh 监控mysql的一些挂载盘
var=$1MYSQL_PORT=$2MYSQL_NAME=`ps -ef |grep '/mysql/app/bin/mysqld'| grep "$MYSQL_PORT" |grep -v grep | awk -F" " '{print $11}' |awk -F"/" '{print $2}'` ;
MYSQL_SOCk_DIR="/$MYSQL_NAME/" ;
df -h "${MYSQL_SOCk_DIR}${var}" |grep -v Filesystem |awk -F" " '{print $5}' | awk -F"%" '{print $1}' ;3.mysql_ping.sh 监控mysql状态
MYSQL_PORT=$1;

[ "${MYSQL_USER}"     = '' ] &&  MYSQL_USER=xxx
[ "${MYSQL_PASSWORD}" = '' ] &&  MYSQL_PASSWORD=xxxxx

mysqladmin=/mysql/app/bin/mysqladmin  ;

MYSQL_SOCk_DIR=`ps -ef |grep 'mysql'| grep "${MYSQL_PORT}" |grep -v 'grep' | awk -F" " '{print $16}'` ;${mysqladmin} -u${MYSQL_USER} -p${MYSQL_PASSWORD} ${MYSQL_SOCk_DIR} ping 2> /dev/null |grep 'alive'|wc -l ;注意: 这边连接实例 都是 mysql -u -p -S /xxx/mysql.sock
但是后来发现部分客户端总是无法正确显示值,而且就是这条 语句报错, 感觉是环境变量的问题
所以拿 –socket=/xxx/mysql.sock 来代替 -S/xxx/mysql.sock 。 这里的变量${MYSQL_SOCk_DIR} 就是–socket=/xxx/mysql.sock 。
4.mysql_repl.sh mysql主从状态监控
var=$1MYSQL_PORT=$2MYSQL_SOCk_DIR=`ps -ef |grep 'mysql'| grep "${MYSQL_PORT}" |grep -v 'grep' | awk -F" " '{print $16}'`  ;
mysql=/mysql/app/bin/mysql
[ "${MYSQL_USER}"     = '' ] &&  MYSQL_USER=xxx
[ "${MYSQL_PASSWORD}" = '' ] && MYSQL_PASSWORD=xxxx${mysql} -u${MYSQL_USER} -p${MYSQL_PASSWORD} ${MYSQL_SOCk_DIR} -e "show slave status\G;" 2> /dev/null |grep "\b${var}\b"|awk -F" " '{print $2}' ;主从状态 有几个端口的值是 空的, 这个得 具体问题具体设置
5.mysql_status2 mysql性能之类的监控
mysql=/mysql/app/bin/mysql
var=$1MYSQL_PORT=$2[ "${MYSQL_USER}"     = '' ] &&  MYSQL_USER=xxx
[ "${MYSQL_PASSWORD}" = '' ] &&  MYSQL_PASSWORD=xxxxx

MYSQL_SOCk_DIR=`ps -ef |grep 'mysql'| grep "${MYSQL_PORT}" |grep -v 'grep' | awk -F" " '{print $16}'` ;${mysql} -u${MYSQL_USER} -p${MYSQL_PASSWORD} ${MYSQL_SOCk_DIR} -e "show global status;" 2> /dev/null |grep -v Variable_name|grep "\b${var}\b"|awk '{print $2}' ;发现有些监控项 或因为数字过长而无法显示,待解决
6.mysql_version.sh mysql版本监控
MYSQL_PORT=$1;

MYSQL_SOCk_DIR=`ps -ef |grep 'mysql'| grep "${MYSQL_PORT}" |grep -v 'grep' | awk -F" " '{print $16}'`  ;

mysql=/mysql/app/bin/mysql ;

[ "${MYSQL_USER}"     = '' ] &&  MYSQL_USER=xxx
[ "${MYSQL_PASSWORD}" = '' ] && MYSQL_PASSWORD=xxxx${mysql} -u${MYSQL_USER} -p${MYSQL_PASSWORD} ${MYSQL_SOCk_DIR} -e "select version();" 2> /dev/null |awk 'END {print}'7.mysql_status_many.conf 生成可用键 配置文件
UserParameter=mysql.discovery[*],/patrol/zabbix/bin/duoshili_discovery/discovery_mysql.sh $1
UserParameter=mysql.status_many[*],/patrol/zabbix/bin/duoshili_discovery/mysql_status2 $1 $2UserParameter=mysql.ping_many[*],/patrol/zabbix/bin/duoshili_discovery/mysql_ping.sh $1UserParameter=mysql.version_many[*],/patrol/zabbix/bin/duoshili_discovery/mysql_version.sh $1UserParameter=mysqlcheck_repl[*],/patrol/zabbix/bin/duoshili_discovery/mysql_repl.sh $1 $2UserParameter=mysql.filestyle_many[*],/patrol/zabbix/bin/duoshili_discovery/mysql_filestype
The above is the detailed content of How to use zabbix to monitor multiple mysql. For more information, please follow other related articles on the PHP Chinese website!

Hot AI Tools

Undresser.AI Undress
AI-powered app for creating realistic nude photos

AI Clothes Remover
Online AI tool for removing clothes from photos.

Undress AI Tool
Undress images for free

Clothoff.io
AI clothes remover

AI Hentai Generator
Generate AI Hentai for free.

Hot Article
Hot Tools

Notepad++7.3.1
Easy-to-use and free code editor

SublimeText3 Chinese version
Chinese version, very easy to use

Zend Studio 13.0.1
Powerful PHP integrated development environment

Dreamweaver CS6
Visual web development tools

SublimeText3 Mac version
God-level code editing software (SublimeText3)
Hot Topics
 1378
1378
 52
52

 MySQL: The Ease of Data Management for Beginners
Apr 09, 2025 am 12:07 AM
MySQL: The Ease of Data Management for Beginners
Apr 09, 2025 am 12:07 AM
MySQL is suitable for beginners because it is simple to install, powerful and easy to manage data. 1. Simple installation and configuration, suitable for a variety of operating systems. 2. Support basic operations such as creating databases and tables, inserting, querying, updating and deleting data. 3. Provide advanced functions such as JOIN operations and subqueries. 4. Performance can be improved through indexing, query optimization and table partitioning. 5. Support backup, recovery and security measures to ensure data security and consistency.
 MySQL: Simple Concepts for Easy Learning
Apr 10, 2025 am 09:29 AM
MySQL: Simple Concepts for Easy Learning
Apr 10, 2025 am 09:29 AM
MySQL is an open source relational database management system. 1) Create database and tables: Use the CREATEDATABASE and CREATETABLE commands. 2) Basic operations: INSERT, UPDATE, DELETE and SELECT. 3) Advanced operations: JOIN, subquery and transaction processing. 4) Debugging skills: Check syntax, data type and permissions. 5) Optimization suggestions: Use indexes, avoid SELECT* and use transactions.
 How to open phpmyadmin
Apr 10, 2025 pm 10:51 PM
How to open phpmyadmin
Apr 10, 2025 pm 10:51 PM
You can open phpMyAdmin through the following steps: 1. Log in to the website control panel; 2. Find and click the phpMyAdmin icon; 3. Enter MySQL credentials; 4. Click "Login".
 How to create navicat premium
Apr 09, 2025 am 07:09 AM
How to create navicat premium
Apr 09, 2025 am 07:09 AM
Create a database using Navicat Premium: Connect to the database server and enter the connection parameters. Right-click on the server and select Create Database. Enter the name of the new database and the specified character set and collation. Connect to the new database and create the table in the Object Browser. Right-click on the table and select Insert Data to insert the data.
 MySQL and SQL: Essential Skills for Developers
Apr 10, 2025 am 09:30 AM
MySQL and SQL: Essential Skills for Developers
Apr 10, 2025 am 09:30 AM
MySQL and SQL are essential skills for developers. 1.MySQL is an open source relational database management system, and SQL is the standard language used to manage and operate databases. 2.MySQL supports multiple storage engines through efficient data storage and retrieval functions, and SQL completes complex data operations through simple statements. 3. Examples of usage include basic queries and advanced queries, such as filtering and sorting by condition. 4. Common errors include syntax errors and performance issues, which can be optimized by checking SQL statements and using EXPLAIN commands. 5. Performance optimization techniques include using indexes, avoiding full table scanning, optimizing JOIN operations and improving code readability.
 How to create a new connection to mysql in navicat
Apr 09, 2025 am 07:21 AM
How to create a new connection to mysql in navicat
Apr 09, 2025 am 07:21 AM
You can create a new MySQL connection in Navicat by following the steps: Open the application and select New Connection (Ctrl N). Select "MySQL" as the connection type. Enter the hostname/IP address, port, username, and password. (Optional) Configure advanced options. Save the connection and enter the connection name.
 How to recover data after SQL deletes rows
Apr 09, 2025 pm 12:21 PM
How to recover data after SQL deletes rows
Apr 09, 2025 pm 12:21 PM
Recovering deleted rows directly from the database is usually impossible unless there is a backup or transaction rollback mechanism. Key point: Transaction rollback: Execute ROLLBACK before the transaction is committed to recover data. Backup: Regular backup of the database can be used to quickly restore data. Database snapshot: You can create a read-only copy of the database and restore the data after the data is deleted accidentally. Use DELETE statement with caution: Check the conditions carefully to avoid accidentally deleting data. Use the WHERE clause: explicitly specify the data to be deleted. Use the test environment: Test before performing a DELETE operation.
 How to execute sql in navicat
Apr 08, 2025 pm 11:42 PM
How to execute sql in navicat
Apr 08, 2025 pm 11:42 PM
Steps to perform SQL in Navicat: Connect to the database. Create a SQL Editor window. Write SQL queries or scripts. Click the Run button to execute a query or script. View the results (if the query is executed).
