How to fix blurry text on Windows 10 on high-resolution monitors?
The Windows 10 operating system is a bundle packed with new features. But one annoying problem is blurry text on Windows 10. In some cases, high DPI displays can cause blurred fonts. Many desktop applications suffer from high DPI display issues.
Many Windows desktop applications do not take advantage of the DPI scaling support provided by Windows. Microsoft is working on fixing Windows 10 DPI issues, and many app developers are also actively responding. Try these solutions to fix blurry text issues on Windows 10.
What is blurred text?

Unclear text refers to text that is difficult to read, and long-term use of such blurry computer screens can have an impact on your eyes. To avoid this, you must address this issue as soon as possible as it can harm your eyes. Text appears blurry due to a combination of a high-resolution screen and incomplete graphics card drivers.
In addition to this vague text error, Windows 10 users are often annoyed by image errors. In this error, users will receive error code 0xc000012f. There are some easy-to-implement solutions to fix this error listed here.
Symptoms of Blurry Fonts Windows 10
If you find yourself in any of the following situations, you can assume blurry fonts in Windows 10.
- When you open any application on your Windows 10 system and the text or image looks blurry.
- If your desktop application looks blurry or blurry.
- If the display on the second screen looks blurry.
How to solve the problem of blurry text in Windows 10?
We have tested a few solutions to resolve this blurry text issue depending on the situation. However, we can't tell exactly what's causing the blurry text, so try the following solutions, any of which may fix your issue.
Check the power cord
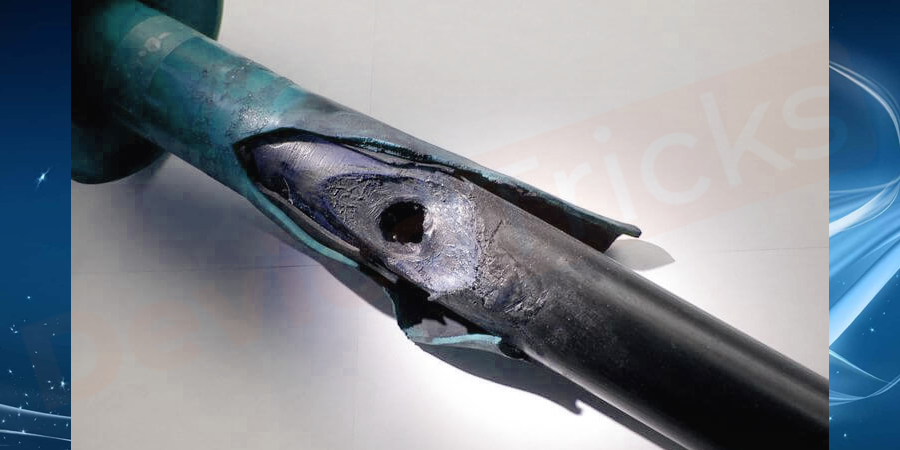
Check the power supply to the monitor and check if the power cord may be burned out or damaged. If you have a voltmeter, check the connections to make sure the monitor is getting the correct voltage from the electrical outlet. The normal amount of voltage for a running computer monitor is about 100 watts. Sometimes, the problem is with the computing power because it's not receiving the correct amount of voltage, causing the image to be blurry.
System Restore
If you accidentally made any changes to the screen size or changed any styles. Are you worried that due to these changes, your Windows 10 system screen will be fuzzy or fuzzy and text will not be clear? To avoid this, restoring the system to its previous location is the best option. When the system is running fine, you must follow the steps below to restore the system.
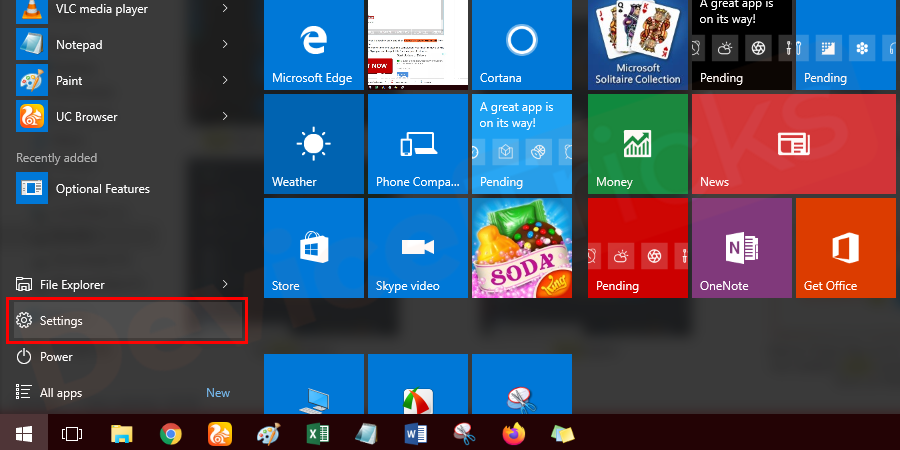
- Press from the desktop screen to start the menu and go to Settings options.
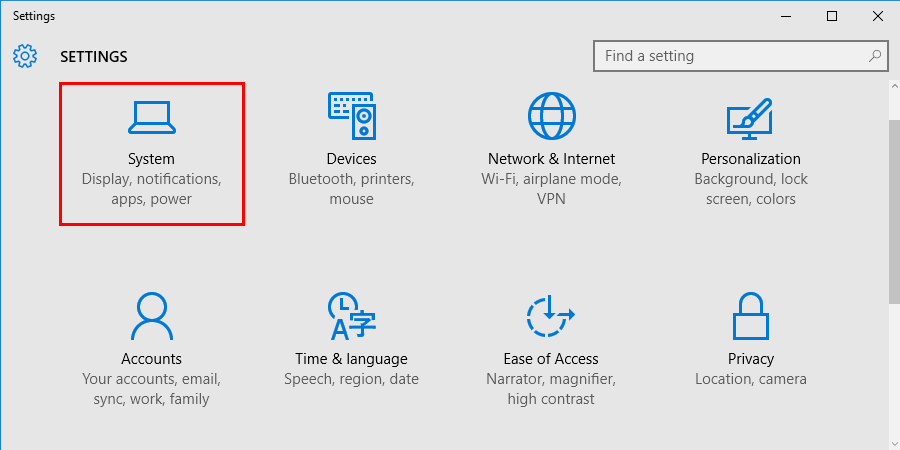
- Click the System category.
- On the next screen, go to the System Restore option and click on the System Restore option where you will find System restore point. You can also find it directly in the search box.
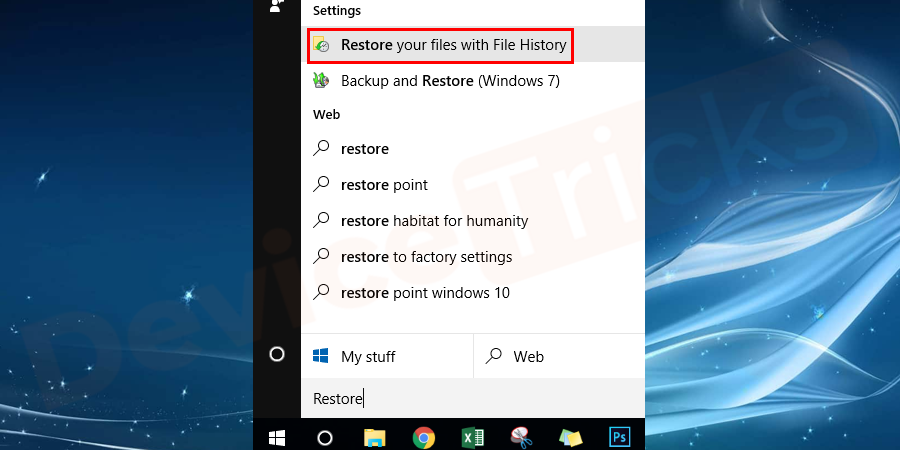
- Select any system option you want to restore, you can see without any blurry text before the option.
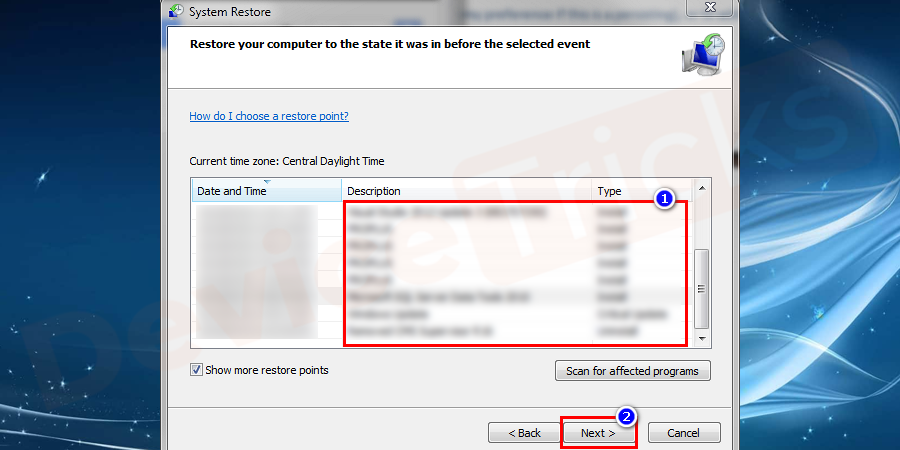
- If you have any software installed that may be affected, you can check the affected programs. But your documents, images and media will not be affected.
- Wait for some time and the system will recover and restart your system.
- SystemAfter restarting, check whether the text is clear and there is no blur. If this doesn't help, move on to the next solution.
Disconnect device
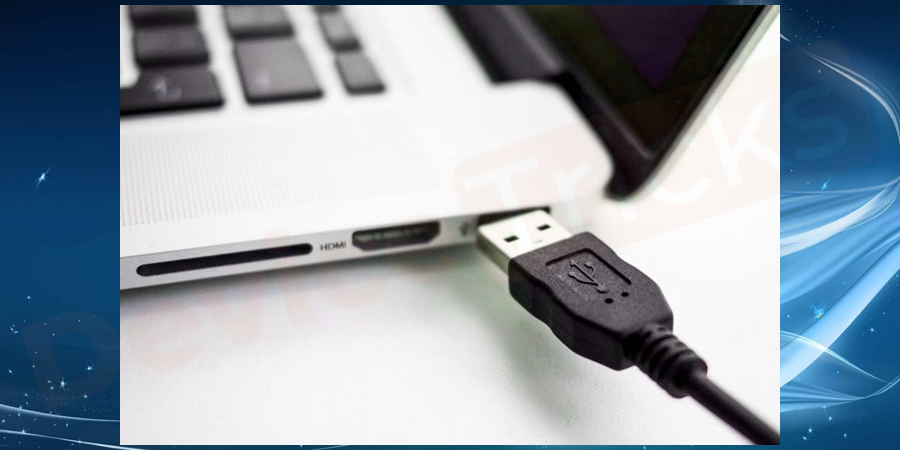
Sometimes external devices connected near the system can cause text to be blurry. To avoid this, unplug headphones, speakers, or any external devices connected near the monitor. Therefore, these devices can create an electromagnetic field that can blur or distort the picture.
Refresh Rate
You must change your monitor's resolution and refresh rate settings to eliminate blurring.
- Go to the Start menu and select Control Panel or Settings.
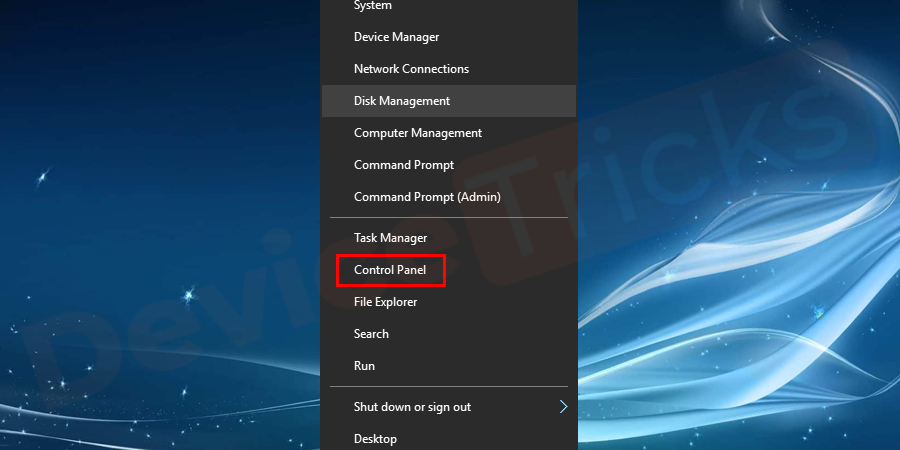
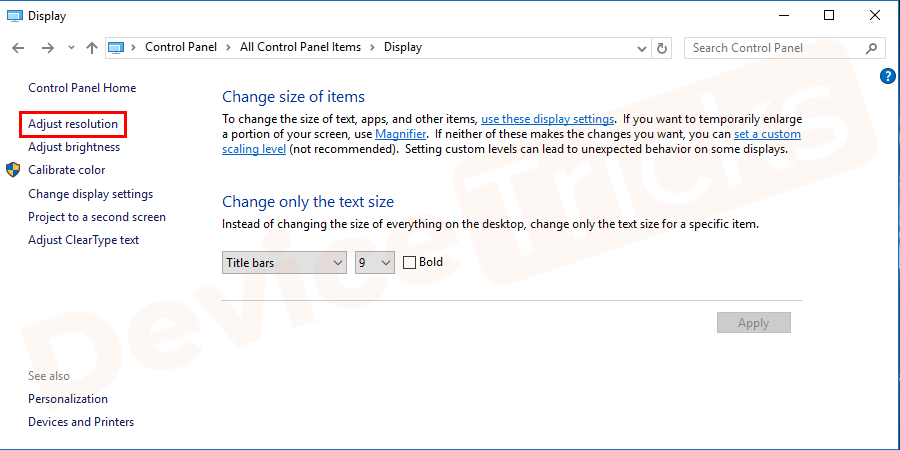
- Click to display options.
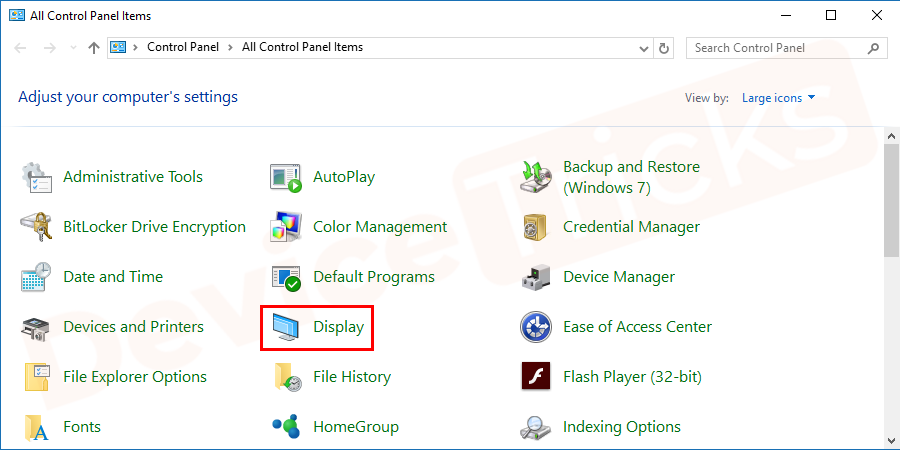
- Navigate to Adjust resolution.
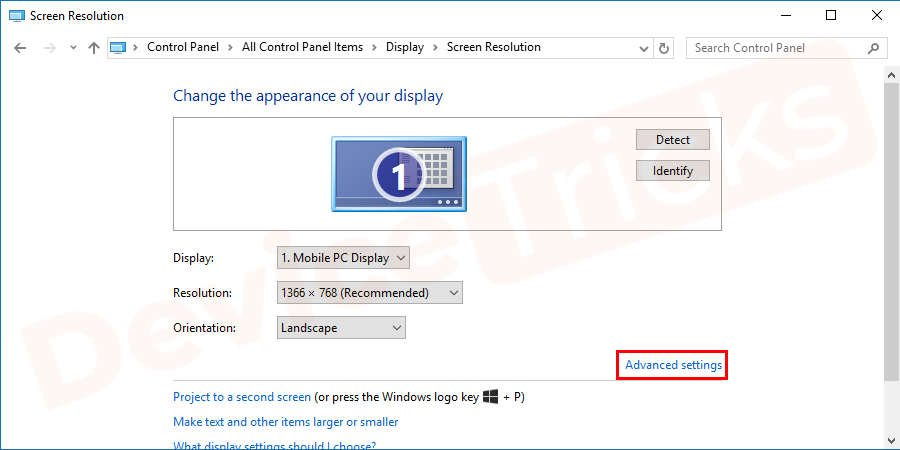
- Then, click the Advanced button.
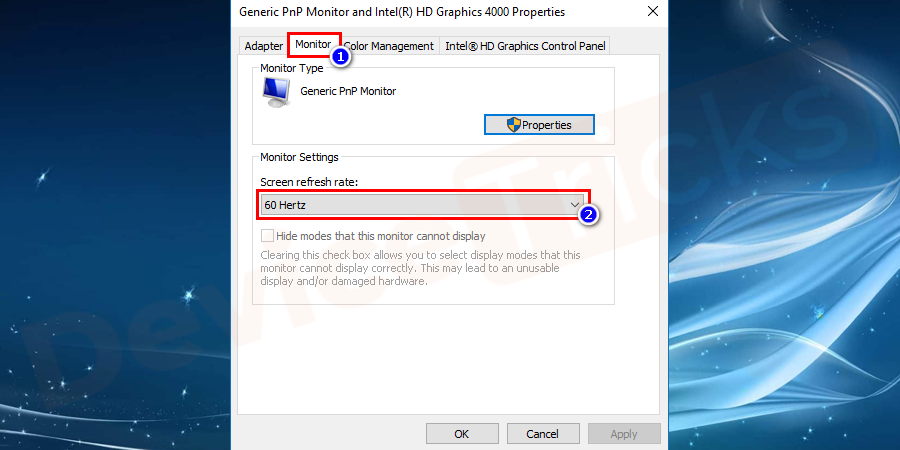
- Next, go to the Monitor tab , you can change it in this tab Screen refresh rate.
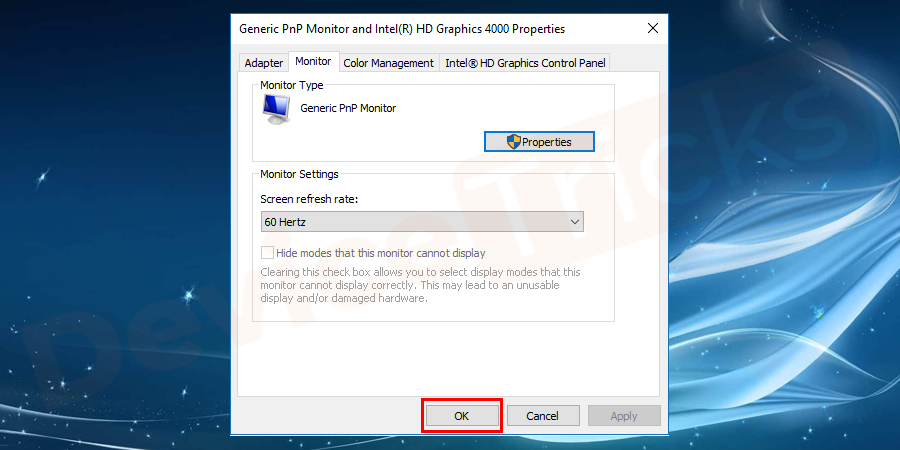
- Click the "OK" button after completing the refresh rate setting.
- You must restart your computer to make the new settings.
- Sometimes you need to adjust settings multiple times to get them right.
Update or reinstall the driver

In rare cases, the problem is with the monitor driver. To fix this blurry text issue on Windows 10, you have to update the monitor driver or uninstall and reinstall the monitor driver. Go to the support page on your computer monitor manufacturer's website to download the software for your computer monitor model. After installing or updating the driver, restart the system to apply the necessary changes to the system.
Adjust display scaling settings
Your laptop may be convertible, or a tablet or laptop with a high DPI Windows 10 will automatically select the appropriate display Zoom settings. Sometimes you need to manually adjust the settings to make it larger and more readable, which is more important than other aspects.
- Go to the Start button. If you know it, navigate directly to Settings in the Start menu.
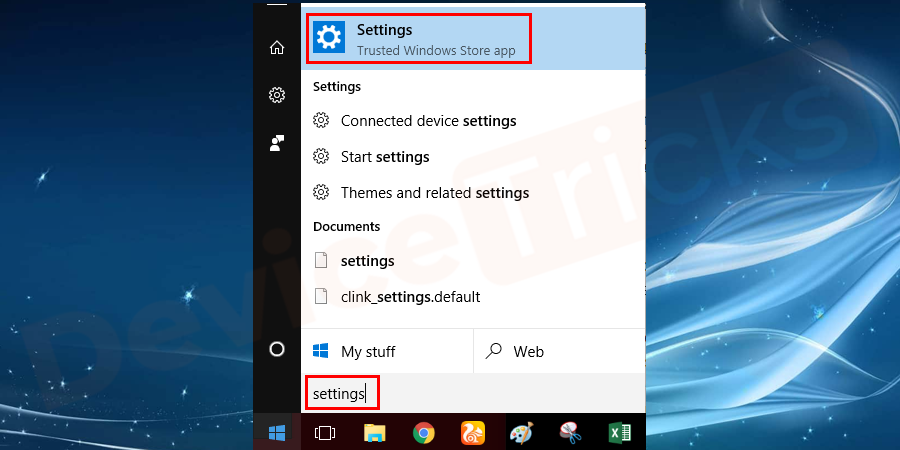
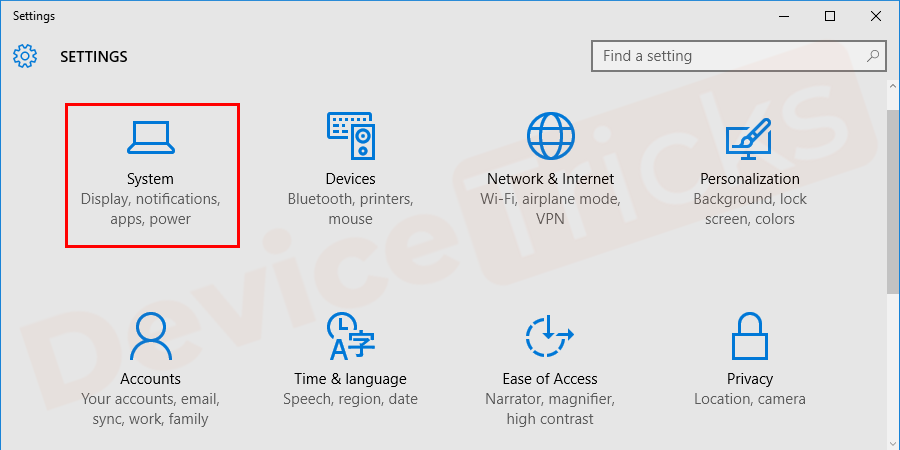
- window will open, go to the System category from the list.
- Next, go to Show options. You'll have multiple customization options to choose based onyour preferences.
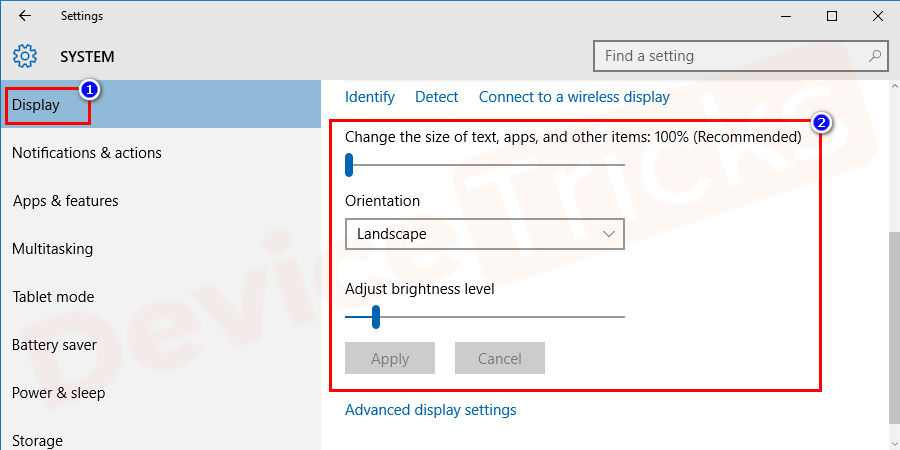
- Even if your PC is connected to multiple screens, you can configure the scaling for each screen individually.
- The perfect ratio setting will depend on your monitor and eyes. So , use a trial and error method to choose settings, and fix what works best for your eyes.
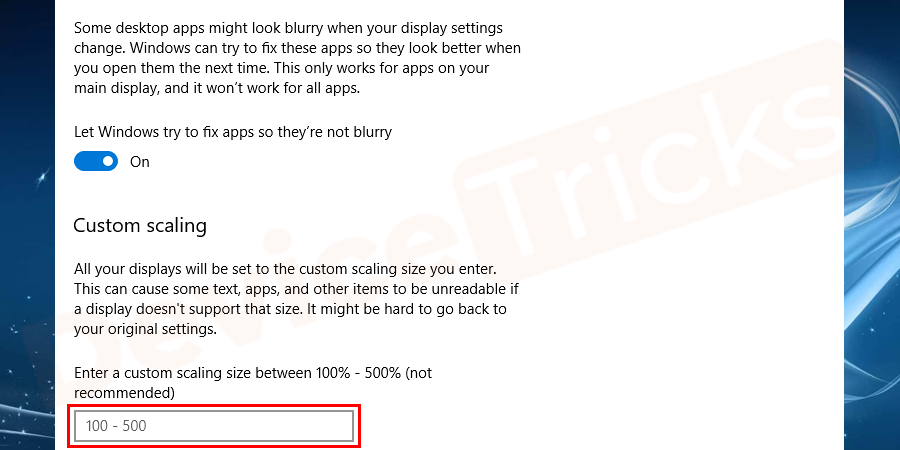
- You must select Custom Scaling and can set a custom percentage value between 100 % and 500 % values.
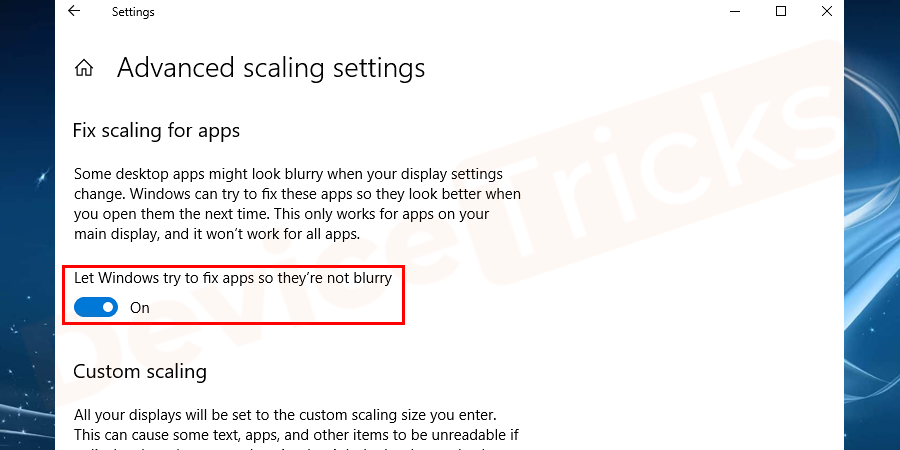
- As shown in the figure, select the Advanced zoom settings option from the window.
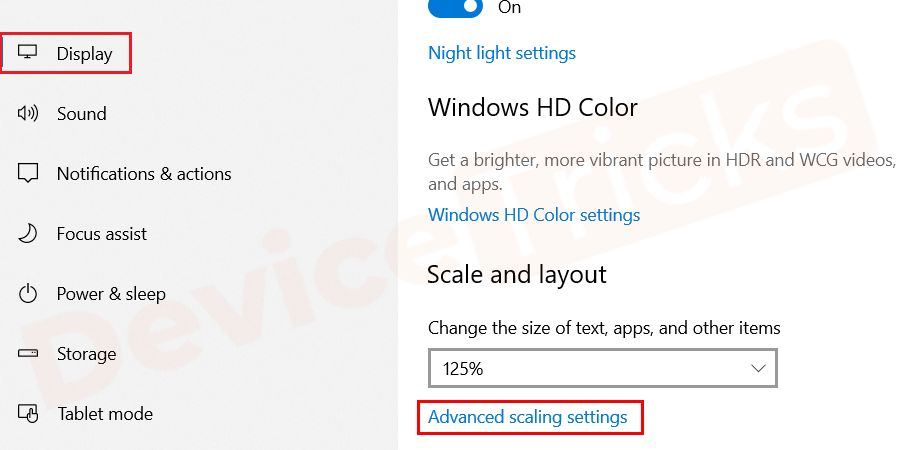
- The next window screen, you will see the fixed scaling of the application section. Enable the Let Windows try to repair applications so they don't blur the switch. This will fix apps that are always blurry. If you have an app in mind that always causes blur, turn it on. When you open Windows 10, a toast notification should appear stating that it was detected as a blurry app and it will try to fix it. Allow Windows 10 to do its thing and check if the app is better.
- Below the same window you can see a custom zoom option where you can set a custom zoom level. Microsoft does not recommend this option, so use it with caution. If you notice any inappropriate behavior when opening the app, undo the zoom changes.
- #After making the necessary changes, close all windows to apply the changes without restarting. Because the system automatically inculcates the scaling option after closing the settings window. But doing your job after a reboot will give you the best results. Because the processor will be loaded due to the reboot, making your system work faster.
Note: Microsoft recommends that you select the default option for maximum compatibility with applications.
Override system DPI scaling on applications
If you turn on DPI scaling, sometimes the fonts of third-party applications will become blurred and cannot be displayed clearly. You are facing this problem because Windows zooms in to make the application appear larger, just like enlarging an image. As a result, the desired text or image appears larger and more readable, but appears blurry.
In older applications, blurrier text is often caused by a lack of support for DPI scaling, which is theoretically possible. But in practice, this problem applies to many common desktop applications. You can manually resolve this issue when adjusting the DPI scaling settings for individual applications that are not performing well.
- If the application is present on the taskbar, right-click the problematic application icon.
- Select the attribute option from the expanded list.
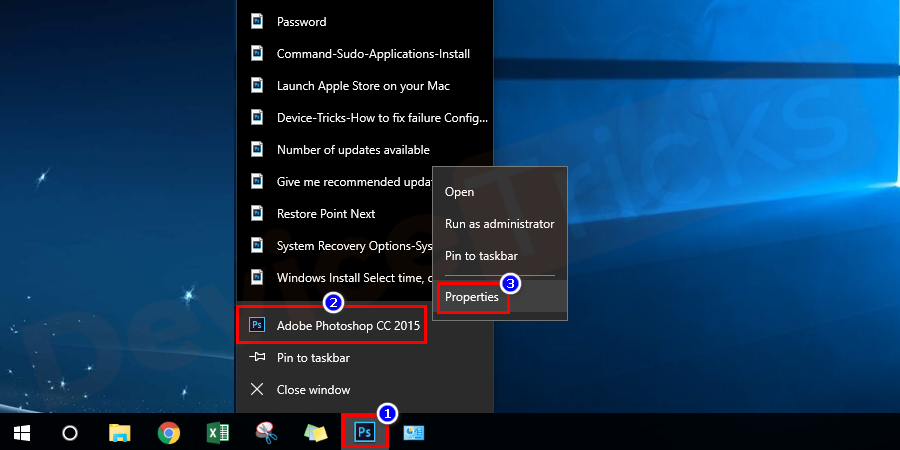
- A new window opens, displaying the properties of all categories.
- Navigate from the menu to the Compatible mode category. click it. Under the Settings category, you can see a dropdown next to the Zoom performer. Check out the images to get a clear understanding.
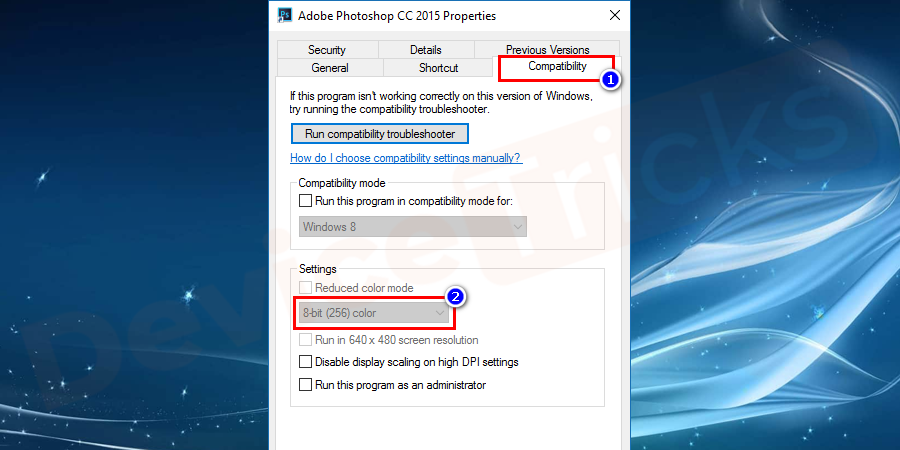
- You must select one of the three high DPI scaling options from the drop-down list. You can see three options that make changes to your application and its view settings.
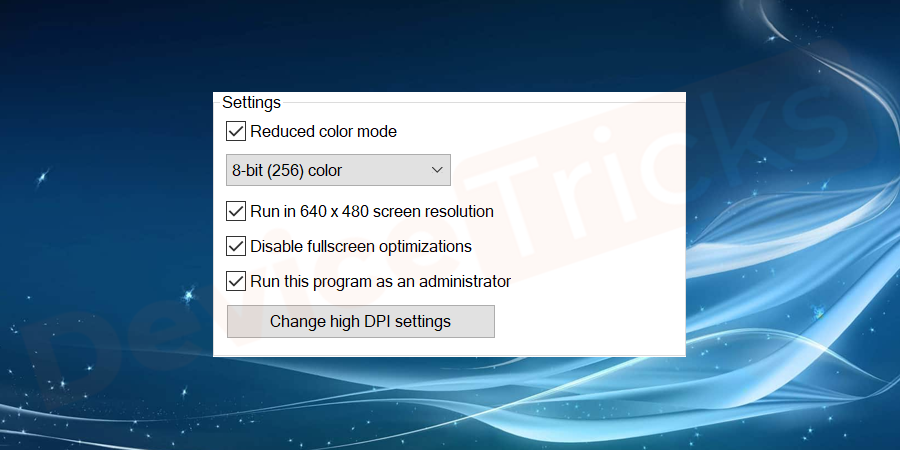
#Apply
Windows will leave the application as is. Selecting this application will completely disable DPI scaling for this application. This will make the app look small but won't make it look blurry. You can disable display scaling on high DPI settings, but this won't provide a perfect picture.
#System
Windows will use its normal behavior. Applications that are not shaped according to the system DPI setting stretch bitmaps to appear larger. It helps you read text more easily, but it often appears blurry. This is the default behavior of the application.
#System (Enhanced)
Windows will extend applications in a smarter way. Selecting this option causes text and certain other elements in the application to exhibit a blurry effect at normal system scaling. In the Creators Update, this option is only available for GDI-based applications. This new feature will eliminate an issue with blurry text appearing in Device Manager and other system tools in the Creators Update.
- After selecting your preferred option, click the Apply button if highlighted, and then click the OK button.
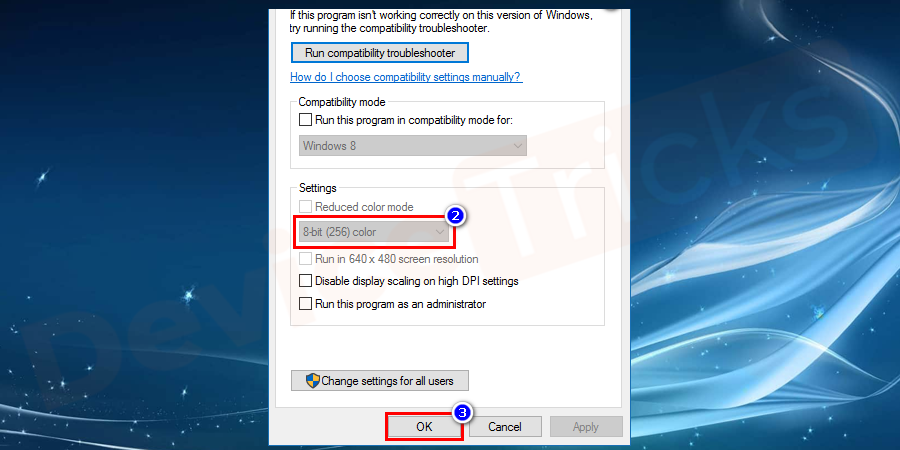
- You must close the application that changed the settings for the changes to be applied. Restart the application again to apply the changes.
NOTE: If you don’t know which option to choose between Application, System, System (Enhanced). Try one of the options to see how the app looks and choose the best option to apply to the app.
Use settings to fix Windows applications to avoid blurring issues. Windows 10 version 1803 update must be installed on your system.
Clear Type
Microsoft has been using a system-wide technology called ClearType to reduce the ambiguity of text and make it clear. Windows 10 automatically includes ClearType support, which is usually turned on by default. You have to check again whether the ClearType setting has been fine-tuned.
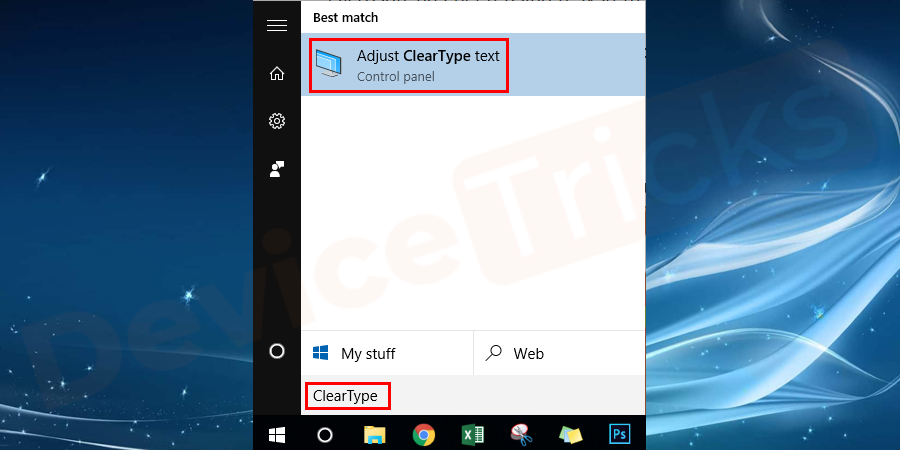
- Search for ClearType in the Start menu by typing in the search box. Alternatively, you can also use cttune.exe to search in the Windows Start Search box. and select Adjust ClearType Text from the results list to open the Control Panel window.
- ClearType The Text Tuner control panel opens and the box next to "Turn on ClearType" is checked. If the checkbox is not checked, you must do this and click the "Next" button.
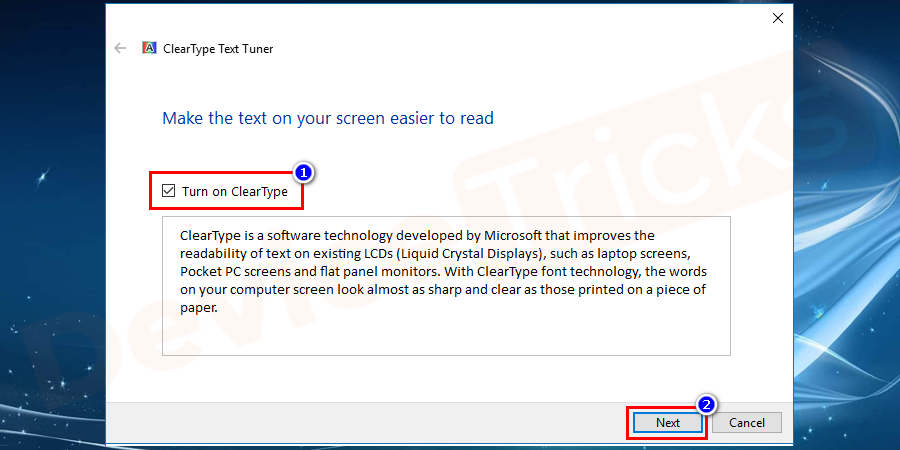
- Windows 10 will check that your monitor resolution is set correctly. Click the
- Next button.
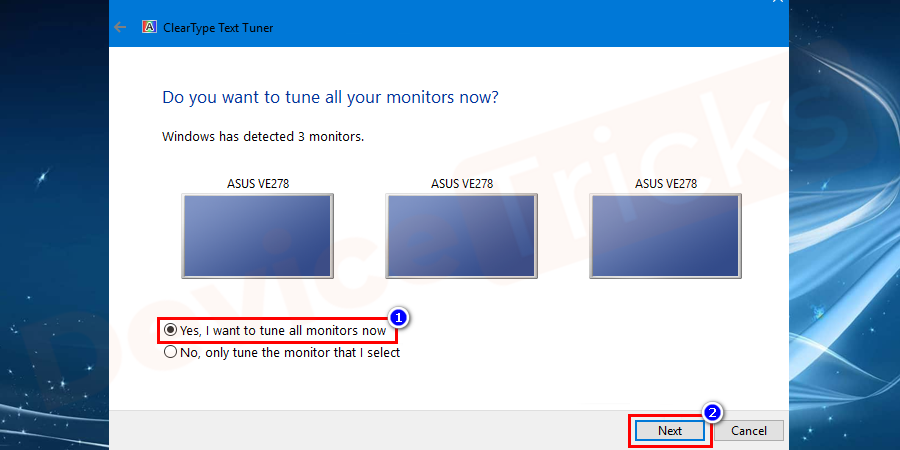
- In the next five screens, you will see several blocks of text. You have to choose the text block that suits your eyes best. This process is like an eye exam, checking for the best font style for your eyes.
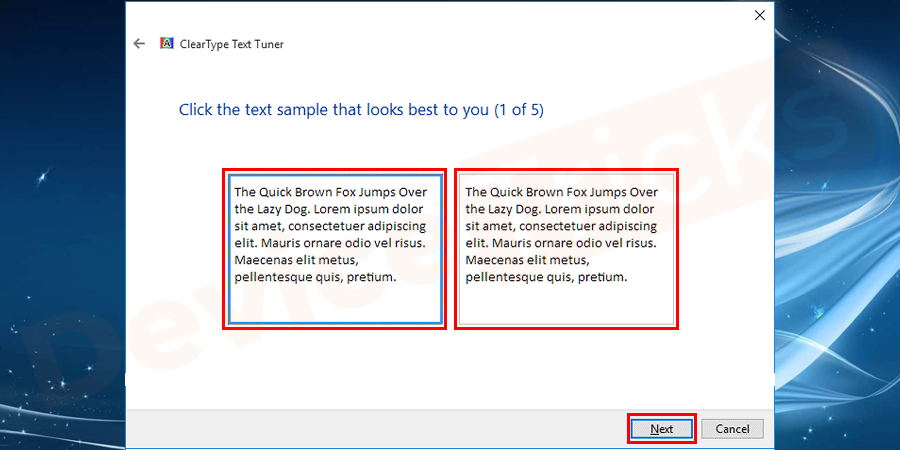
- If you have another monitor, you have to repeat the same when clicking
- Next and set up another monitor the process of.
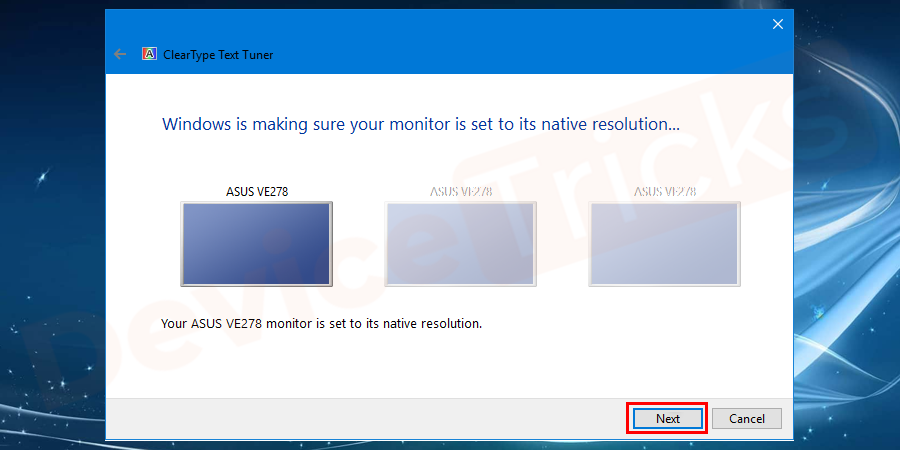
- Your
- ClearType settings will rotate accordingly and click the Done button.
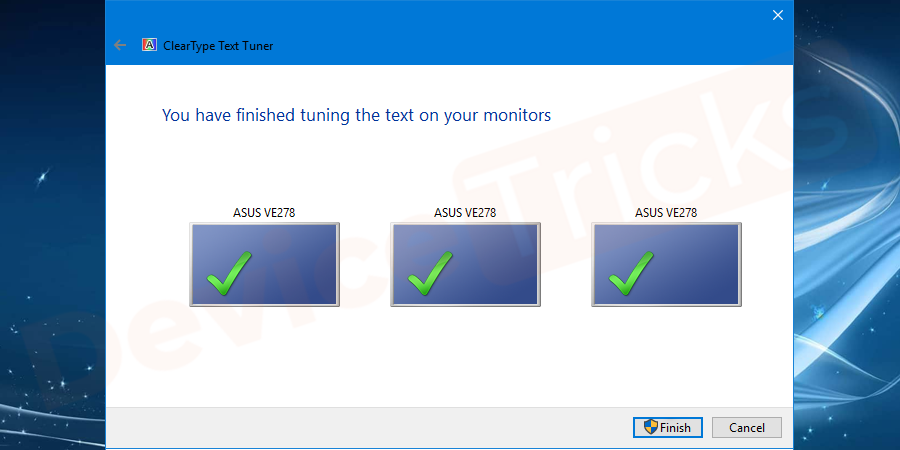
- If you want to make changes, follow the same steps as above. Finally, you can adjust settings to protect your eyes from blurry text.
Fine-tuning display
If you want to make more adjustments, follow the steps below.- Open the
- Start menu and select Settings from the options.
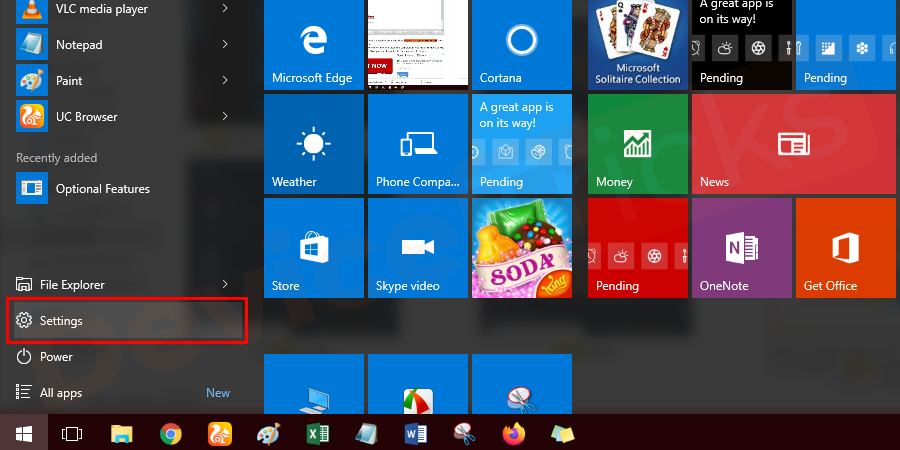
- In the newly opened window, select
- SystemCategory.

- In the next screen under System Settings, navigate to
- Displayon the left side of the box. Select display options. Here you can
- resize the text on the screen and can change the brightness level.
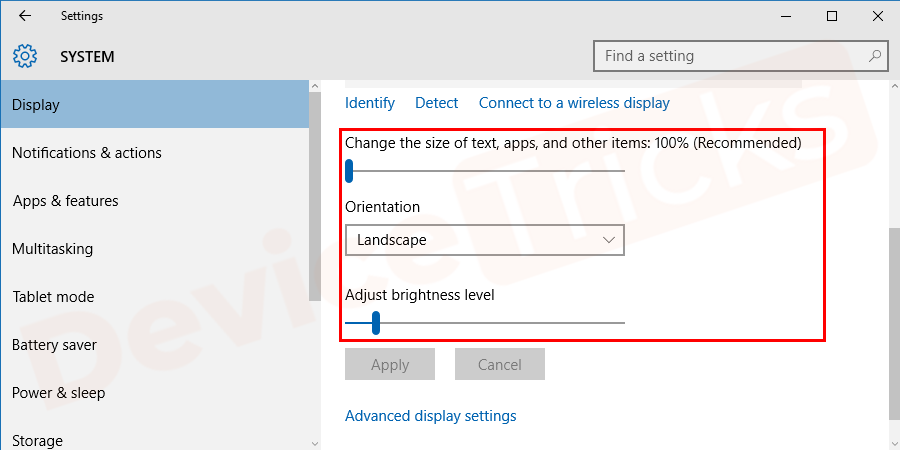
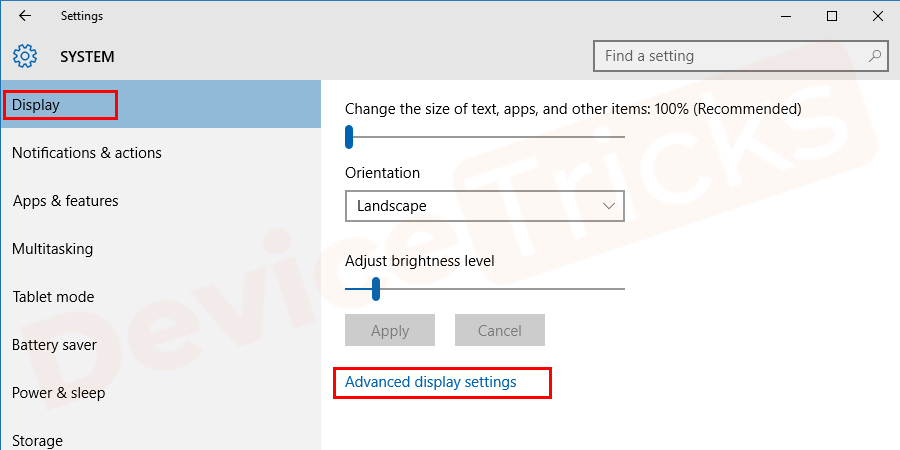
- Select the
- Advanced display settings link at the bottom of the box.
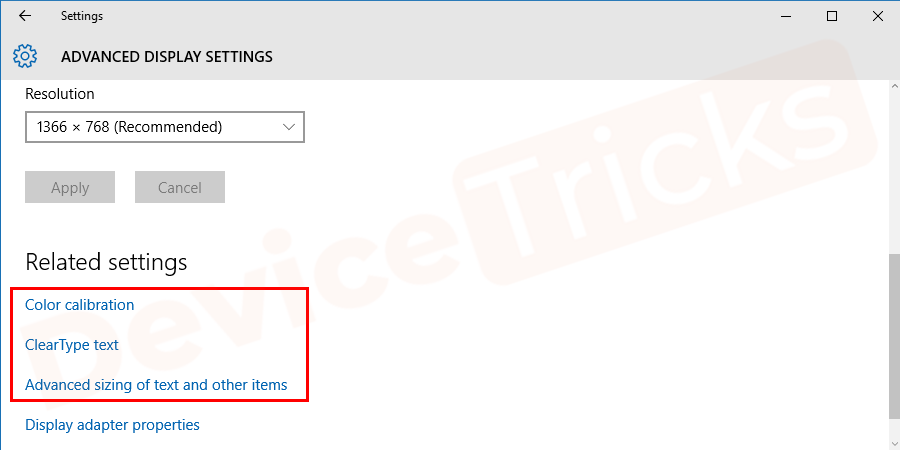
- Here you can select color collaborations to fine-tune the colors on your monitor. Additional advanced resize text and other items options increase the size of text in Windows title bars, menus, and other screen elements.
Update Display Driver
Most of the time it is found that outdated graphics card can cause several issues and one of them is “Fizzy text on Windows 10”, to solve the same problem, you need to update your graphics card. The process is simple and the steps are provided below for your convenience.
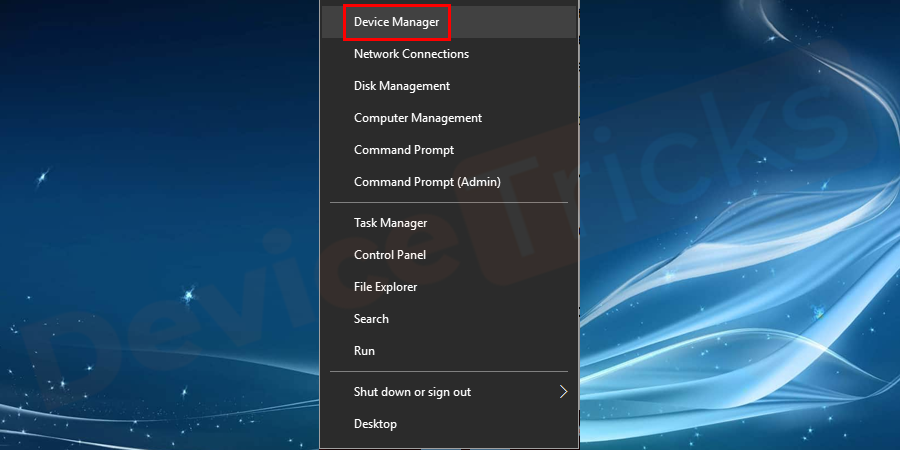
- Hover your mouse cursor over the Start menu, right-click it and select the "Device Manager" option.
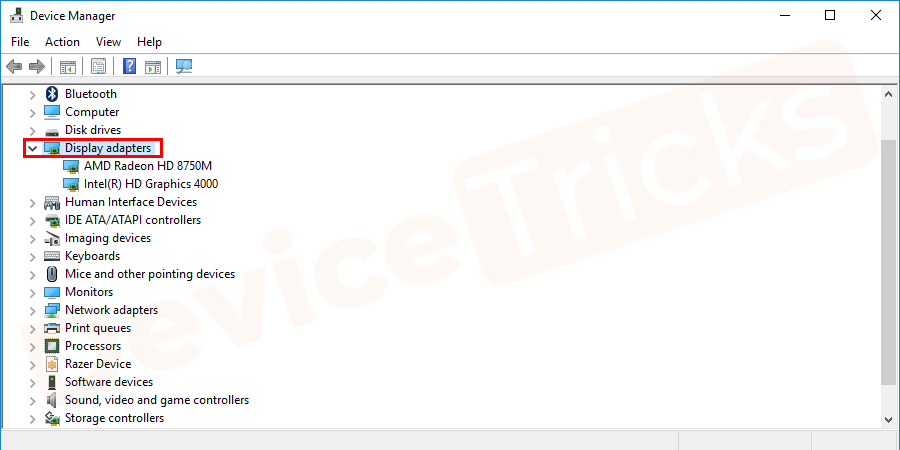
- Soon, the Device Manager window will open, move to "Display Adapters" and double click on the display adapter icon to Get a list of all graphics card drivers.
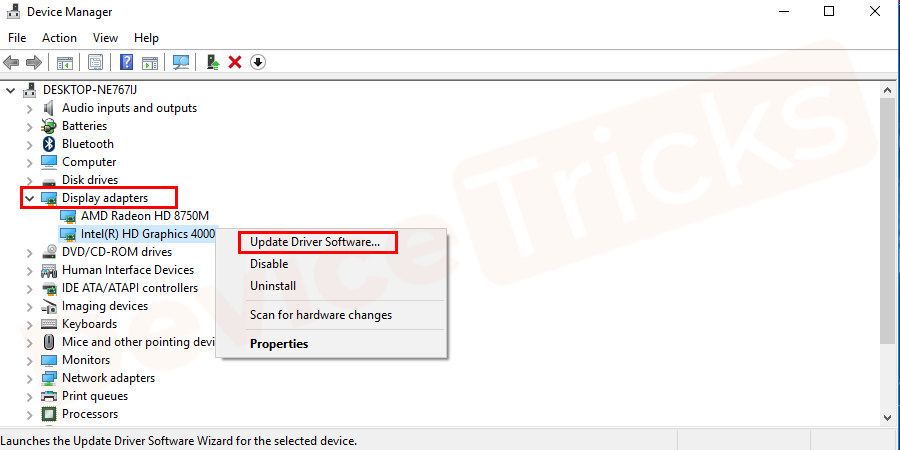
- Select your preferred graphics card, right-click on it and select the "Update Driver" option from the drop-down menu.
- After this, you will get the option to update your graphics card, select "Search automatically for updated driver software" .
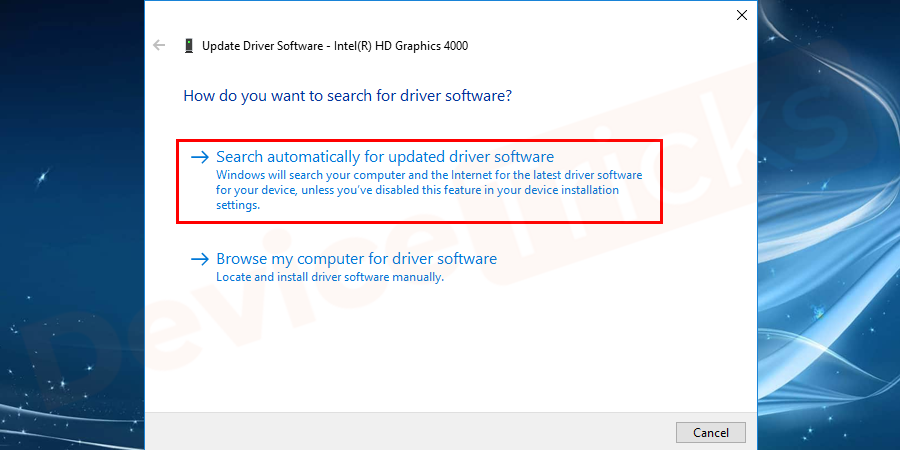
- Now, wait for some time as Windows will start performing its tasks.
- After the task is completed, Restart the computer to apply the changes.
The above is the detailed content of How to fix blurry text on Windows 10 on high-resolution monitors?. For more information, please follow other related articles on the PHP Chinese website!

Hot AI Tools

Undresser.AI Undress
AI-powered app for creating realistic nude photos

AI Clothes Remover
Online AI tool for removing clothes from photos.

Undress AI Tool
Undress images for free

Clothoff.io
AI clothes remover

AI Hentai Generator
Generate AI Hentai for free.

Hot Article

Hot Tools

Notepad++7.3.1
Easy-to-use and free code editor

SublimeText3 Chinese version
Chinese version, very easy to use

Zend Studio 13.0.1
Powerful PHP integrated development environment

Dreamweaver CS6
Visual web development tools

SublimeText3 Mac version
God-level code editing software (SublimeText3)

Hot Topics
 1377
1377
 52
52
 What is idp generic malware? Is it a virus or a false positive?
May 14, 2023 pm 01:04 PM
It's Sunday afternoon and you're enjoying your favorite game on your PC. Your game is almost over but is suddenly interrupted by a pop-up window. When you see the warning message “IDP.Generic threat detected” from your antivirus program, you feel annoyed and worried at the same time. Is it a virus or just a warning? So confused that you somehow managed to get to this page on the internet. Don’t worry, we will resolve your concerns immediately. What does IDP mean? IDP is the identity detection protection mechanism of antivirus programs, which prevents computers from being stolen by Trojans or viruses from personal data related to your identity, such as your bank credentials, important documents, and ID cards. When an antivirus program fails to detect a file type and therefore raises a warning, it usually
 'DNS Probe Finished No Internet' Error in Google Chrome - How to Fix?
Apr 18, 2023 pm 09:31 PM
Imagine you're working on a presentation that's due tomorrow, and you find the perfect web page that contains all the statistics you've been searching for hours. Once you open it, instead of a web page, you see a small T-Rex with a small DNS_PROBE_FINISHED_NO_INTERNET error written underneath it. How frustrating can it be when DNS probing starts with no internet? Like a fireman, I will try to quickly address all of your pressing questions related to this error. What is DNS_Probe_Finished_No_Internet error? DNS_PROBE error is very common for Google Chrome users, it is mainly
 How to fix Steam missing file permissions error?
May 19, 2023 pm 04:03 PM
Steam is a gaming platform that offers action-packed games, adventure games, and more. In short, it is an ideal hub for gamers where they can find all types of games. There is no doubt that Steam is a great application but some users fail to access the platform efficiently and the reason behind it is an issue namely “Steam Missing File Permissions”. So don’t worry if you are in the same list as the problem is very common and with some quick solutions you can resolve it in no time. But before going further into the solution section, let’s figure out what is the reason behind “Steam update missing file permissions” issue. Once we figure out the cause, then it's easy to fix
 How to fix Unable to connect to NVIDIA error in Windows?
May 04, 2023 am 08:40 AM
"Unable to connect to NVIDIA, try again later" error displayed on the screen means that the GeForceExperience application cannot connect to NVIDIA, thus causing such issues. Most of the time the error notification looks like Unable to connect to NVIDIA Please try again later or Unable to connect to NVIDIA Check your Internet connection Many users are facing this issue and you are not the only one reporting GeForceExperience cannot open error. So, to solve the same problem, there are some fruitful solutions that can help you overcome this problem. Before moving on to the solution section, let us discuss why this error occurs. continue
 What should I do if it prompts 80070035 that the network path cannot be found in win10?
May 12, 2023 pm 05:17 PM
Solution to the prompt 80070035 Network path not found in win10: 1. Click "Network", "Open Network and Internet Settings", select "Network and Sharing Center" and then select "Change advanced sharing settings", and then check " Enable sharing so that users with network access can read files in public folders"; 2. Return to "Network and Sharing Center", click "Broadband Connection" and select "Properties", click "Network", check "Microsoft Network Client" Just click "end".
 How to fix print screen not working on Windows 10?
Apr 14, 2023 am 08:37 AM
Are you encountering “ Print Screen not working ” while trying to capture screenshots on Windows 10 via Print Screen (PrtSc) key? Well, don’t worry because you are not alone, many Windows 10 users have experienced the Print Screen feature suddenly stopped working and complained about the error on forum threads. Well, this is indeed very disturbing but a common problem and if you are still dealing with Windows 10 screen capture not working issue or Print Screen key no longer working, then luckily you are at the right place. In this article, you will learn how to fix
 How to fix 502 Bad Gateway error?
Apr 14, 2023 am 09:07 AM
We have to be grateful to technology for making our lives easier, but that same technology often falls victim to technical glitches. 502 Bad Gateway is one such technical glitch you may encounter. It indicates that one server is unable to get some valid response from another server. If you're wondering what exactly a 502 Bad Gateway error is, keep reading. What does 502 Bad Gateway mean? It's just an HTTP status code, similar to a specific server being unable to receive a response from another server. The 502 Bad Gateway error depends entirely on your specific setup. You may end up experiencing it in any browser at any given time across any operating system
 How to use LG Smart TV without remote control?
Apr 16, 2023 pm 03:07 PM
Currently, most people have LED smart TVs in their homes and office areas, and this upgraded TV can help them go digital. Furthermore, these smart TVs act as computer devices and smartphone devices. A smart TV is nothing but a device that broadcasts local channels to you and you can also view social media and other media platform websites on a single device. These devices connect via Wi-Fi, so you can access your TV from your computer device or smartphone. Remote control settings allow you to access all types of services available in your LG TV, for example, when you have to connect your LG TV to Wi-Fi without a remote control, you will need to use a USB mouse to connect your TV Connect to a wireless network. how to


