

How to use the python third-party library pygame

Function: pygame is generally used to make games
Note: 1. Before using the functions provided by pygame, you need to call the init method
2.You need to call the quit method before the game ends
Various functions in pygame:
1.pygame.init(): This function is initialized when using pygame. Only by referencing this function can you use the functions provided by pygame
2.pygame.Rect(): This function can set the position and size of a picture. This is a special function that can be used without referencing the init function.
3.pygame.display.set_mode (resolution=(0,0),flags=0,depth=0): This function can create the main window object of the game,
Parameter 1: Specify the width and height of the screen, the default is the same as the screen size
Parameter 2: Specify additional options for the screen, not passed by default
Parameter 3: The number of digits in the color, automatically matched by default
4.pygame.display.update(): Refresh the main window content
5.pygame.image.load(): Load the required image
6.Main window object.blit(image, position): Draw the image to the specified position
7.pygame.time.Clock(): Create a time object to control the frame rate
8. Time object.tick (number): Control the frame rate per second
9.pygame.event.get(): event listening, returns a list
10.pygame.sprite.Sprite: sprite, object used to store image data images and rect
11.pygame.sprite.Group(Elven 1, Elf 2): Create a sprite group object
12.Sprite group object.update(): Update the position of the sprite in the sprite group
13.Elf group object.draw(): Draw all the elves in the elf group to the main window
14.pygame.time.set_time(eventid,milliseconds): Set the program to be executed for each period of time What content, the first one needs to be specified based on the constant pygame.USEREVENT, the second parameter is the millisecond value
15.pygame.key.get_pressed(): key monitoring, will return tuples of all keys, passed Keyboard constant, determines whether a key in the tuple is triggered. If it is triggered, the corresponding value is 1
16.pygame.sprite.groupcollide(elf group 1, sprite group 2, bool, bool): detects two The collision of an elf group will return a dictionary. The first parameter is associated with the third parameter, and the second parameter is associated with the fourth parameter. When the bool type is true, the collision will be destroyed
17.pygame.sprite.spritecollide(elf, elf group, bool): detects the collision between the elf and the elf group, and returns a list of the elf group. When the bool type is true, the elf group will be destroyed
Summary of a plane war game:
import pygame
import time
from plane_Sprite import *

class PlaneGame(object):
    def __init__(self):
        print('初始化')
        # 1.创建游戏窗口
        self.screem = pygame.display.set_mode(SCREEM_RECT.size)  # 这里需要拿到元组类型的数据,使用 .size 可以拿到数组中的数据
        # 2.创建游戏时钟
        self.clock = pygame.time.Clock()
        # 3.调用私有方法,精灵和精灵组的创建
        self.__create_sprite()
        # 4.创建敌机定时器
        pygame.time.set_timer(CREATE_ENEMY_EVENT, 1000)
        # 5.创建子弹定时器
        pygame.time.set_timer(HERO_FIRE_EVENT, 500)
    def __create_sprite(self):
        # 创建背景精灵类
        # bg1 = BackGround('./images/background.jpg')
        # bg2 = BackGround('./images/background.jpg')
        bg1 = BackGround()
        bg2 = BackGround(True)
        self.back_groud = pygame.sprite.Group(bg1, bg2)  # 创建背景精灵组
        self.enemy_group = pygame.sprite.Group()  # 创建敌机精灵组
        self.he1 = Hero()
        self.hero_group = pygame.sprite.Group(self.he1)  # 创建英雄精灵组

    def StartGame(self):
        print('开始游戏')
        while True:
            # 1.设置刷新的帧率
            self.clock.tick(SHUA)
            # 2.事件监听
            self.__event_handler()
            # 3.碰撞检测
            self.__check_cllide()
            # 4.更新/和绘制精灵组图片
            self.__update_sprite()
            # 5.更新显示
            pygame.display.update()
    # 定义私有方法
    def __event_handler(self):
        """监听事件处理"""
        for event in pygame.event.get():
            if event.type == pygame.QUIT:
                # 调用静态方法:使用类名
                PlaneGame.__game_over()
            # 判断定时器事件
            elif event.type == CREATE_ENEMY_EVENT:
                # 创建敌机对象
                enemy = Enemy()
                # 添加到精灵组中
                self.enemy_group.add(enemy)
            elif event.type == HERO_FIRE_EVENT:
                self.he1.fire()
        # 获取键盘信息
        key_pressed = pygame.key.get_pressed()
        # 判断对应的键盘
        if key_pressed[pygame.K_RIGHT]:
            self.he1.speed = 3
        elif key_pressed[pygame.K_LEFT]:
            self.he1.speed = -3
        elif key_pressed[pygame.K_UP]:
            self.he1.speed = -2
        elif key_pressed[pygame.K_DOWN]:
            self.he1.speed = 2
        else:
            self.he1.speed = 0
    def __check_cllide(self):
        """碰撞检测"""
        # 子弹摧毁敌机
        pygame.sprite.groupcollide(self.he1.bullets, self.enemy_group, True, True)
        # 敌机撞毁英雄
        enemy_list = pygame.sprite.spritecollide(self.he1, self.enemy_group,True)
        if len(enemy_list) > 0:
            # 销毁英雄
            self.he1.kill()
            # 结束游戏
            PlaneGame.__game_over()
    def __update_sprite(self):
        """更新精灵组"""
        self.back_groud.update()  # 刷新图像数据
        self.back_groud.draw(self.screem)  # 绘画图像
        # 敌机精灵组更新
        self.enemy_group.update()
        self.enemy_group.draw(self.screem)
        # 英雄精灵组更新
        self.hero_group.update()
        self.hero_group.draw(self.screem)
        # 子弹精灵组更新
        self.he1.bullets.update()
        self.he1.bullets.draw(self.screem)
    @staticmethod # 静态方法
    def __game_over():
        """结束游戏"""
        print('游戏结束')
        pygame.quit()
        exit()
if __name__ == "__main__":

    # 创建游戏对象
    plane_start = PlaneGame()
    # 启动游戏
plane_start.StartGame()The above is the code for the game to implement the function
import random
import pygame
# 定义常量,一般使用大写字母'
# 屏幕大小常量
SCREEM_RECT = pygame.Rect(0, 0, 591, 764)
# 刷新的帧率
SHUA = 60
# 设置敌机定时器事件常量
CREATE_ENEMY_EVENT = pygame.USEREVENT
# 设置英雄子弹定时器事件常量
HERO_FIRE_EVENT = pygame.USEREVENT + 1 # 因为 pygame.USEREVENT 被占用,所以需要加1进行区分
class GameSprite(pygame.sprite.Sprite):
"""飞机大战游戏精灵"""
def __init__(self, image_name, speed = 1):
# 需要调用超级初始化方法
super().__init__()
# 定义属性
self.image = pygame.image.load(image_name) # 加载图像
self.rect = self.image.get_rect() # 获取到图像位置变更的信息
self.speed = speed # 设置变更的速度
def update(self):
# 在屏幕垂直向上移动
self.rect.y += self.speed
# 创建一个子类,完成屏幕需求
class BackGround(GameSprite):
"""游戏背景精灵"""
# is_alt 判断参数
def __init__(self, is_alt= False):
# 调用父类初始化方法设置参数
super().__init__('./images/background.jpg')
# 判断是否是叠加图像
if is_alt:
self.rect.y = -self.rect.height
def update(self):
# 调用父类的方法
super().update()
# 2.判断是否移出屏幕,移出屏幕,重新设置到屏幕上方
if self.rect.y >= SCREEM_RECT.height:
self.rect.y = -self.rect.height
# 创建敌机类
class Enemy(GameSprite):
def __init__(self):
# 1.调用父类方法,创建敌机精灵,同时指定敌机图片
super().__init__('./images/enemy_2.jpg')
# 2.指定敌机的初始随机速度
self.speed = random.randint(1, 3)
# 3.指定敌机的初始随机位置
self.rect.bottom = 0
max_x = SCREEM_RECT.width - self.rect.width # 计算x的最大值
self.rect.x = random.randint(0, max_x)
def update(self):
# 调用父类方法,保持垂直飞行
super().update()
# 判断是否非常屏幕,是,则删除精灵组
if self.rect.y >= SCREEM_RECT.height + self.rect.height:
# kill 方法可以将精灵从精灵组中移除,精灵就会被自动销毁
self.kill()
def __del__(self):
# print('%s' % self.rect)
pass
# 创建英雄类
class Hero(GameSprite):
def __init__(self):
# 1.调用父类中的初始方法,加载图片
super().__init__('./images/planeNormal_2.jpg', 0)
# 2.重新设置位置
self.rect.centerx = SCREEM_RECT.centerx
self.rect.bottom = SCREEM_RECT.bottom - 80
# 创建子弹组
self.bullets = pygame.sprite.Group()
def update(self):
self.rect.x += self.speed
# 控制屏幕不会出界
if self.rect.x <= -30:
self.rect.x = -30
elif self.rect.right >= SCREEM_RECT.right + 30:
self.rect.right = SCREEM_RECT.right + 30
def fire(self):
# 设置每次发射三枚子弹
for i in (0, 1, 2):
# 1.创建子弹精灵
bullet = Bullet()
# 2.设置精灵位置
bullet.rect.bottom = self.rect.y - i * 24
bullet.rect.centerx = self.rect.centerx
# 3.将精灵添加到精灵组
self.bullets.add(bullet)
# 创建子弹类
class Bullet(GameSprite):
def __init__(self):
# 调用父类方法
super().__init__('./images/bullet2.jpg', -3)
def update(self):
super().update()
if self.rect.bottom < 0:
self.kill()The above is the code for each sprite to implement. Change the code segment to plane_Sprite and use it as a module to implement the function. It is referenced in the code. The pictures used in the above code need to be found by yourself
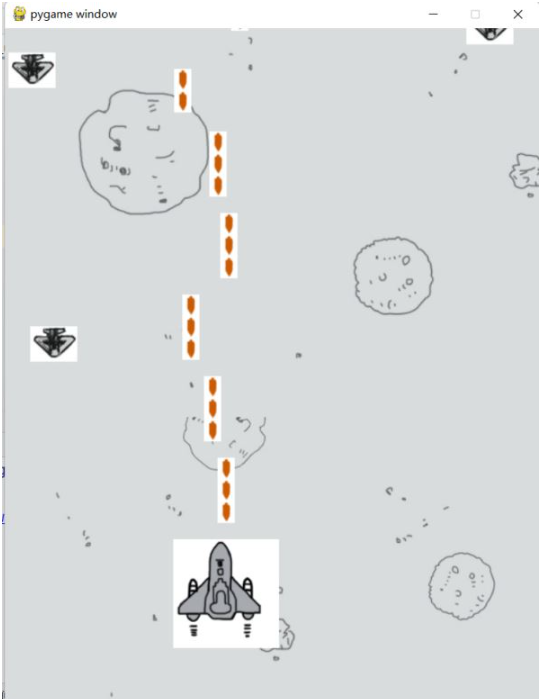
[Code implementation effect]
The above is the detailed content of How to use the python third-party library pygame. For more information, please follow other related articles on the PHP Chinese website!

Hot AI Tools

Undresser.AI Undress
AI-powered app for creating realistic nude photos

AI Clothes Remover
Online AI tool for removing clothes from photos.

Undress AI Tool
Undress images for free

Clothoff.io
AI clothes remover

Video Face Swap
Swap faces in any video effortlessly with our completely free AI face swap tool!

Hot Article
Hot Tools

Notepad++7.3.1
Easy-to-use and free code editor

SublimeText3 Chinese version
Chinese version, very easy to use

Zend Studio 13.0.1
Powerful PHP integrated development environment

Dreamweaver CS6
Visual web development tools

SublimeText3 Mac version
God-level code editing software (SublimeText3)
Hot Topics
 1393
1393
 52
1207
24
52
1207
24

 PHP and Python: Different Paradigms Explained
Apr 18, 2025 am 12:26 AM
PHP and Python: Different Paradigms Explained
Apr 18, 2025 am 12:26 AM
PHP is mainly procedural programming, but also supports object-oriented programming (OOP); Python supports a variety of paradigms, including OOP, functional and procedural programming. PHP is suitable for web development, and Python is suitable for a variety of applications such as data analysis and machine learning.
 Choosing Between PHP and Python: A Guide
Apr 18, 2025 am 12:24 AM
Choosing Between PHP and Python: A Guide
Apr 18, 2025 am 12:24 AM
PHP is suitable for web development and rapid prototyping, and Python is suitable for data science and machine learning. 1.PHP is used for dynamic web development, with simple syntax and suitable for rapid development. 2. Python has concise syntax, is suitable for multiple fields, and has a strong library ecosystem.
 Python vs. JavaScript: The Learning Curve and Ease of Use
Apr 16, 2025 am 12:12 AM
Python vs. JavaScript: The Learning Curve and Ease of Use
Apr 16, 2025 am 12:12 AM
Python is more suitable for beginners, with a smooth learning curve and concise syntax; JavaScript is suitable for front-end development, with a steep learning curve and flexible syntax. 1. Python syntax is intuitive and suitable for data science and back-end development. 2. JavaScript is flexible and widely used in front-end and server-side programming.
 Can visual studio code be used in python
Apr 15, 2025 pm 08:18 PM
Can visual studio code be used in python
Apr 15, 2025 pm 08:18 PM
VS Code can be used to write Python and provides many features that make it an ideal tool for developing Python applications. It allows users to: install Python extensions to get functions such as code completion, syntax highlighting, and debugging. Use the debugger to track code step by step, find and fix errors. Integrate Git for version control. Use code formatting tools to maintain code consistency. Use the Linting tool to spot potential problems ahead of time.
 Can vs code run in Windows 8
Apr 15, 2025 pm 07:24 PM
Can vs code run in Windows 8
Apr 15, 2025 pm 07:24 PM
VS Code can run on Windows 8, but the experience may not be great. First make sure the system has been updated to the latest patch, then download the VS Code installation package that matches the system architecture and install it as prompted. After installation, be aware that some extensions may be incompatible with Windows 8 and need to look for alternative extensions or use newer Windows systems in a virtual machine. Install the necessary extensions to check whether they work properly. Although VS Code is feasible on Windows 8, it is recommended to upgrade to a newer Windows system for a better development experience and security.
 PHP and Python: A Deep Dive into Their History
Apr 18, 2025 am 12:25 AM
PHP and Python: A Deep Dive into Their History
Apr 18, 2025 am 12:25 AM
PHP originated in 1994 and was developed by RasmusLerdorf. It was originally used to track website visitors and gradually evolved into a server-side scripting language and was widely used in web development. Python was developed by Guidovan Rossum in the late 1980s and was first released in 1991. It emphasizes code readability and simplicity, and is suitable for scientific computing, data analysis and other fields.
 How to run programs in terminal vscode
Apr 15, 2025 pm 06:42 PM
How to run programs in terminal vscode
Apr 15, 2025 pm 06:42 PM
In VS Code, you can run the program in the terminal through the following steps: Prepare the code and open the integrated terminal to ensure that the code directory is consistent with the terminal working directory. Select the run command according to the programming language (such as Python's python your_file_name.py) to check whether it runs successfully and resolve errors. Use the debugger to improve debugging efficiency.
 Is the vscode extension malicious?
Apr 15, 2025 pm 07:57 PM
Is the vscode extension malicious?
Apr 15, 2025 pm 07:57 PM
VS Code extensions pose malicious risks, such as hiding malicious code, exploiting vulnerabilities, and masturbating as legitimate extensions. Methods to identify malicious extensions include: checking publishers, reading comments, checking code, and installing with caution. Security measures also include: security awareness, good habits, regular updates and antivirus software.
