Four-layer load balancing vs. seven-layer load balancing
It is often said that seven-layer load balancing or four-layer load balancing is actually based on the name of the layer of the iso osi network model. The final decision is that nginx is called seven-layer load balancing because it uses the http protocol to perform load balancing operations at the application layer. For example, lvs that performs load balancing operations on the tcp layer is called layer 4 load balancing. Generally speaking, there are the following load balancing classifications:

Common software support

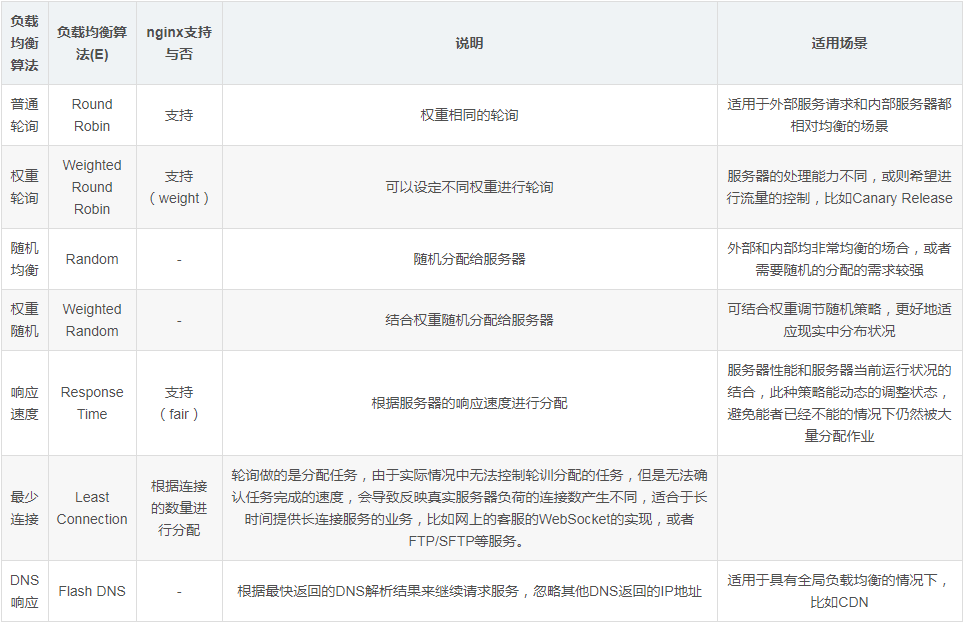
Common load balancing algorithms
The common load balancing algorithms are as follows:

Load balancing demonstration example : Ordinary polling
Next use nginx to demonstrate how to perform ordinary polling:

Preparation in advance
Beforehand, start two services on the two ports 7001/7002 to display different information. For the convenience of demonstration, I used tornado to make a mirror. The parameters passed when starting the docker container are different and used to display the services. different.
[root@kong ~]# docker run -d -p 7001:8080 liumiaocn/tornado:latest python /usr/local/bin/daemon.py "user service 1: 7001"
ddba0abd24524d270a782c3fab907f6a35c0ce514eec3159357bded09022ee57
[root@kong ~]# docker run -d -p 7002:8080 liumiaocn/tornado:latest python /usr/local/bin/daemon.py "user service 1: 7002"
95deadd795e19f675891bfcd44e5ea622c95615a95655d1fd346351eca707951
[root@kong ~]#
[root@kong ~]# curl http://192.168.163.117:7001
hello, service :user service 1: 7001
[root@kong ~]#
[root@kong ~]# curl http://192.168.163.117:7002
hello, service :user service 1: 7002
[root@kong ~]#
Start nginx
[root@kong ~]# docker run -p 9080:80 --name nginx-lb -d nginx
9d53c7e9a45ef93e7848eb3f4e51c2652a49681e83bda6337c89a3cf2f379c74
[root@kong ~]# docker ps |grep nginx-lb
9d53c7e9a45e    nginx           "nginx -g 'daemon ..."  11 seconds ago   up 10 seconds    0.0.0.0:9080->80/tcp                         nginx-lb
[root@kong ~]#
nginx code snippet
Prepare the following nginx code snippet and add it to nginx/etc
http {
upstream nginx_lb {
  server 192.168.163.117:7001;
  server 192.168.163.117:7002;
}
server {
  listen    80;
  server_name www.liumiao.cn 192.168.163.117;
  location / {
    proxy_pass http://nginx_lb;
  }
}How to modify default.conf in /nginx/conf.d/default.conf
You can achieve the effect by installing vim in the container, or you can do it locally Modify and then pass it in through docker cp, or modify it directly with sed. If you install vim in a container, use the following method
[root@kong ~]# docker exec -it nginx-lb sh
# apt-get update
...省略
# apt-get install vim
...省略
Before modification
# cat default.conf
server {
  listen    80;
  server_name localhost;
  #charset koi8-r;
  #access_log /var/log/nginx/host.access.log main;
  location / {
    root  /usr/share/nginx/html;
    index index.html index.htm;
  }
  #error_page 404       /404.html;
  # redirect server error pages to the static page /50x.html
  #
  error_page  500 502 503 504 /50x.html;
  location = /50x.html {
    root  /usr/share/nginx/html;
  }
  # proxy the php scripts to apache listening on 127.0.0.1:80
  #
  #location ~ \.php$ {
  #  proxy_pass  http://127.0.0.1;
  #}
  # pass the php scripts to fastcgi server listening on 127.0.0.1:9000
  #
  #location ~ \.php$ {
  #  root      html;
  #  fastcgi_pass  127.0.0.1:9000;
  #  fastcgi_index index.php;
  #  fastcgi_param script_filename /scripts$fastcgi_script_name;
  #  include    fastcgi_params;
  #}
  # deny access to .htaccess files, if apache's document root
  # concurs with nginx's one
  #
  #location ~ /\.ht {
  #  deny all;
  #}
}
#After modification
# cat default.conf
upstream nginx_lb {
  server 192.168.163.117:7001;
  server 192.168.163.117:7002;
}
server {
  listen    80;
  server_name www.liumiao.cn 192.168.163.117;
  #charset koi8-r;
  #access_log /var/log/nginx/host.access.log main;
  location / {
    #root  /usr/share/nginx/html;
    #index index.html index.htm;
    proxy_pass http://nginx_lb;
  }
  #error_page 404       /404.html;
  # redirect server error pages to the static page /50x.html
  #
  error_page  500 502 503 504 /50x.html;
  location = /50x.html {
    root  /usr/share/nginx/html;
  }
  # proxy the php scripts to apache listening on 127.0.0.1:80
  #
  #location ~ \.php$ {
  #  proxy_pass  http://127.0.0.1;
  #}
  # pass the php scripts to fastcgi server listening on 127.0.0.1:9000
  #
  #location ~ \.php$ {
  #  root      html;
  #  fastcgi_pass  127.0.0.1:9000;
  #  fastcgi_index index.php;
  #  fastcgi_param script_filename /scripts$fastcgi_script_name;
  #  include    fastcgi_params;
  #}
  # deny access to .htaccess files, if apache's document root
  # concurs with nginx's one
  #
  #location ~ /\.ht {
  #  deny all;
  #}
}
#Restart nginx container
[root@kong ~]# docker restart nginx-lb
nginx-lb
[root@kong ~]#
Confirm the result
You can clearly see that polling is performed in order:
[root@kong ~]# curl
hello, service :user service 1: 7001
[root@kong ~]# curl
hello, service :user service 1: 7002
[root@kong ~]# curl
hello, service :user service 1: 7001
[root@kong ~]# curl
hello, service :user service 1: 7002
[root@kong ~]
#Load balancing demonstration example: weight polling
On this basis, you only need to add weight to perform weight polling

Modify default.conf
Modify default.conf as follows
# cp default.conf default.conf.org
# vi default.conf
# diff default.conf default.conf.org
2,3c2,3
<   server 192.168.163.117:7001 weight=100;
<   server 192.168.163.117:7002 weight=200;
---
>   server 192.168.163.117:7001;
>   server 192.168.163.117:7002;
#
Restart nginx container
[root@kong ~]# docker restart nginx-lb
nginx-lb
[root@kong ~]#
Confirm the results
You can see that the polling results are carried out according to the ratio of 1/3 and 2/3:
#[root @kong ~]# curl
hello, service :user service 1: 7001
[root@kong ~]# curl
hello, service :user service 1: 7002
[root@kong ~] # curl
hello, service :user service 1: 7002
[root@kong ~]
The above is the detailed content of How to use nginx for load balancing. For more information, please follow other related articles on the PHP Chinese website!
 nginx restart
 Detailed explanation of nginx configuration
 Detailed explanation of nginx configuration
 What are the differences between tomcat and nginx
 What are the PHP visual Chinese development tools?
 Detailed explanation of nohup command
 How to recover completely deleted files on computer
 Usage of indexof in java


