How to enable Start Menu flagging in Windows 11 build 25227

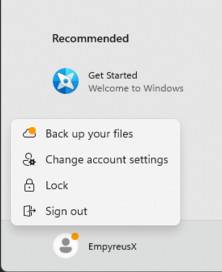
Microsoft continues to experiment with various UI changes and improvements to its latest operating system. Windows 11 build 25227 (currently available in the Dev Channel) brings a new notification badge to the Start menu. According to Microsoft, Windows 11 will display a small orange dot next to your profile name when some part of the operating system or its settings require your attention.

#Like many other experiments in the Dev Channel, only a subset of Windows Insiders will be able to test these new badges. Of course, it's frustrating that those willing to try out early and unstable Windows builds can't get the latest features to see how they work and share feedback with Microsoft. This is where the ViveTool app comes into play.
Important: Please operate with caution and back up important data before using third-party software to enable experimental features.
How to enable Start menu flags in Windows 11 build 25227?
- Download ViveTool from GitHub and extract the files somewhere convenient. Using shorter paths makes it easier to navigate in Windows Terminal. For example, C:\Vive.
- Right-click on the Start menu and select Terminal (Administrator).
-
Switch to the Command Prompt profile by pressing Ctrl Shift 2 or clicking the down arrow button on the tab strip.

- Use the CD command to go to the folder containing the ViveTool files. For example, CD C:\Vive.
- Enter vivetool /enable /id:36435151 and press Enter.
- Restart your computer.
It's worth noting that you might not see these notification badges right away—these orange dots appear when there's something that requires your immediate attention. In this case, clicking on your profile name will display the standard lock/exit menu with links to the features you need something for.
The above is the detailed content of How to enable Start Menu flagging in Windows 11 build 25227. For more information, please follow other related articles on the PHP Chinese website!

Hot AI Tools

Undresser.AI Undress
AI-powered app for creating realistic nude photos

AI Clothes Remover
Online AI tool for removing clothes from photos.

Undress AI Tool
Undress images for free

Clothoff.io
AI clothes remover

AI Hentai Generator
Generate AI Hentai for free.

Hot Article

Hot Tools

Notepad++7.3.1
Easy-to-use and free code editor

SublimeText3 Chinese version
Chinese version, very easy to use

Zend Studio 13.0.1
Powerful PHP integrated development environment

Dreamweaver CS6
Visual web development tools

SublimeText3 Mac version
God-level code editing software (SublimeText3)

Hot Topics
 How to edit the start menu in Ubuntu? How to edit the start menu in Ubuntu
Jan 07, 2024 pm 03:26 PM
In the Windows system, users can easily edit the start menu and perform various operations. However, in the Ubuntu system, many users do not know much about it and are relatively unfamiliar with the method of editing the start menu. Therefore, the editor will introduce how to edit the start menu in Ubuntu. Let’s go and see it together! Method 1: Enter the command alacarte directly in the Ubuntu terminal. You can add, modify, hide, and display menus at will, but you cannot delete menus, even if you have root permissions. Method 2: Pay attention to several directories and files. desktop file/usr/share/applications/mime under /usr/share/applications/
 How to fix aka.ms/windowssysreq error in Windows 11
May 14, 2023 pm 07:43 PM
During installation or Windows 11 upgrade, you may encounter many errors. However, the most common errors require several steps to fix. Before exploring fixes for specific error codes, you should try some of these general solutions. The Windows 11 error aka.ms/windowssysreq will mostly be solved using the fixes discussed in this article without the need to purchase a new computer with the Windows 11 operating system pre-installed. Making sure your system meets the minimum requirements for a Windows 11 upgrade is best to avoid complications during and after the upgrade. How do you know if your PC meets the minimum requirements for an upgrade? If you need to upgrade to Windows 11 and
 How to set the Start menu to classic mode in Win11?
Jun 30, 2023 pm 02:37 PM
How to set the start menu to classic mode in win11? Recently, some users upgraded their computers to the Win11 system. During subsequent use, they found that the classic mode start menu is more suitable for them. So how to change the Win11 start menu to the classic mode? Friends who are not sure how to operate can try the classic mode operation process of the win11 system settings menu. I hope it will be helpful to you. Classic mode operation process of win11 system settings menu To switch back to the classic start menu from the Windows 11 start menu, you can use this simple registry editor adjustment. Press Win+R to open the run window and type the command regedit in the run field. Press Enter to open the Registry Editor window.
 Microsoft Win11 24H2 Build 26100 has found multiple bugs and installation is not recommended
Apr 07, 2024 pm 09:22 PM
The latest news from this site on April 7 is that multiple bugs have been discovered in Microsoft Win1124H2Build26100, and it is temporarily not recommended to install it on commonly used devices. Windows 1124H2 is still in a very unstable stage. Although Microsoft will gradually fix the problem through monthly cumulative updates, it may take some time before this version is officially released and brings a stable experience to everyone. If any user has installed the 24H2 version image and encountered problems, it is recommended that the user reinstall it. It is now relatively stable. ZacBowden, encountered a Blue Screen of Death when trying to reset Windows 1124H2Build26100 version, and the "Reset this PC" function was supposed to fix system problems, but instead
 Windows 11 will offer the option to hide recommended items in the Start menu
Jan 02, 2024 pm 12:43 PM
Many friends will find that when using win11 system, there is a recommended item in the start menu, which occupies the lower part of the start menu, and the recommended items are basically all that we do not need to use, which is very troublesome. Recently, Microsoft stated that this feature will be hidden in the future. Let’s take a look at the specific situation. The win11 start menu will be able to hide recommended items 1. We can see that when the start menu is clicked, more than 30% of the space below the start menu is occupied by this "recommended item". 2. In the feedback center of win11, there are 8462 proposals for hiding recommended items, indicating that a large number of users request this feature. 3. According to foreign media reports, Microsoft is considering opening hidden recommended projects
 How to set up the start menu in win7
Mar 26, 2024 pm 05:10 PM
1. Select the Start menu, right-click the mouse, and select [Properties]. As shown in the picture: 2. Select [Custom]. As shown in the figure: 3. Select the computer option [Show as menu]. Here, take computer as an example. Click OK to add [Computer] to the start menu bar. As shown in the picture: 4. Let me introduce to you below. The program circled in red is called [Fixed Program], which is where it is fixed. Below the red circle are commonly used programs, which are the programs that have been used recently. As shown in the figure: 5. Next, I will teach you how to add a program to [Fixed Programs]. Here we take adding [Resource Manager] as an example and click [All Programs]. As shown in the picture: 6. Select [Attachment]. As shown in the figure: 7. Select the resource manager, right-click the mouse, and select [Attach to Start
 Start menu not working on Windows 11 after update? how to fix
May 30, 2023 am 10:29 AM
The Windows 11 Start Menu is the most significant change to Windows recently. It has tons of additional features while making the GUI easier to find most items on your PC. The ability to have the same content on the desktop is also a boon to many users. Sadly, a recent update released by Microsoft appears to have broken the Start menu for many users. If you're in the same boat and can't use the Start menu after a recent update, here's everything you need to know. Why doesn't the Start menu work after Windows update? The issue appears to be related to a recently released security update from Microsoft, namely security update KB5015814 (released in July 2022). The update appears to break
 How to set the start menu transparent in WIN10
Mar 27, 2024 pm 03:50 PM
1. Let’s first take a look at the style of the start menu by default, which is displayed with a solid color background. 2. Right-click the start menu, and then select the [Settings] menu item in the pop-up menu. 3. In the Windows Settings window that opens, click the Personalization icon to open the Personalization Settings window. 4. In the Windows Personalization window that opens, click the [Color] menu item in the left sidebar. 5. At this time, click the switch under [Transparency Effect] in the right window and set it to [On]. 6. Now look at the start menu and it has become transparent.


