How to configure master-slave replication in MySQL
1. Detect communication
Check the IP addresses of the master and slave, and check whether communication is possible

Guarantee The network between master and slave is interconnected. Use the ping command to detect

. At this point we know that the master’s IP is 192.168.131.129 and the slave’s IP is 192.168.0.6. and can communicate with each other. Ensure that port 3306 is open
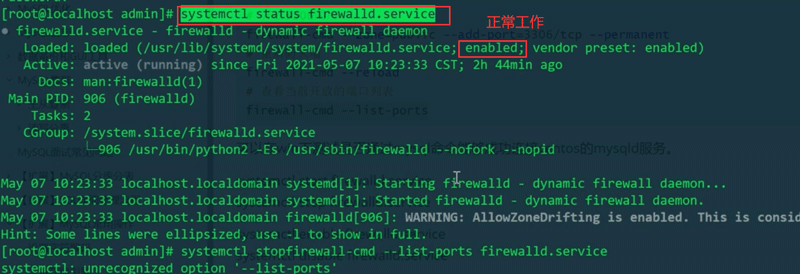

Check the firewall statussystemctl status firewalld.service
Temporary manual Start the firewallsystemctl start firewalld.service
Temporarily manually stop the firewallsystemctl stop firewalld.service
Permanently turn on the firewall (restart the service to take effect)systemctl enable firewalld.service
Permanently close the firewall (restart the service to take effect)systemctl disable firewalld.service
View the currently open port listfirewall-cmd --list- ports
2. Master configuration
1. Enable binary log
Configure log_bin and globally unique server-id, which are different from slave and cannot be configured the same (If the configuration is newly added to my.cnf, the MySQL service must be restarted)
vim /etc/my.cnfOpen the my.cnf file

2. Create an account for master-slave library communication
That is, create an account in the master for slave to log in to the master and read the binlog
Although we are The IP address viewed on Linux is 192.168.131.129, but when we create an account and log in, we do not write this IP address, but write 192.168.131.1. Because the virtual machine here uses NAT mode (if it is bridge mode, it can be used directly). When the virtual machine (master) communicates with the physical machine (slave), the virtual machine first sends the data to the gateway 192.168.131.1 (default communicate with VMnet8), 192.168.131.1 is then forwarded to the physical machine, so the physical machine receives the data of 192.168.131.1, so when we create an account for the slave on the master, we should write 192.168.131.1

If the slave is not configured with the gateway 192.168.131.1 address, vim /var/log/mysqld.logWhen you open the error log, the following information will appear:
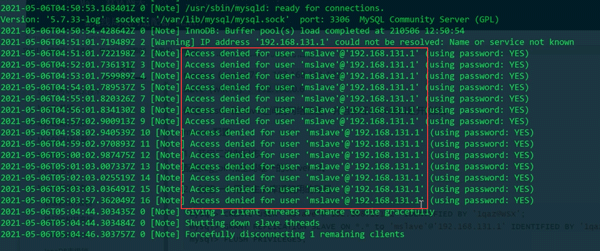
This means that the mslave permissions from 192.168.131.1 are not enough. That is because we configured the master to allow login from other places and did not allow login from the 192.168.131.1 address, resulting in insufficient permissions. .
Since the master received a request from 192.168.131.1, the error log shows 192.168.131.1
Command to create a user:
//如果嫌麻烦可以用%代替192.168.131.1,,它就可以匹配任何ip
mysql> CREATE USER 'mslave'@'192.168.131.1' IDENTIFIED BY '1qaz@WSX';
//启动主从,在主库上给当前的mslave用户开启REPLICATION SLAVE主从复制的权限,从库就可以通过1qaz@WSX账户密码
//从192.168.131.1 IP地址来请求访问这台主库上的任意库里面的任意表*.*,同步这个主库的任意库里的任意表
mysql> GRANT REPLICATION SLAVE ON *.* to 'mslave'@'192.168.131.1' IDENTIFIED BY '1qaz@WSX';
mysql> FLUSH PRIVILEGES;
3. Get the log file name and position of binlog
show master status

1. Configure a globally unique server-id

Configure a globally unique server-id

Involving modifying the configuration file, you need to restart the MySQL service
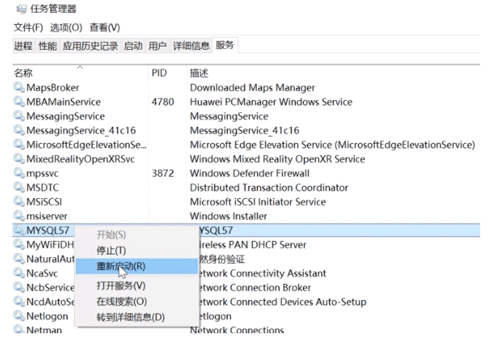
This step of configuration is mainly used for IO threads to read binlog:
mysql> CHANGE MASTER TO MASTER_HOST='192.168.131.129',
MASTER_PORT=3306,
MASTER_USER='mslave',
MASTER_PASSWORD='1qaz@WSX',
MASTER_LOG_FILE='mysql-bin.000006',
MASTER_LOG_POS=1262;
- ##MASTER_HOST: Specify
master’s ip
- MASTER_LOG_FILE:
binlog file name
- MASTER_LOG_POS:
position of binlog
3. Start the slave service
View the master-slave replication status through the
show slave status command, and show processlistView the running status of the master and slave related threads
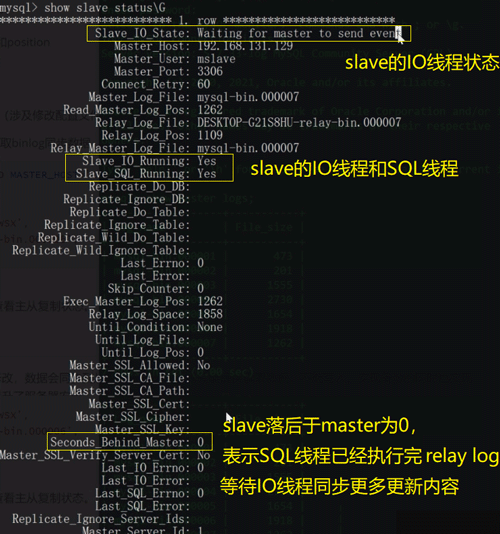 4. Possible problems in configuration
1. Network connection problem
Check the master-slave replication status through the show slave status command

然后再检查从库里面的配置信息是否正确 如果都正确,检查主库所在机器的3306端口是否正常 如果发现3306端口不能连通,就需要怀疑主库对端口有限制吗,也就是防火墙限制,就需要在防火墙把3306端口开放出来。 如果这个错误还没解决,就查看一个主库的错误日志 这说的就是从192.168.131.1的mslave权限不够,自己玩的时候,如果虚拟机是NAT模式,则需要写成VMnet8网关ip。如果都是物理机通信,那直接写正确的ip即可 可以在MySQL数据库下的mysql库的user表中更改允许登录的ip 然后重新赋予权限: 在master中查看show master status一下binlog日志文件名以及position,然后用命令重新配置slave,比如: 配置slave前需要stop slave,配置完成再start slave 错误原因:首先配置主从复制的时候,slave的mytest库中没有user表,而master的mytest库已经有user表了。配置好主从复制后直接drop table mytest.user,这就会写到binlog里面,然后在通过dump线程和IO线程将这个操作发送到从库的relay log,然后从库的SQL线程从relay log里把drop table mytest.user捞出来在从库执行这个SQL,可从库的mytest根本就没有user表,这就是删除一个不存在的表,于是出现错误了。 一般我们是不会做这样的操作的,我们一般都是主库配置以后,slave从数据开始增量进行同步,不会同步以后一开始就删主库里的东西,如果真的出现这样的问题了,随时可以通过 可以通过show slave status查看以下标识,IO线程出错一般是网络问题,SQL线程出错一般是SQL在slave库执行出现了问题 The above is the detailed content of How to configure master-slave replication in MySQL. For more information, please follow other related articles on the PHP Chinese website!
telnet xxx.xxx.xxx.xxx 3306
/var/log/mysql/mysqld.log,查看错误日志中提示的ip是否和自己允许slave登录的ip一致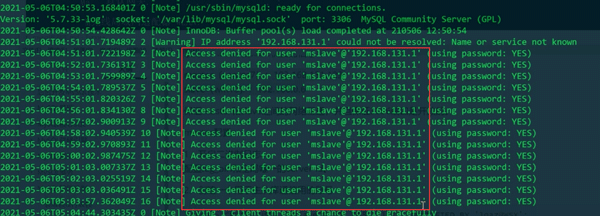
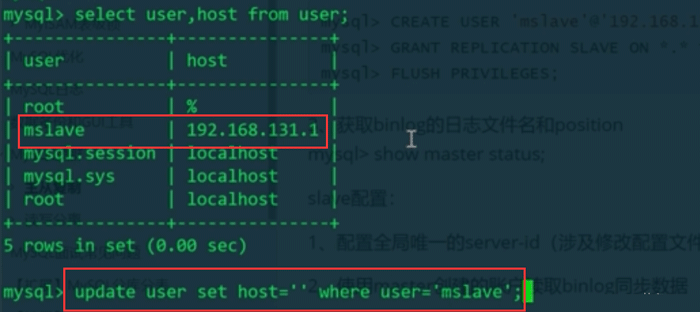
mysql> GRANT REPLICATION SLAVE ON *.* to 'mslave'@'xxx.xxx.xxx.xxx' IDENTIFIED BY '1qaz@WSX';
2. binlog的position问题

mysql> CHANGE MASTER TO MASTER_HOST='192.168.131.129',MASTER_PORT=3306,MASTER_USER='mslave',MASTER_PASSWORD='1qaz@WSX',
MASTER_LOG_FILE='mysql-bin.000006',MASTER_LOG_POS=1262;
3. SQL线程出错
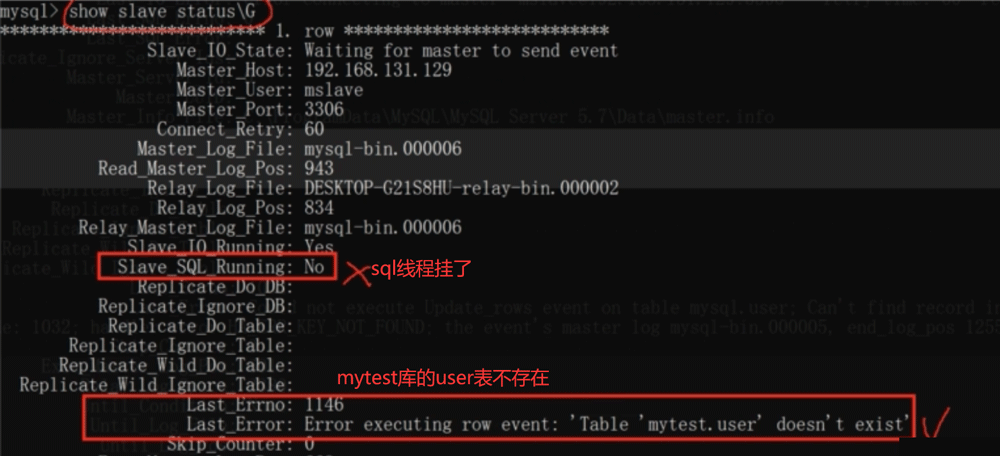
show slave status来查看主从库的状态来解决错误,如果是上图这个错误,
(1)可以在从库stop slave,然后把位置重新设置一下,然后再start slave,相当于重新开始主从同步的位置。
(2)可以在从库stop slave,然后set global sql_slave_skip_counter=1;(跳过一个错误),然后再start slave重启从库的线程,相当于把错误跳过了,异常操作。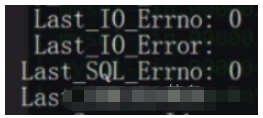

Hot AI Tools

Undresser.AI Undress
AI-powered app for creating realistic nude photos

AI Clothes Remover
Online AI tool for removing clothes from photos.

Undress AI Tool
Undress images for free

Clothoff.io
AI clothes remover

AI Hentai Generator
Generate AI Hentai for free.

Hot Article

Hot Tools

Notepad++7.3.1
Easy-to-use and free code editor

SublimeText3 Chinese version
Chinese version, very easy to use

Zend Studio 13.0.1
Powerful PHP integrated development environment

Dreamweaver CS6
Visual web development tools

SublimeText3 Mac version
God-level code editing software (SublimeText3)

Hot Topics
 PHP's big data structure processing skills
May 08, 2024 am 10:24 AM
Big data structure processing skills: Chunking: Break down the data set and process it in chunks to reduce memory consumption. Generator: Generate data items one by one without loading the entire data set, suitable for unlimited data sets. Streaming: Read files or query results line by line, suitable for large files or remote data. External storage: For very large data sets, store the data in a database or NoSQL.
 How to use MySQL backup and restore in PHP?
Jun 03, 2024 pm 12:19 PM
Backing up and restoring a MySQL database in PHP can be achieved by following these steps: Back up the database: Use the mysqldump command to dump the database into a SQL file. Restore database: Use the mysql command to restore the database from SQL files.
 How to optimize MySQL query performance in PHP?
Jun 03, 2024 pm 08:11 PM
MySQL query performance can be optimized by building indexes that reduce lookup time from linear complexity to logarithmic complexity. Use PreparedStatements to prevent SQL injection and improve query performance. Limit query results and reduce the amount of data processed by the server. Optimize join queries, including using appropriate join types, creating indexes, and considering using subqueries. Analyze queries to identify bottlenecks; use caching to reduce database load; optimize PHP code to minimize overhead.
 How to insert data into a MySQL table using PHP?
Jun 02, 2024 pm 02:26 PM
How to insert data into MySQL table? Connect to the database: Use mysqli to establish a connection to the database. Prepare the SQL query: Write an INSERT statement to specify the columns and values to be inserted. Execute query: Use the query() method to execute the insertion query. If successful, a confirmation message will be output.
 How to create a MySQL table using PHP?
Jun 04, 2024 pm 01:57 PM
Creating a MySQL table using PHP requires the following steps: Connect to the database. Create the database if it does not exist. Select a database. Create table. Execute the query. Close the connection.
 How to use MySQL stored procedures in PHP?
Jun 02, 2024 pm 02:13 PM
To use MySQL stored procedures in PHP: Use PDO or the MySQLi extension to connect to a MySQL database. Prepare the statement to call the stored procedure. Execute the stored procedure. Process the result set (if the stored procedure returns results). Close the database connection.
 How to fix mysql_native_password not loaded errors on MySQL 8.4
Dec 09, 2024 am 11:42 AM
One of the major changes introduced in MySQL 8.4 (the latest LTS release as of 2024) is that the "MySQL Native Password" plugin is no longer enabled by default. Further, MySQL 9.0 removes this plugin completely. This change affects PHP and other app
 The difference between oracle database and mysql
May 10, 2024 am 01:54 AM
Oracle database and MySQL are both databases based on the relational model, but Oracle is superior in terms of compatibility, scalability, data types and security; while MySQL focuses on speed and flexibility and is more suitable for small to medium-sized data sets. . ① Oracle provides a wide range of data types, ② provides advanced security features, ③ is suitable for enterprise-level applications; ① MySQL supports NoSQL data types, ② has fewer security measures, and ③ is suitable for small to medium-sized applications.


