20 ways to customize Windows 11: A step-by-step tutorial
- Click to enter:ChatGPT tool plug-in navigation list
The top 20 setting changes on Windows 11
Many users may have realized Below are some settings to change. But for those who don't know, we'll cover the changes that will be most beneficial to Windows users, whether or not they're making these changes on a new installation of Windows.
1. Personalized taskbar
The taskbar is located at the bottom of the screen and is easily visible at a glance. It is one of the first areas you should create your own. There are a few things you may need to change immediately:
1.1 Remove Unnecessary Taskbar Icons
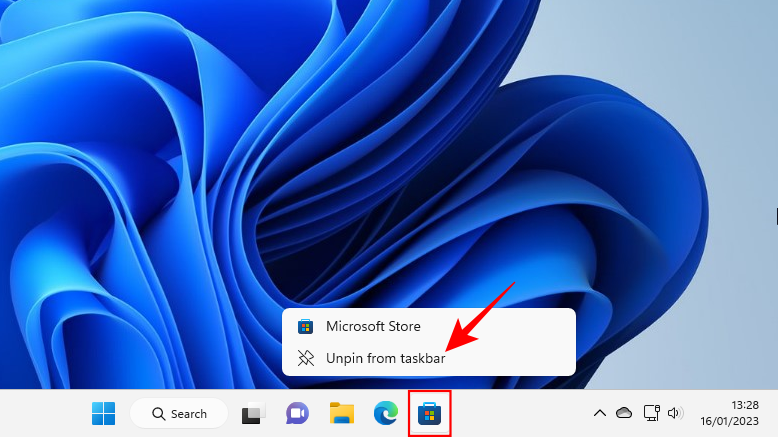
There are many unwanted app icons and bars that Microsoft imposes on users, such as Teams, Microsoft Store, Widgets etc. Some of them, like Microsoft Store and Edge, can be easily removed. Right-click on them and select Unpin from taskbar.
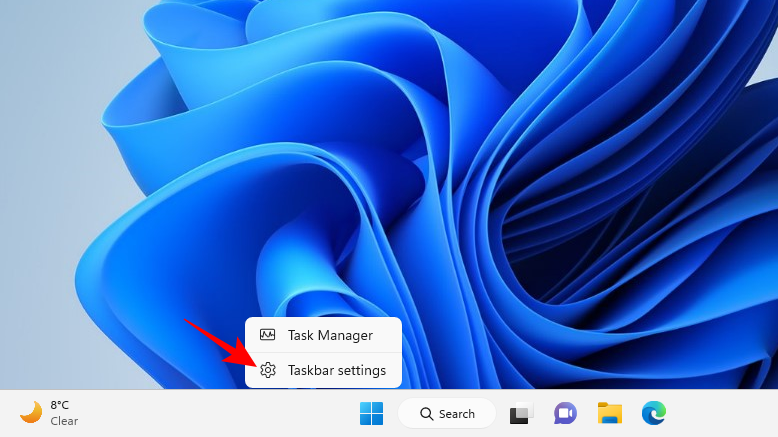
Other taskbar icons such as Teams Chat, Widgets, Task view, and Search will be disabled from the taskbar settings. To get there, right-click on the taskbar and select Taskbar Settings.
#Then disable the unwanted ones on the taskbar by flicking the switch to the off position.
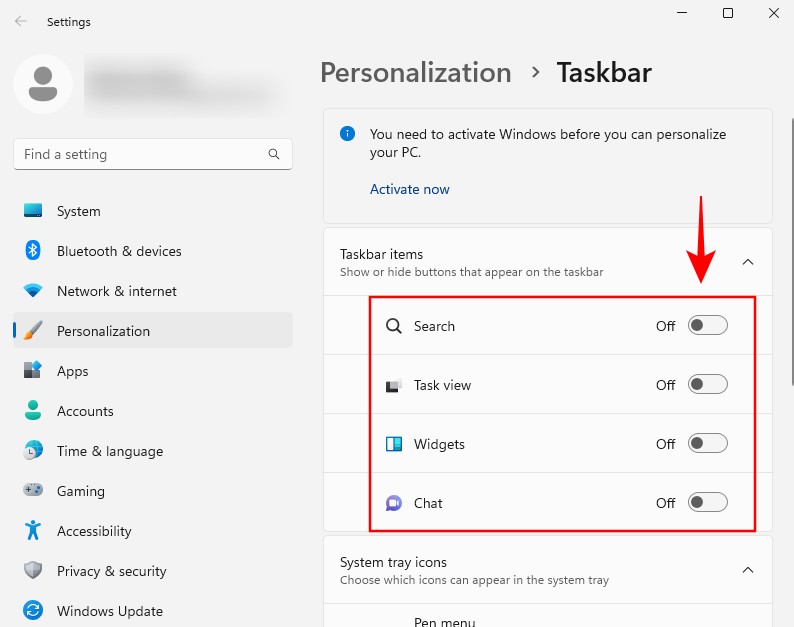
The taskbar has started to look more minimalist.
1.2 Add frequently used apps to the taskbar
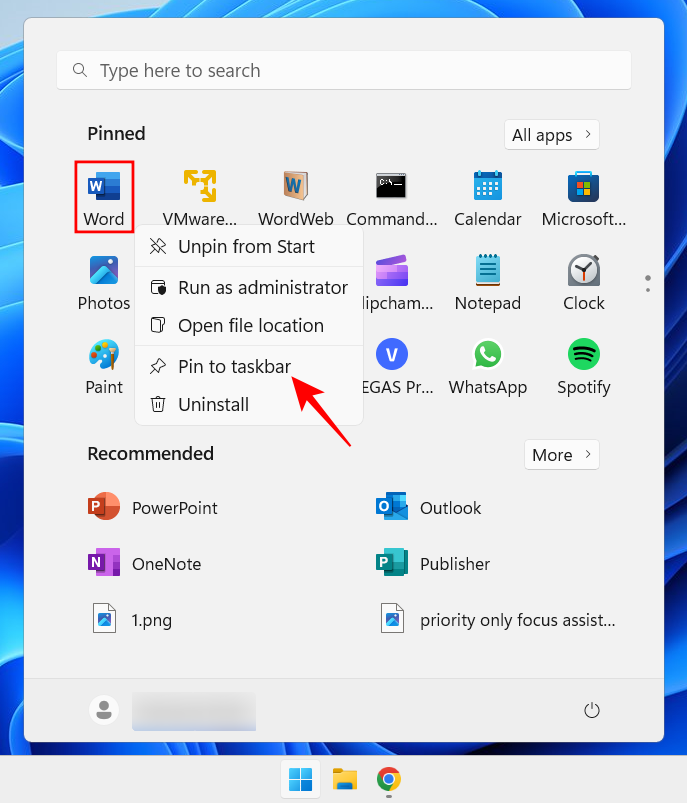
With a clean taskbar, you can add your most commonly used apps to the taskbar to access them with one click. To do this, press Start, right-click your app, and select Pin to taskbar.
You can also select All Apps in the Start menu to find a list of all apps installed on your PC.
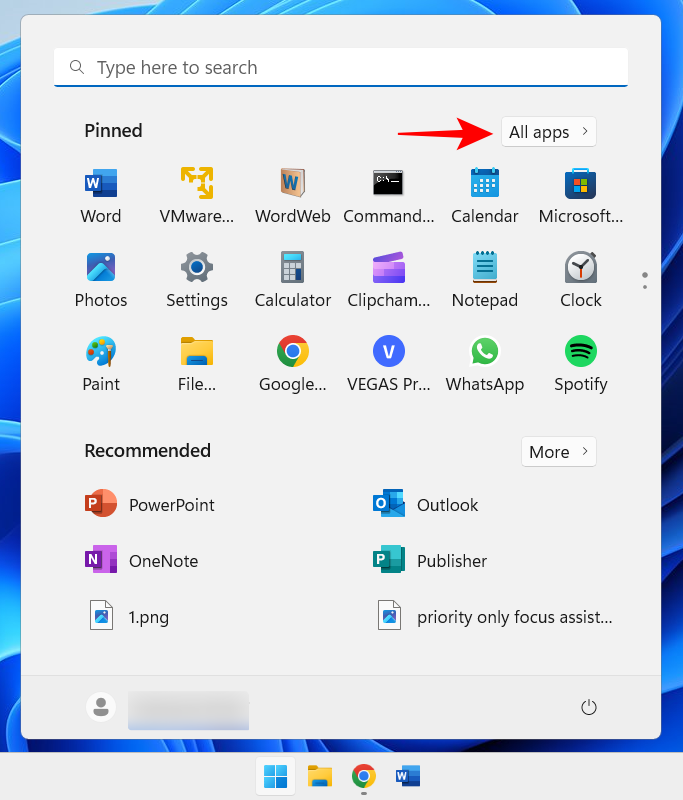
Then right-click on your app, select More, then select Pin to taskbar.
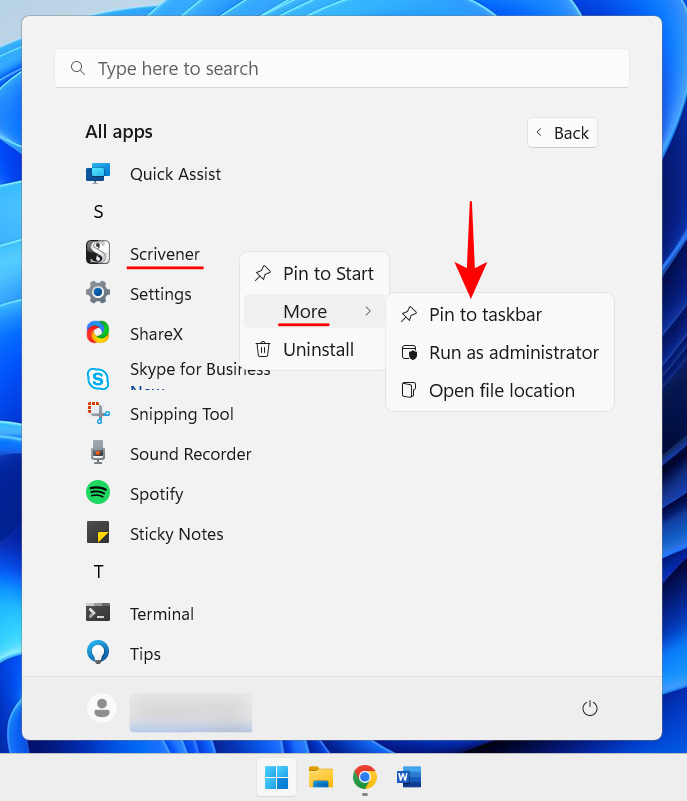
You can also add applications that are open to the taskbar. Right-click the icon in the taskbar and select Pin to taskbar.
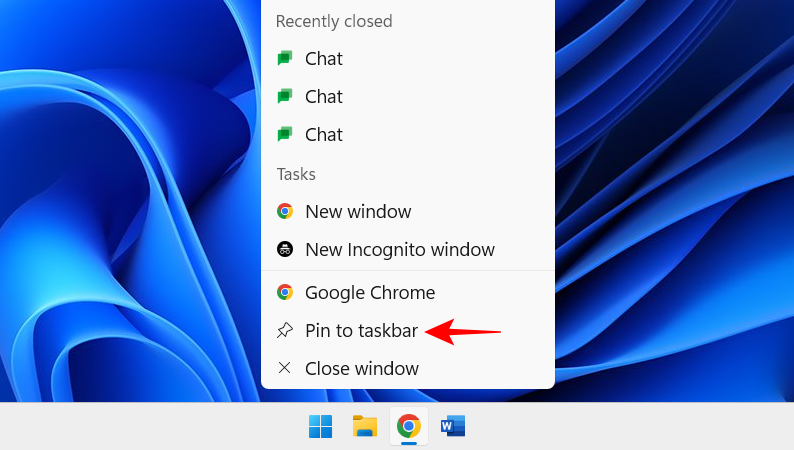
#So even after they are closed, it only takes one click in the taskbar.
1.3 Show/hide system tray icon
The system tray in the taskbar provides quick access to notifications, language and connection centers, and applications running in the background.
The system tray is a very useful piece of real estate that cannot be moved, and for good reason. But you can decide which background app icons you want to see in the hidden system tray, or whether you want it at all.
These hidden system tray icons are accessible from the arrow icon.
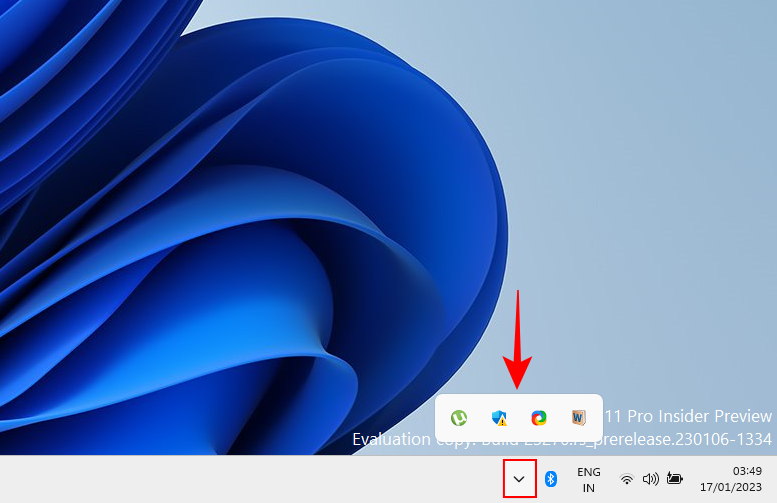
To change the apps you see here, right-click the taskbar and select Taskbar Settings.
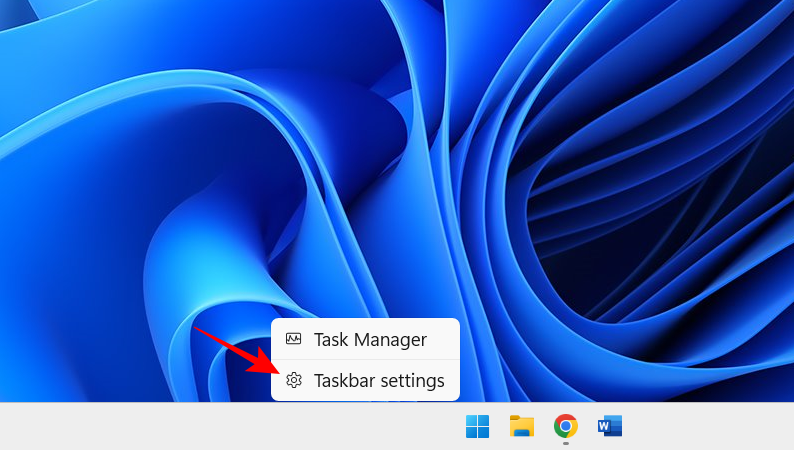
Then, click on “Other System Tray Icons”.
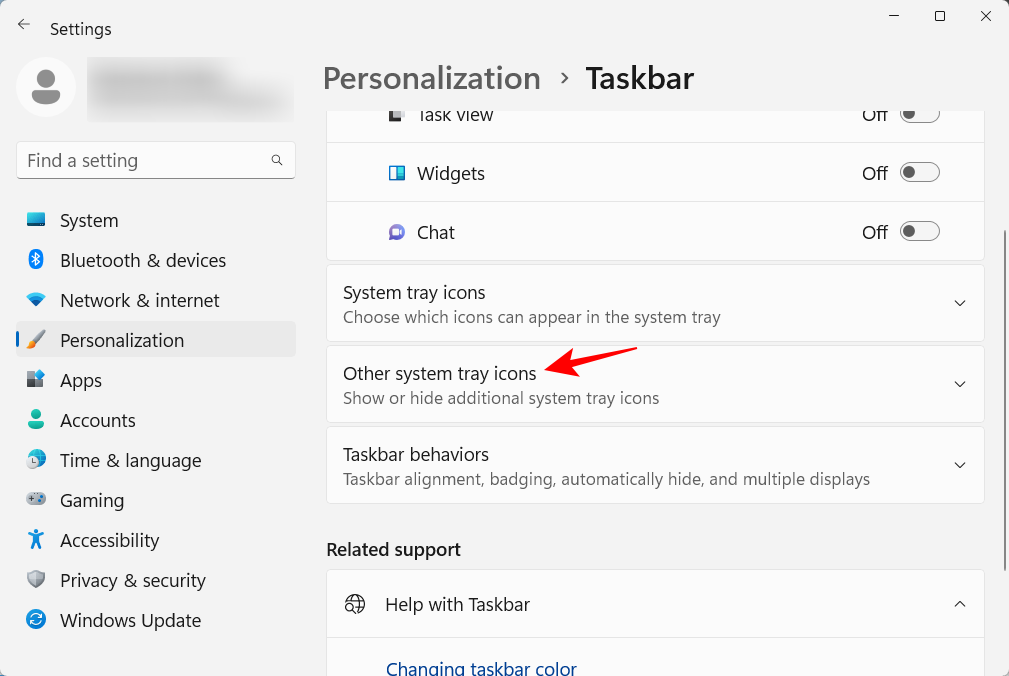
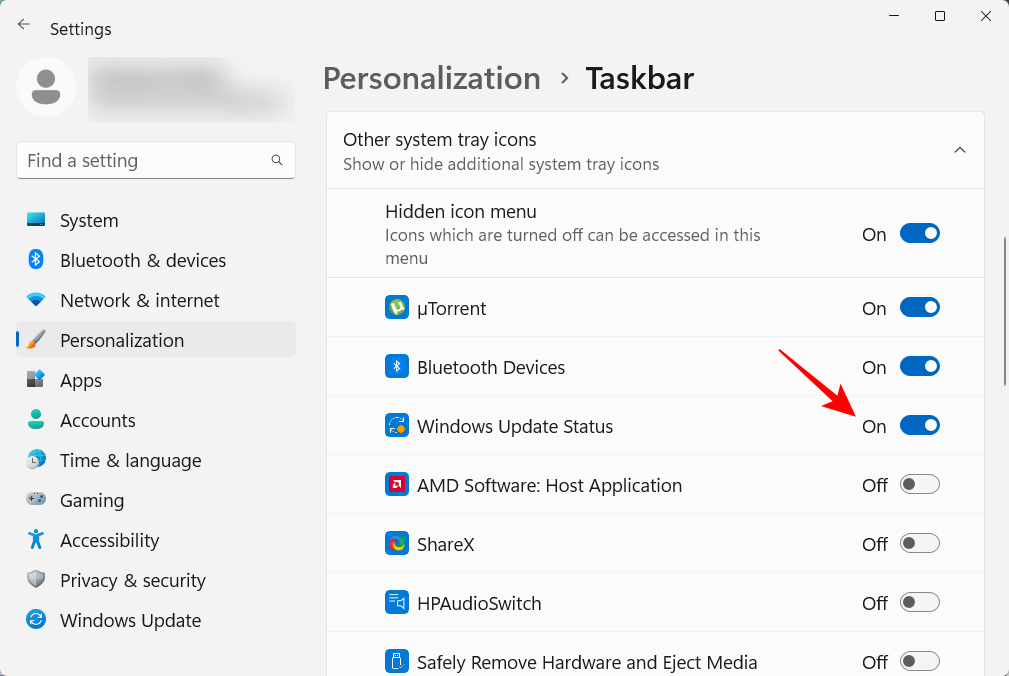
#Here, enable the application icons that you want to appear in the system tray when running.
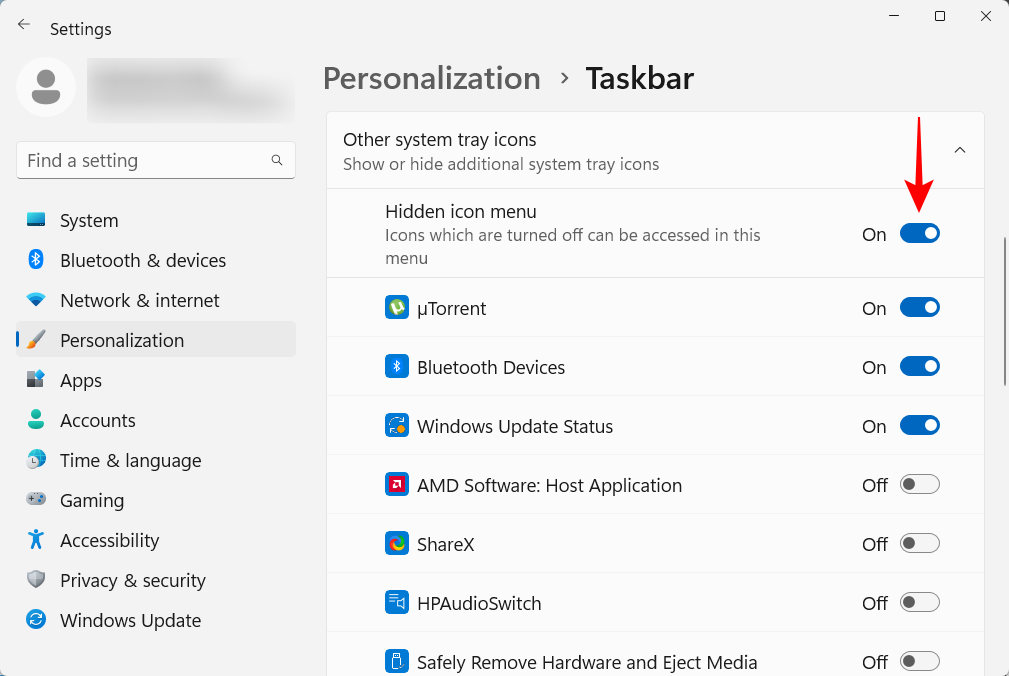
Or, if you don’t want to have another system tray area, turn off Hidden icon menu.
#2. Personalized Start Menu
Next, let’s set up the Start menu. Here are a few things you can do to take advantage of the centralized location of the Start menu in Windows 11.
2.1 Add or remove apps and folders to the Start Menu
The Start menu provides plenty of space to pin your frequently used apps. Some preset apps may not work for you and can be easily replaced with the ones you need. However, you can pin more than just apps to Start this way. Drives and folders you access frequently can also be pinned to the Start menu.
To pin an item, just right-click on it and select "Pin to Start".
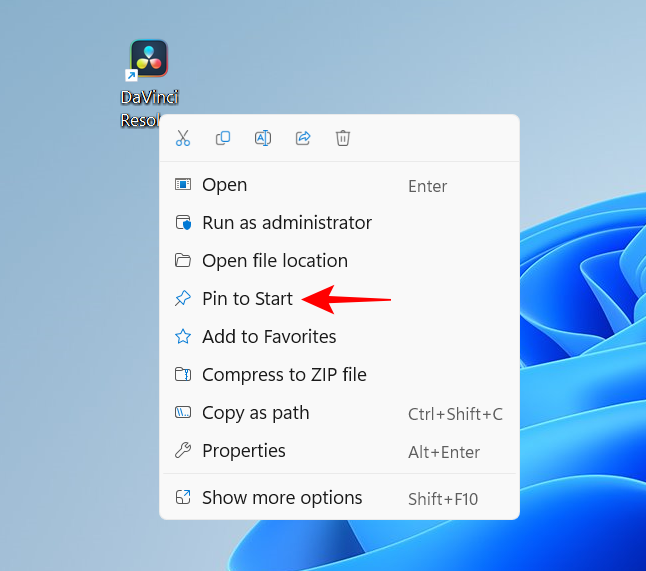
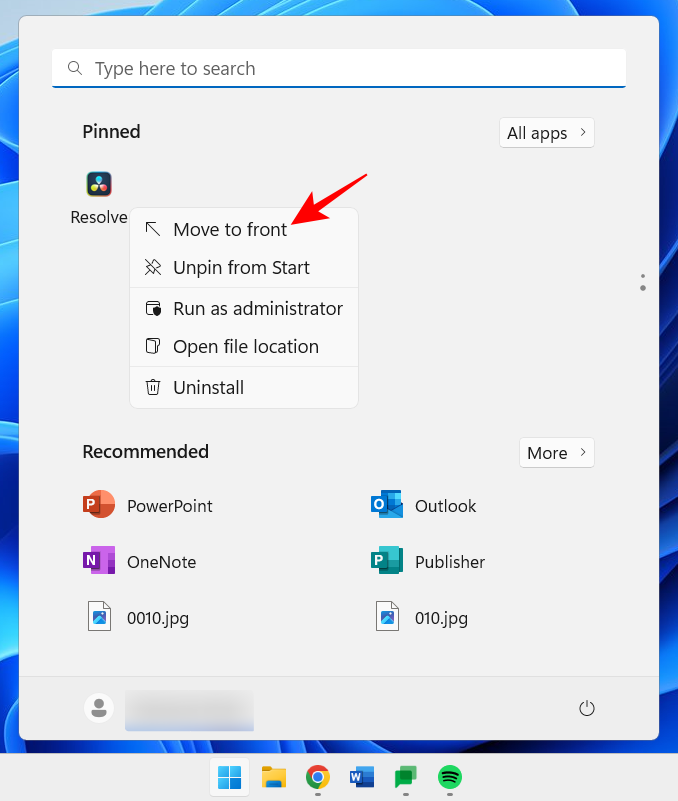
# Your recently pinned apps go into the Start menu at the bottom of the pinned items list. You may need to scroll to the next page (using your mouse wheel) to find it. To move it to the front of the pack, right-click it and select Move to front.
To remove a pinned item, right-click it and select Unpin from Start.
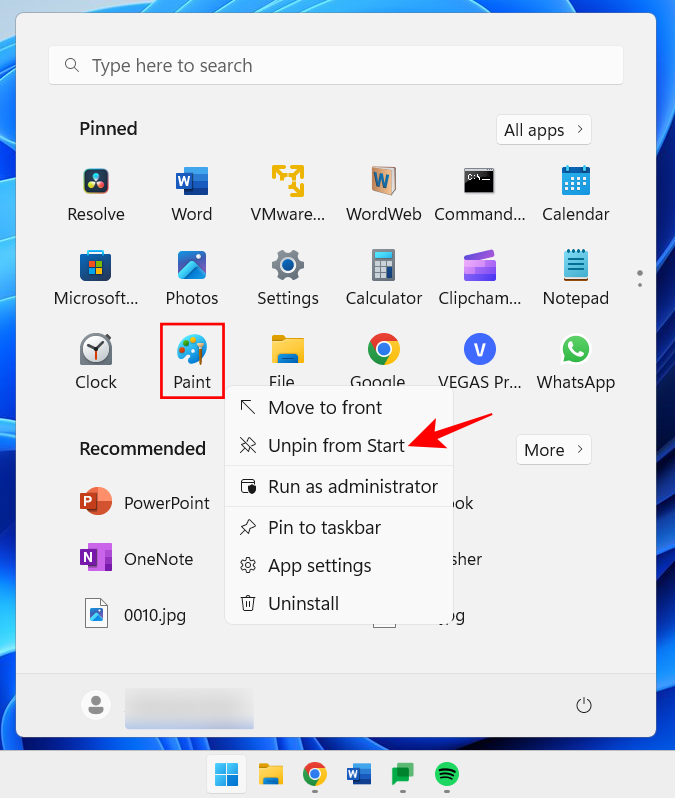
#Use these options to customize pinned Start menu items.
2.2 Change the Start menu layout
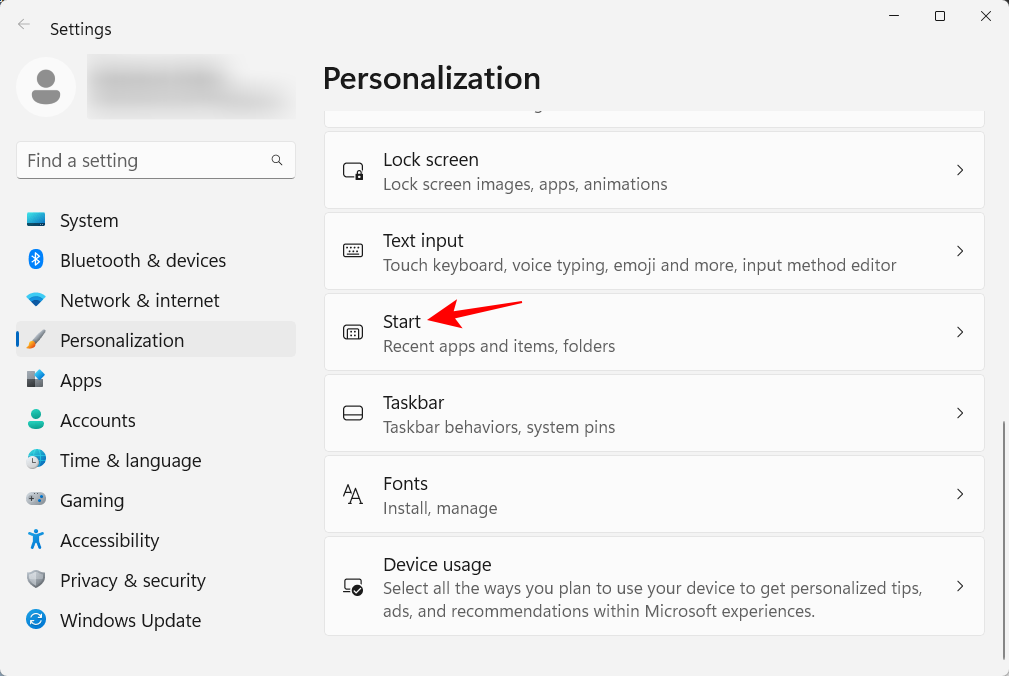
The Start menu has two main parts - fixed items and recommended items. The default layout provides equal space for both. However, if you want any of them to get extra space, you'll have to choose a different layout. To do this, right-click on the desktop and select Personalize.
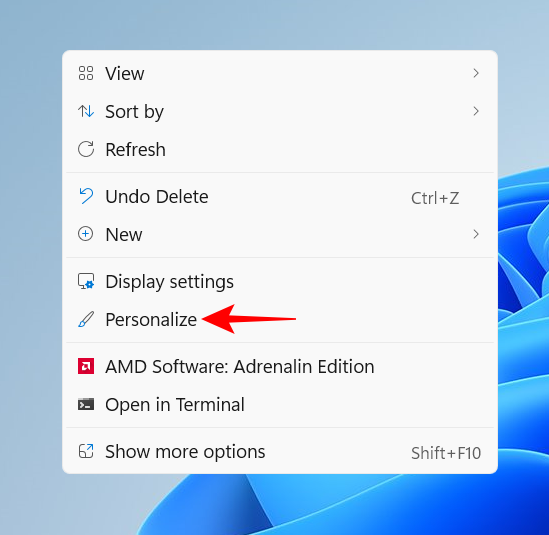
Or open the Settings app (press Win I) and select Personalize. Once there, scroll down and select Get Started.
Here, choose whether you want "More Pins" or "More Recommendations."
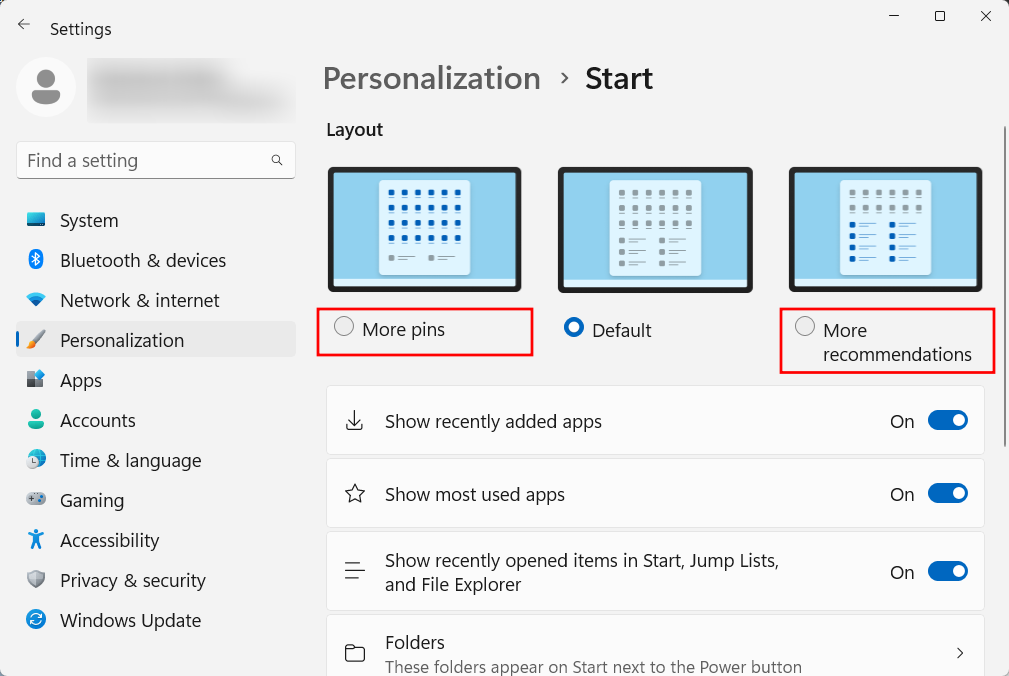
Although these areas will not completely disappear, most users will agree that the "fixed" area is more important than the "recommended" area. Here's how to prevent items from showing up in the Recommended section:
On the same start personalization page, turn off Show recently added apps, Show most used apps, and Show recent Open project...".
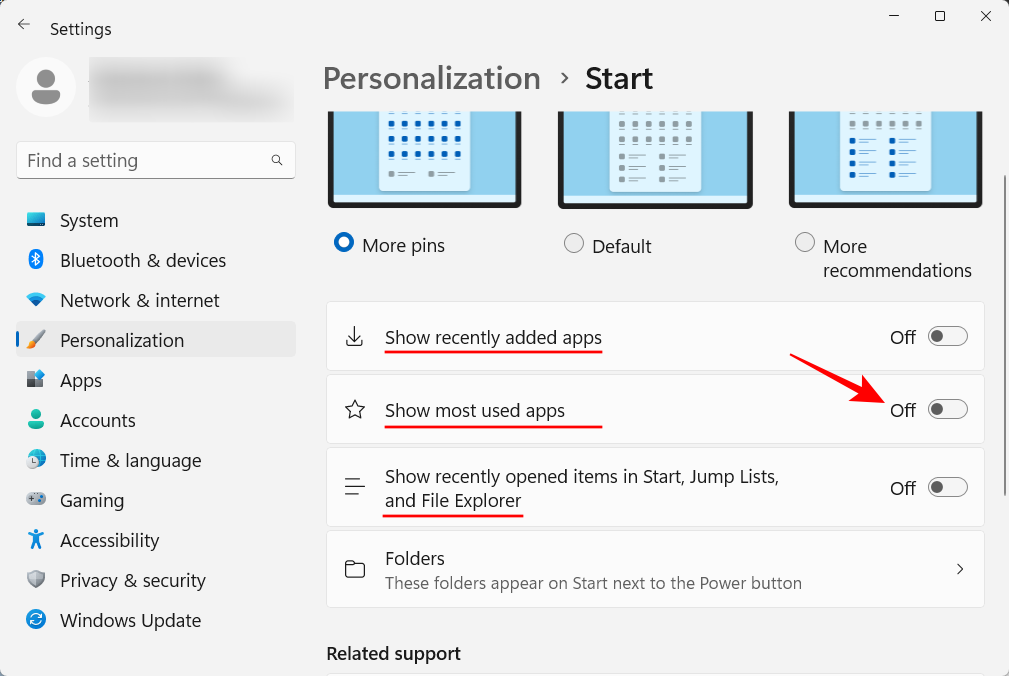
These suggestions will now disappear.
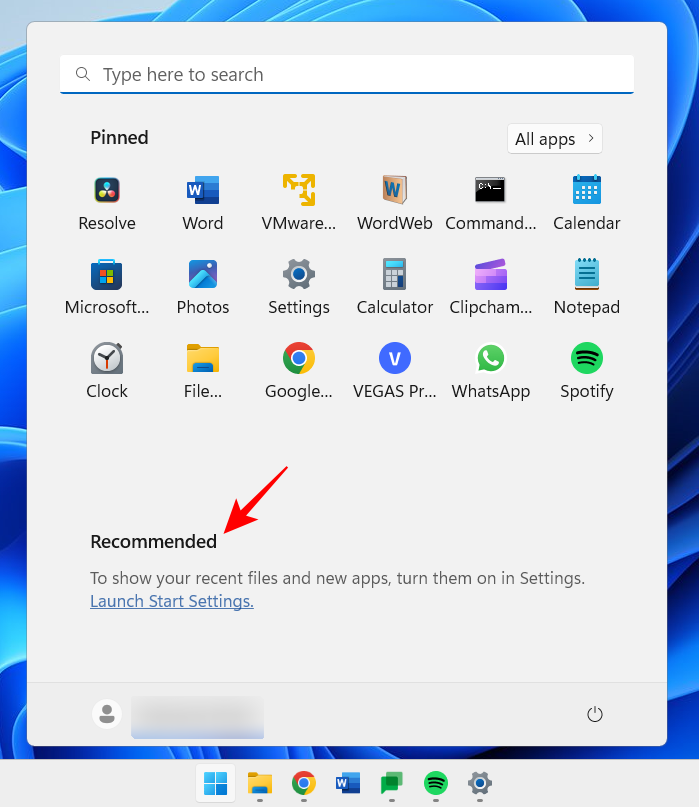
If you want to remove the Recommendations section entirely, see our tutorial on how to remove recommendations from the Windows 11 Start menu.
2.3 Add folders to the Start Menu
The Start Menu also allows you to quickly access some system folders. On the same Start Personalizing page as before, click Folder.
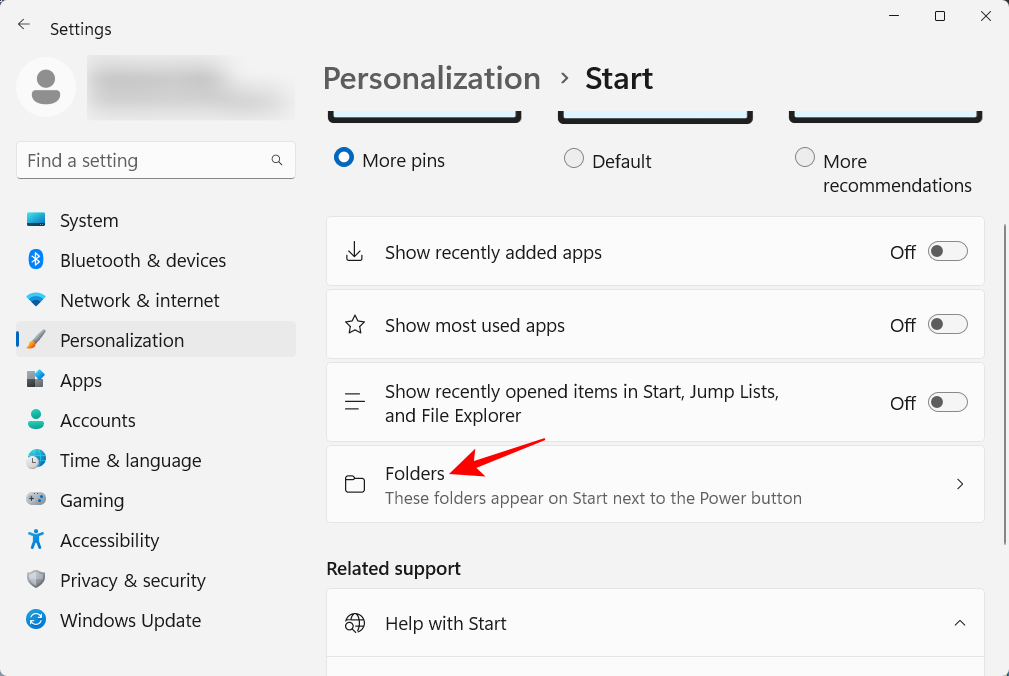
Then enable the desired folder in the Start menu.
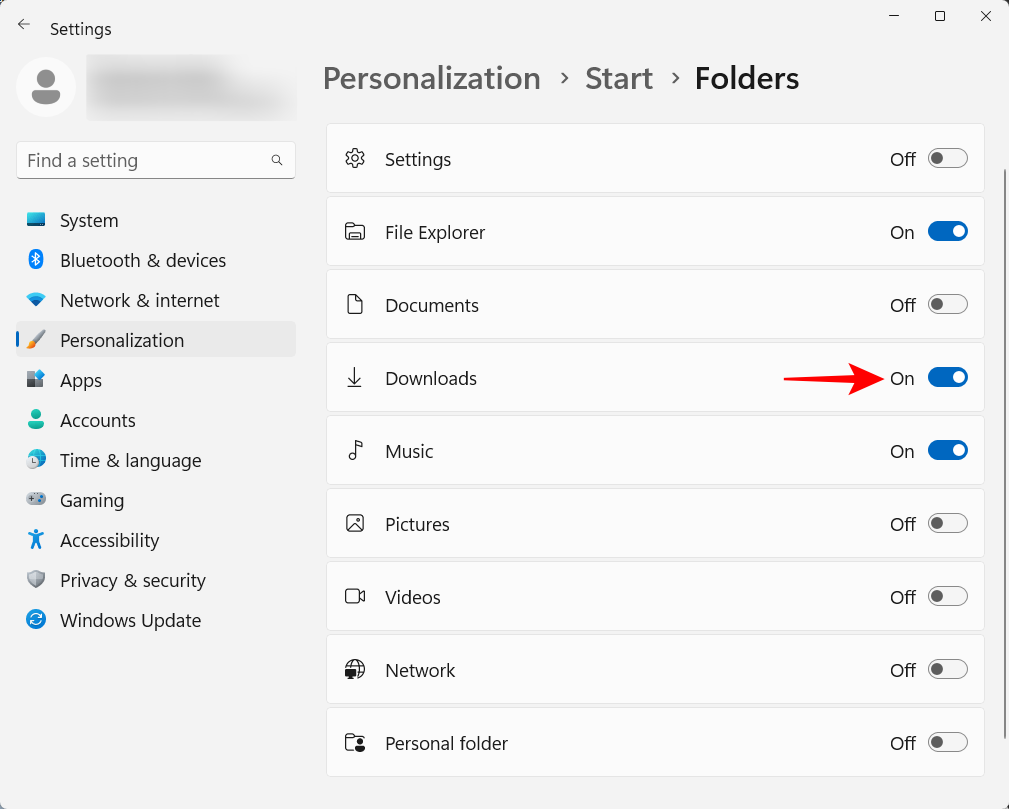
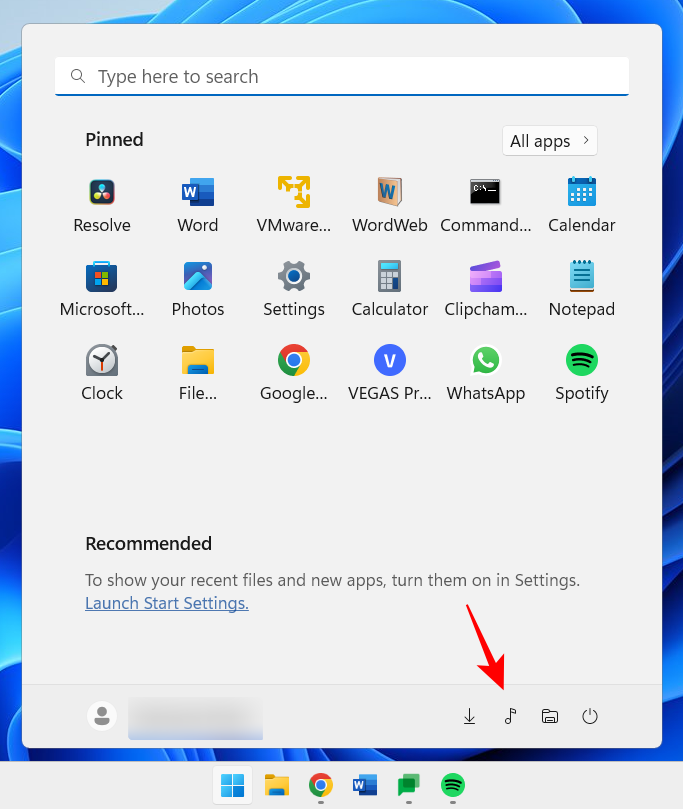
These will appear next to the power button.
3. Disable UAC
To protect you from malware, User Account Control (UAC) protects by always running applications and tasks your systems as if they were on a non-administrator account unless authorized by an administrator. However, if you are an administrator, and most users with personal computers are administrators, UAC can be a headache because it prompts constantly every time you want to open an important Windows application or install software pop up.
To turn it off, press Start, type UAC, and press Enter.
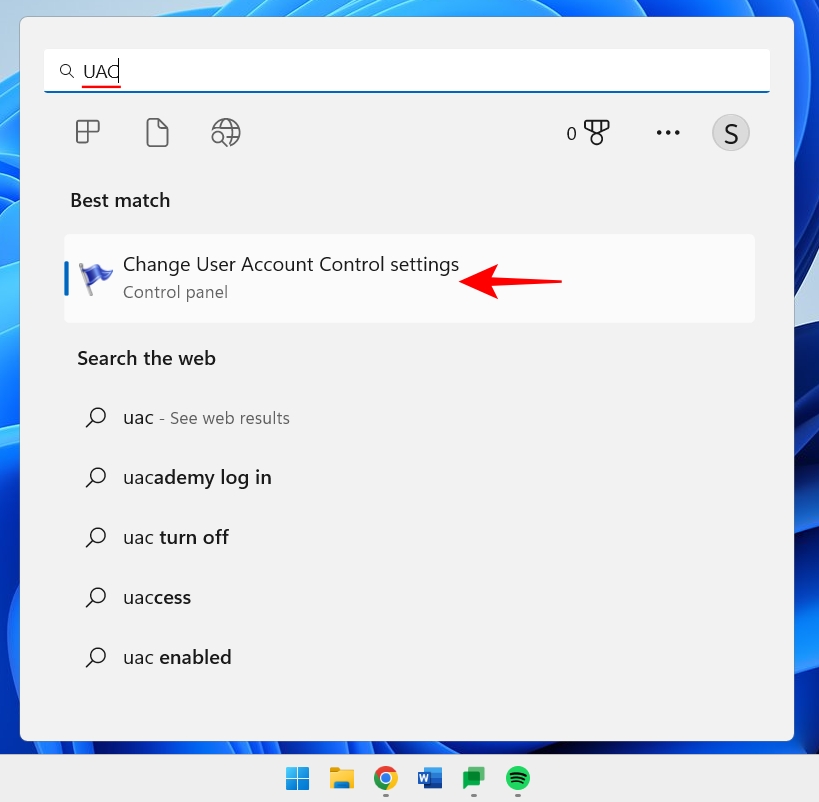
Then drag the Notifications slider all the way to the bottom.
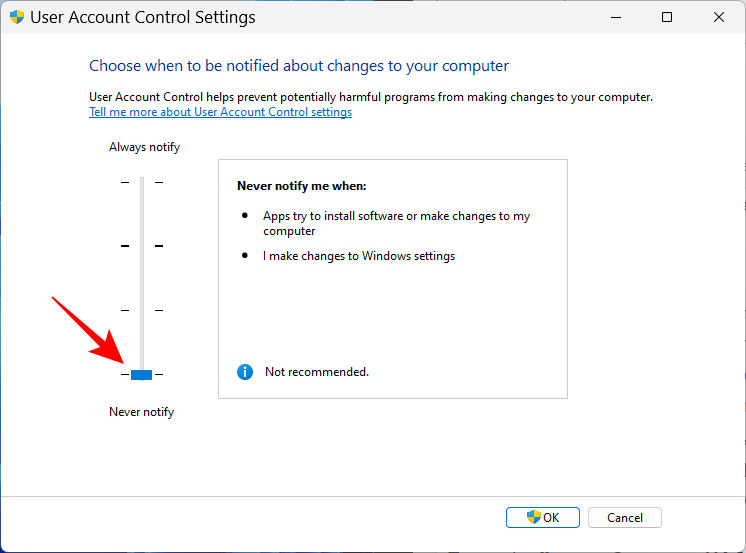
Then click "OK".
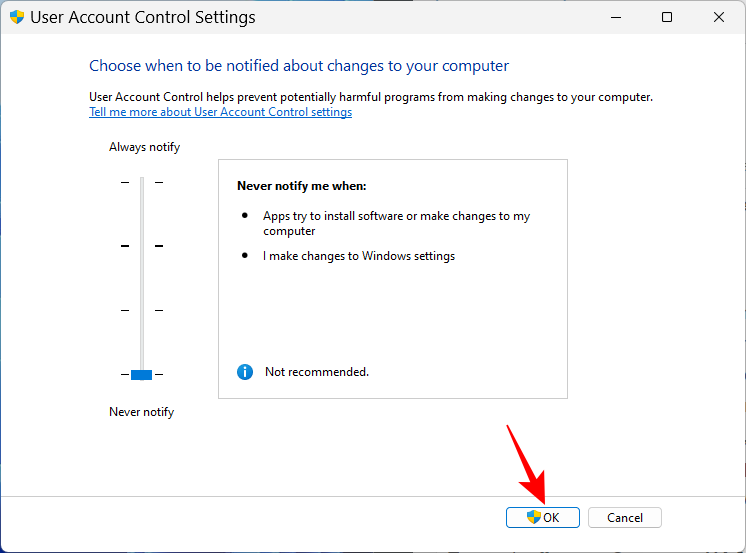
#UAC won't bother you anymore and you'll save a lot of time and clicks.
4. Rename your computer
Your PC is your personal computer. Nothing is more personal than a name. Additionally, it can help others identify your system on a shared network. Here's how to rename your PC:
Press Win I and open Settings. Then click Rename.
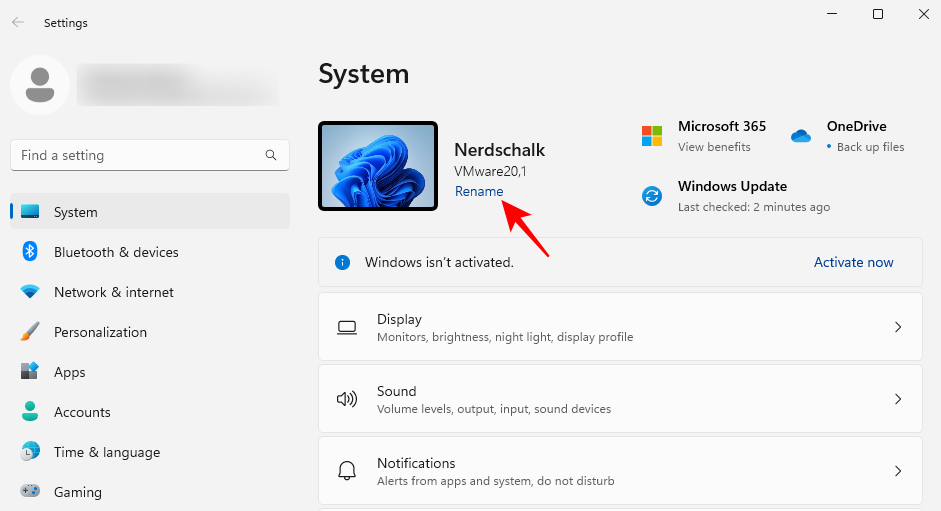
Enter a name for your PC and click Next.
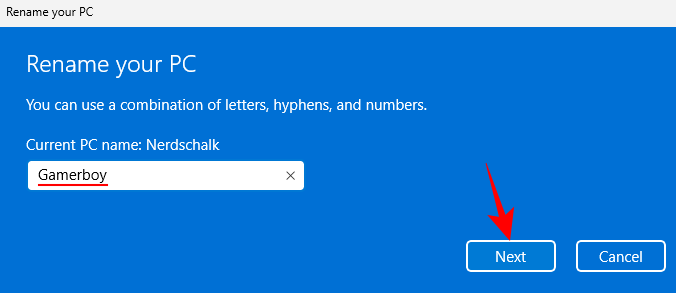
Click Restart now to update the changes.

5. Turn on the night light
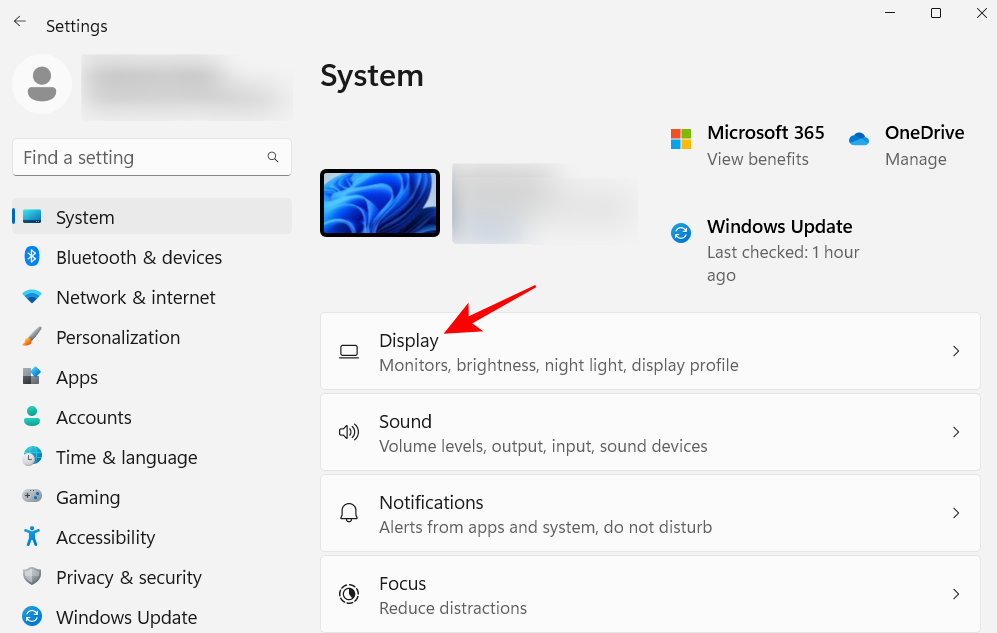
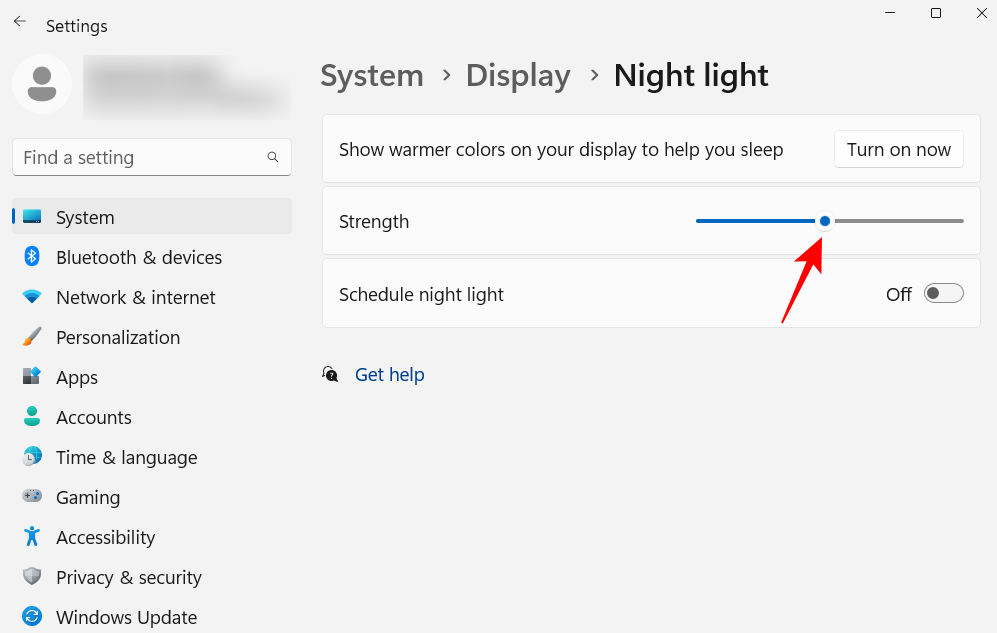
Working on the PC for a long time late at night can cause eye fatigue, especially when the lights are turned off, which is why it is recommended to Automatically turn on the night light or reading light at a specific time. Here's how to set your night light to turn on and off at predefined times: Open the Settings app as shown before and click Display.
#Here you can turn on the night light by flipping the switch to on.
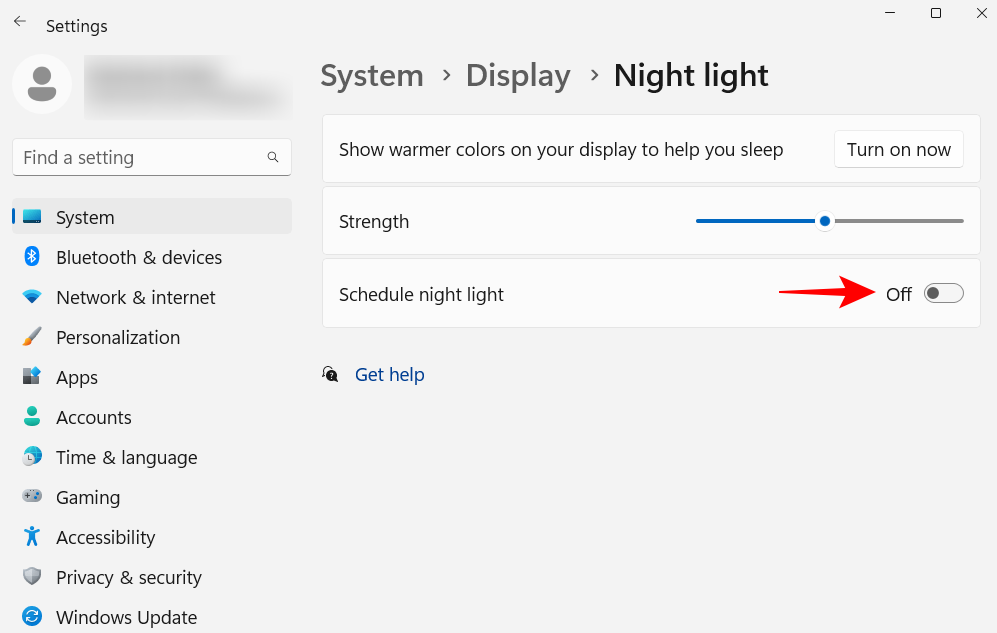
Schedule Night Light. 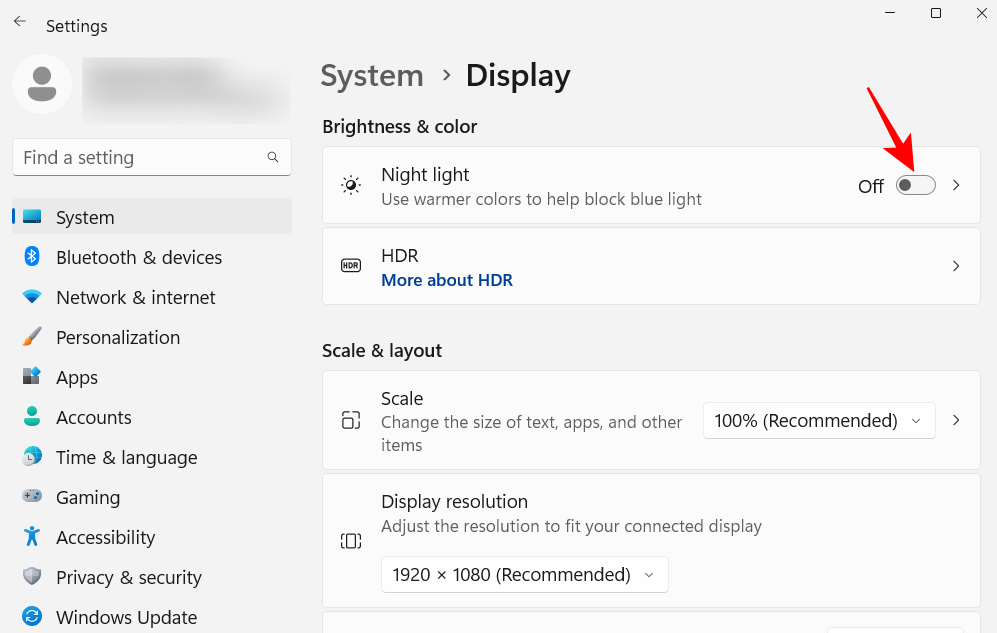
#Now, set the time for the night light. Click on a number to change its value.
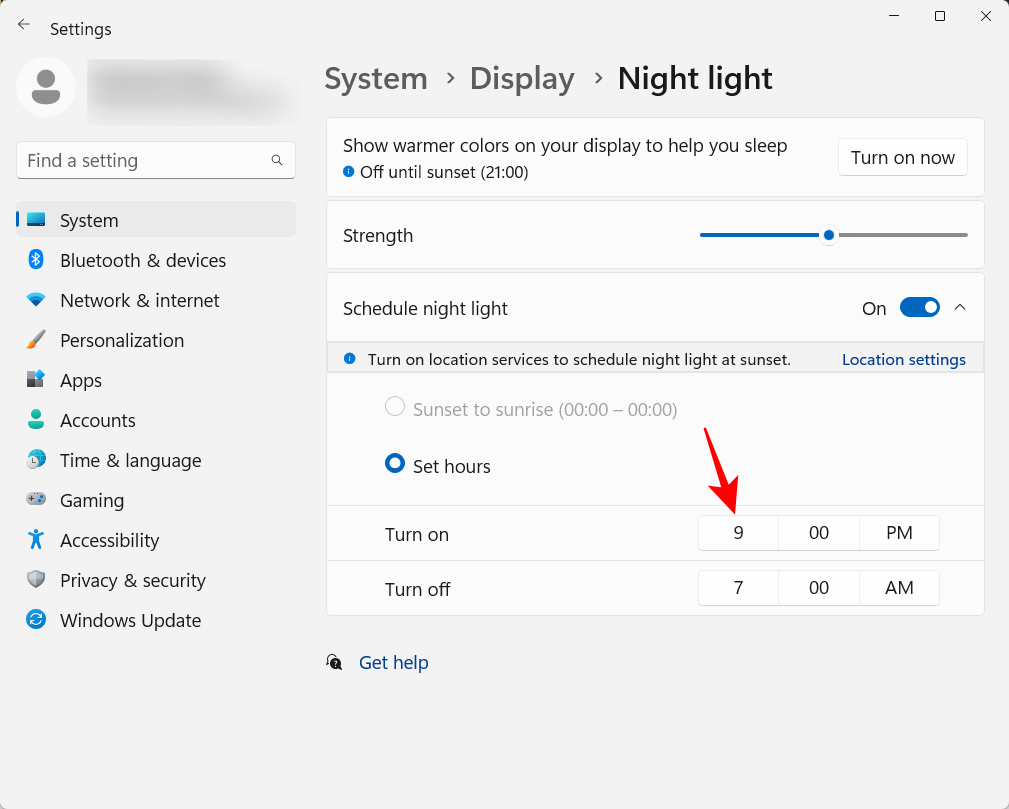
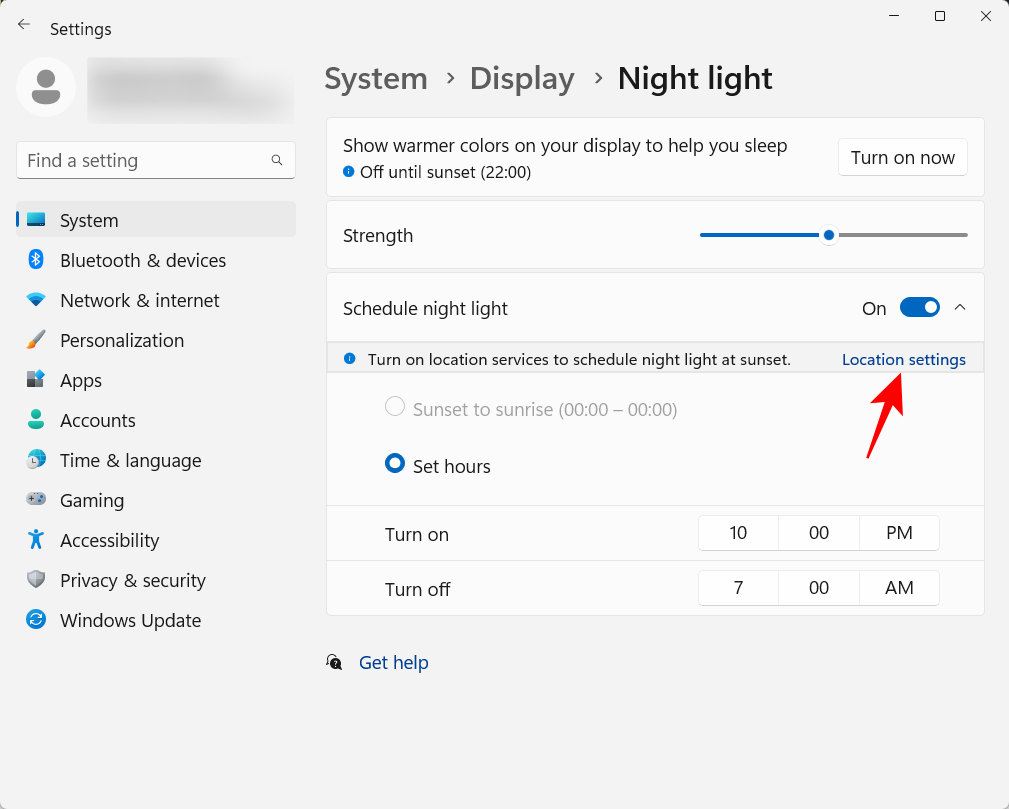
Location Settings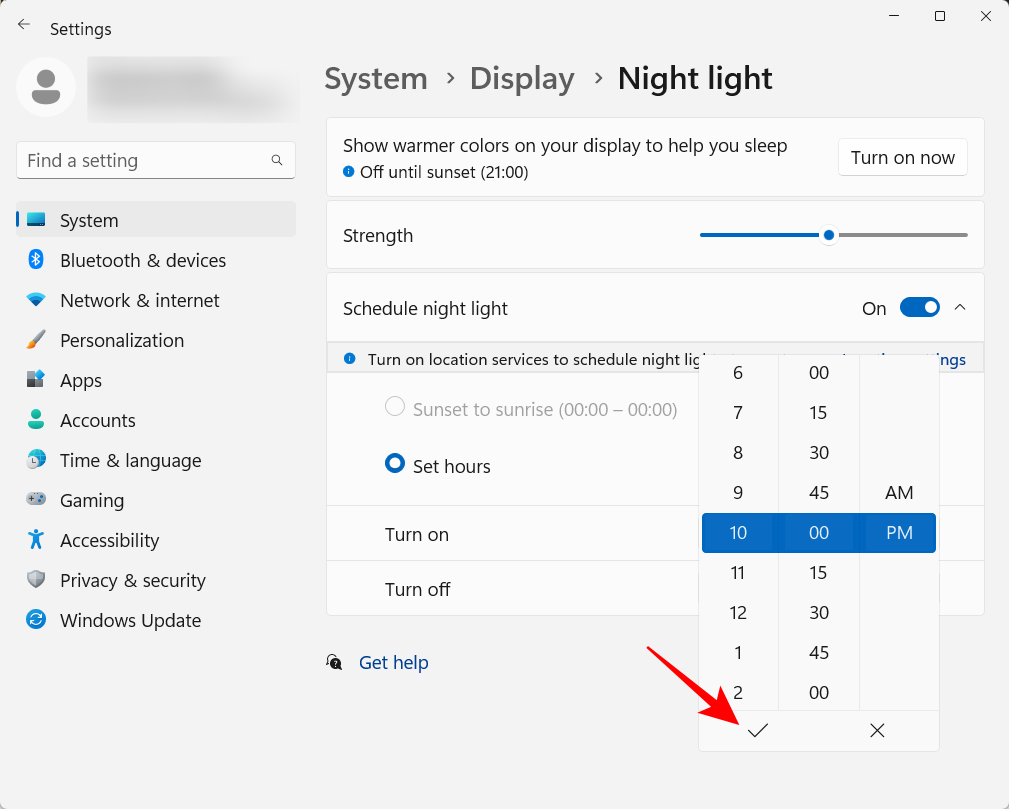 .
.
Enable it and then return to Night Light settings.
Sunset to sunrise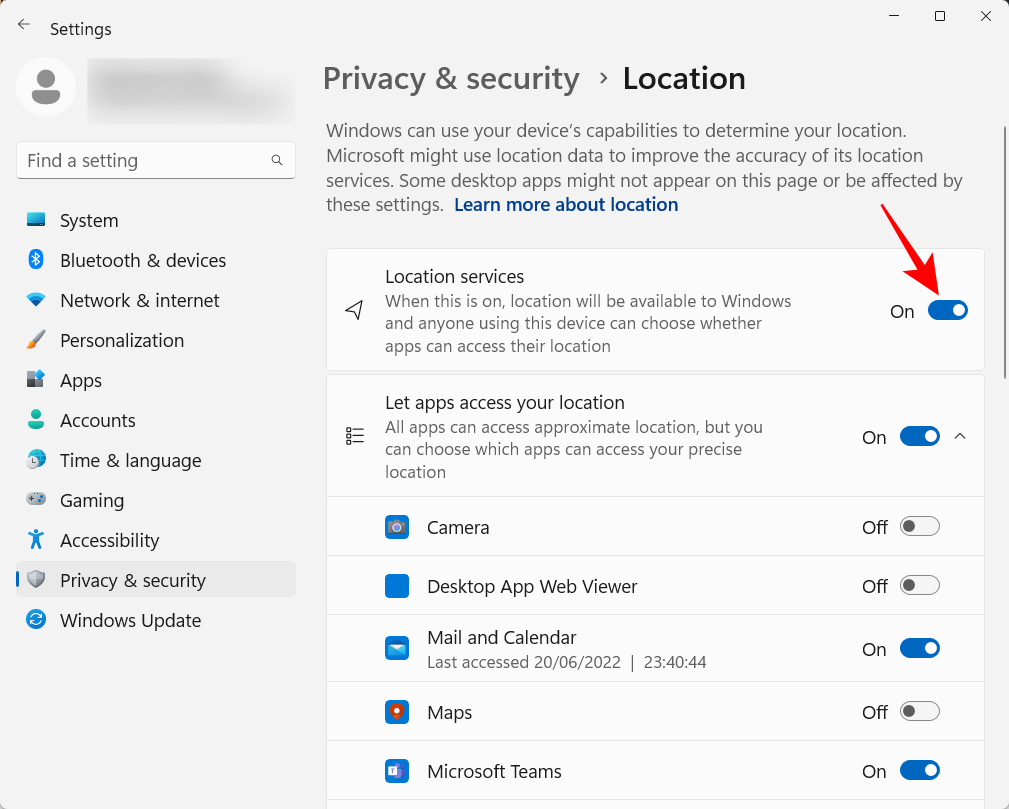 .
.
Select this option if you are okay with automatically turning the night light on/off based on your location and time of year and giving up your location. Otherwise, stick to a custom schedule.
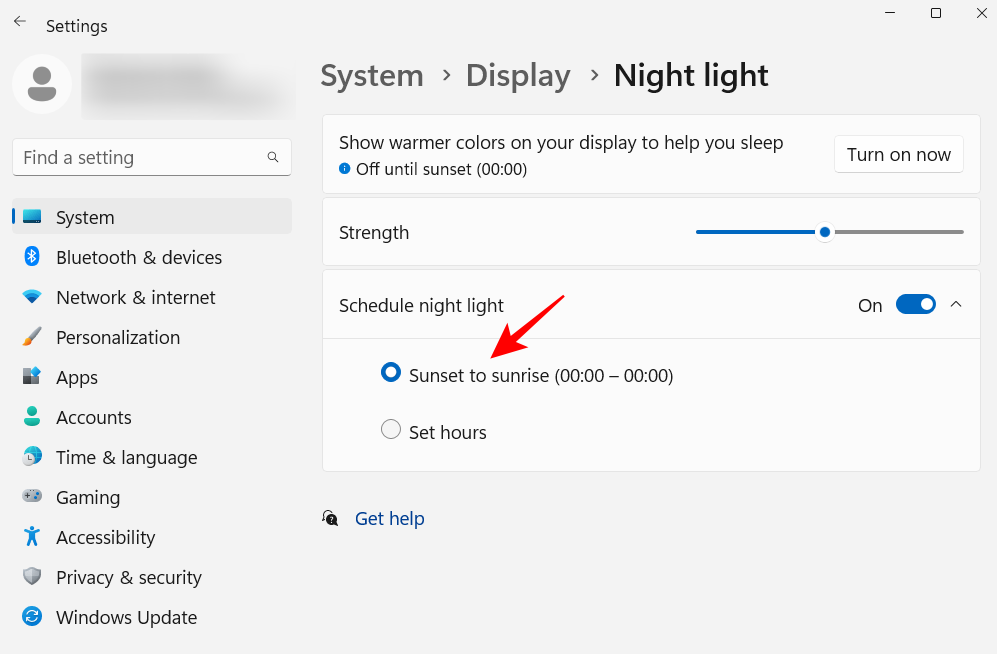 You can also adjust the
#6. Turn off personalized ads and recommended content
 Advertising is anathema to the focused mind and should be taken from every possible location is closed. The easiest way to turn off personalized ads and suggested content from Windows is to use the Settings app. Open it and select
Under Windows Permissions, click
General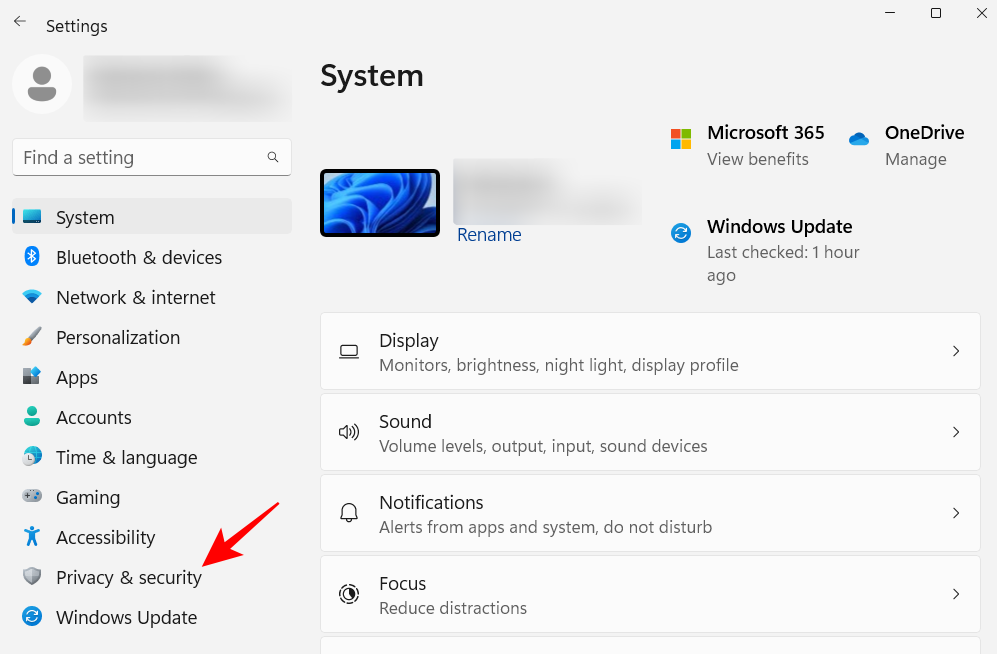 .
.
Turn off "Let apps use my advertising ID to show me personalized ads." Please also turn off the second option to avoid local content based on your language list.
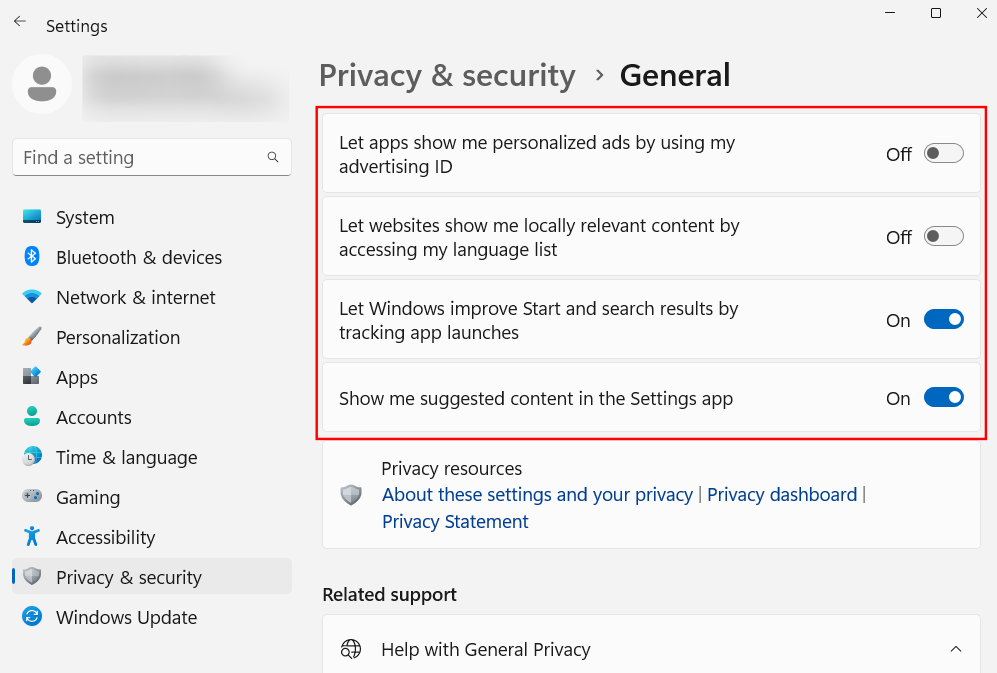
The last two options help Windows give you better app and file suggestions in the Start menu, as well as related to the options available on specific settings pages content. These are good to keep open. However, if you don't want such related content, go ahead and disable them.
7. Customize File Explorer Settings
File Explorer is one of the key areas that must be optimized to enable more intuitive and user-friendly interactions and easy exploration of files. Here are some things you can do to make your usage more efficient.
7.1 Open File Explorer to "This PC"
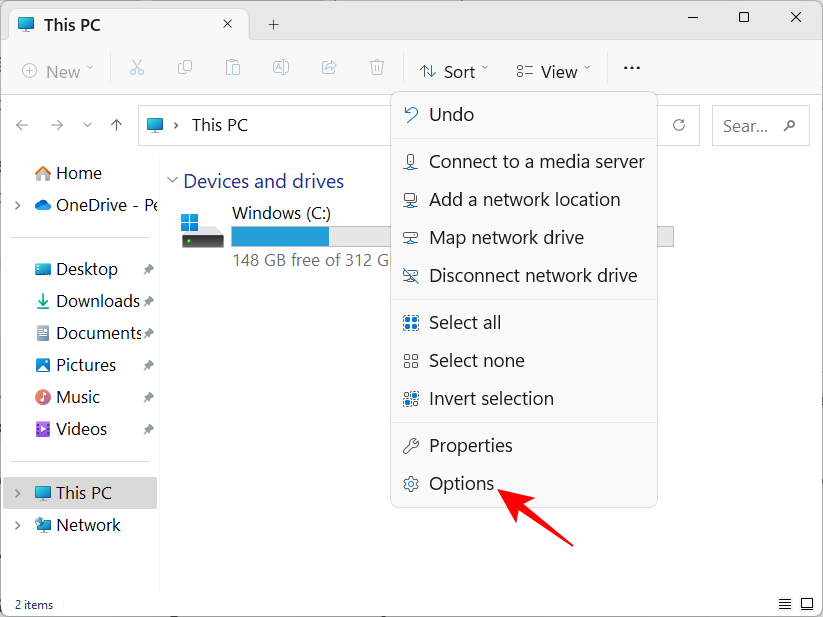
Press Win E to open File Explorer. By default, it opens to "Home". You can change it to "This PC" for easier access to your drive. To do this, click on the three-dot button in the upper right corner.
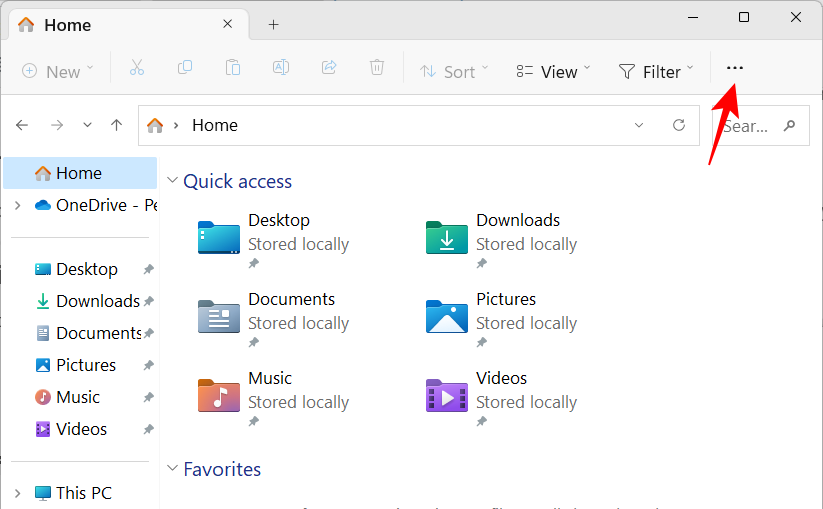
Click Option.
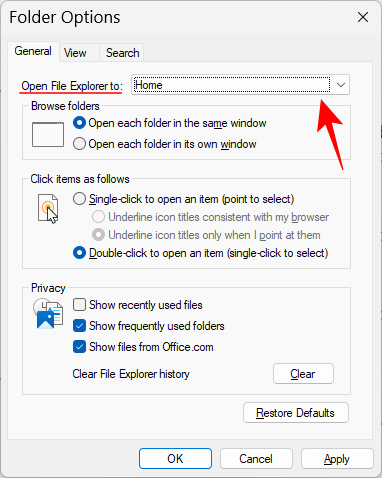
Click the drop-down menu next to Open File Explorer to:
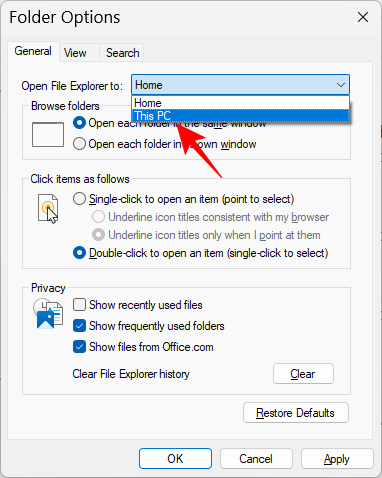
Select This computer.
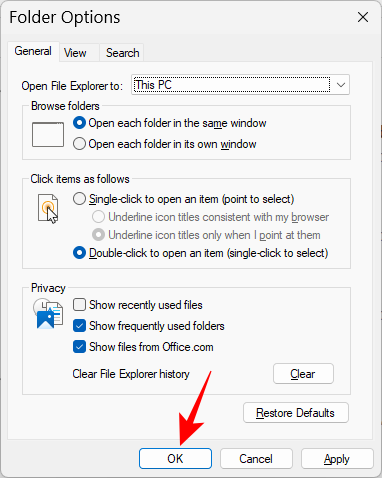
Then click OK.
7.2 Show hidden files and file extensions in File Explorer
For security purposes, Windows hides file extensions and some files and file extensions. folders, also because many users don't actually need to use them. But those who want to access them or make changes to them can easily view hidden files and file extensions. Open File Explorer and click View.
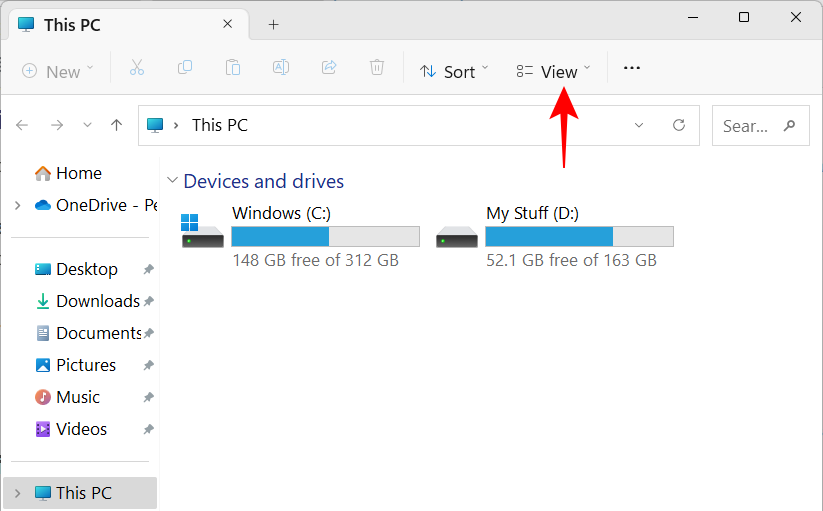
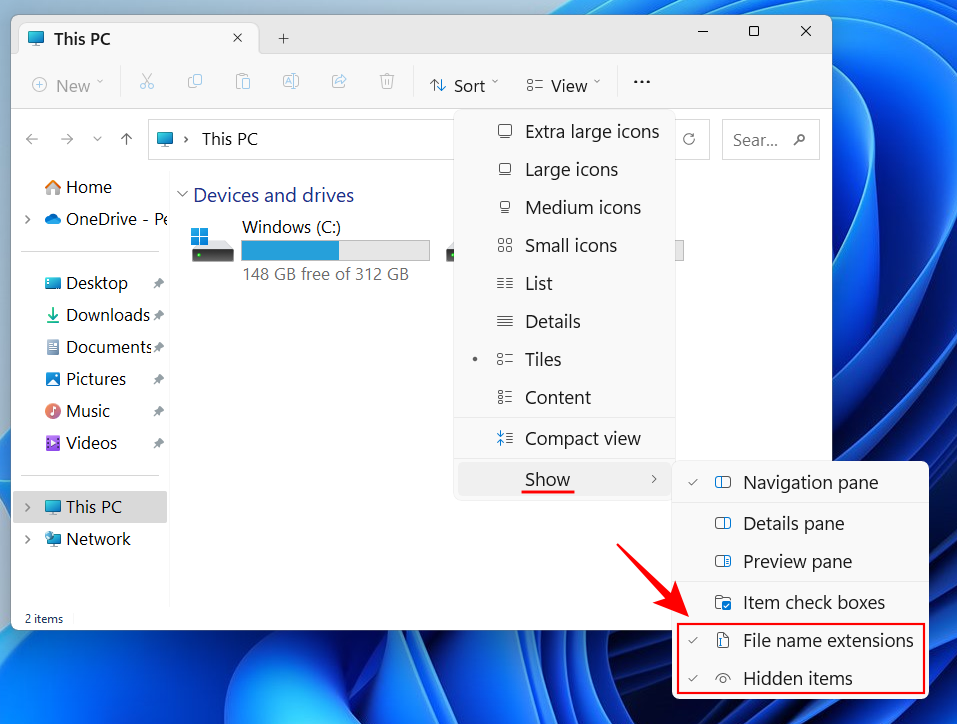
Then hover over "Show" and select File extensions and Hidden items so that next to them There is a check mark.
#7.3 Turn off ads in File Explorer
There are still too many ads! Yes, ads for Windows sync provider OneDrive's new features in its File Explorer are helpful for users who use OneDrive to sync files. But to those who don't, it's worthless. To close it, click on the three-dot icon in File Explorer.
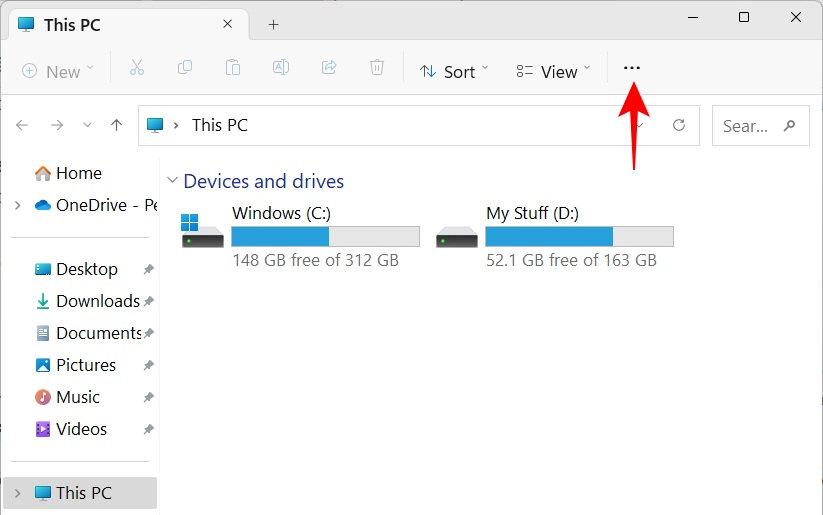
Select option.

Then click on the View tab and go to it.
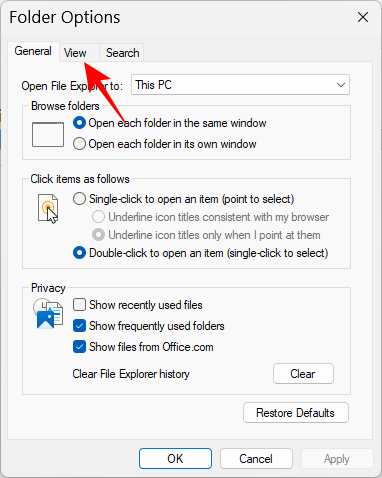
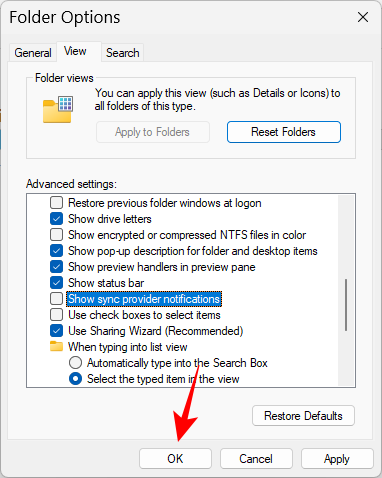
Show sync provider notifications.
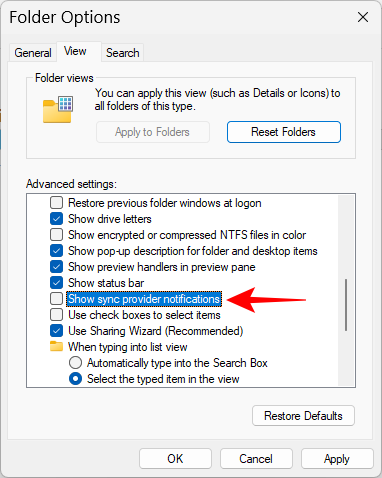
OK.
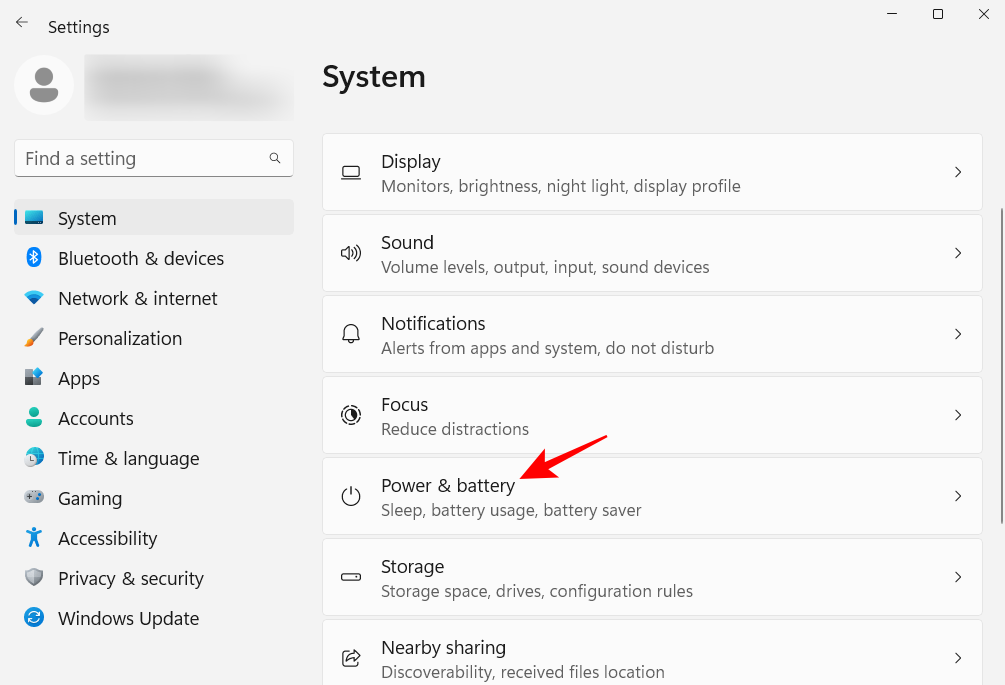
Win I) and click on " Power & Battery".
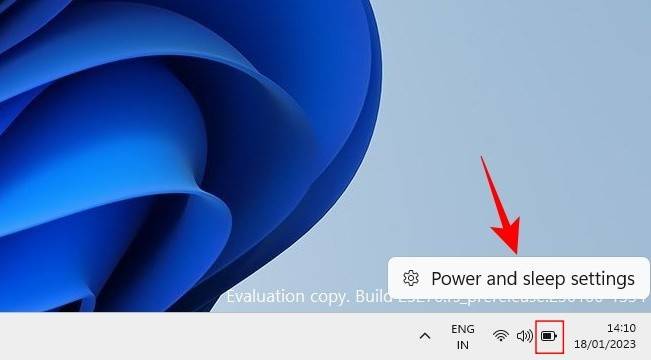
Alternatively, you can right-click the battery icon in the system tray and select Power & Sleep Settings.
Scroll down and click the drop-down menu next to Power Mode.
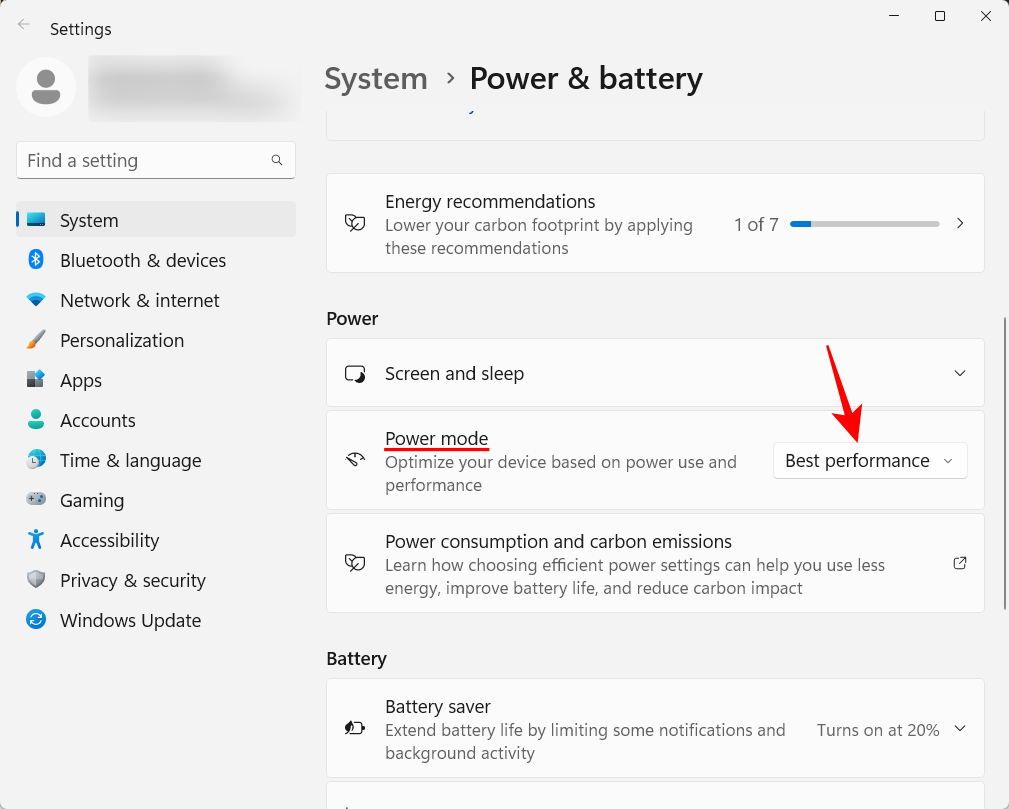
# and choose the power mode setting that best suits your needs.
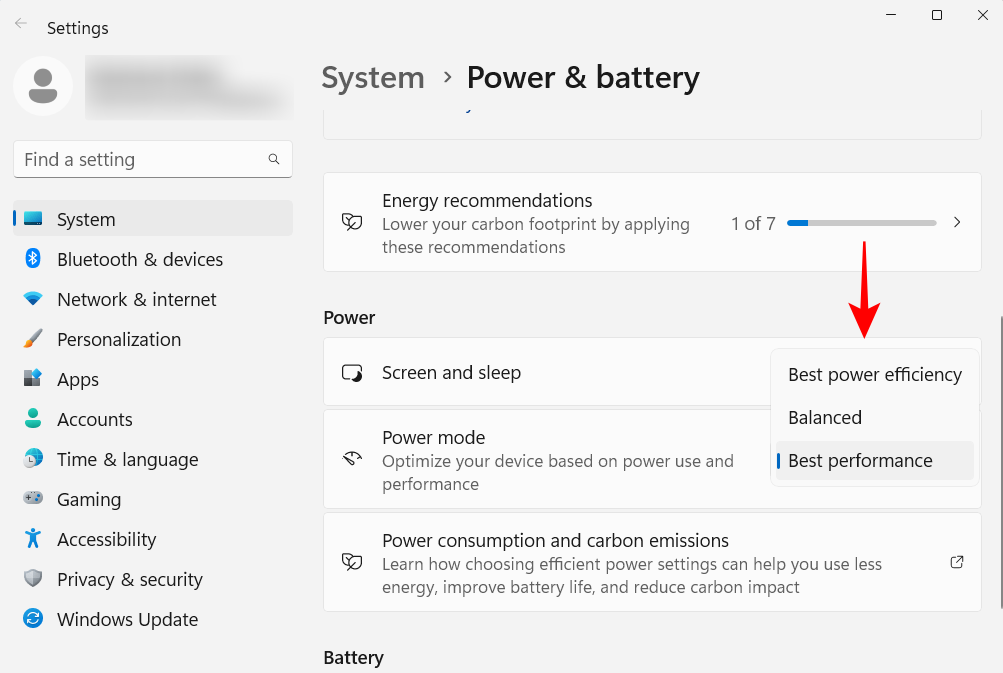
9. Set up automatic system restore points
Restore points are screenshots of system settings and configurations that Windows retains in case something goes wrong and a reference point is needed . By default, system restore points are created automatically. But since their importance cannot be overstated, it’s a good idea to check to see if this is the case. Additionally, you can configure your system restore points better this way.
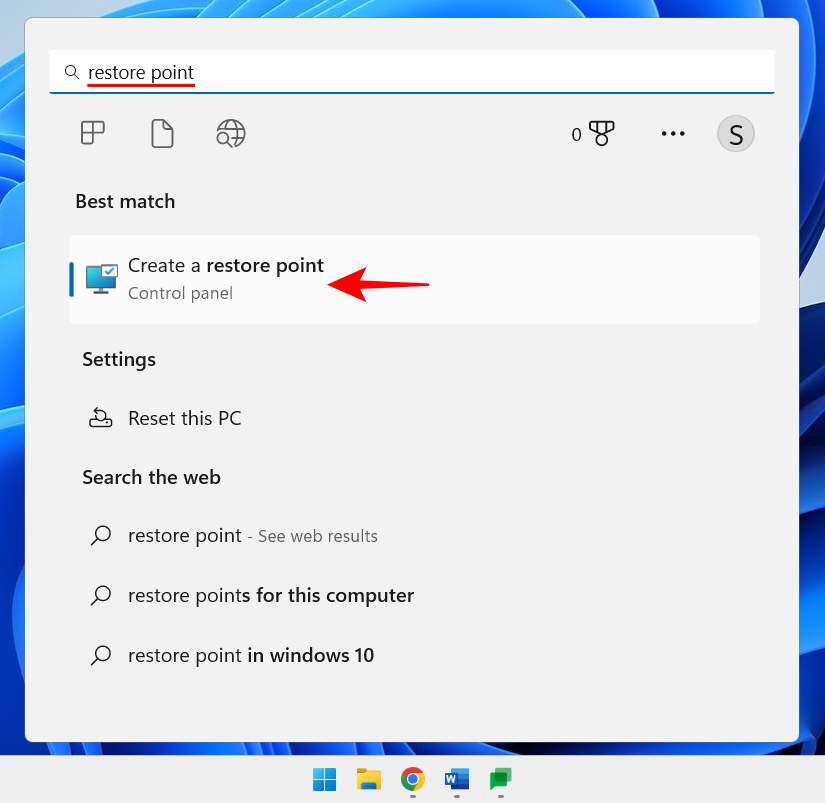
Press "Start", type "Restore Point" and click "Create Restore Point".
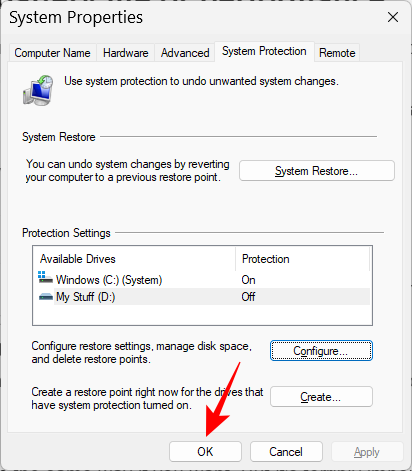
#If your C drive's protection settings are set to off, your system will not create a restore point. Select your C drive and click Configure.
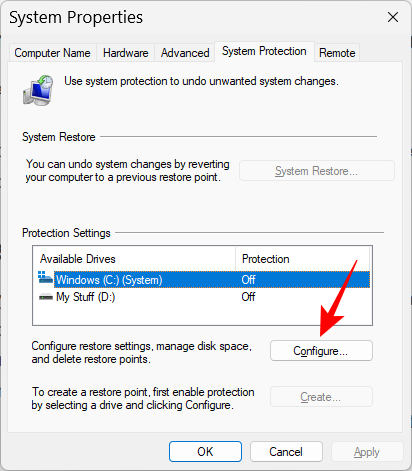
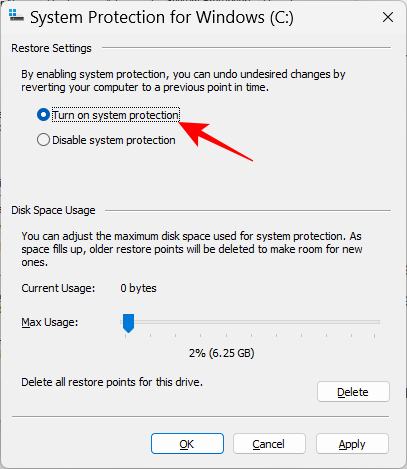
Then select Turn on system protection.
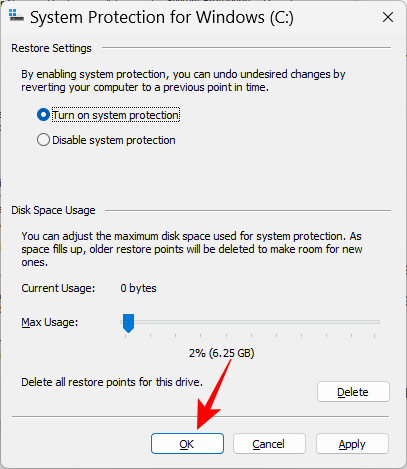
Click OK.
#If needed, you can also turn on protection for other drives in the same way. But it's important to at least do this for the system drive. When finished, click OK.
10. Enable Clipboard History
Anything you copy or cut to paste elsewhere will first be copied to the clipboard until pasted until. But the clipboard on Windows can be used for much more. You can save multiple items on the clipboard and even view your clipboard history. But before that, you need to enable it. To do this, open the Settings app, scroll down on the right side and click Clipboard.
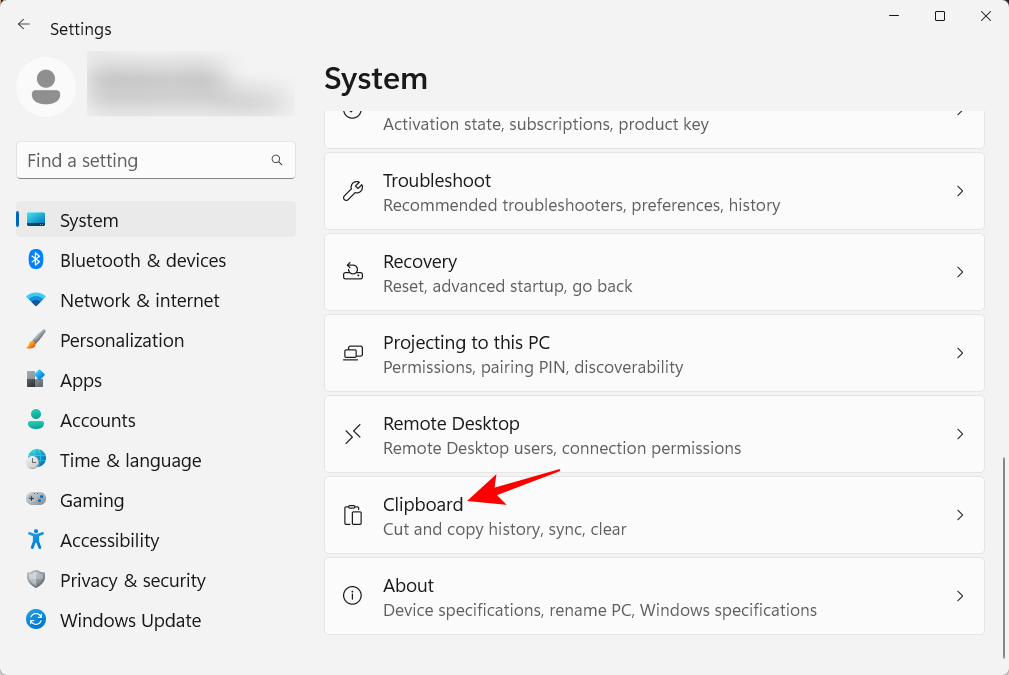
Then enable Clipboard History.
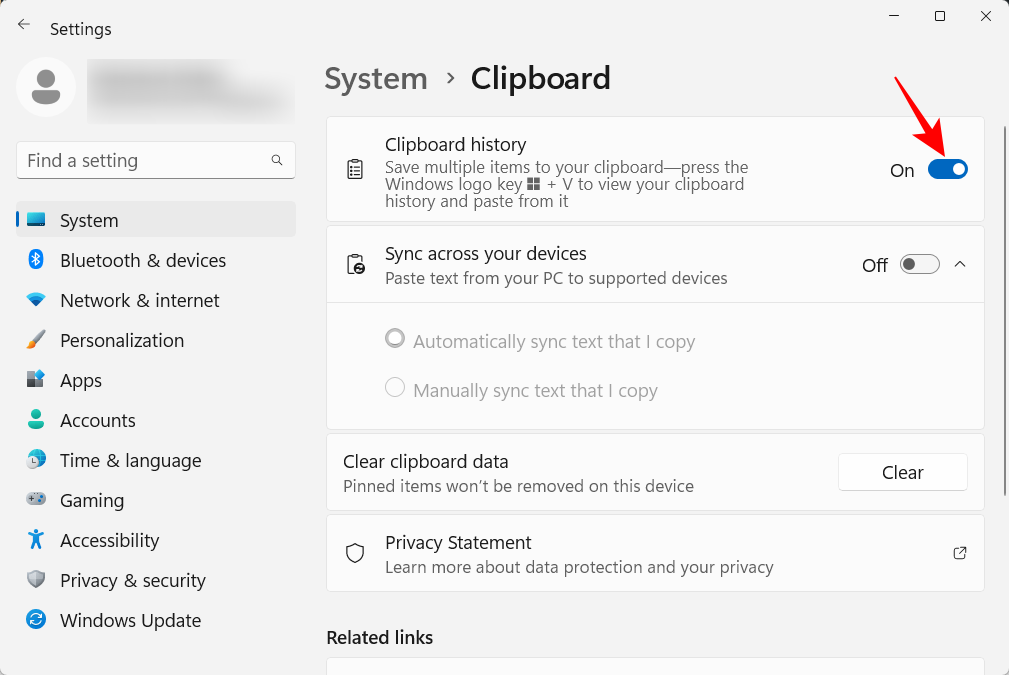
Now, whenever you need to view your clipboard history, press Win V as mentioned in the option description.
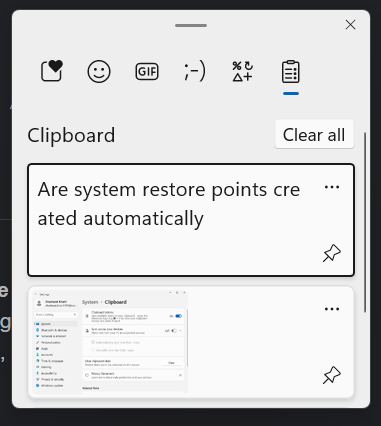
If you need to clear your clipboard history for privacy purposes, just click Clear in the clipboard or from its settings page.
11. Turn off notifications from apps and other senders
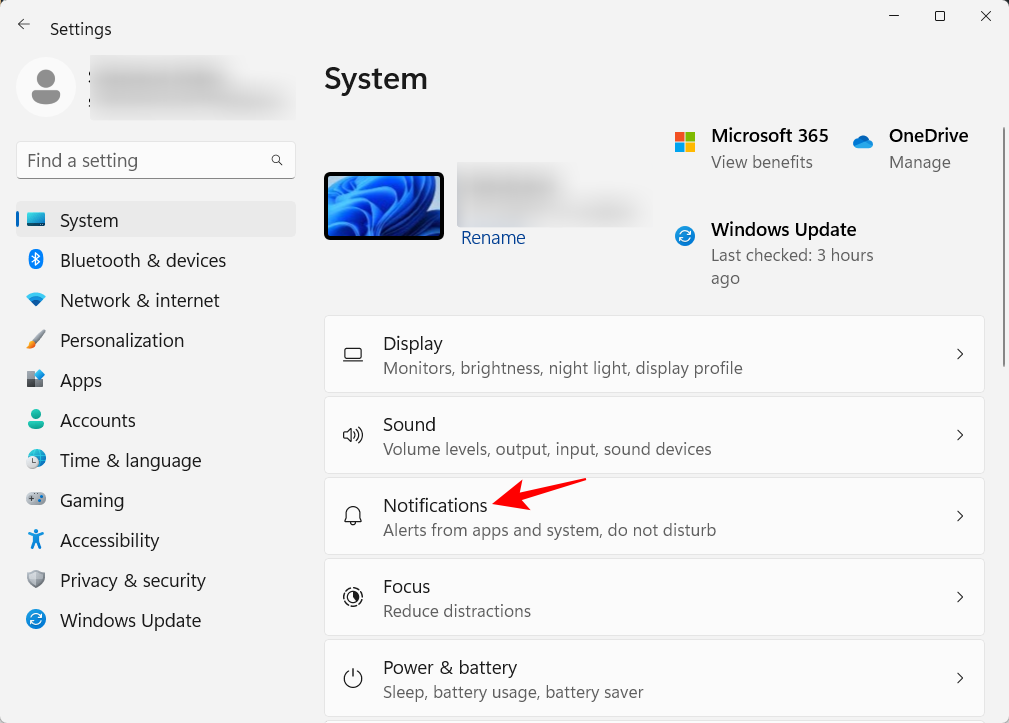
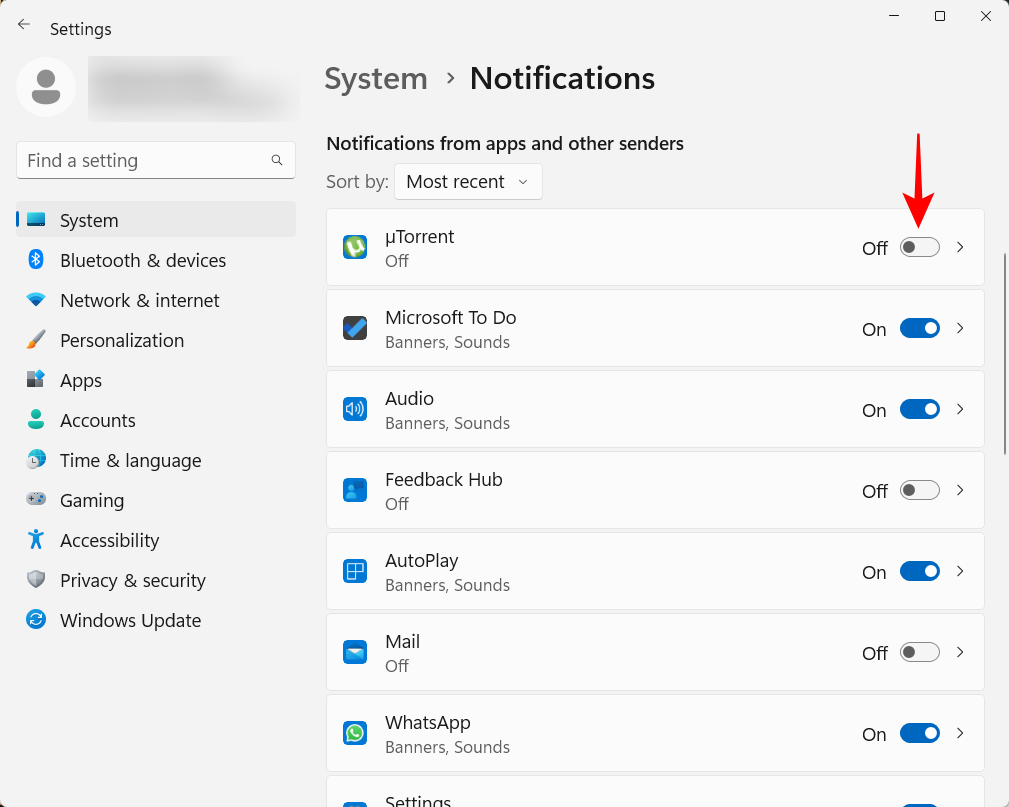
Not all notifications require our attention. Notifications from some apps should be turned off completely, especially if they do nothing but interrupt occasionally. To do this, open the Settings app and click Notifications on the right.
##
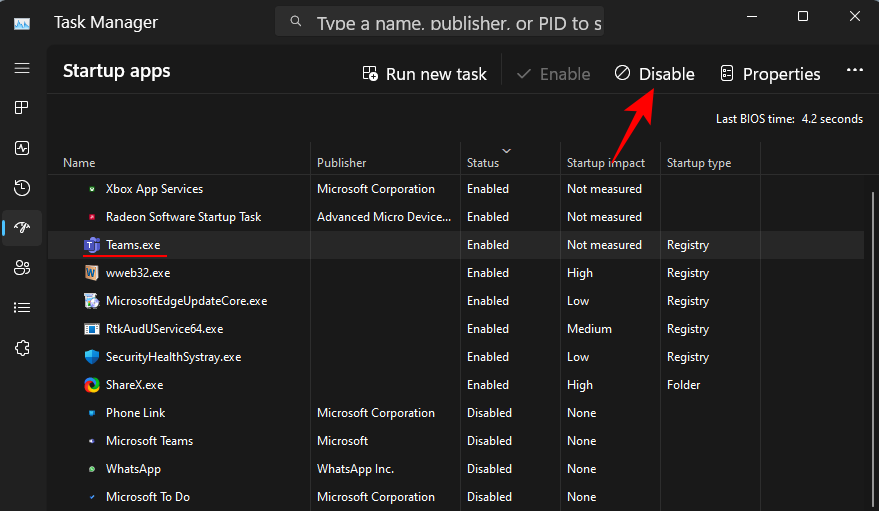
12. Disable startup applications
Windows will automatically start some applications and services in the background when it starts. Some of them are crucial. But many of them are just ancillary services that you may not need, like the Xbox App service, or even services that you installed but forgot to disable starting. To do this, press Open Task ManagerCtrl Shift Esc, or right-click on the taskbar and select "Task Manager."
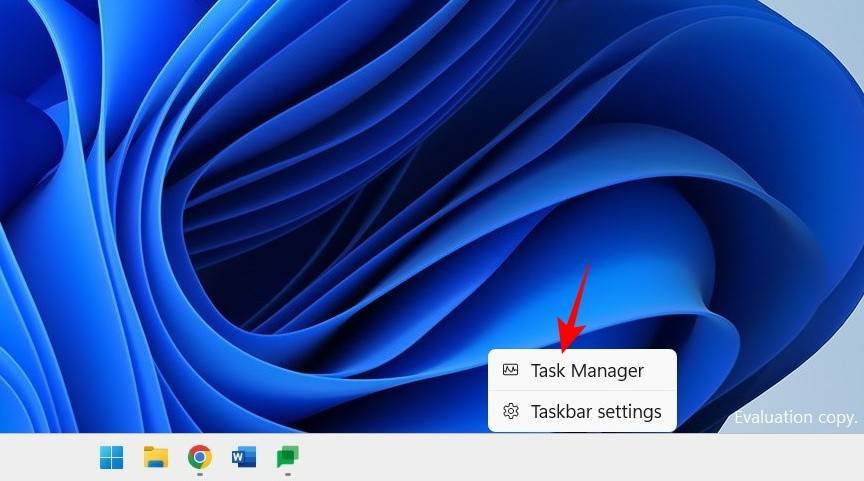
#Then click the hamburger icon in the upper left corner.
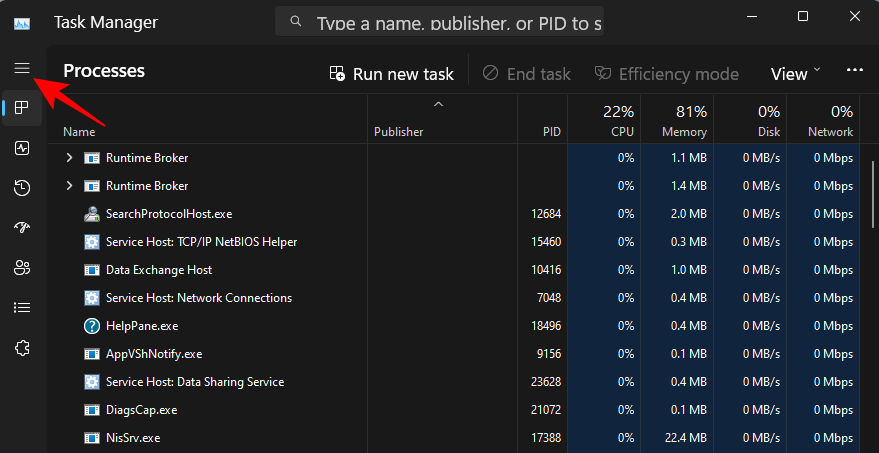
Select Launch Application.
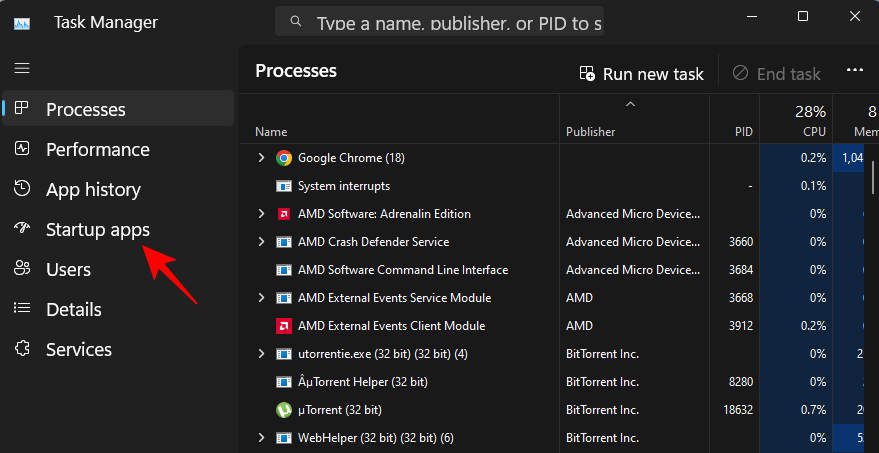
Check the status of the application in the Status column.
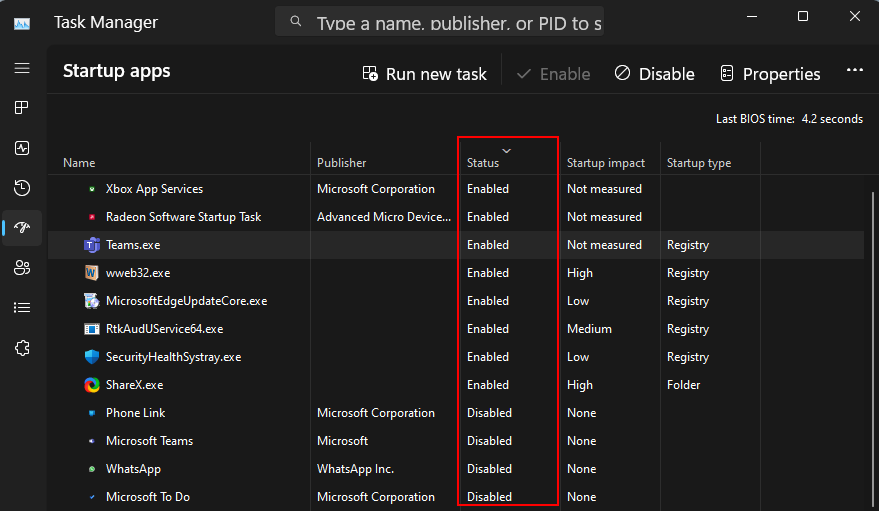
To disable one, click on it to select it, then click Disable at the top.
13. Change the default browser
Microsoft has been trying to push Edge as the default browser. Until recently, Windows users could change their default browser with a single click. Here's how to do it:
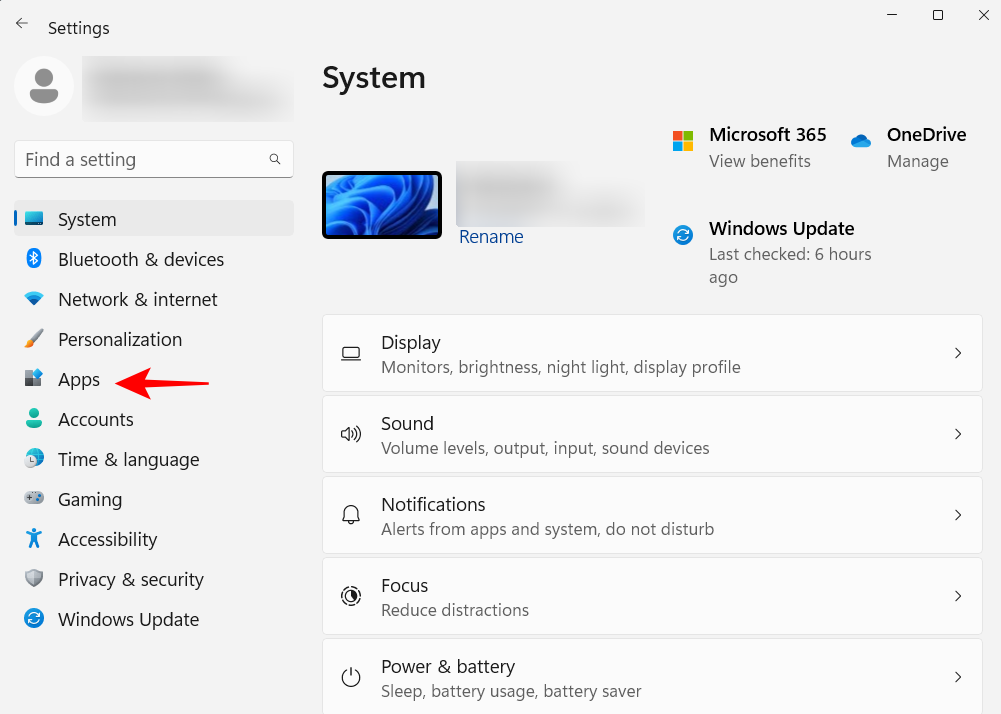
Install a new browser. Then open Settings and click Apps in the left pane.
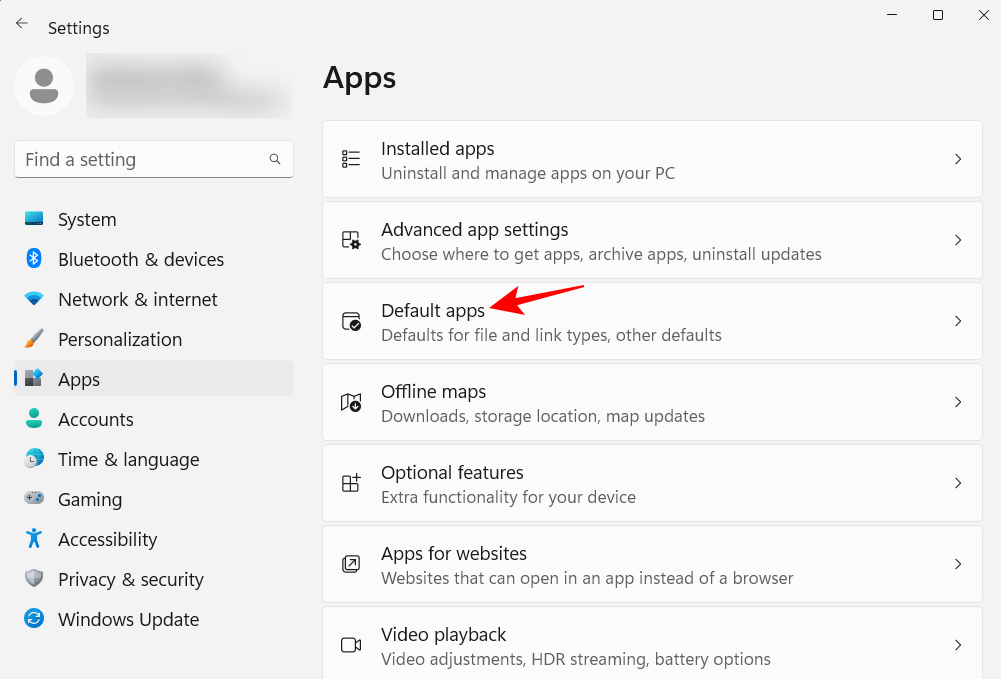
#Then click Default Applications on the right.
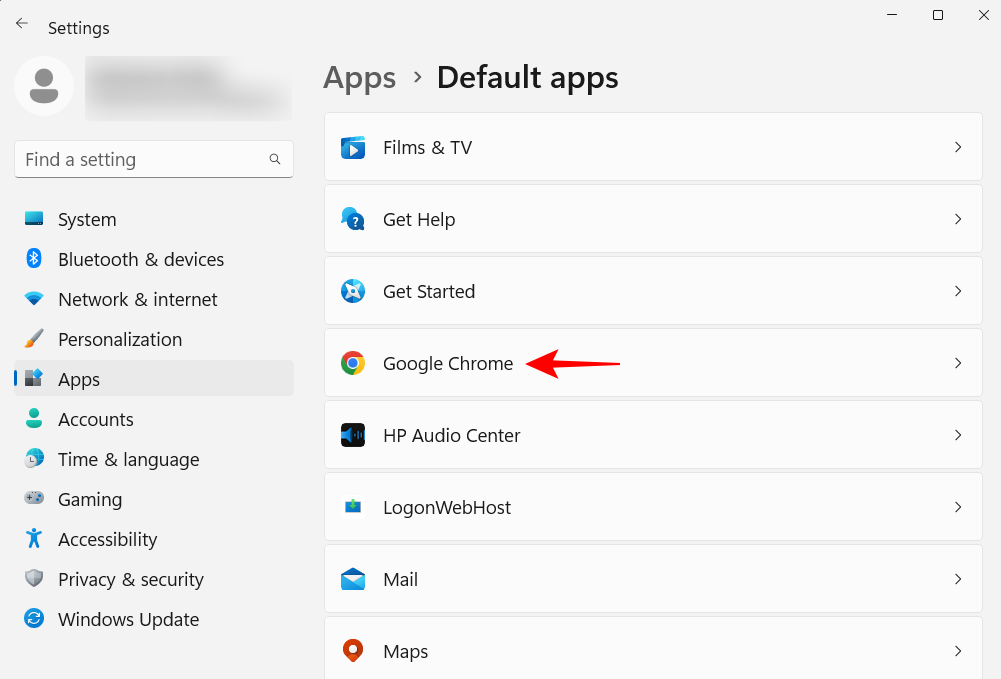
Scroll down the list of apps and select your browser.
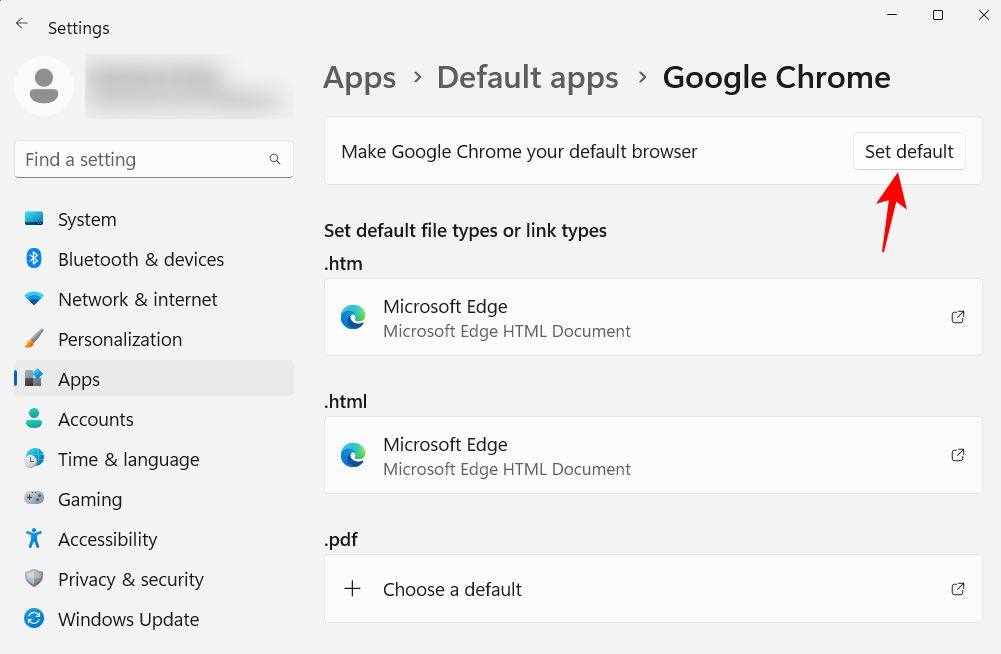
Click to set the default value.
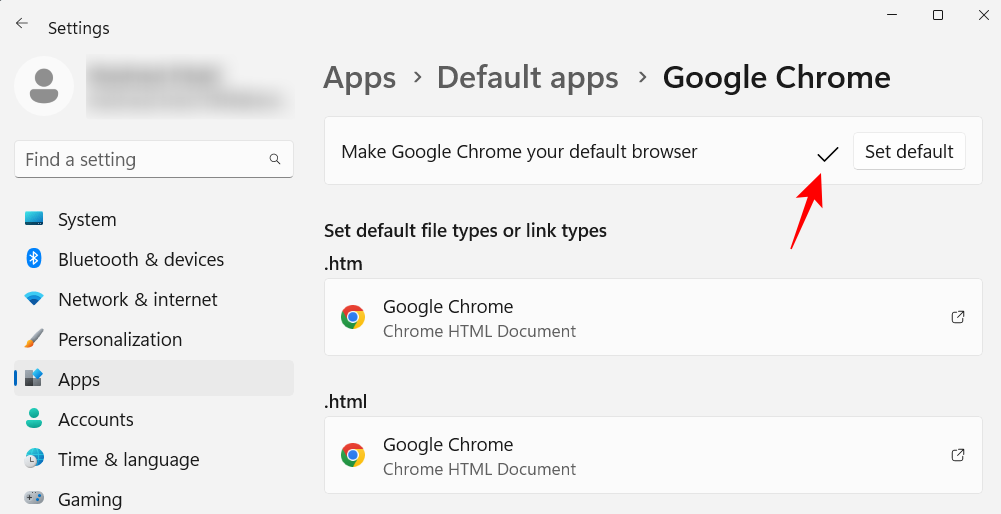
#When you see a check mark next to the option, you will change your default browser.
14. Personalize your desktop, lock screen, and theme
This is a minor personalization tweak, but one that can add to your personal Computers add personality. Here's how to modify your computer's desktop background, lock screen, and Windows theme:
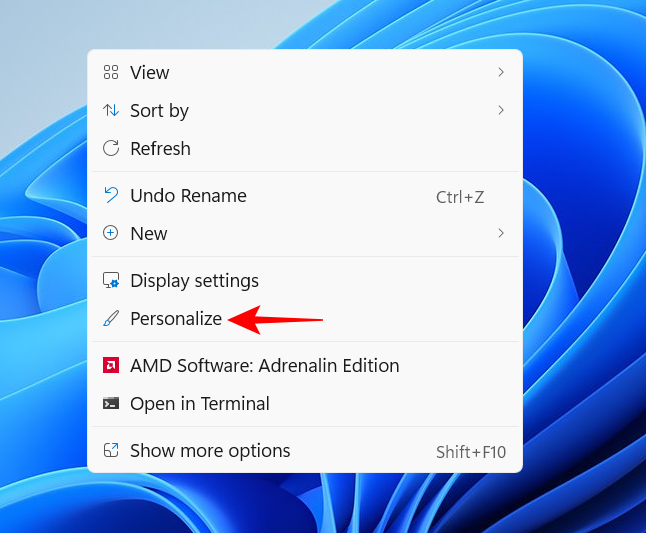
Right-click on the desktop and select Personalize.
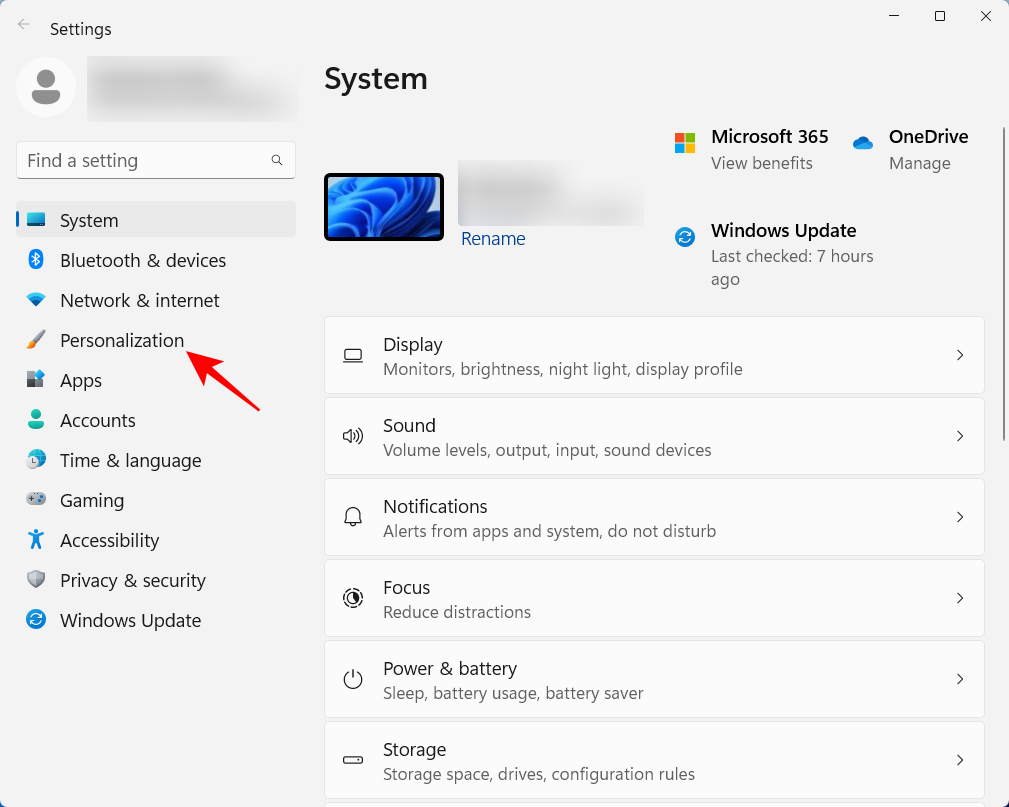
Alternatively, open the Settings app and select the same app from the left pane.
Click Background to change your desktop wallpaper.
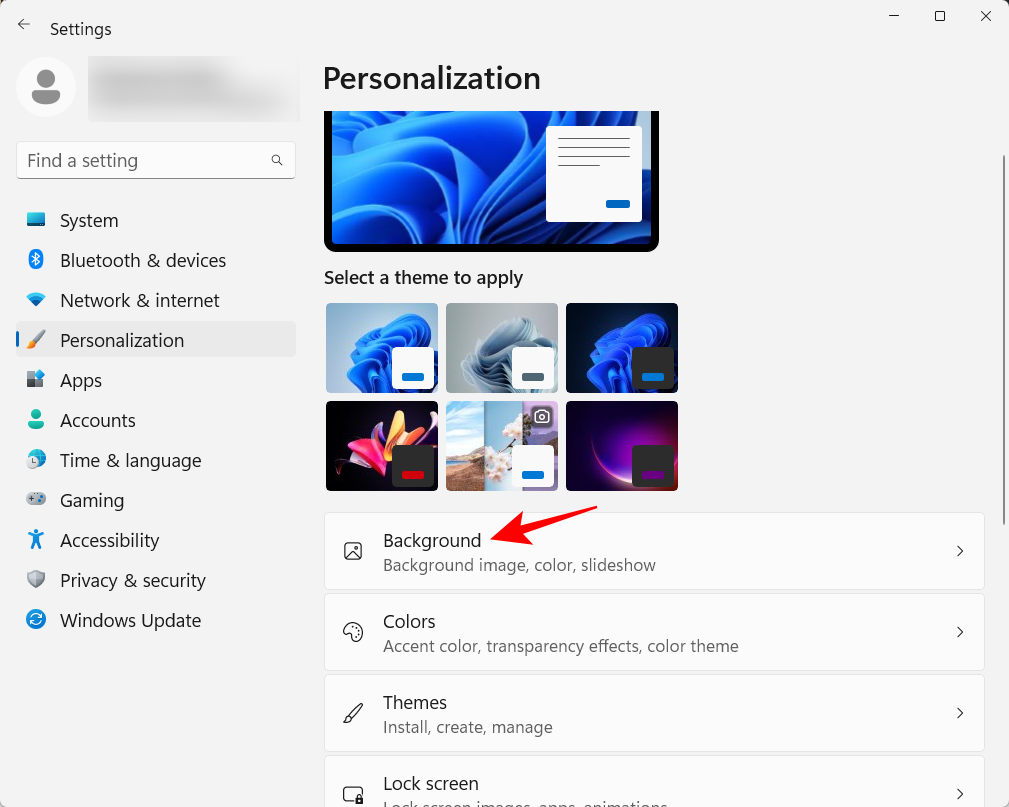
The default background will be the one that comes with the theme. You can choose to use your favorite picture, slideshow, solid color, or Windows spotlight as your background. Click the drop-down menu next to "Personalize your background."
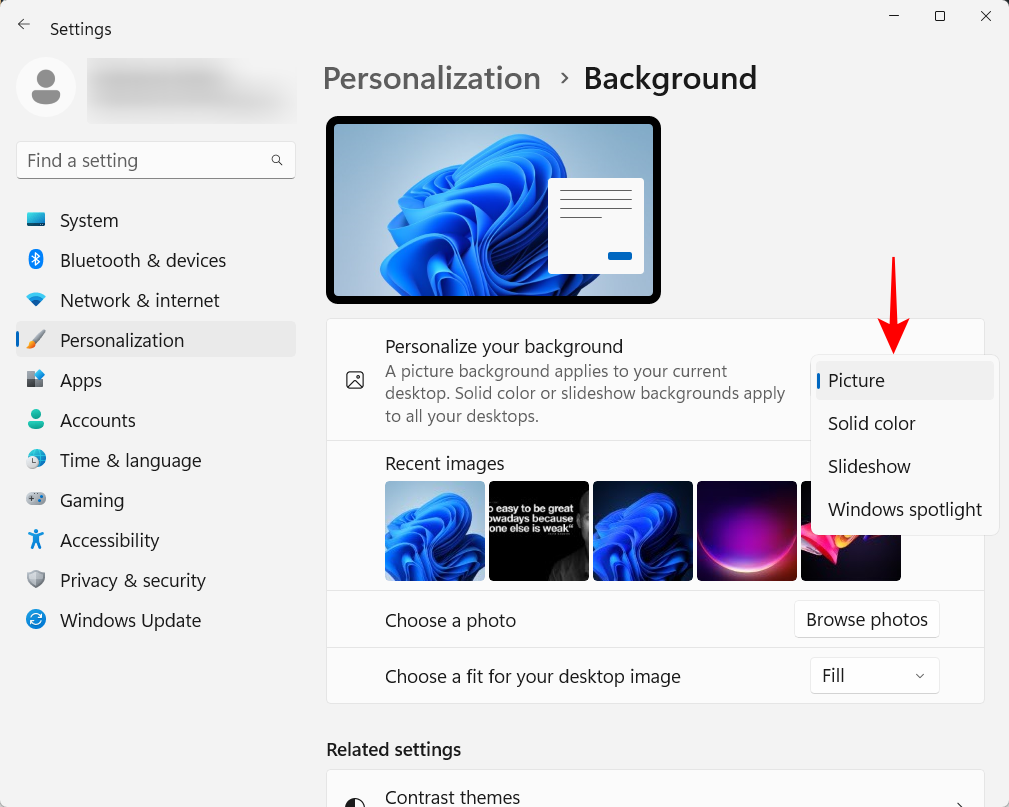
Select an option to display its settings, then select your image, color, or slideshow settings.
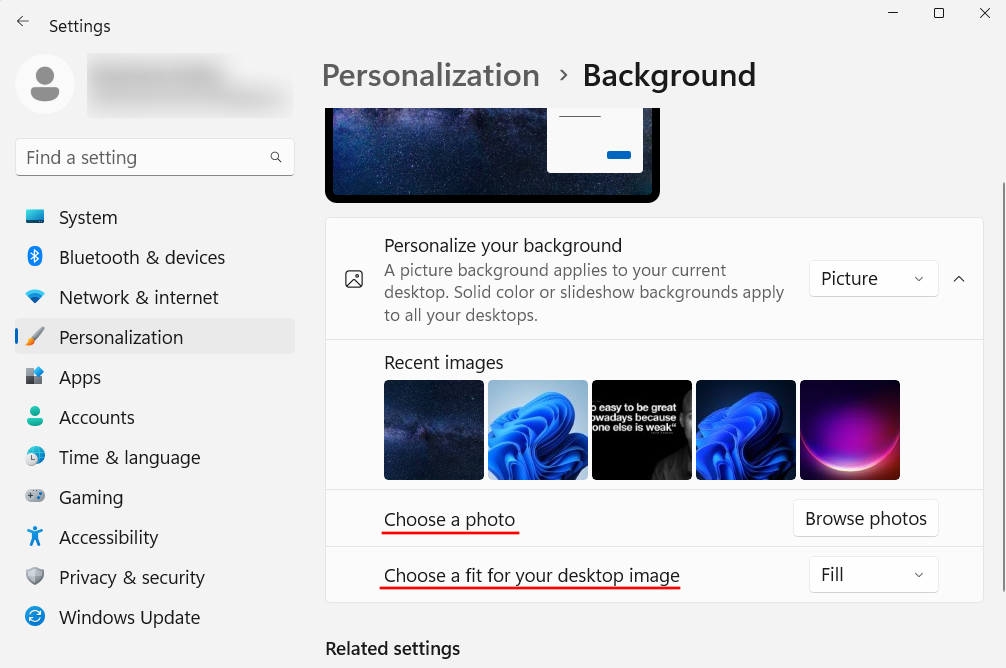
If you don't want to bother with these, but still want to have a nice image as your background, we recommend using Windows Spotlight.
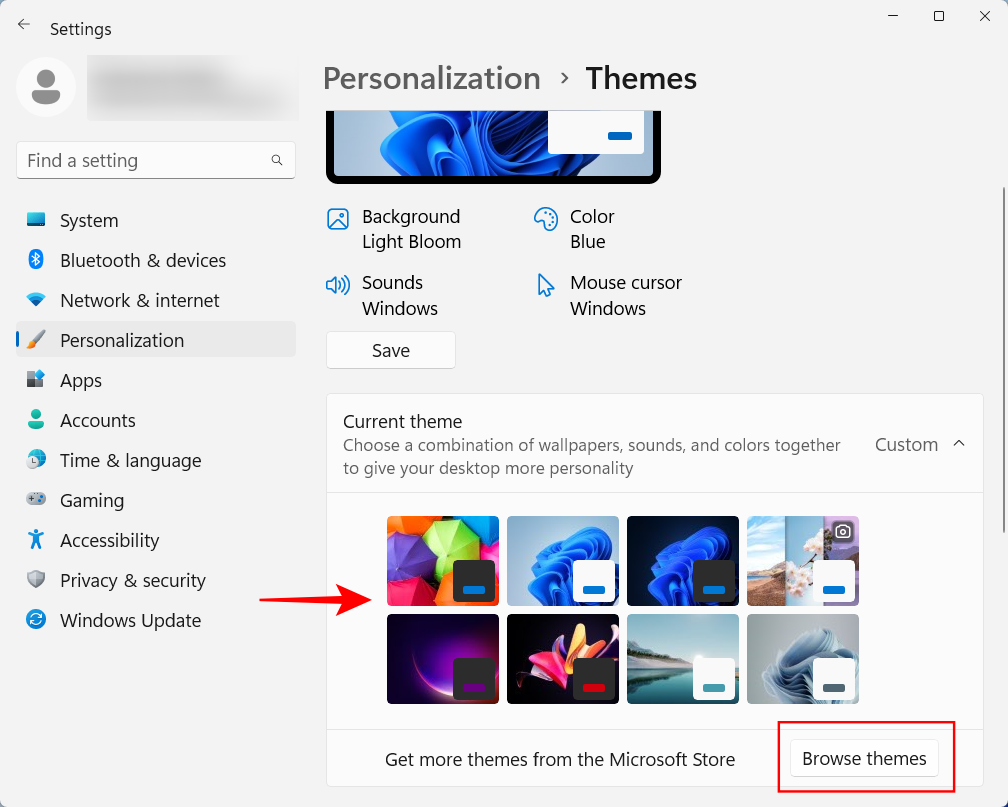
To change the theme, select from the options available in Personalization. Or, click Theme for more options.
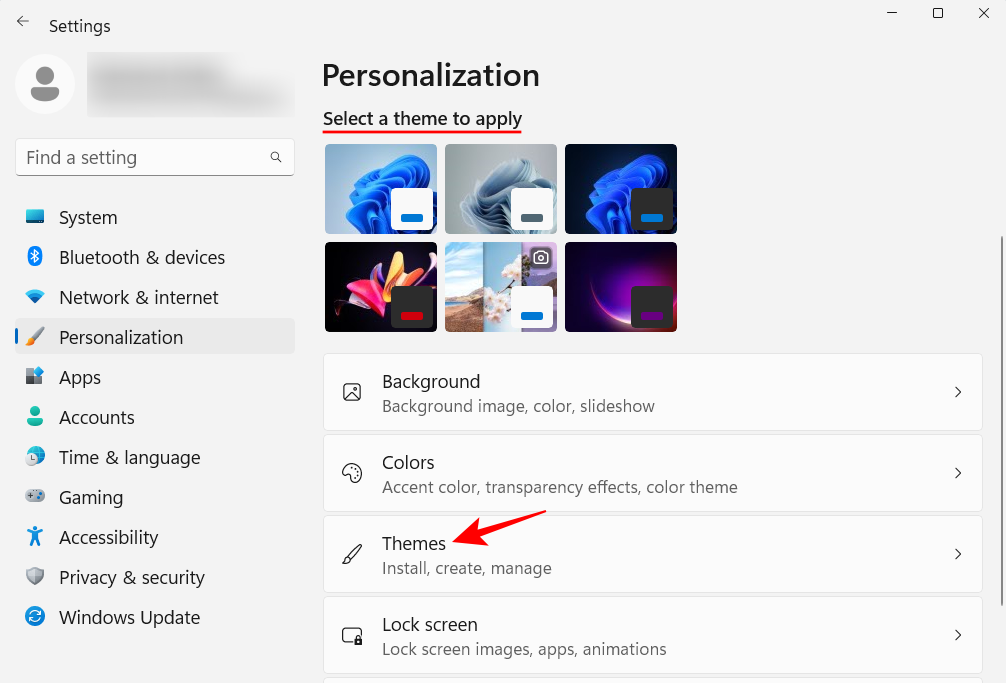
Choose from the themes listed here, or click Browse Themes to get more themes from the Microsoft Store.
15. Change font size, display resolution, and scaling
Windows will recognize your monitor and set the recommended font size, resolution, and scaling Proportion. If these are too large or small for your liking, here's how to change them:
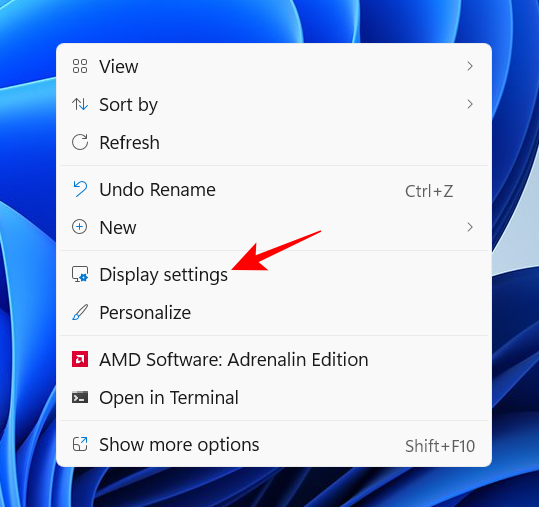
Right-click on the desktop and select Display Settings.
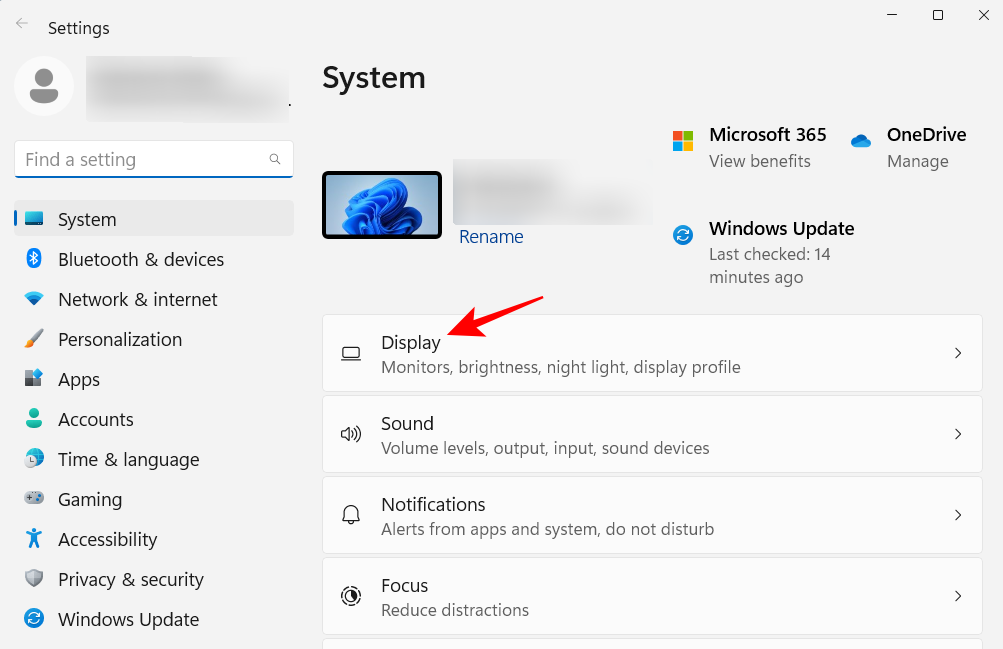
Alternatively, open the Settings app and select Display on the right.
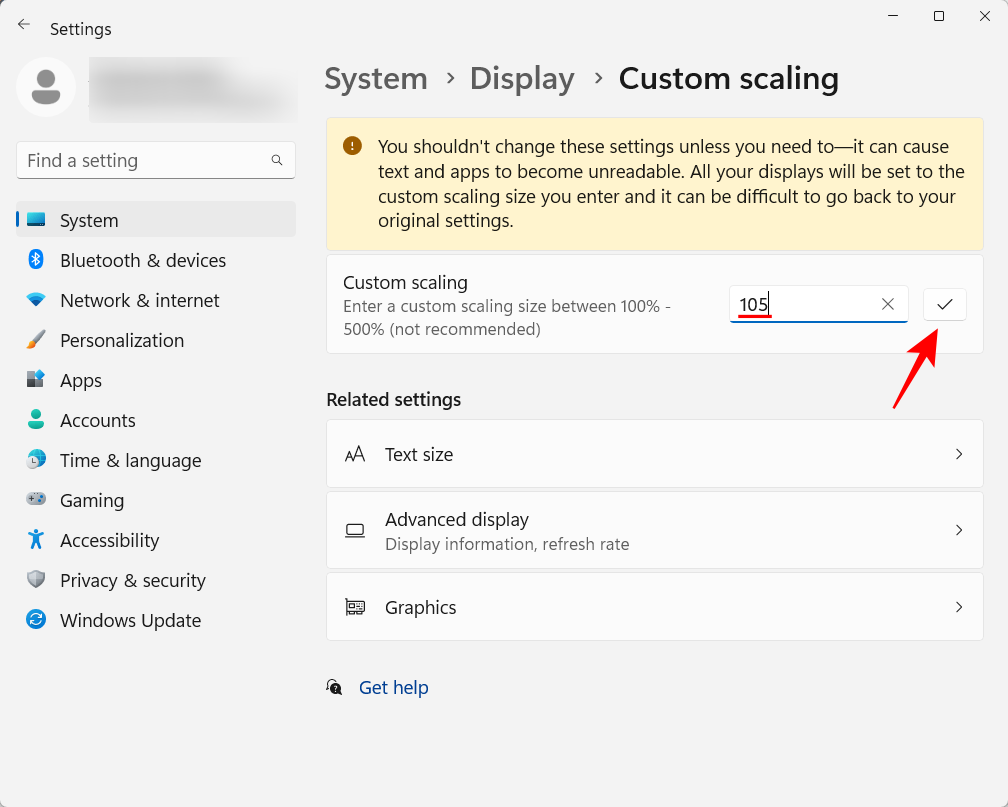
Under "Scale & Layout," click the drop-down menu next to "Scale" and select an option to change the size of text, apps, and other items .
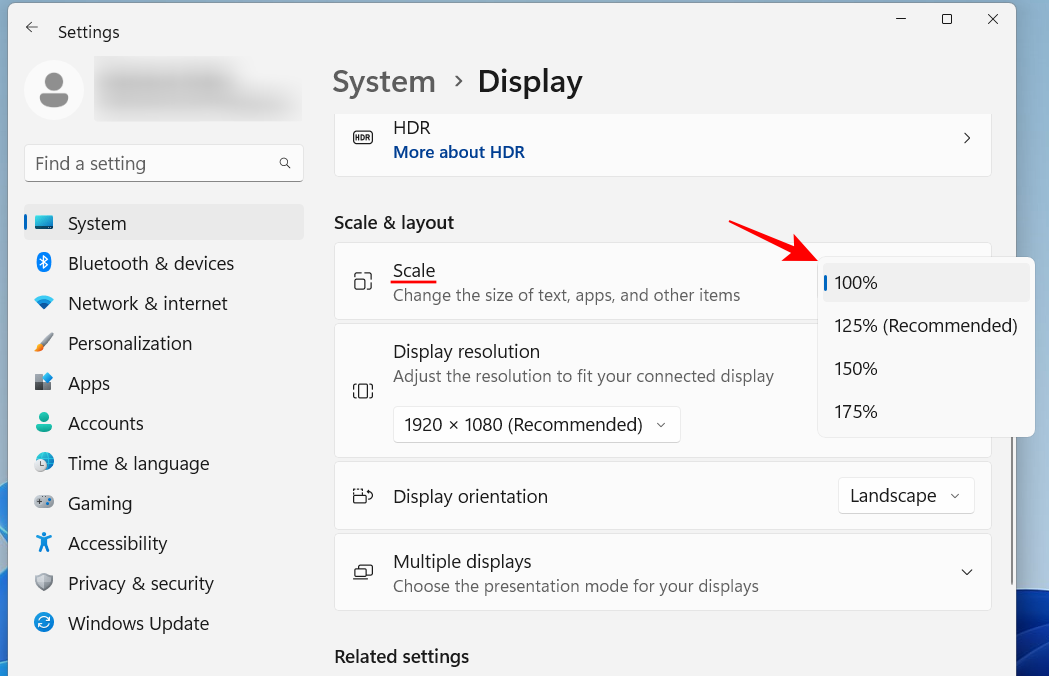
#You can also select a custom scale by clicking on the Scale option itself and entering a Custom Scale value.
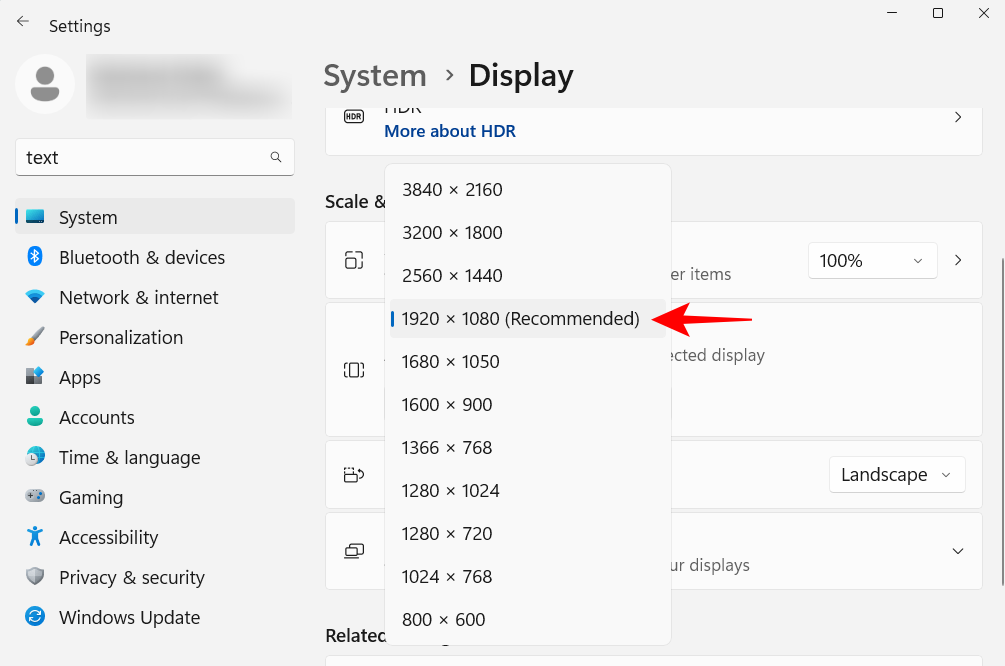
#To get more screen real estate, make sure you select the maximum resolution your monitor offers in your display settings. Or, if you want a larger view, choose a lower resolution if necessary.
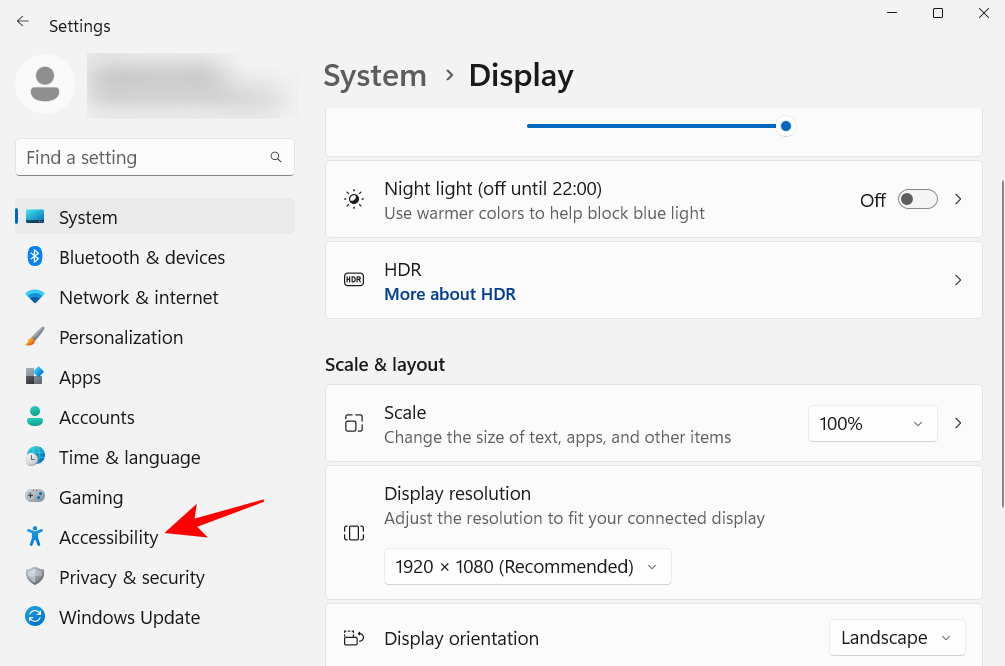
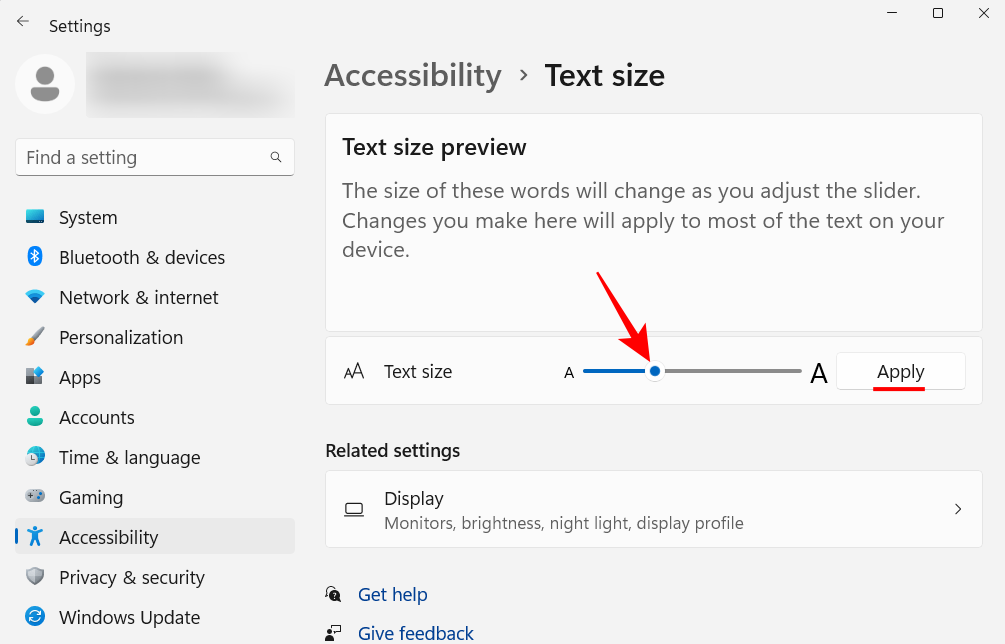
#To change the text size, click Accessibility in the left pane.
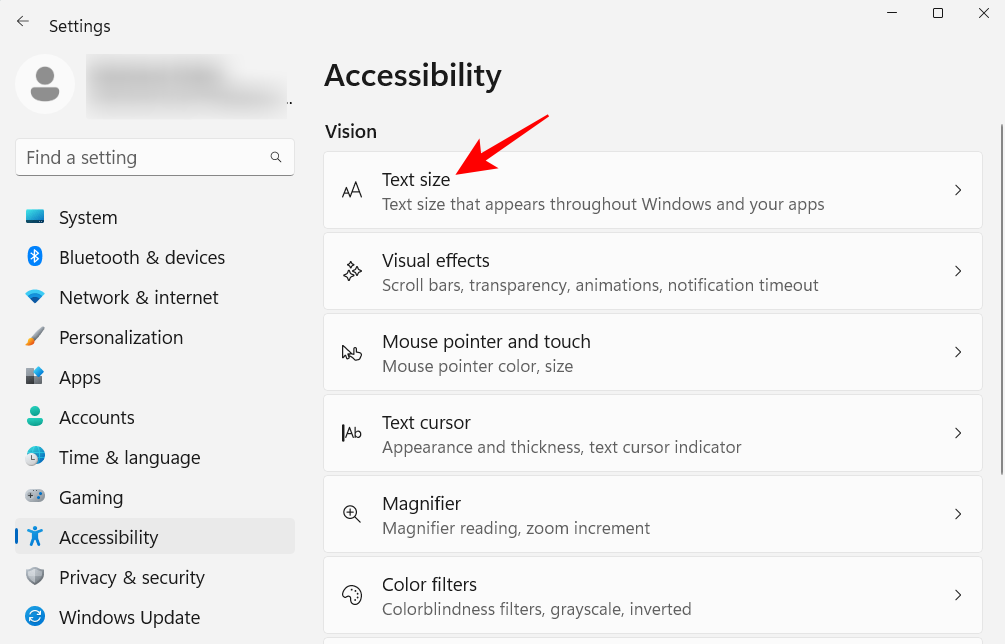
#Then select the text size on the right.
# Use the slider to change the text size. Then click Apply.
16. Disable Unnecessary Windows 11 Services
Windows automatically runs many services, either at startup or when they are called. But many of them are of no use to the average user. To save your system resources, it's best to turn them off. If you want to know which Windows 11 services need to be disabled and how to do so, check out our security tutorial.
17. Switch to the old right-click context menu
The new Windows 11 context menu has received mixed reviews at best. While the old context menu is still available via the "Show more options" button, this extra click is just an unnecessary hurdle to get rid of. However, switching to the old right-click context menu is not difficult. Here's how to do it:
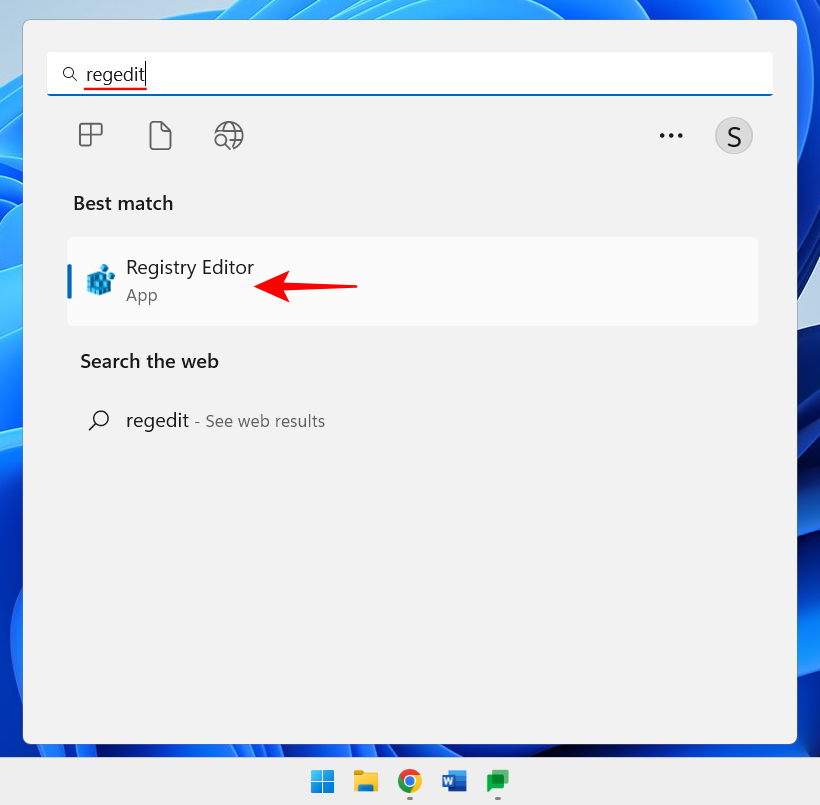
Press "Start", enter regedit, and then press Enter.
Copy the following address:
HKEY_CURRENT_USER\SOFTWARE\CLASSES\CLSID
and paste it into the registration in the address bar of the table editor.
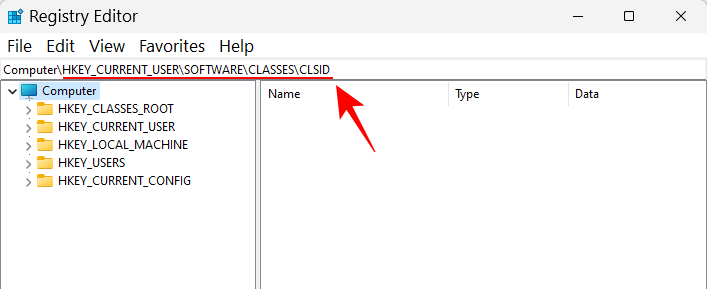
Then press Enter. Now, right-click on the CLSID key in the left pane, select New, and then select Key.
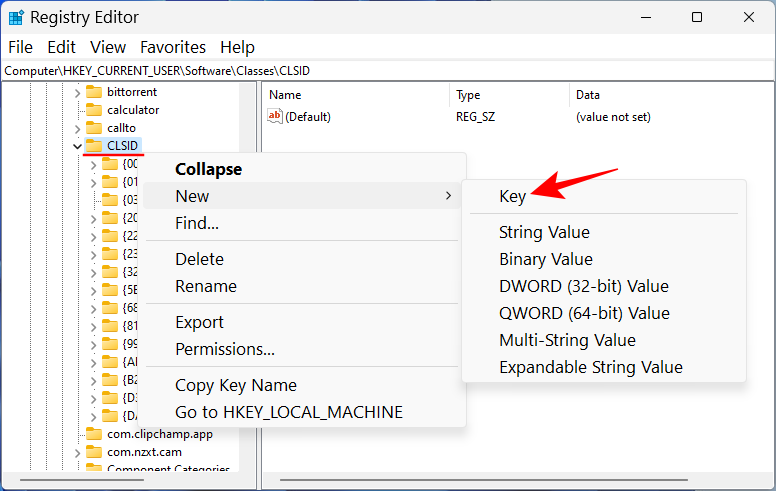
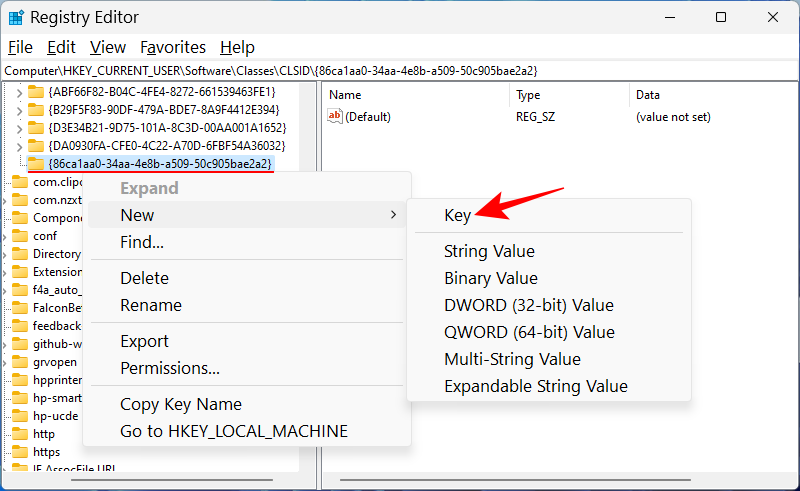
{86ca1aa0-34aa-4e8b-a509-50c905bae2a2}
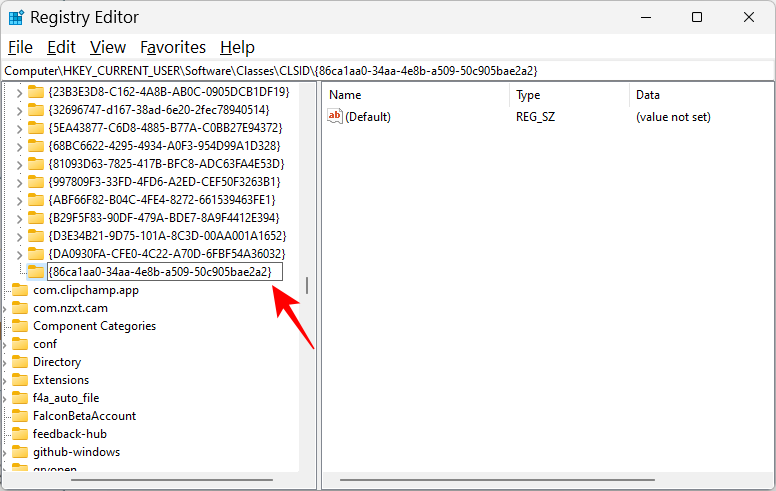
New, and then select Key to create a subkey.
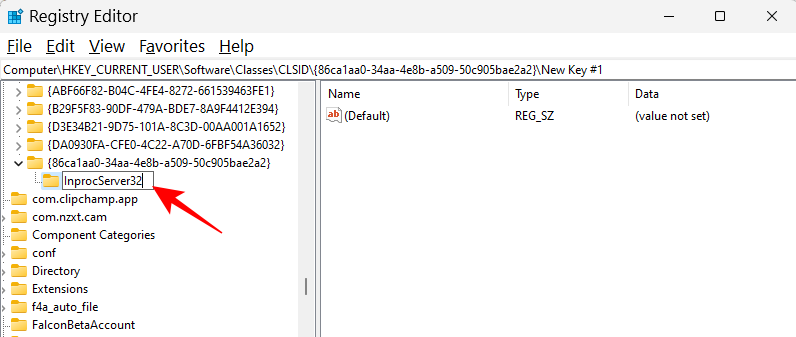
InprocServer32.
Double-click "Default" on the right and make sure the value data is left blank. Then click "OK".
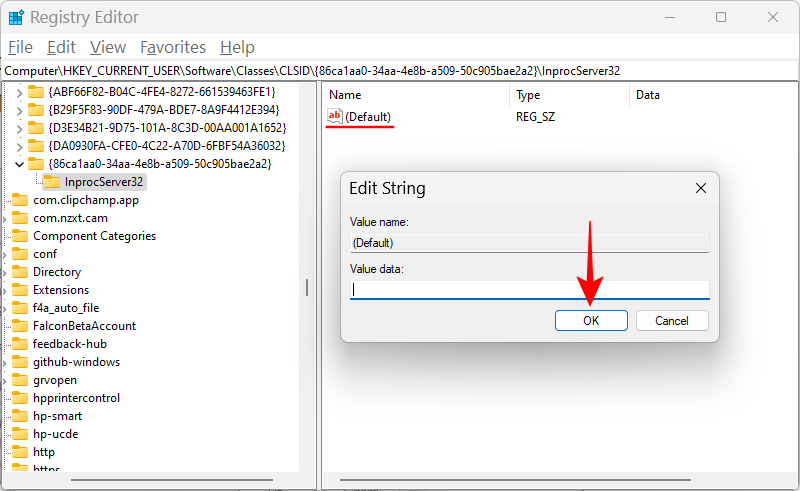
Now restart your PC to restore the old context menu.
18. Adjust visual effects for appearance or performance
Windows 11’s new look comes with animations and effects that may consume a lot of memory resources. If your system is lagging and freezing, disabling some of these effects can help.
Press Start, type "Adjust Appearance" and press Enter.
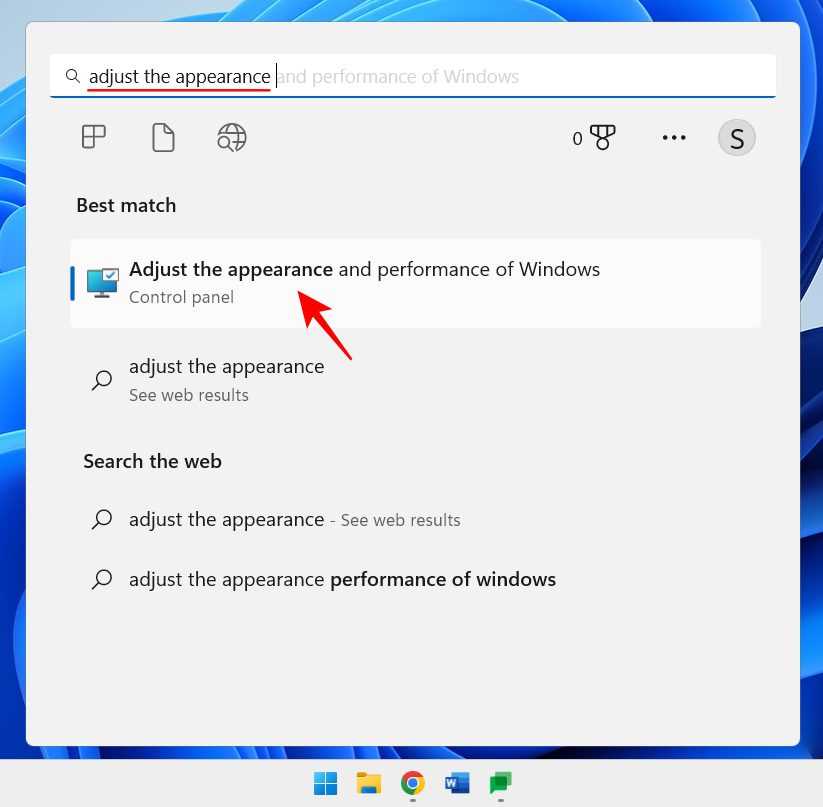
Here you can "Adjust for best appearance," "Adjust for best performance," or "Let Windows choose what's best for your computer."
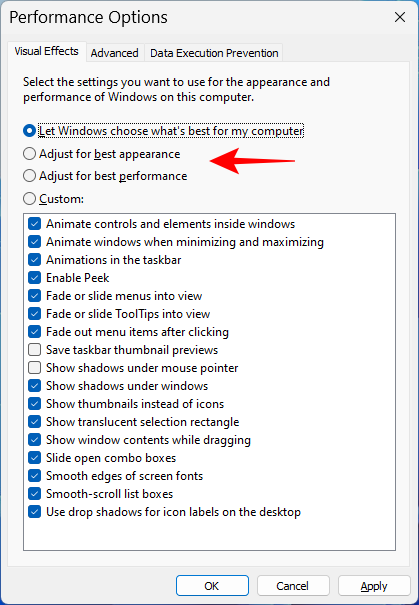
You can select "Customize" and check the options in the image below to keep the overall appearance good while avoiding resource starvation.
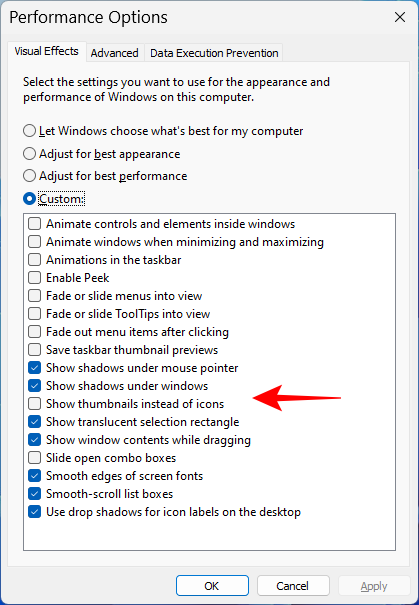
Then click "OK".
19. Change Windows Update settings
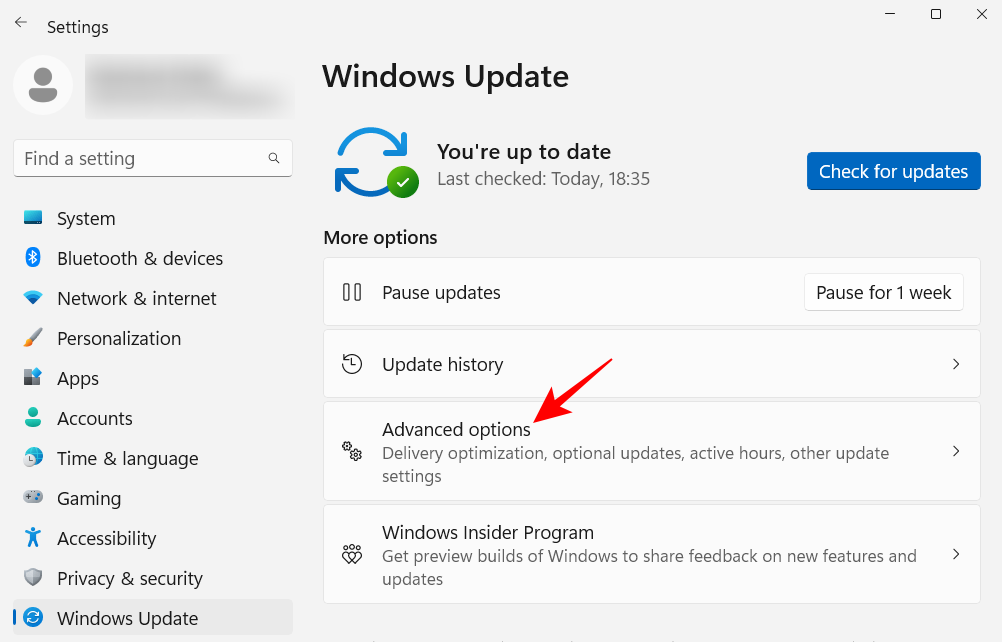
Windows will set Windows Update to notify you when a restart is required to complete the update. But such notifications can be intrusive, especially since some updates may actually take some time to complete, and restarting while you're at work may not be an option. To remove such update notifications, open the Settings app and click Windows Update in the left pane.
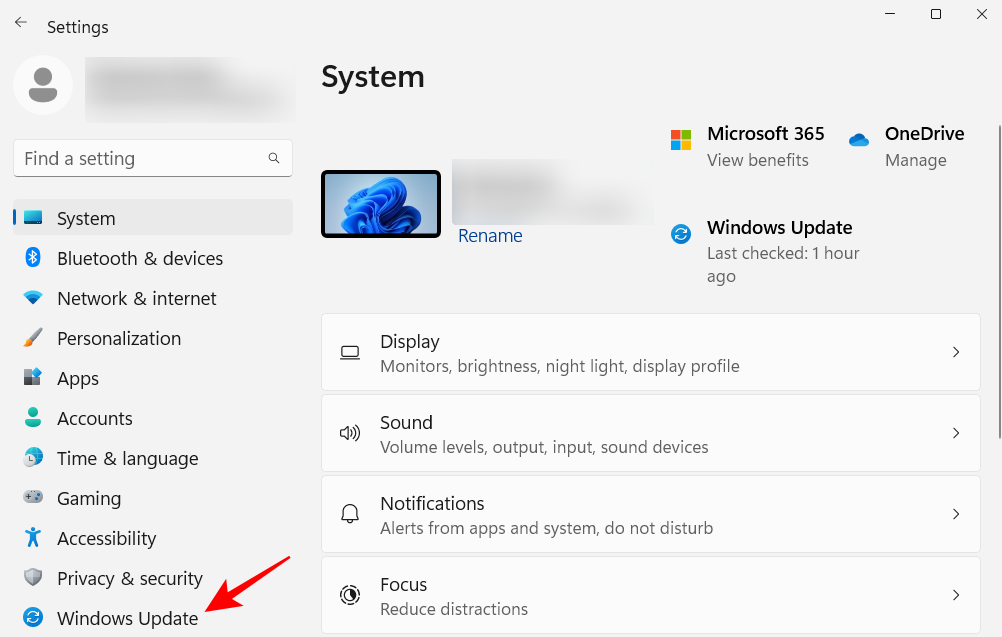
Select Advanced Options.
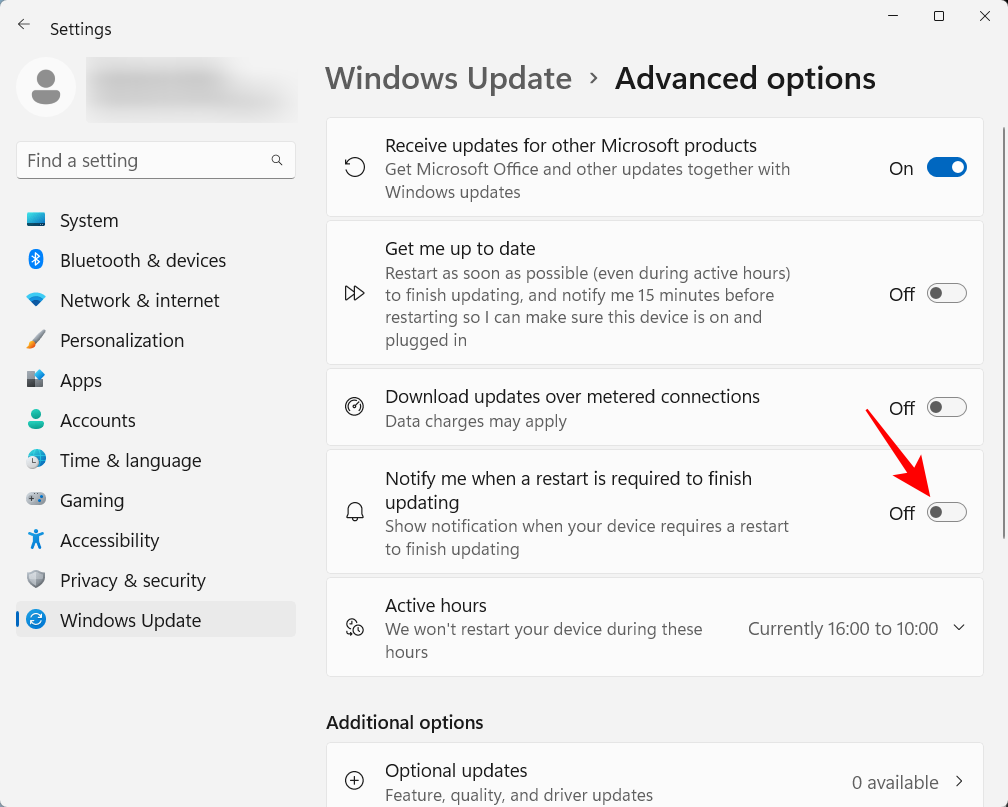
Here, close Notify me when a restart is required to finish updating.
20. Set up a local account
Setting up a local account on your system comes in handy when others need to use your computer. Here's how to do it: Open the Settings app and click Accounts in the left pane.
#Then scroll down and click 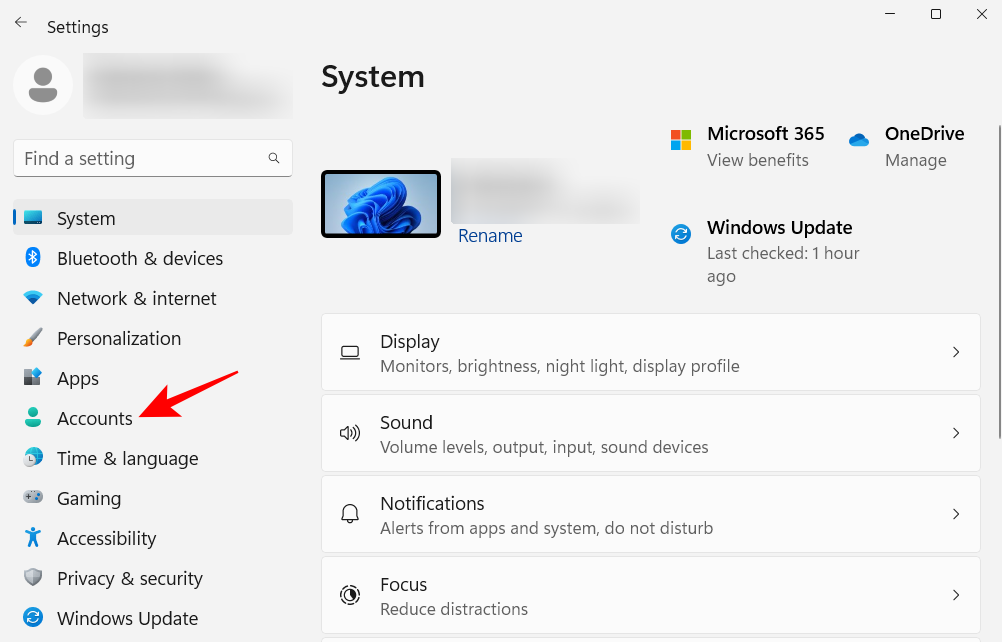 Other Users on the right.
Then click 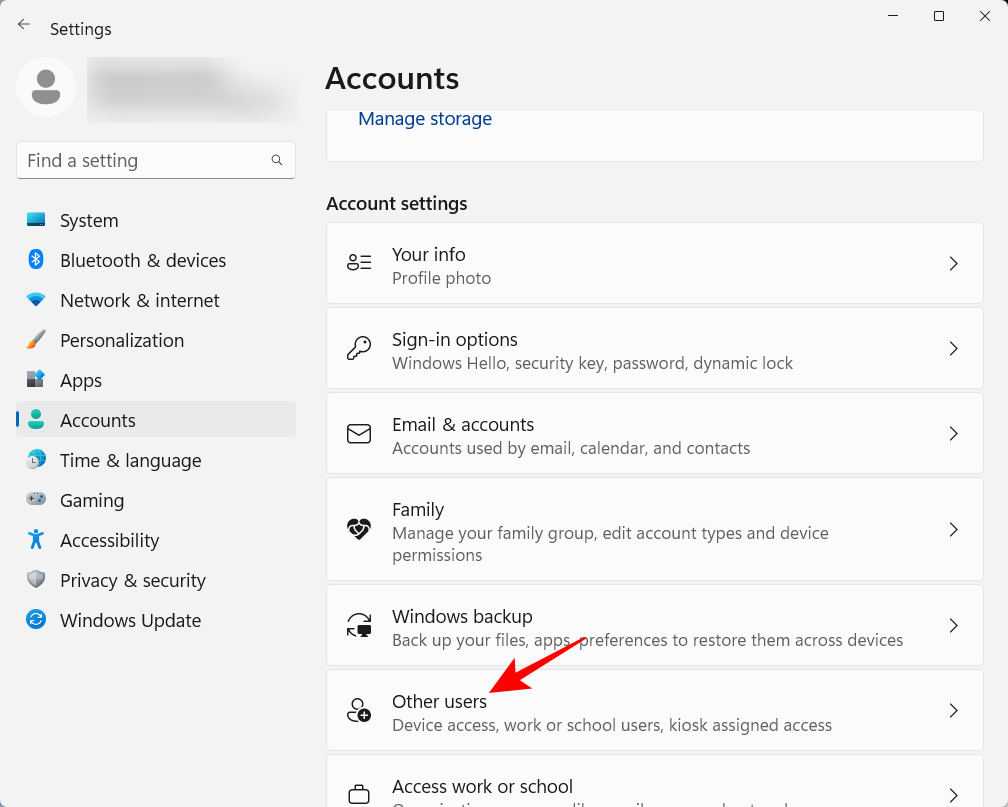 Add Account
Click 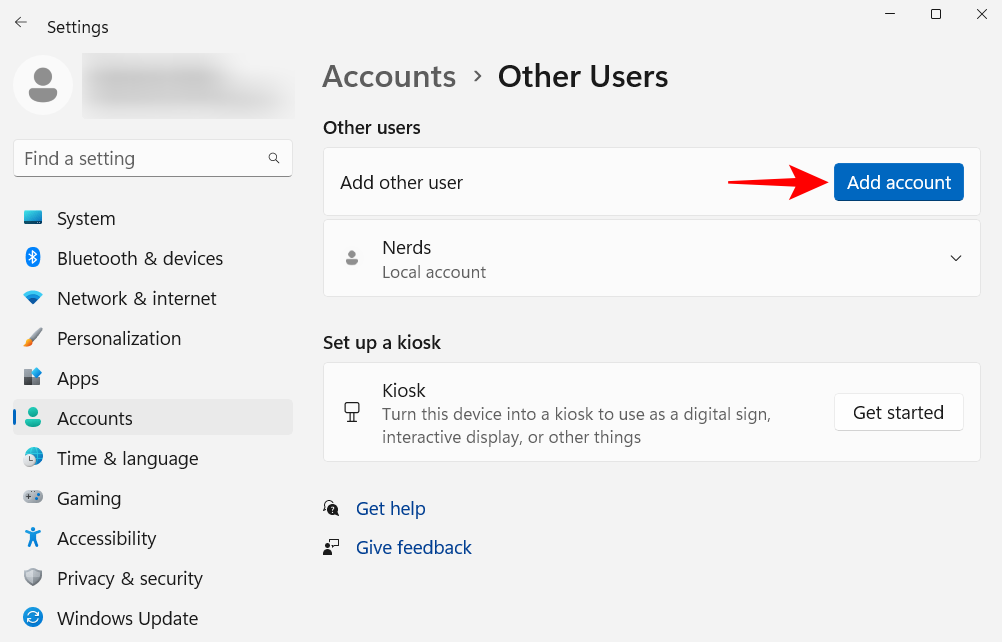 I don’t have login information for this person
On the next screen, click 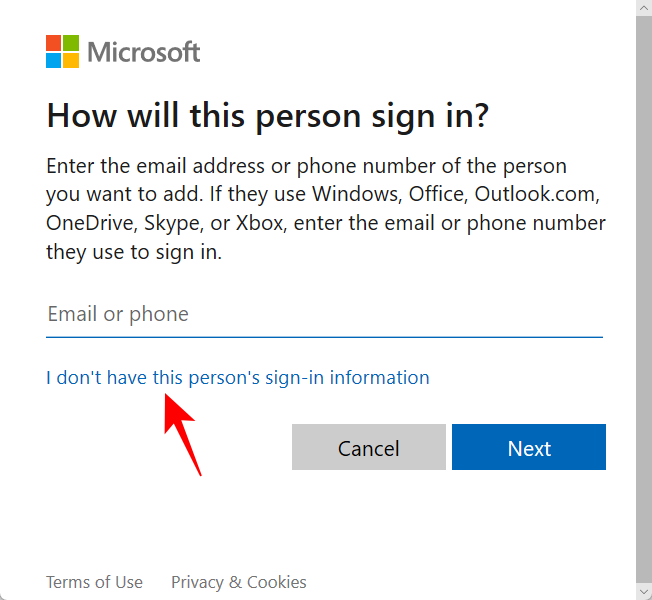 Add users without a Microsoft account
Enter your username and password and click 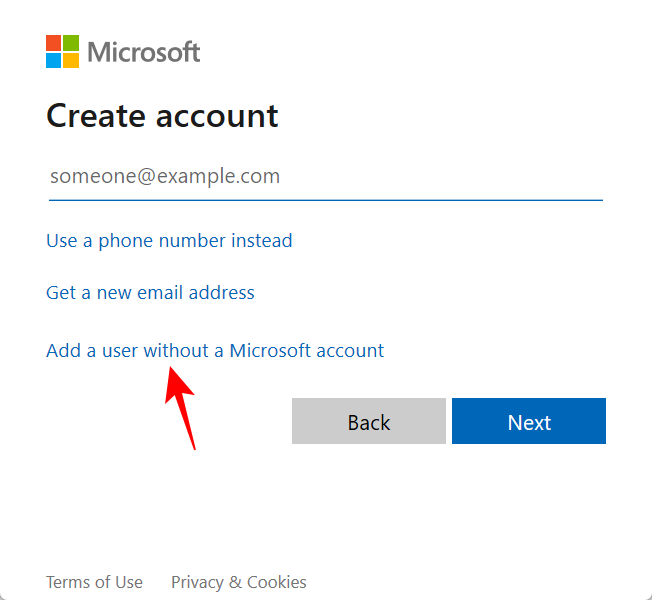 "Next"
Then select your security question and enter your answer. Then click 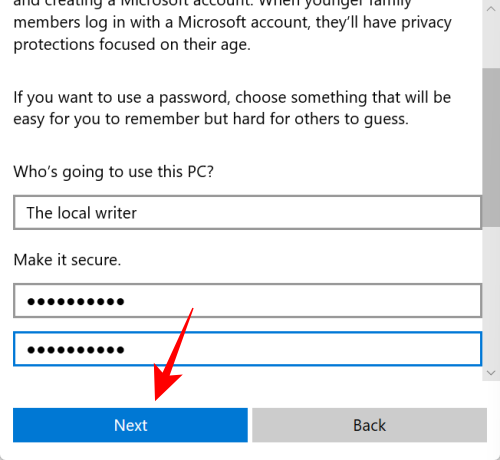 "Next"
That’s it, you’ve added another local account to your computer. 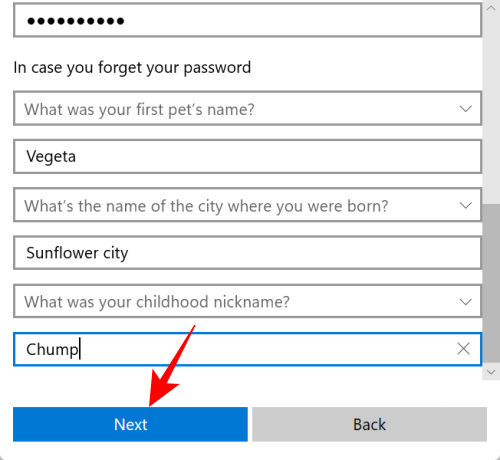
FAQ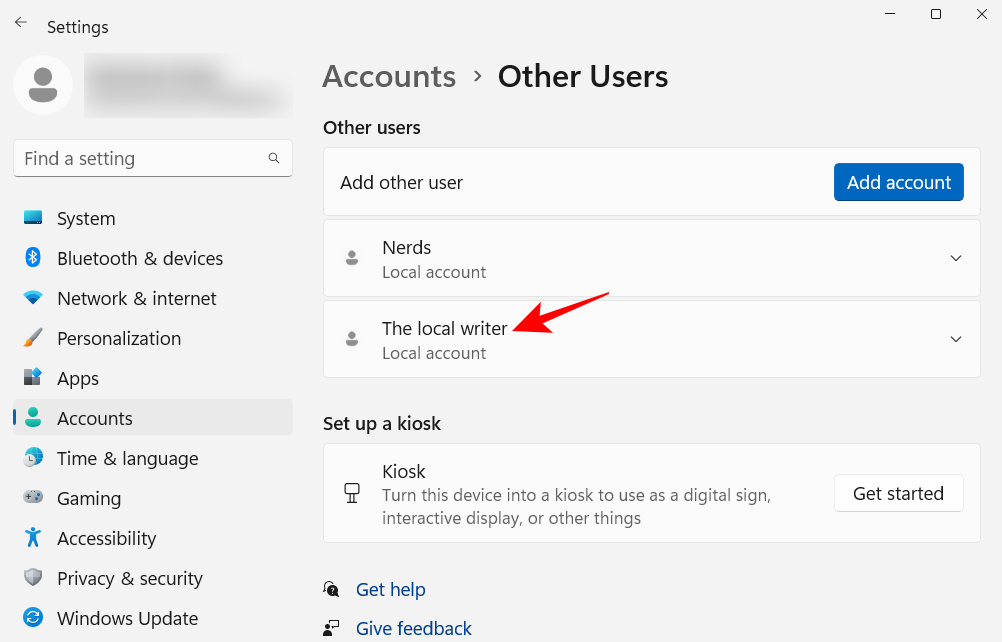
How to organize the Start menu in Windows 11?
You can change the layout of the Start menu, including organizing pins and recommendations sections, and add pins and system folders for faster access to them. See our tutorial above to learn how to organize your Start menu.
How to right-click "Always show more options" in Windows 11?
The "Show more options" button in the Windows 11 context menu opens the old context menu. To always get the old context menu, see our tutorial above.
How to change popular apps in Windows 11?
Other apps can easily replace the apps that appear at the top of the Start menu. Right-click an application in the Start menu and select Bring to Top.
The above is the detailed content of 20 ways to customize Windows 11: A step-by-step tutorial. For more information, please follow other related articles on the PHP Chinese website!

Hot AI Tools

Undresser.AI Undress
AI-powered app for creating realistic nude photos

AI Clothes Remover
Online AI tool for removing clothes from photos.

Undress AI Tool
Undress images for free

Clothoff.io
AI clothes remover

Video Face Swap
Swap faces in any video effortlessly with our completely free AI face swap tool!

Hot Article

Hot Tools

Notepad++7.3.1
Easy-to-use and free code editor

SublimeText3 Chinese version
Chinese version, very easy to use

Zend Studio 13.0.1
Powerful PHP integrated development environment

Dreamweaver CS6
Visual web development tools

SublimeText3 Mac version
God-level code editing software (SublimeText3)

Hot Topics
 What software is crystaldiskmark? -How to use crystaldiskmark?
Mar 18, 2024 pm 02:58 PM
CrystalDiskMark is a small HDD benchmark tool for hard drives that quickly measures sequential and random read/write speeds. Next, let the editor introduce CrystalDiskMark to you and how to use crystaldiskmark~ 1. Introduction to CrystalDiskMark CrystalDiskMark is a widely used disk performance testing tool used to evaluate the read and write speed and performance of mechanical hard drives and solid-state drives (SSD). Random I/O performance. It is a free Windows application and provides a user-friendly interface and various test modes to evaluate different aspects of hard drive performance and is widely used in hardware reviews
 What should I do if the Win7 taskbar does not display the icon? How to solve the problem of the computer taskbar icon disappearing
Jun 09, 2024 pm 01:49 PM
Recently, many users using Win7 system have found that the icons in the taskbar suddenly disappeared, which makes the operation very inconvenient and they do not know how to solve the problem. This article will introduce to you how to solve the problem of disappearing taskbar icons in Win7 system. Bar! Cause Analysis When encountering such a situation, there are generally two situations: one is that the taskbar on the computer does not really disappear, but is just hidden, and the other is that the taskbar does disappear. Method 1: 1. There is a situation that you need to confirm first, that is, when the mouse is placed at the bottom of the screen, the taskbar will be displayed. You can directly click the mouse on the taskbar and select "Properties". 2. In the dialog box that opens, click & on the "Hide taskbar" option.
 How to make the Win11 taskbar black? Introduction to how to set the black taskbar in Win11
Apr 22, 2024 pm 06:40 PM
Some friends also want the taskbar to turn black after changing the dark wallpaper on their computers, but they don’t know how to do it. Let’s take a look at the specific methods below! 1. Right-click an empty area in the taskbar and select "Taskbar Settings." 2. In the taskbar settings window, find the "Appearance" tab and click it. 3. Under the "Appearance" tab, find the "Taskbar Background" option and click the drop-down menu. 4. Select "Black". 5. Close the "Taskbar Settings" window. Taskbar beautification Xiaozhi Eye Protector is a very easy-to-use win11 transparent taskbar tool. It supports taskbar transparency, taskbar beautification, and multiple styles to beautify the taskbar interface, making your computer interface more beautiful. Xiaozhi Eye Protector Eye Baby (click to download now) Xiaozhi Eye Protection
 How to solve the problem that the win11 taskbar does not respond when clicked/cannot be used
May 09, 2024 pm 06:43 PM
After upgrading to Windows 11 system, many users encountered the problem that the taskbar cannot be clicked, which has a great impact on life and work. So how to solve it specifically? Let’s take a look below! Method 1 1. First, we press the Ctrl+Shift+Esc shortcut keys on the keyboard to open the Task Manager. 2. Then click File in the upper left corner and select Run New Task. 3. After opening it, enter control and press Enter to enter the control panel. 4. Find the time and area and choose to change the date and time. 5. Change the time to September 4 or later, turn off automatic time synchronization after the setting is completed, and then restart the computer. 6. After restarting, re-enter the time settings and come to the internet time selection.
 CrystalDiskinfo usage tutorial-What software is CrystalDiskinfo?
Mar 18, 2024 pm 04:50 PM
CrystalDiskInfo is a software used to check computer hardware devices. In this software, we can check our own computer hardware, such as reading speed, transmission mode, interface, etc.! So in addition to these functions, how to use CrystalDiskInfo and what exactly is CrystalDiskInfo? Let me sort it out for you! 1. The Origin of CrystalDiskInfo As one of the three major components of a computer host, a solid-state drive is the storage medium of a computer and is responsible for computer data storage. A good solid-state drive can speed up file reading and affect consumer experience. When consumers receive new devices, they can use third-party software or other SSDs to
 How to solve the problem that the taskbar cannot be resized in Windows 11 system
Apr 17, 2024 pm 06:40 PM
Recently, some Windows 11 users have found that the size of the taskbar cannot be freely scaled according to personal preferences, especially when they want to increase or decrease the size of the taskbar. In order to solve the troubles faced by these users, this article will focus on the problem that the taskbar size cannot be adjusted in Windows 11 system and provide relevant solutions. Operation method 1. Click Start in the taskbar in the lower left corner, enter "Registry Editor" in the search box above and open it. 2. After entering the new interface, click "HKEY_CURRENT_USERSoftwareMicrosoftWindowsCurrentVersionExpl" in the left column
 How to set the Win11 taskbar to be fully transparent? Detailed guide to setting up 100% transparency for the Win11 taskbar
May 09, 2024 pm 01:22 PM
Windows 11 is the latest operating system launched by Microsoft. It adopts a new interface design and interaction method. Many users will habitually set the taskbar to be fully transparent. So how should they do it? Let’s take a look below! Basic settings 1. Right-click a blank space on the taskbar and select "Taskbar Settings". 2. In the "Personalization" tab, find the "Theme" option. 3. Scroll to the bottom and find the "Transparency" option. 4. Adjust the "Transparency" slider to the far right to set the taskbar to be fully transparent. The third-party tool Xiaozhi Eye Protection is an efficient eye protection software that effectively filters screen blue light. Compared with Eye Protection Wizard and Eye Protection Guardian, we provide a variety of eye protection color adjustments to meet the needs of color-sensitive groups at all times of the day. Eye protection requirements
 What should I do if the Win11 taskbar does not display the time? Introduction to the most effective solutions
May 09, 2024 pm 01:13 PM
The win11 taskbar is very unique. Many users will also adjust the transparency of the taskbar to beautify the taskbar. However, they don’t know what to do when the win11 taskbar does not display the time? Let’s take a look below! 1. Restart Windows 11: Sometimes, restarting the system can solve the taskbar display problem. 2. Check the taskbar settings: right-click an empty space on the taskbar and select "Taskbar Settings". Make sure the "Show time" option is enabled. If it's not enabled, toggle the switch to enable it. 3. Check your date and time settings: Open the Settings app, select Time & Language, then select Date & Time. Make sure the date, time and time zone are set correctly. 4. Update operating system: Make sure your Wind


