As a web developer, I have been working with the HTML5 canvas element. Rendering images is a big branch that is very important and commonly used. Therefore, today’s tutorial is about canvas image display and how to rotate images. Maybe it is a good thing you really want now.
In general, there are two ways to rotate canvas: center rotation and reference point rotation. Proficient application of the rotation function will be of great help to your development works.
About the center rotation of the object
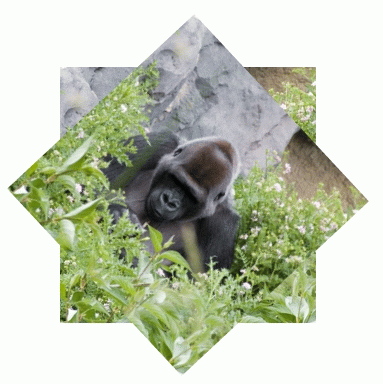
The first type of rotation, we want to look at rotating an object about its center. Implemented using the canvas element, which is the simplest type of rotation. We used a picture of a gorilla as material for our experiment.
The basic idea is that we need to rotate the canvas around a center point, rotate the canvas, and then return the canvas to its original position. If you have some experience with graphics engines, then this should sound familiar. The code is probably like this: (Click to see the effect)
JavaScript CodeCopy content to clipboard
- function onload() {
-
var canvas = document.getElementById('c1');
-
var ctx1 = canvas.getContext('2d');
-
var image1 = new Image();
-
image1.onload = function() {
-
-
var xpos = canvas.width/2;
-
var ypos = canvas.height/2;
- ctx1.drawImage(image1, xpos - image1.width / 2, ypos - image1.height / 2);
- ctx1.save();
- ctx1.translate(xpos, ypos);
-
ctx1.rotate(47 * Math.PI / 180);
- ctx1.translate(-xpos, -ypos);
- ctx1.drawImage(image1, xpos - image1.width / 2, ypos - image1.height / 2);
- ctx1.restore();
- }
-
image1.src = 'image.png';
- }

The comments are already very detailed, but I still want to mention one thing: .save() and .restore(). Their purpose is to save the canvas as it was before the rotation and then restore it after the rotation. It is very important to effectively avoid conflicts with other renderings. Many friends have not been able to rotate smoothly, mostly due to this reason.
Rotate around a certain point
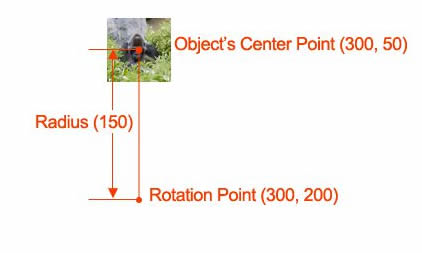
The second type is to rotate the image around a certain point in space, which will become more complicated. But why do this? In many cases, you need to rotate an object with reference to another object, and a single rotation around the center cannot meet the needs. And the latter is more commonly used. For example, in web games, rotation is often used.

JavaScript CodeCopy content to clipboard
- function onload() {
-
var canvas2 = document.getElementById('c2');
-
var ctx2 = canvas2.getContext('2d');
-
-
var image2 = new Image();
-
image2.onload = function() {
-
-
var angle = 120 * Math.PI / 180;
-
var rx = 300, ry = 200;
-
var px = 300, py = 50;
-
var radius = ry - py;
-
var dx = rx radius * Math.sin(angle);
-
var dy = ry - radius * Math.cos(angle);
- ctx2.drawImage(image2, 300 - image2.width / 2, 50 - image2.height / 2);
- ctx2.beginPath();
-
ctx2.arc(300,200,5,0,Math.PI*2,false);
- ctx2.closePath();
-
ctx2.fillStyle = 'rgba(0,255,0,0.25)';
- ctx2.fill();
-
- ctx2.save();
- ctx2.translate(dx, dy);
- ctx2.rotate(angle);
- ctx2.translate(-dx, -dy);
- ctx2.drawImage(image2, dx - image2.width / 2, dy - image2.height / 2);
- ctx2.restore();
- }
-
image2.src = 'smallimage.png';
- }

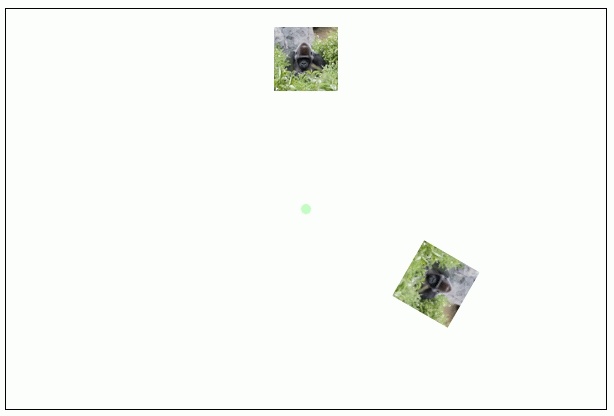
The code is simple, and its function is to rotate a picture 120 degrees according to a point, making the picture more vivid.
Drawing a magical logo
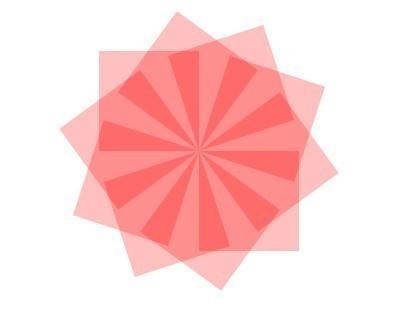
This is a logo I saw on Du Niang. I cleverly used rotation transformation. I used a very simple rectangle and transformed it into a very beautiful logo through rotation transformation. . Isn’t this logo very magical? Children's shoes use their brains and try to realize it. Below, provide the code I used to implement it.
JavaScript CodeCopy content to clipboard
-
- "zh">
-
- "UTF-8">
- 绘制魔性Logo
-
-
-
"canvas-warp">
-
- 你的浏览器居然不支持Canvas?!赶快换一个吧!!
-
-
- <script> </span></li>
<li class="alt">
<span> window.onload = </span><span class="keyword">function</span><span>(){ </span>
</li>
<li>
<span> </span><span class="keyword">var</span><span> canvas = document.getElementById(</span><span class="string">"canvas"</span><span>); </span>
</li>
<li class="alt"><span> canvas.width = 800; </span></li>
<li><span> canvas.height = 600; </span></li>
<li class="alt">
<span> </span><span class="keyword">var</span><span> context = canvas.getContext(</span><span class="string">"2d"</span><span>); </span>
</li>
<li>
<span> context.fillStyle = </span><span class="string">"#FFF"</span><span>; </span>
</li>
<li class="alt"><span> context.fillRect(0,0,800,600); </span></li>
<li><span> </span></li>
<li class="alt">
<span> </span><span class="keyword">for</span><span>(</span><span class="keyword">var</span><span> i=1; i<=10; i ){ </span></li>
<li><span> context.save(); </span></li>
<li class="alt"><span> context.translate(400,300); </span></li>
<li><span> context.rotate(36 * i * Math.PI / 180); </span></li>
<li class="alt"><span> context.fillStyle = </span><span class="string">"rgba(255,0,0,0.25)"</span><span>; </span></li>
<li><span> context.fillRect(0, -200, 200, 200); </span></li>
<li class="alt"><span> context.restore(); </span></li>
<li><span> } </span></li>
<li class="alt"><span> }; </span></li>
<li><span></script>
-
-
运行结果:

是不是非常的酷?这个图形稍微分析一下发现还是蛮简单的,就是让一个正放形,以屏幕中点(即初始正方形左下角顶点)为圆心进行旋转。
艺术是不是很美妙?大家一定以及体会到了Canvas的奇妙,简简单单的几行代码就能实现无穷无尽的效果。只要脑洞够大,没有什么是不可以实现的。所以,扬起咱们的艺术家的旗帜,加快步伐,继续前进!


