How to implement SMS login in Redis shared session application


1. Implement SMS login based on session
1.1 SMS login flow chart
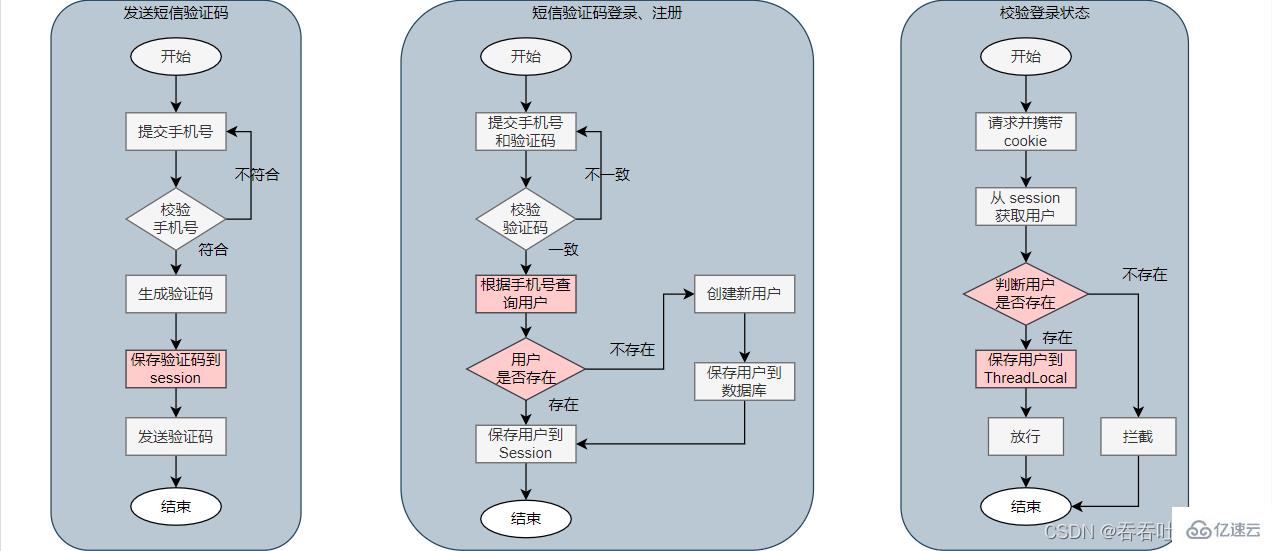
1.2 Implementation of sending SMS verification code
Front-end request instructions:
| POST | |
| /user/code | |
| phone (phone number) | |
| None |
@Slf4j
@Service
public class UserServiceImpl extends ServiceImpl<UserMapper, User> implements IUserService {

    @Override
    public Result sendCode(String phone, HttpSession session) {
        // 1. 校验手机号
        if(RegexUtils.isPhoneInvalid(phone)){
            // 2. 如果不符合,返回错误信息
            return Result.fail("手机号格式错误!");
        }
        // 3. 符合,生成验证码(设置生成6位)
        String code = RandomUtil.randomNumbers(6);
        // 4. 保存验证码到 session
        session.setAttribute("code", code);
        // 5. 发送验证码(这里并未实现,通过日志记录)
        log.debug("发送短信验证码成功,验证码:{}", code);
        // 返回 ok
        return Result.ok();
    }
}| POST | |
| / user/login | |
| phone (phone number); code (verification code) | |
| None |
@Slf4j
@Service
public class UserServiceImpl extends ServiceImpl<UserMapper, User> implements IUserService {

    @Override
    public Result login(LoginFormDTO loginForm, HttpSession session) {
        // 1. 校验手机号
        String phone = loginForm.getPhone();
        if(RegexUtils.isPhoneInvalid(phone)){
            // 不一致,返回错误信息
            return Result.fail("手机号格式错误!");
        }
        // 2. 校验验证码
        String cacheCode = (String) session.getAttribute("code");
        String code = loginForm.getCode();
        if(cacheCode == null || !cacheCode.equals(cacheCode)){
            // 不一致,返回错误信息
            return Result.fail("验证码错误!");
        }
        // 4. 一致,根据手机号查询用户(这里使用的 mybatis-plus)
        User user = query().eq("phone", phone).one();
        // 5. 判断用户是否存在
        if(user == null){
            // 6. 不存在,创建新用户并保存
            user = createUserWithPhone(phone);
        }
        	// 7. 保存用户信息到 session 中(通过 BeanUtil.copyProperties 方法将 user 中的信息过滤到 UserDTO 上,即用来隐藏部分信息)
        session.setAttribute("user", BeanUtil.copyProperties(user, UserDTO.class));
        return Result.ok();
    }

    private User createUserWithPhone(String phone) {
        // 1. 创建用户
        User user = new User();
        user.setPhone(phone);
        user.setNickName("user_" + RandomUtil.randomString(10));
        // 2. 保存用户(这里使用 mybatis-plus)
        save(user);
        return user;
    }
}public class LoginInterceptor implements HandlerInterceptor {
@Override
public boolean preHandle(HttpServletRequest request, HttpServletResponse response, Object handler) throws Exception {
// 1. 获取 session
HttpSession session = request.getSession();
// 2. 获取 session 中的用户
UserDTO user = (UserDTO) session.getAttribute("user");
// 3. 判断用户是否存在
if(user == null){
// 4. 不存在,拦截,返回 401 未授权
response.setStatus(401);
return false;
}
// 5. 存在,保存用户信息到 ThreadLocal
UserHolder.saveUser(user);
// 6. 放行
return true;
}
@Override
public void afterCompletion(HttpServletRequest request, HttpServletResponse response, Object handler, Exception ex) throws Exception {
// 移除用户,避免内存泄露
UserHolder.removeUser();
}
}public class UserHolder {
private static final ThreadLocal<UserDTO> tl = new ThreadLocal<>();
public static void saveUser(UserDTO user){
tl.set(user);
}
public static UserDTO getUser(){
return tl.get();
}
public static void removeUser(){
tl.remove();
}
}@Configuration
public class MvcConfig implements WebMvcConfigurer {
@Override
public void addInterceptors(InterceptorRegistry registry) {
registry.addInterceptor(new LoginInterceptor())
.excludePathPatterns(
"/user/login",
"/user/code"
);
}
}| POST | |
| /user/me | |
| None | |
| None |
@Slf4j
@Service
public class UserServiceImpl extends ServiceImpl<UserMapper, User> implements IUserService {
@Override
public Result me() {
UserDTO user = UserHolder.getUser();
return Result.ok(user);
}
}- Data sharing (different tomcats can access data in Redis)
- Memory storage (Redis stores through memory)
- key, value structure (Redis is a key-value structure)
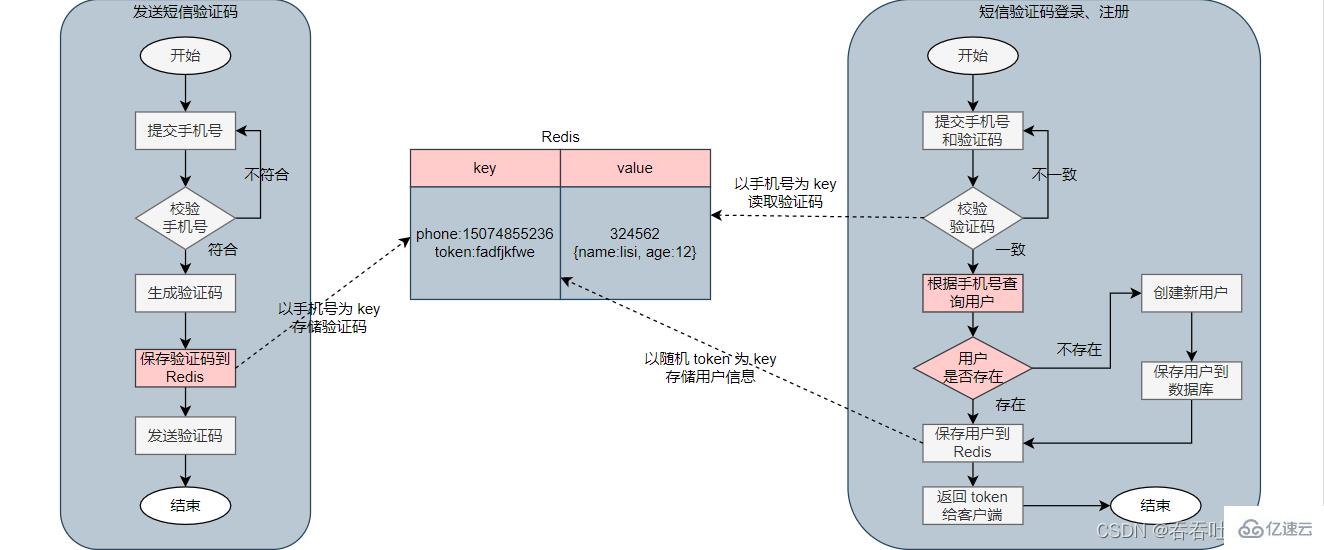
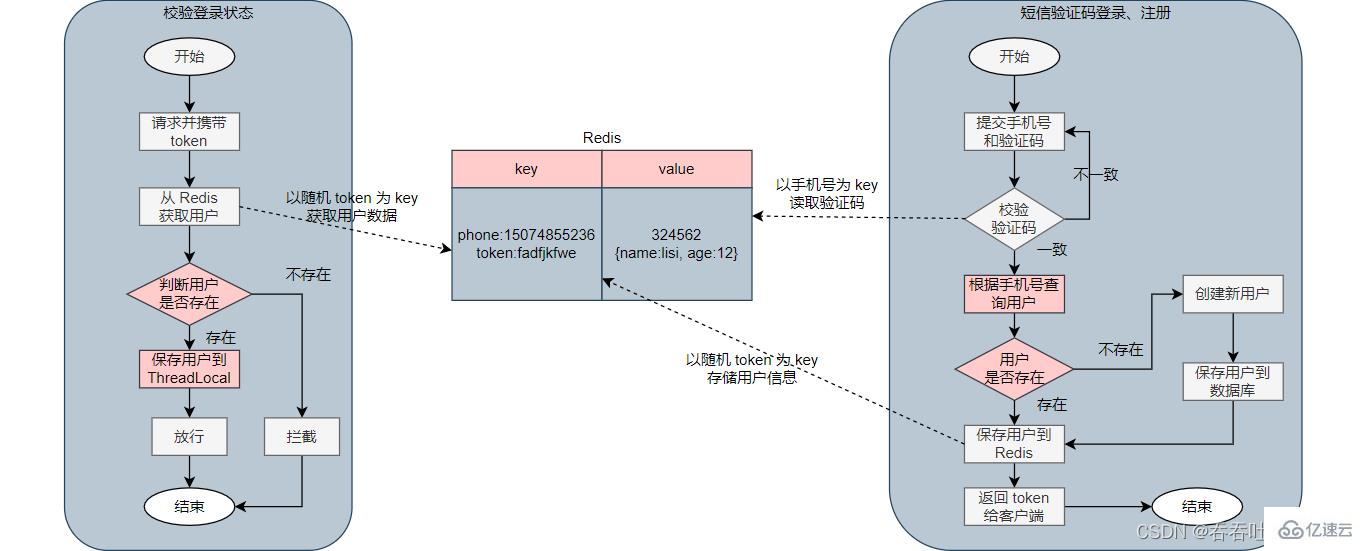
3.1 Redis implements shared session login flow chart
 ##3.2 Implement sending SMS verification code
Front-end request instructions:
Instructions | |
|---|---|
| POST | |
| /user/code | |
| phone(phone number) | |
| None |
@Slf4j
@Service
public class UserServiceImpl extends ServiceImpl<UserMapper, User> implements IUserService {
@Resource
private StringRedisTemplate stringRedisTemplate;
@Override
public Result sendCode(String phone, HttpSession session) {
// 1. 校验手机号
if (RegexUtils.isPhoneInvalid(phone)) {
// 2. 如果不符合,返回错误信息
return Result.fail("手机号格式错误!");
}
// 3. 符合,生成验证码(设置生成6位)
String code = RandomUtil.randomNumbers(6);
// 4. 保存验证码到 Redis(以手机号为 key,设置有效期为 2min)
stringRedisTemplate.opsForValue().set("login:code:" + phone, code, 2, TimeUnit.MINUTES);
// 5. 发送验证码(这里并未实现,通过日志记录)
log.debug("发送短信验证码成功,验证码:{}", code);
// 返回 ok
return Result.ok();
}
}3.3 Implement SMS verification code login and registration
Front-end request instructions:
Description | |
|---|---|
| POST | |
| /user/login | |
| phone (phone number); code (verification code) | ##Return value |
public class RefreshTokenInterceptor implements HandlerInterceptor {
private StringRedisTemplate stringRedisTemplate;
public RefreshTokenInterceptor(StringRedisTemplate stringRedisTemplate){
this.stringRedisTemplate = stringRedisTemplate;
}
@Override
public boolean preHandle(HttpServletRequest request, HttpServletResponse response, Object handler) throws Exception {
// 1. 获取请求头中的 token
String token = request.getHeader("authorization");
if (StrUtil.isBlank(token)) {
return true;
}
// 2. 基于 token 获取 redis 中的用户
String tokenKey = "login:token:" + token;
Map<Object, Object> userMap = stringRedisTemplate.opsForHash().entries(tokenKey);
// 3. 判断用户是否存在
if (userMap.isEmpty()) {
return true;
}
// 5. 将查询到的 Hash 数据转为 UserDTO 对象
UserDTO user = BeanUtil.fillBeanWithMap(userMap, new UserDTO(), false);
// 6. 存在,保存用户信息到 ThreadLocal
UserHolder.saveUser(user);
// 7. 刷新 token 有效期 30 min
stringRedisTemplate.expire(tokenKey, 30, TimeUnit.MINUTES);
// 8. 放行
return true;
}
}public class LoginInterceptor implements HandlerInterceptor {
@Override
public boolean preHandle(HttpServletRequest request, HttpServletResponse response, Object handler) throws Exception {
// 1. 获取 session
HttpSession session = request.getSession();
// 2. 获取 session 中的用户
UserDTO user = (UserDTO) session.getAttribute("user");
// 3. 判断用户是否存在
if(user == null){
// 4. 不存在,拦截,返回 401 未授权
response.setStatus(401);
return false;
}
// 5. 存在,保存用户信息到 ThreadLocal
UserHolder.saveUser(user);
// 6. 放行
return true;
}
@Override
public void afterCompletion(HttpServletRequest request, HttpServletResponse response, Object handler, Exception ex) throws Exception {
// 移除用户,避免内存泄露
UserHolder.removeUser();
}
}
public class UserHolder {
    private static final ThreadLocal<UserDTO> tl = new ThreadLocal<>();

    public static void saveUser(UserDTO user){
        tl.set(user);
    }

    public static UserDTO getUser(){
        return tl.get();
    }

    public static void removeUser(){
        tl.remove();
    }
}@Configuration
public class MvcConfig implements WebMvcConfigurer {
@Resource
private StringRedisTemplate stringRedisTemplate;
@Override
public void addInterceptors(InterceptorRegistry registry) {
registry.addInterceptor(new RefreshTokenInterceptor(stringRedisTemplate))
.addPathPatterns("/**").order(0);
registry.addInterceptor(new LoginInterceptor())
.excludePathPatterns(
"/user/login",
"/user/code"
).order(1);
}
}| Description | Request method |
|---|---|
| Request path | |
| Request parameters | |
| Return value | |