

What is the SpringSecurity+Redis authentication process?

Introduction to the introduction
The popular technology stack combination used for permission management on the market today is
ssm shrio
SpringCloud SpringBoot SpringSecurity
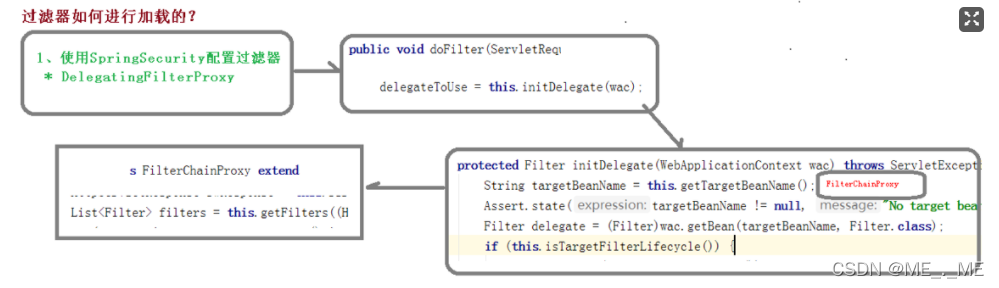
This combination naturally has its own matching characteristics. Due to SpringBoot's automatic injection configuration principle, it is automatically injected when the project is created. Manage SpringSecurity's filter container (DelegatingFilterProxy), and this filter is the core of the entire SpringSercurity. Masters the entire permission authentication process of SpringSercurity, and SpringBoot helps you automatically inject it into . Using ssm
to integrate Security will consume a lot of configuration files and is not easy to develop. Security's microservice permission scheme can be perfectly integrated with Cloud, so Security is more powerful and more complete than Shrio.
Security’s core configuration file
Core: Class SecurityConfig extends WebSecurityConfigurerAdapter
After inheriting WebSecurityConfigurerAdapter, we focus on the configure method For related configurations in the entire security authentication process, of course, before configuring, we will briefly understand the process
After briefly looking at the entire authority authentication process, it is easy to conclude that the core of SpringSecurity is as follows Several configuration items
Interceptor
Filter
Handler (Handler, exception handler, login success handler)
Then let’s complete the authentication process through configuration first! ! ! !
Security’s authentication process
Suppose we want to implement the following authentication function
1. It is a login request
We need to first determine whether the verification code is correct (verification code filter, implement pre-interception through addFilerbefore)
, and then determine whether the username and password are correct (use the built-in username and password filter , UsernamePasswordAuthenticationFilter)
Configure the exception handler (Handler) to write out the exception information through the IO stream
About password Verification process:
The password verification rules of UsernamePasswordAuthenticationFilter are verified based on the rules in UserDetailsService under AuthenticationManagerBuilder (Authentication Manager):
The core method:
1.public UserDetails *loadUserByUsername(String username)
Go to the database to query whether it exists through the username of the request parameter. If it exists, it will be encapsulated in UserDetails, and the verification process is to obtain the username and password in UserDetail through AuthenticationManagerBuilder To verify,
so that we can configure the yaml file to set the account password through
Set the account through the database combined with UserDetail Password
(Method in UserDetailsService, note that UserDetailsService needs to be injected into AuthenticationManagerBuilder)
	@Override
	public UserDetails loadUserByUsername(String username) throws UsernameNotFoundException {
		SysUser sysUser = sysUserService.getByUsername(username);
		if (sysUser == null) {
			throw new UsernameNotFoundException("用户名或密码不正确");
		}
		// 注意匹配参数,前者是明文后者是暗纹
		System.out.println("是否正确"+bCryptPasswordEncoder.matches("111111",sysUser.getPassword()));
		return new AccountUser(sysUser.getId(), sysUser.getUsername(), sysUser.getPassword(), getUserAuthority(sysUser.getId()));
}After passing this verification, the filter will be allowed, otherwise use custom Or the default processor handles
Core configuration file:
package com.markerhub.config;

import com.markerhub.security.*;
import org.springframework.beans.factory.annotation.Autowired;
import org.springframework.context.annotation.Bean;
import org.springframework.context.annotation.Configuration;
import org.springframework.security.config.annotation.authentication.builders.AuthenticationManagerBuilder;
import org.springframework.security.config.annotation.method.configuration.EnableGlobalMethodSecurity;
import org.springframework.security.config.annotation.web.builders.HttpSecurity;
import org.springframework.security.config.annotation.web.configuration.EnableWebSecurity;
import org.springframework.security.config.annotation.web.configuration.WebSecurityConfigurerAdapter;
import org.springframework.security.config.http.SessionCreationPolicy;
import org.springframework.security.crypto.bcrypt.BCryptPasswordEncoder;
import org.springframework.security.web.authentication.UsernamePasswordAuthenticationFilter;

@Configuration
@EnableWebSecurity
@EnableGlobalMethodSecurity(prePostEnabled = true)
public class SecurityConfig extends WebSecurityConfigurerAdapter {

	@Autowired
	LoginFailureHandler loginFailureHandler;

	@Autowired
	LoginSuccessHandler loginSuccessHandler;

	@Autowired
	CaptchaFilter captchaFilter;

	@Autowired
	JwtAuthenticationEntryPoint jwtAuthenticationEntryPoint;

	@Autowired
	JwtAccessDeniedHandler jwtAccessDeniedHandler;

	@Autowired
	UserDetailServiceImpl userDetailService;

	@Autowired
	JwtLogoutSuccessHandler jwtLogoutSuccessHandler;

	@Bean
	JwtAuthenticationFilter jwtAuthenticationFilter() throws Exception {
		JwtAuthenticationFilter jwtAuthenticationFilter = new JwtAuthenticationFilter(authenticationManager());
		return jwtAuthenticationFilter;
	}

	@Bean
	BCryptPasswordEncoder bCryptPasswordEncoder() {
		return new BCryptPasswordEncoder();
	}

	private static final String[] URL_WHITELIST = {

			"/login",
			"/logout",
			"/captcha",
			"/favicon.ico",

	};


	protected void configure(HttpSecurity http) throws Exception {

		http.cors().and().csrf().disable()

				// 登录配置
				.formLogin()
				.successHandler(loginSuccessHandler)
				.failureHandler(loginFailureHandler)

				.and()
				.logout()
				.logoutSuccessHandler(jwtLogoutSuccessHandler)

				// 禁用session
				.and()
				.sessionManagement()
				.sessionCreationPolicy(SessionCreationPolicy.STATELESS)

				// 配置拦截规则
				.and()
				.authorizeRequests()
				.antMatchers(URL_WHITELIST).permitAll()
				.anyRequest().authenticated()

				// 异常处理器
				.and()
				.exceptionHandling()
				.authenticationEntryPoint(jwtAuthenticationEntryPoint)
				.accessDeniedHandler(jwtAccessDeniedHandler)

				// 配置自定义的过滤器
				.and()
				.addFilter(jwtAuthenticationFilter())
				.addFilterBefore(captchaFilter, UsernamePasswordAuthenticationFilter.class)

		;

	}

	@Override
	protected void configure(AuthenticationManagerBuilder auth) throws Exception {
		auth.userDetailsService(userDetailService);
	}
}2. Not a login request
View through JwtfFilter Whether it is logged in status
Notes when using Redis integration
Essentially, it is still writing a filter chain:
In Add a filter before the login request
Pay attention to the expiration time of the verification code stored in redis. If the expiration time exceeds, it will be intercepted by the verification code interceptor
-
You need to prepare an interface for generating verification codes and store them in Redis
You need to delete the verification code after using it
// 校验验证码逻辑
	private void validate(HttpServletRequest httpServletRequest) {

		String code = httpServletRequest.getParameter("code");
		String key = httpServletRequest.getParameter("token");

		if (StringUtils.isBlank(code) || StringUtils.isBlank(key)) {
			System.out.println("验证码校验失败2");
			throw new CaptchaException("验证码错误");
		}

		System.out.println("验证码:"+redisUtil.hget(Const.CAPTCHA_KEY, key));
		if (!code.equals(redisUtil.hget(Const.CAPTCHA_KEY, key))) {
			System.out.println("验证码校验失败3");
			throw new CaptchaException("验证码错误");
		}

		// 一次性使用
		redisUtil.hdel(Const.CAPTCHA_KEY, key);
}The above is the detailed content of What is the SpringSecurity+Redis authentication process?. For more information, please follow other related articles on the PHP Chinese website!

Hot AI Tools

Undresser.AI Undress
AI-powered app for creating realistic nude photos

AI Clothes Remover
Online AI tool for removing clothes from photos.

Undress AI Tool
Undress images for free

Clothoff.io
AI clothes remover

AI Hentai Generator
Generate AI Hentai for free.

Hot Article
Hot Tools

Notepad++7.3.1
Easy-to-use and free code editor

SublimeText3 Chinese version
Chinese version, very easy to use

Zend Studio 13.0.1
Powerful PHP integrated development environment

Dreamweaver CS6
Visual web development tools

SublimeText3 Mac version
God-level code editing software (SublimeText3)
Hot Topics
 1378
1378
 52
52

 How to build the redis cluster mode
Apr 10, 2025 pm 10:15 PM
How to build the redis cluster mode
Apr 10, 2025 pm 10:15 PM
Redis cluster mode deploys Redis instances to multiple servers through sharding, improving scalability and availability. The construction steps are as follows: Create odd Redis instances with different ports; Create 3 sentinel instances, monitor Redis instances and failover; configure sentinel configuration files, add monitoring Redis instance information and failover settings; configure Redis instance configuration files, enable cluster mode and specify the cluster information file path; create nodes.conf file, containing information of each Redis instance; start the cluster, execute the create command to create a cluster and specify the number of replicas; log in to the cluster to execute the CLUSTER INFO command to verify the cluster status; make
 How to use the redis command
Apr 10, 2025 pm 08:45 PM
How to use the redis command
Apr 10, 2025 pm 08:45 PM
Using the Redis directive requires the following steps: Open the Redis client. Enter the command (verb key value). Provides the required parameters (varies from instruction to instruction). Press Enter to execute the command. Redis returns a response indicating the result of the operation (usually OK or -ERR).
 How to view all keys in redis
Apr 10, 2025 pm 07:15 PM
How to view all keys in redis
Apr 10, 2025 pm 07:15 PM
To view all keys in Redis, there are three ways: use the KEYS command to return all keys that match the specified pattern; use the SCAN command to iterate over the keys and return a set of keys; use the INFO command to get the total number of keys.
 How to start the server with redis
Apr 10, 2025 pm 08:12 PM
How to start the server with redis
Apr 10, 2025 pm 08:12 PM
The steps to start a Redis server include: Install Redis according to the operating system. Start the Redis service via redis-server (Linux/macOS) or redis-server.exe (Windows). Use the redis-cli ping (Linux/macOS) or redis-cli.exe ping (Windows) command to check the service status. Use a Redis client, such as redis-cli, Python, or Node.js, to access the server.
 How to implement the underlying redis
Apr 10, 2025 pm 07:21 PM
How to implement the underlying redis
Apr 10, 2025 pm 07:21 PM
Redis uses hash tables to store data and supports data structures such as strings, lists, hash tables, collections and ordered collections. Redis persists data through snapshots (RDB) and append write-only (AOF) mechanisms. Redis uses master-slave replication to improve data availability. Redis uses a single-threaded event loop to handle connections and commands to ensure data atomicity and consistency. Redis sets the expiration time for the key and uses the lazy delete mechanism to delete the expiration key.
 How to read the source code of redis
Apr 10, 2025 pm 08:27 PM
How to read the source code of redis
Apr 10, 2025 pm 08:27 PM
The best way to understand Redis source code is to go step by step: get familiar with the basics of Redis. Select a specific module or function as the starting point. Start with the entry point of the module or function and view the code line by line. View the code through the function call chain. Be familiar with the underlying data structures used by Redis. Identify the algorithm used by Redis.
 How to use redis lock
Apr 10, 2025 pm 08:39 PM
How to use redis lock
Apr 10, 2025 pm 08:39 PM
Using Redis to lock operations requires obtaining the lock through the SETNX command, and then using the EXPIRE command to set the expiration time. The specific steps are: (1) Use the SETNX command to try to set a key-value pair; (2) Use the EXPIRE command to set the expiration time for the lock; (3) Use the DEL command to delete the lock when the lock is no longer needed.
 How to clear redis data
Apr 10, 2025 pm 10:06 PM
How to clear redis data
Apr 10, 2025 pm 10:06 PM
How to clear Redis data: Use the FLUSHALL command to clear all key values. Use the FLUSHDB command to clear the key value of the currently selected database. Use SELECT to switch databases, and then use FLUSHDB to clear multiple databases. Use the DEL command to delete a specific key. Use the redis-cli tool to clear the data.
