
 Operation and Maintenance
Nginx
How to install nginx server and configure load balancing in CentOS6.5 environment
Operation and Maintenance
Nginx
How to install nginx server and configure load balancing in CentOS6.5 environment
How to install nginx server and configure load balancing in CentOS6.5 environment

1、下载pcre, 是一个用c语言编写的正则表达式函数库
[root@localhost pcre-8.36]# cd /tmp/download/
[root@localhost download]# wget http://nchc.dl.sourceforge.net/project/pcre/pcre/8.37/pcre-8.37.tar.gz
[root@localhost download]# tar zxvf pcre-8.36.tar.gz
2、下载zlib库
[root@localhost pcre-8.36]# cd /tmp/download/
[root@localhost download]# wget http://ncu.dl.sourceforge.net/project/libpng/zlib/1.2.8/zlib-1.2.8.tar.gz
[root@localhost download]# tar -zxvf zlib-1.2.8.tar.gz cd zlib-1.2.8
4、下载ssl
[root@localhost zlib-1.2.8]# cd ..
[root@localhost download]# wget http://www.openssl.org/source/openssl-1.0.1p.tar.gz
[root@localhost download]# cd openssl-1.0.1c
[root@localhost openssl-1.0.1c]# tar -zxvf openssl-1.0.1c.tar.gz
5、下载nginx
[root@localhost download]# wget http://nginx.org/download/nginx-1.2.8.tar.gz
[root@localhost download]# tar -zxvf nginx-1.2.8.tar.gz
6、安装
[root@localhost download]mv pcre-8.36 /usr/local/
[root@localhost download]mv zlib-1.2.8 /usr/local/
[root@localhost download]mv openssl-1.0.1c /usr/local/
[root@localhost download]mv nginx-1.2.8 /usr/local/
[root@localhost download]cd /usr/local/
[root@localhost local]# cd pcre-8.36
[root@localhost pcre-8.36]# ./configure&&make&&make install
[root@localhost pcre-8.36] cd ../zlib-1.2.8
[root@localhost zlib-1.2.8]# ./configure && make && make install
[root@localhost zlib-1.2.8]# cd ../openssl-1.0.1c
[root@localhost openssl-1.0.1c]# ./config && make && make install
[root@localhost openssl-1.0.1c]# cd ../nginx-1.2.8
[root@localhost nginx-1.2.8]# ./configure --prefix=/usr/local/nginx && make && make install
7、启动nginx
[root@localhost nginx]# /usr/local/nginx/sbin/nginx -c /usr/local/nginx/conf/nginx.conf
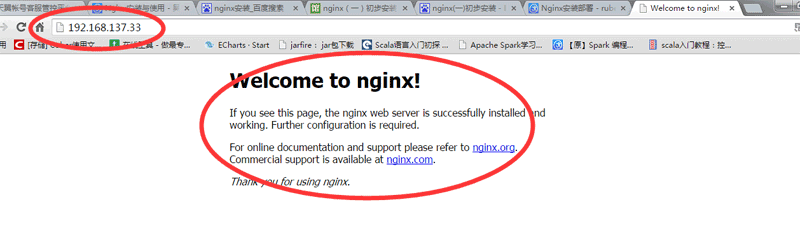
8、测试
在确保可以连接到服务器的电脑上,浏览器输入装了nginx的机器的ip地址,会看到welcome to nginx!的提示说明安装配配置成功了。
9、设置开机自动启动(shell脚本处理)
[root@localhost logs]# vi /etc/init.d/nginx
添加以下shell脚本。
#!/bin/bash
# nginx startup script for the nginx http server
# it is v.0.0.2 version.
# chkconfig: - 85 15
# description: nginx is a high-performance web and proxy server.
#       it has a lot of features, but it's not for everyone.
# processname: nginx
# pidfile: /var/run/nginx.pid
# config: /usr/local/nginx/conf/nginx.conf
nginxd=/usr/local/nginx/sbin/nginx
nginx_config=/usr/local/nginx/conf/nginx.conf
nginx_pid=/var/run/nginx.pid
retval=0
prog="nginx"
# source function library.
. /etc/rc.d/init.d/functions
# source networking configuration.
. /etc/sysconfig/network
# check that networking is up.
[ ${networking} = "no" ] && exit 0
[ -x $nginxd ] || exit 0
# start nginx daemons functions.
start() {
if [ -e $nginx_pid ];then
  echo "nginx already running...."
  exit 1
fi
  echo -n $"starting $prog: "
  daemon $nginxd -c ${nginx_config}
  retval=$?
  echo
  [ $retval = 0 ] && touch /var/lock/subsys/nginx
  return $retval
}
# stop nginx daemons functions.
stop() {
    echo -n $"stopping $prog: "
    killproc $nginxd
    retval=$?
    echo
    [ $retval = 0 ] && rm -f /var/lock/subsys/nginx /var/run/nginx.pid
}
# reload nginx service functions.
reload() {
  echo -n $"reloading $prog: "
  #kill -hup `cat ${nginx_pid}`
  killproc $nginxd -hup
  retval=$?
  echo
}
# see how we were called.
case "$1" in
start)
    start
    ;;
stop)
    stop
    ;;
reload)
    reload
    ;;
restart)
    stop
    start
    ;;
status)
    status $prog
    retval=$?
    ;;
*)
    echo $"usage: $prog {start|stop|restart|reload|status|help}"
    exit 1
esac
exit $retval保存后,设置权限让所有人可以操作。
[root@localhost ~]# chmod a+x /etc/init.d/nginx
[root@localhost logs]# /etc/init.d/nginx status
nginx (pid 2417 2416) is running...
[root@localhost logs]# /etc/init.d/nginx stop
stopping nginx: [ ok ]
[root@localhost logs]# /etc/init.d/nginx start
starting nginx: [ ok ]
[root@localhost logs]# /etc/init.d/nginx status
nginx (pid 2454 2452) is running...
[root@localhost ~]# vi /etc/rc.local
添加:
/etc/init.d/nginx start
重启电脑就会生效。
注意:脚本里面关于启动目录的,如果你的安装地址不一样,要进行修改。
负载均衡配置:
现有两部服务器:
192.168.137.197 (按照以上操作安装有nginx,作为转发机,虚拟机)
192.168.137.33 (无安装nginx,运行有测试用的web工程,虚拟机)
10.10.33.59 (无安装nginx,运行有测试用的web工程,本地电脑地址)
,运行有测试用的web工程
127.0.0.1 web_app
[root@a conf]# vi /usr/local/nginx/conf/nginx.conf
配置如下展示:
worker_processes 8;
pid /usr/local/nginx/nginx.pid;
worker_rlimit_nofile 102400;
events
{
use epoll;
worker_connections 102400;
}
http
{
 include    mime.types;
 default_type application/octet-stream;
 fastcgi_intercept_errors on;
 charset utf-8;
 server_names_hash_bucket_size 128;
 client_header_buffer_size 4k;
 large_client_header_buffers 4 32k;
 client_max_body_size 300m;
 sendfile on;
 tcp_nopush   on;
 keepalive_timeout 60;
 tcp_nodelay on;
 client_body_buffer_size 512k;
 proxy_connect_timeout  5;
 proxy_read_timeout    60;
 proxy_send_timeout    5;
 proxy_buffer_size    16k;
 proxy_buffers      4 64k;
 proxy_busy_buffers_size 128k;
 proxy_temp_file_write_size 128k;
 gzip on;
 gzip_min_length 1k;
 gzip_buffers   4 16k;
 gzip_http_version 1.1;
 gzip_comp_level 2;
 gzip_types    text/plain application/x-javascript text/css application/xml;
 gzip_vary on;
###2012-12-19 change nginx logs
log_format main '$http_x_forwarded_for - $remote_user [$time_local] "$request" '
       '$status $body_bytes_sent "$http_referer" '
       '"$http_user_agent" $request_time $remote_addr';
upstream web_app {
server 192.168.137.197:8080 weight=1 max_fails=2 fail_timeout=30s;
server 192.168.137.33:8080 weight=1 max_fails=2 fail_timeout=30s;
server 10.10.33.59:8080 weight=1 max_fails=2 fail_timeout=30s;
}
####chinaapp.sinaapp.com
server {
  listen 80;
  server_name chinaapp.sinaapp.com;
  index index.jsp index.html index.htm;
  #发布目录/data/www
  root /data/www;
  location /
  {
  proxy_next_upstream http_502 http_504 error timeout invalid_header;
  proxy_set_header host $host;
  proxy_set_header x-real-ip $remote_addr;
  proxy_set_header x-forwarded-for $proxy_add_x_forwarded_for;
  proxy_pass http://web_app;
  expires   3d;
  }
 }
}设置host:
[root@a conf]# vi /etc/hosts
添加hosts:
127.0.0.1 web_app
启动nginx
[root@localhost nginx]# /usr/local/nginx/sbin/nginx -c /usr/local/nginx/conf/nginx.conf
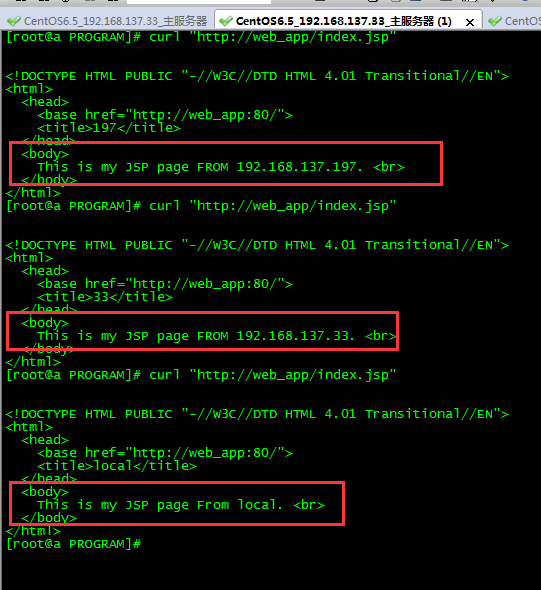
启动三部服务器的web应用:
在192.168.137.197执行指令:
[root@a program]# curl "http://web_app/index.jsp"
测试结果如下:
常见问题及解决办法:
1、安装pcre时提示configure: error: you need a c++ compiler for c++ support.
原因是没有安装c++编译器,采用下面的命令安装:
[root@localhost pcre-8.37]# yum install -y gcc gcc-c++
2、启动nginx失败
[root@localhost nginx]# /usr/local/nginx/sbin/nginx -c /usr/local/nginx/conf/nginx.conf
/usr/local/nginx/sbin/nginx: error while loading shared libraries: libpcre.so.1: cannot open shared object file: no such file or directory
原因是64bit的系统,但是默认取了/usr/local/lib里面的包
检查方法:
[root@localhost nginx]# cd /usr/local/
[root@localhost local]# ls /lib64/ |grep pcre
libpcre.so.0
libpcre.so.0.0.1
[root@localhost local]# ls /lib/ |grep pcre
说明缺失的包在lib64
设置软连接来解决:
[root@localhost local]# ln -s /lib64/libpcre.so.0.0.1 /lib64/libpcre.so.1
[root@localhost local]# cd nginx
[root@localhost nginx]# /usr/local/nginx/sbin/nginx -c /usr/local/nginx/conf/nginx.conf
3、启动报错:
报错:nginx: [emerg] bind() to 0.0.0.0:80 failed (98: address already in use)
解决办法:sudo fuser -k 80/tcp
端口被占用,关闭占用端口
The above is the detailed content of How to install nginx server and configure load balancing in CentOS6.5 environment. For more information, please follow other related articles on the PHP Chinese website!

Hot AI Tools

Undresser.AI Undress
AI-powered app for creating realistic nude photos

AI Clothes Remover
Online AI tool for removing clothes from photos.

Undress AI Tool
Undress images for free

Clothoff.io
AI clothes remover

Video Face Swap
Swap faces in any video effortlessly with our completely free AI face swap tool!

Hot Article
Hot Tools

Notepad++7.3.1
Easy-to-use and free code editor

SublimeText3 Chinese version
Chinese version, very easy to use

Zend Studio 13.0.1
Powerful PHP integrated development environment

Dreamweaver CS6
Visual web development tools

SublimeText3 Mac version
God-level code editing software (SublimeText3)
Hot Topics
 1386
1386
 52
52

 How to optimize CentOS HDFS configuration
Apr 14, 2025 pm 07:15 PM
How to optimize CentOS HDFS configuration
Apr 14, 2025 pm 07:15 PM
Improve HDFS performance on CentOS: A comprehensive optimization guide to optimize HDFS (Hadoop distributed file system) on CentOS requires comprehensive consideration of hardware, system configuration and network settings. This article provides a series of optimization strategies to help you improve HDFS performance. 1. Hardware upgrade and selection resource expansion: Increase the CPU, memory and storage capacity of the server as much as possible. High-performance hardware: adopts high-performance network cards and switches to improve network throughput. 2. System configuration fine-tuning kernel parameter adjustment: Modify /etc/sysctl.conf file to optimize kernel parameters such as TCP connection number, file handle number and memory management. For example, adjust TCP connection status and buffer size
 Centos stops maintenance 2024
Apr 14, 2025 pm 08:39 PM
Centos stops maintenance 2024
Apr 14, 2025 pm 08:39 PM
CentOS will be shut down in 2024 because its upstream distribution, RHEL 8, has been shut down. This shutdown will affect the CentOS 8 system, preventing it from continuing to receive updates. Users should plan for migration, and recommended options include CentOS Stream, AlmaLinux, and Rocky Linux to keep the system safe and stable.
 How to check CentOS HDFS configuration
Apr 14, 2025 pm 07:21 PM
How to check CentOS HDFS configuration
Apr 14, 2025 pm 07:21 PM
Complete Guide to Checking HDFS Configuration in CentOS Systems This article will guide you how to effectively check the configuration and running status of HDFS on CentOS systems. The following steps will help you fully understand the setup and operation of HDFS. Verify Hadoop environment variable: First, make sure the Hadoop environment variable is set correctly. In the terminal, execute the following command to verify that Hadoop is installed and configured correctly: hadoopversion Check HDFS configuration file: The core configuration file of HDFS is located in the /etc/hadoop/conf/ directory, where core-site.xml and hdfs-site.xml are crucial. use
 Centos shutdown command line
Apr 14, 2025 pm 09:12 PM
Centos shutdown command line
Apr 14, 2025 pm 09:12 PM
The CentOS shutdown command is shutdown, and the syntax is shutdown [Options] Time [Information]. Options include: -h Stop the system immediately; -P Turn off the power after shutdown; -r restart; -t Waiting time. Times can be specified as immediate (now), minutes ( minutes), or a specific time (hh:mm). Added information can be displayed in system messages.
 How to create a mirror in docker
Apr 15, 2025 am 11:27 AM
How to create a mirror in docker
Apr 15, 2025 am 11:27 AM
Steps to create a Docker image: Write a Dockerfile that contains the build instructions. Build the image in the terminal, using the docker build command. Tag the image and assign names and tags using the docker tag command.
 Tips for using HDFS file system on CentOS
Apr 14, 2025 pm 07:30 PM
Tips for using HDFS file system on CentOS
Apr 14, 2025 pm 07:30 PM
The Installation, Configuration and Optimization Guide for HDFS File System under CentOS System This article will guide you how to install, configure and optimize Hadoop Distributed File System (HDFS) on CentOS System. HDFS installation and configuration Java environment installation: First, make sure that the appropriate Java environment is installed. Edit /etc/profile file, add the following, and replace /usr/lib/java-1.8.0/jdk1.8.0_144 with your actual Java installation path: exportJAVA_HOME=/usr/lib/java-1.8.0/jdk1.8.0_144exportPATH=$J
 How to mount hard disk in centos
Apr 14, 2025 pm 08:15 PM
How to mount hard disk in centos
Apr 14, 2025 pm 08:15 PM
CentOS hard disk mount is divided into the following steps: determine the hard disk device name (/dev/sdX); create a mount point (it is recommended to use /mnt/newdisk); execute the mount command (mount /dev/sdX1 /mnt/newdisk); edit the /etc/fstab file to add a permanent mount configuration; use the umount command to uninstall the device to ensure that no process uses the device.
 What steps are required to configure CentOS in HDFS
Apr 14, 2025 pm 06:42 PM
What steps are required to configure CentOS in HDFS
Apr 14, 2025 pm 06:42 PM
Building a Hadoop Distributed File System (HDFS) on a CentOS system requires multiple steps. This article provides a brief configuration guide. 1. Prepare to install JDK in the early stage: Install JavaDevelopmentKit (JDK) on all nodes, and the version must be compatible with Hadoop. The installation package can be downloaded from the Oracle official website. Environment variable configuration: Edit /etc/profile file, set Java and Hadoop environment variables, so that the system can find the installation path of JDK and Hadoop. 2. Security configuration: SSH password-free login to generate SSH key: Use the ssh-keygen command on each node
