

How to use Nginx to implement HTTPS two-way authentication

单向验证与双向验证的区别:
单向验证: 指客户端验证服务器端证书,服务器并不需要验证客户端证书。
双向验证:指客户端验证服务器端证书,而服务器也需要通过ca的公钥证书来验证客户端证书。
详细的握手过程:
单向验证
浏览器发送一个连接请求给安全服务器。
1、服务器将自己的证书,以及同证书相关的信息发送给客户浏览器。
2、客户浏览器检查服务器送过来的证书是否是由自己信赖的ca中心所签发的。如果是,就继续执行协议;如果不是,客户浏览器就给客户一个警告消息:警告客户这个证书不是可以信赖的询问客户是否需要继续。
3、接着客户浏览器比较证书里的消息,例如域名和公钥,与服务器刚刚发送的相关消息是否一致,如果是一致的,客户浏览器认可这个服务器的合法身份。
4、浏览器随机产生一个用于后面通讯的“通话密钥”,然后用服务器的公钥对其加密,然后将加密后的“预主密码”传给服务器。
5、服务器从客户发送过来的密码方案中,选择一种加密程度最高的密码方案,用服务器的私钥加密后通知浏览器。
6、浏览器针对这个密码方案,接着用服务器的公钥加过密后发送给服务器。
7、服务器接收到浏览器送过来的消息,用自己的私钥解密,获得。
8、服务器、浏览器接下来的通讯都是用对称密码方案,使用相同的对称密钥。
双向验证
1、浏览器发送一个连接请求给安全服务器。
2、服务器将自己的证书,以及同证书相关的信息发送给客户浏览器。
3、客户浏览器检查服务器送过来的证书是否是由自己信赖的ca中心所签发的。如果是,就继续执行协议;如果不是,客户浏览器就给客户一个警告消息:警告客户这个证书不是可以信赖的询问客户是否需要继续。
4、接着客户浏览器比较证书里的消息,例如域名和公钥,与服务器刚刚发送的相关消息是否一致,如果是一致的,客户浏览器认可这个服务器的合法身份。
5、服务器要求客户的身份认证,用户可以建立一个随机数然后对其进行数字签名,将这个含有签名的随机数和客户自己的证书以及加密过的“预主密码”一起传给服务器。
6、服务器必须检验客户证书和签名随机数的合法性,具体的合法性验证过程包括:客户的证书使用日期是否有效,为客户提供证书的ca 是否可靠,发行ca 的公钥能否正确解开客户证书的发行ca的数字签名,检查客户的证书是否在证书废止列表(crl)中。检验如果没有通过,通讯立刻中断;如果验证通过,服务器将用自己的私钥解开加密的“预主密码”,然后执行一系列步骤来产生主通讯密码(客户端也将通过同样的方法产生相同的主通讯密码)。
7、客户浏览器告诉服务器自己所能够支持的通讯对称密码方案。
8、服务器从客户发送过来的密码方案中,选择一种加密程度最高的密码方案,用客户的公钥加过密后通知浏览器。
9、浏览器针对这个密码方案,选择一个通话密钥,接着用服务器的公钥加过密后发送给服务器。
10、服务器接收到浏览器送过来的消息,用自己的私钥解密,获得通话密钥。
11、服务器、浏览器接下来的通讯都是用对称密码方案,使用相同的对称密钥。
一、自建ca,签署证书
#openssl配置文件路径
vim/etc/pki/tls/openssl.cnf
#下面只列出配置文件中和自建ca有关的几个关键指令
dir=/etc/pki/ca#ca的工作目录
database=$dir/index.txt#签署证书的数据记录文件
new_certs_dir=$dir/newcerts#存放新签署证书的目录
serial=$dir/serial#新证书签署号记录文件
certificate=$dir/ca.crt#ca的证书路径
private_key=$dir/private/cakey.pem#ca的私钥路径
使用openssl制作ca的自签名证书
#切换到ca的工作目录
cd/etc/pki/ca
#制作ca私钥
(umask077;opensslgenrsa-outprivate/cakey.pem2048)
#制作自签名证书
opensslreq-new-x509-keyprivate/cakey.pem-outca.crt
#生成数据记录文件,生成签署号记录文件,给文件一个初始号。
touchindex.txt
touchserial
echo'01'>serial
#自建ca完成
准备服务器端证书
#制作服务器端私钥
(umask077;opensslgenrsa-outserver.key1024)
#制作服务器端证书申请指定使用sha512算法签名(默认使用sha1算法)
opensslreq-new-keyserver.key-sha512-outserver.csr
#签署证书
opensslca-inserver.csr-outserver.crt-days3650
准备客户端证书
#制作客户端私钥
(umask077;opensslgenrsa-outkehuduan.key1024)
#制作客户端证书申请
opensslreq-new-keykehuduan.key-outkehuduan.csr
#签署证书
opensslca-inkehuduan.csr-outkehuduan.crt-days3650
注意事项:
1、制作证书时会提示输入密码,设置密码可选,服务器证书和客户端证书密码可以不相同。
2、服务器证书和客户端证书制作时提示输入省份、城市、域名信息等,需保持一致。
3、以下信息根证书需要和客户端证书匹配,否则可能出现签署问题。
countryname = match stateorprovincename = match organizationname = match organizationalunitname = match
如何指定签署证书的签名算法
<strong>opensslreqxx
-[digest]digesttosignwith(seeopenssldgst-hforlist)</strong>
查看使用的签名算法:
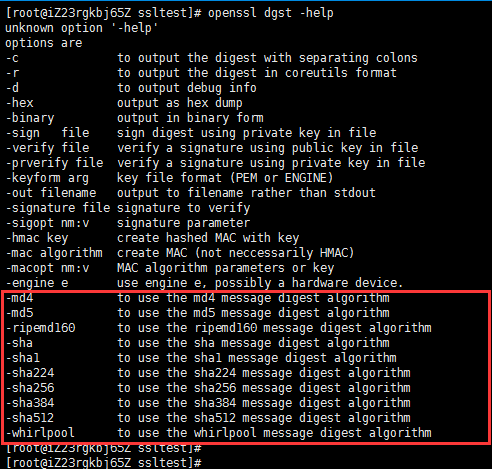
<strong>#使用-sha256指定算法
opensslreq-new-keyserver.key-sha256-outserver.csr</strong>
二、提供nginx配置文件
<strong>server{
listen443;
server_namepro.server.com;
ssion;
ssi_silent_errorson;
ssi_typestext/shtml;
sslon;
ssl_certificate/data/server/nginx/ssl/self/server.crt;
ssl_certificate_key/data/server/nginx/ssl/self/server.key;
ssl_client_certificate/data/server/nginx/ssl/self/ca/ca.crt;
ssl_verify_clienton;
ssl_protocolstlsv1tlsv1.1tlsv1.2;
ssl_ciphersecdhe-ecdsa-aes256-gcm-sha384:ecdhe-rsa-aes256-gcm-sha384:ecdhe-ecdsa-aes256-sha384:ecdhe-rsa-aes256-sha384:ecdhe-ecdsa-aes128-gcm-sha256:ecdhe-rsa-aes128-gcm-sha256:ecdhe-ecdsa-aes128-sha256:ecdhe-rsa-aes128-sha256:ecdhe-ecdsa-rc4-sha:!ecdhe-rsa-rc4-sha:ecdh-ecdsa-rc4-sha:ecdh-rsa-rc4-sha:ecdhe-rsa-aes256-sha:!rc4-sha:high:!anull:!enull:!low:!3des:!md5:!exp:!cbc:!edh:!kedh:!psk:!srp:!kecdh;
ssl_prefer_server_cipherson;
indexindex.htmlindex.htmindex.php;
root/data/www;
location~.*\.(php|php5)?$
{
#fastcgi_passunix:/tmp/php-cgi.sock;
fastcgi_pass127.0.0.1:9000;
fastcgi_indexindex.php;
includefastcgi.conf;
}
location~.*\.(gif|jpg|jpeg|png|bmp|swf)$
{
expires30d;
}
location~.*\.(js|css)?$
{
expires1h;
}
###thisistouseopenwebsitelianjielikeonapache##
location/{
if(!-e$request_filename){
rewrite^(.*)$/index.php?s=$1last;
break;
}
keepalive_timeout0;
}
location~/.svn/{
denyall;
}
###end##
include/data/server/nginx/conf/rewrite/test.conf;
access_log/log/nginx/access/access.log;
}</strong>客户端证书格式转换
<strong>#将文本格式的证书转换成可以导入浏览器的证书
opensslpkcs12-export-clcerts-inclient.crt-inkeyclient.key-outclient.p12</strong>
三、将证书导入浏览器,这里以chrome为例
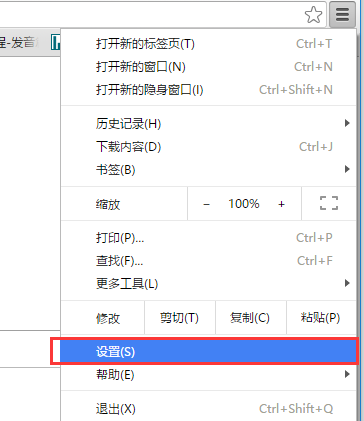
1、在浏览器窗口右上角找到设置
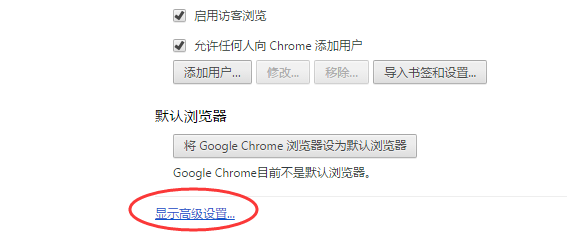
2. Find the advanced settings in the settings window
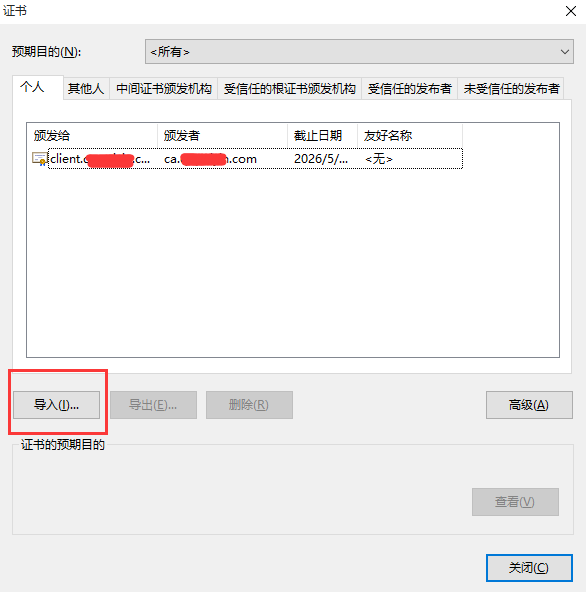
3. Find the management certificate

4. Click to import the certificate, and then select the certificate path.
5. After importing the certificate, you can access the server data normally
6. If you access the server without successfully importing the client certificate, the server will fail to verify the client certificate and return the following error
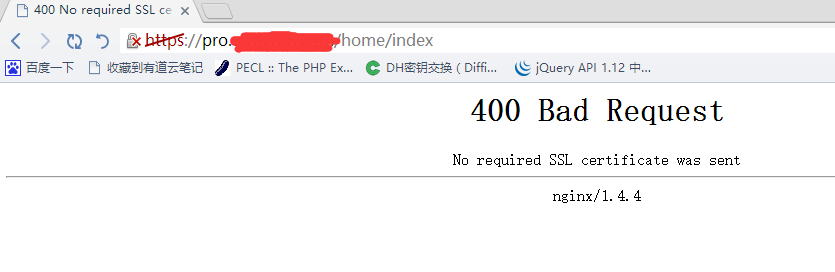
Because the self-signed certificate is not trusted by the public CA, there will be a red cross on https.
The above is the detailed content of How to use Nginx to implement HTTPS two-way authentication. For more information, please follow other related articles on the PHP Chinese website!

Hot AI Tools

Undresser.AI Undress
AI-powered app for creating realistic nude photos

AI Clothes Remover
Online AI tool for removing clothes from photos.

Undress AI Tool
Undress images for free

Clothoff.io
AI clothes remover

AI Hentai Generator
Generate AI Hentai for free.

Hot Article
Hot Tools

Notepad++7.3.1
Easy-to-use and free code editor

SublimeText3 Chinese version
Chinese version, very easy to use

Zend Studio 13.0.1
Powerful PHP integrated development environment

Dreamweaver CS6
Visual web development tools

SublimeText3 Mac version
God-level code editing software (SublimeText3)
Hot Topics


 How to allow external network access to tomcat server
Apr 21, 2024 am 07:22 AM
How to allow external network access to tomcat server
Apr 21, 2024 am 07:22 AM
To allow the Tomcat server to access the external network, you need to: modify the Tomcat configuration file to allow external connections. Add a firewall rule to allow access to the Tomcat server port. Create a DNS record pointing the domain name to the Tomcat server public IP. Optional: Use a reverse proxy to improve security and performance. Optional: Set up HTTPS for increased security.
 What are the nginx start and stop commands?
Apr 02, 2024 pm 08:45 PM
What are the nginx start and stop commands?
Apr 02, 2024 pm 08:45 PM
The start and stop commands of Nginx are nginx and nginx -s quit respectively. The start command starts the server directly, while the stop command gracefully shuts down the server, allowing all current requests to be processed. Other available stop signals include stop and reload.
 How to run thinkphp
Apr 09, 2024 pm 05:39 PM
How to run thinkphp
Apr 09, 2024 pm 05:39 PM
Steps to run ThinkPHP Framework locally: Download and unzip ThinkPHP Framework to a local directory. Create a virtual host (optional) pointing to the ThinkPHP root directory. Configure database connection parameters. Start the web server. Initialize the ThinkPHP application. Access the ThinkPHP application URL and run it.
 Welcome to nginx!How to solve it?
Apr 17, 2024 am 05:12 AM
Welcome to nginx!How to solve it?
Apr 17, 2024 am 05:12 AM
To solve the "Welcome to nginx!" error, you need to check the virtual host configuration, enable the virtual host, reload Nginx, if the virtual host configuration file cannot be found, create a default page and reload Nginx, then the error message will disappear and the website will be normal show.
 How to deploy nodejs project to server
Apr 21, 2024 am 04:40 AM
How to deploy nodejs project to server
Apr 21, 2024 am 04:40 AM
Server deployment steps for a Node.js project: Prepare the deployment environment: obtain server access, install Node.js, set up a Git repository. Build the application: Use npm run build to generate deployable code and dependencies. Upload code to the server: via Git or File Transfer Protocol. Install dependencies: SSH into the server and use npm install to install application dependencies. Start the application: Use a command such as node index.js to start the application, or use a process manager such as pm2. Configure a reverse proxy (optional): Use a reverse proxy such as Nginx or Apache to route traffic to your application
 How to register phpmyadmin
Apr 07, 2024 pm 02:45 PM
How to register phpmyadmin
Apr 07, 2024 pm 02:45 PM
To register for phpMyAdmin, you need to first create a MySQL user and grant permissions to it, then download, install and configure phpMyAdmin, and finally log in to phpMyAdmin to manage the database.
 How to communicate between docker containers
Apr 07, 2024 pm 06:24 PM
How to communicate between docker containers
Apr 07, 2024 pm 06:24 PM
There are five methods for container communication in the Docker environment: shared network, Docker Compose, network proxy, shared volume, and message queue. Depending on your isolation and security needs, choose the most appropriate communication method, such as leveraging Docker Compose to simplify connections or using a network proxy to increase isolation.
 How to generate URL from html file
Apr 21, 2024 pm 12:57 PM
How to generate URL from html file
Apr 21, 2024 pm 12:57 PM
Converting an HTML file to a URL requires a web server, which involves the following steps: Obtain a web server. Set up a web server. Upload HTML file. Create a domain name. Route the request.
