
 Web Front-end
H5 Tutorial
Detailed explanation of how to realize translation and rotation changes of images through HTML5 Canvas_html5 tutorial skills
Web Front-end
H5 Tutorial
Detailed explanation of how to realize translation and rotation changes of images through HTML5 Canvas_html5 tutorial skills
Detailed explanation of how to realize translation and rotation changes of images through HTML5 Canvas_html5 tutorial skills

Translation transformation translate()
Translation transformation, hence the name, is a general graphics displacement. For example, here I want to translate the rectangle located at (100, 100) to the point (200, 200). Then I just need to add context.translate(100,100) before drawing the rectangle.
The translate() here only passes in two parameters, which are actually the coordinates of the origin of the new canvas coordinate system. Let’s take a look at the effect with the code below.
- >
- <html lang="zh">
- <head>
- <meta charset="UTF-8">
- <title>平移变换title>
- <style>
- body { background: url("./images/bg3.jpg") repeat; }
- #canvas { border: 1px solid #aaaaaa; display: block; margin: 50px auto; }
- style>
- head>
- <body>
- <div id="canvas-warp">
- <canvas id="canvas">
- 你的浏览器居然不支持Canvas?!赶快换一个吧!!
- canvas>
- div>
- <script>
- window.onload = function(){
- var canvas = document.getElementById("canvas");
- canvas.width = 800;
- canvas.height = 600;
- var context = canvas.getContext("2d");
- context.fillStyle = "#FFF";
- context.fillRect(0,0,800,600);
- context.fillStyle = "#00AAAA";
- context.fillRect(100,100,200,100);
- context.fillStyle = "red";
- context.translate(100,100);
- context.fillRect(100,100,200,100);
- };
- script>
- body>
- html>
运行结果:
这里的蓝色矩形,是矩形原来的位置,然后调用translate()方法,将矩形位移至(200,200),即红色矩形的位置。我们来用一张图看看,它是怎么做到平移变换的。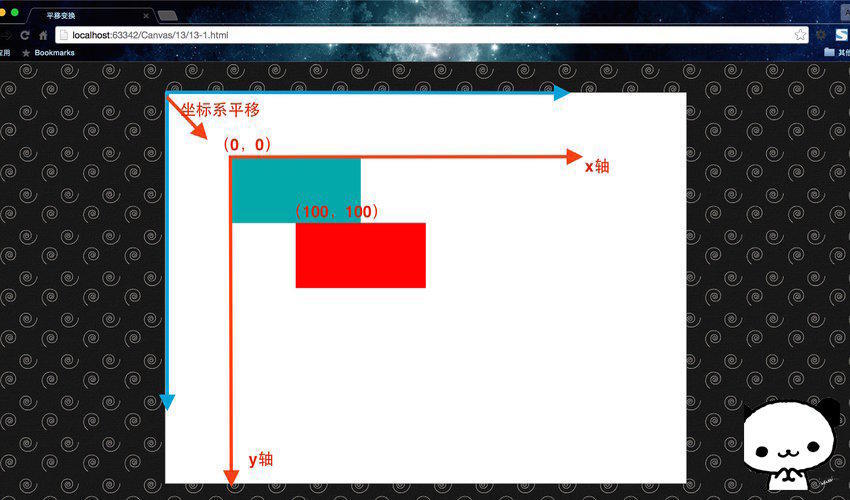
没错,其实这里的平移变换实质就是在平移坐标系,而对translate()传入的参数,实质就是新坐标系相对于旧坐标系的原点。这使得我们依旧是在(100,100)绘制的红色矩形,在平移坐标系之后,变到了(200,200)处。
注意使用状态保存:
其实这里有一个坑,我们如果想把矩形平移至(300,300)怎么办呢?或许我们会想,直接调用context.translate(200,200)就可以了。好,我们看看效果。
- "zh">
- "UTF-8">
-
平移变换 - "canvas-warp">
- 你的浏览器居然不支持Canvas?!赶快换一个吧!!
- <script> </span></li> <li class="alt"> <span> window.onload = </span><span class="keyword">function</span><span>(){ </span> </li> <li> <span> </span><span class="keyword">var</span><span> canvas = document.getElementById(</span><span class="string">"canvas"</span><span>); </span> </li> <li class="alt"><span> canvas.width = 800; </span></li> <li><span> canvas.height = 600; </span></li> <li class="alt"> <span> </span><span class="keyword">var</span><span> context = canvas.getContext(</span><span class="string">"2d"</span><span>); </span> </li> <li> <span> context.fillStyle = </span><span class="string">"#FFF"</span><span>; </span> </li> <li class="alt"><span> context.fillRect(0,0,800,600); </span></li> <li><span> </span></li> <li class="alt"> <span> context.fillStyle = </span><span class="string">"#00AAAA"</span><span>; </span> </li> <li><span> context.fillRect(100,100,200,100); </span></li> <li class="alt"><span> </span></li> <li> <span> context.fillStyle = </span><span class="string">"red"</span><span>; </span> </li> <li class="alt"><span> context.translate(100,100); </span></li> <li><span> context.fillRect(100,100,200,100); </span></li> <li class="alt"><span> </span></li> <li> <span> context.fillStyle = </span><span class="string">"green"</span><span>; </span> </li> <li class="alt"><span> context.translate(200,200); </span></li> <li><span> context.fillRect(100,100,200,100); </span></li> <li class="alt"><span> </span></li> <li><span> }; </span></li> <li class="alt"><span></script>
运行结果: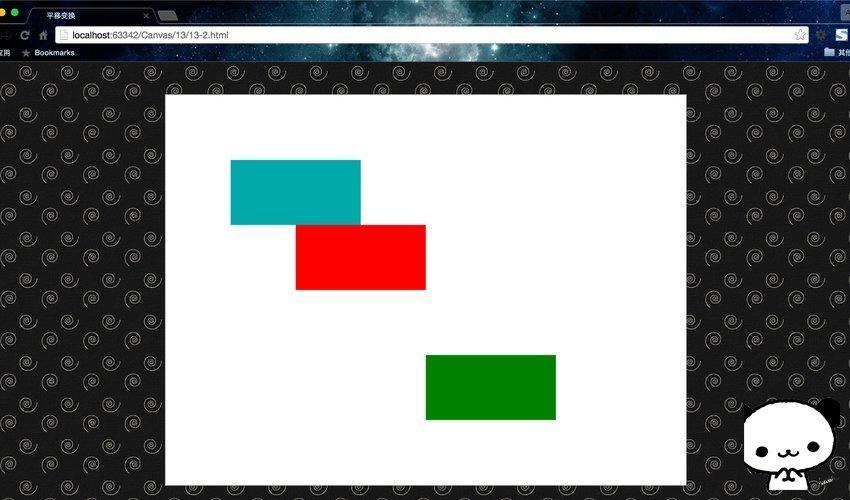
这里的绿色矩形并没有如我们所愿在(300,300)位置处,而是跑到了(400,400)这里。为什么呢?想必大家已经知道了答案——Canvas是基于状态的绘制。在我们第一次平移之后,坐标系已经在(100,100)处了,所以如果继续平移,这个再基于新坐标系继续平移坐标系。那么要怎么去解决呢?很简单,有两个方法。
第一,在每次使用完变换之后,记得将坐标系平移回原点,即调用translate(-x,-y)。
第二,在每次平移之前使用context.save(),在每次绘制之后,使用context.restore()。
切记,千万不要再想着我继续紧接着第一次平移之后再平移translate(100,100)不就行了,这样你自己的坐标系就会乱套,根本找不到自己的坐标系原点在哪,在多次变换或者封装函数之后,会坑死你。所以一定要以最初状态为最根本的参照物,这是原则性问题。这里我建议使用第二种方法,而且在涉及所有图形变换的时候,都要这么处理,不仅仅是平移变换。
具体使用如下。
- "zh">
- "UTF-8">
-
平移变换 - "canvas-warp">
- 你的浏览器居然不支持Canvas?!赶快换一个吧!!
- <script> </span></li> <li class="alt"> <span> window.onload = </span><span class="keyword">function</span><span>(){ </span> </li> <li> <span> </span><span class="keyword">var</span><span> canvas = document.getElementById(</span><span class="string">"canvas"</span><span>); </span> </li> <li class="alt"><span> canvas.width = 800; </span></li> <li><span> canvas.height = 600; </span></li> <li class="alt"> <span> </span><span class="keyword">var</span><span> context = canvas.getContext(</span><span class="string">"2d"</span><span>); </span> </li> <li> <span> context.fillStyle = </span><span class="string">"#FFF"</span><span>; </span> </li> <li class="alt"><span> context.fillRect(0,0,800,600); </span></li> <li><span> </span></li> <li class="alt"> <span> context.fillStyle = </span><span class="string">"#00AAAA"</span><span>; </span> </li> <li><span> context.fillRect(100,100,200,100); </span></li> <li class="alt"><span> </span></li> <li><span> context.save(); </span></li> <li class="alt"> <span> context.fillStyle = </span><span class="string">"red"</span><span>; </span> </li> <li><span> context.translate(100,100); </span></li> <li class="alt"><span> context.fillRect(100,100,200,100); </span></li> <li><span> context.restore(); </span></li> <li class="alt"><span> </span></li> <li><span> context.save(); </span></li> <li class="alt"> <span> context.fillStyle = </span><span class="string">"green"</span><span>; </span> </li> <li><span> context.translate(200,200); </span></li> <li class="alt"><span> context.fillRect(100,100,200,100); </span></li> <li><span> context.restore(); </span></li> <li class="alt"><span> </span></li> <li><span> }; </span></li> <li class="alt"><span></script>
运行结果: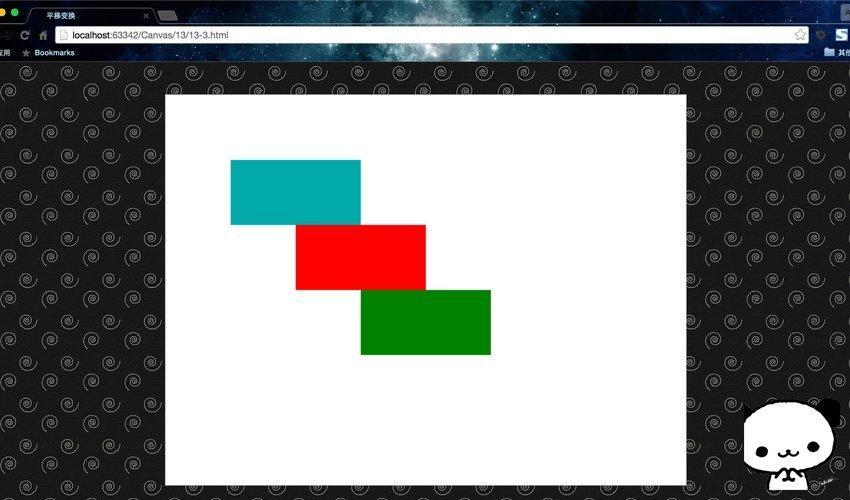
因此,在使用图形变换的时候,要记得结合使用状态保存。
旋转变换rotate()
同画圆弧一样,这里的rotate(deg)传入的参数是弧度,不是角度。同时需要注意的是,这个的旋转是以坐标系的原点(0,0)为圆心进行的顺时针旋转。所以,在使用rotate()之前,通常需要配合使用translate()平移坐标系,确定旋转的圆心。即,旋转变换通常搭配平移变换使用的。
最后一点需要注意的是,Canvas是基于状态的绘制,所以每次旋转都是接着上次旋转的基础上继续旋转,所以在使用图形变换的时候必须搭配save()与restore()方法,一方面重置旋转角度,另一方面重置坐标系原点。
- "zh">
- "UTF-8">
-
旋转变换 - "canvas-warp">
- 你的浏览器居然不支持Canvas?!赶快换一个吧!!
- <script> </span></li> <li class="alt"> <span> window.onload = </span><span class="keyword">function</span><span>(){ </span> </li> <li> <span> </span><span class="keyword">var</span><span> canvas = document.getElementById(</span><span class="string">"canvas"</span><span>); </span> </li> <li class="alt"><span> canvas.width = 800; </span></li> <li><span> canvas.height = 600; </span></li> <li class="alt"> <span> </span><span class="keyword">var</span><span> context = canvas.getContext(</span><span class="string">"2d"</span><span>); </span> </li> <li> <span> context.fillStyle = </span><span class="string">"#FFF"</span><span>; </span> </li> <li class="alt"><span> context.fillRect(0,0,800,600); </span></li> <li><span> </span></li> <li class="alt"><span> </span></li> <li> <span> </span><span class="keyword">for</span><span>(</span><span class="keyword">var</span><span> i = 0; i <= 12; i ){ </span> </li> <li class="alt"><span> context.save(); </span></li> <li><span> context.translate(70 i * 50, 50 i * 40); </span></li> <li class="alt"> <span> context.fillStyle = </span><span class="string">"#00AAAA"</span><span>; </span> </li> <li><span> context.fillRect(0,0,20,20); </span></li> <li class="alt"><span> context.restore(); </span></li> <li><span> </span></li> <li class="alt"><span> context.save(); </span></li> <li><span> context.translate(70 i * 50, 50 i * 40); </span></li> <li class="alt"><span> context.rotate(i * 30 * Math.PI / 180); </span></li> <li> <span> context.fillStyle = </span><span class="string">"red"</span><span>; </span> </li> <li class="alt"><span> context.fillRect(0,0,20,20); </span></li> <li><span> context.restore(); </span></li> <li class="alt"><span> } </span></li> <li><span> </span></li> <li class="alt"><span> }; </span></li> <li><span></script>
运行结果: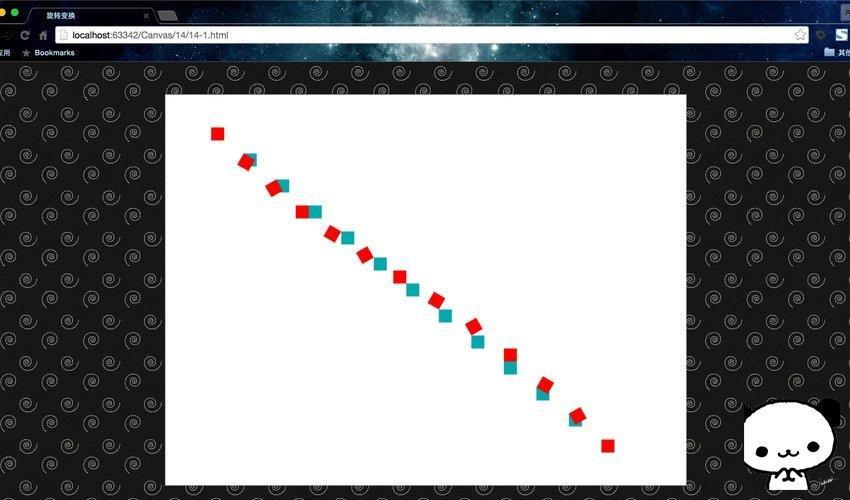
这里用for循环绘制了14对正方形,其中蓝色是旋转前的正方形,红色是旋转后的正方形。每次旋转都以正方形左上角顶点为原点进行旋转。每次绘制都被save()与restore()包裹起来,每次旋转前都移动了坐标系。童鞋们可以自己动动手,实践一下,就能体会到旋转变换的奥妙了。

Hot AI Tools

Undresser.AI Undress
AI-powered app for creating realistic nude photos

AI Clothes Remover
Online AI tool for removing clothes from photos.

Undress AI Tool
Undress images for free

Clothoff.io
AI clothes remover

Video Face Swap
Swap faces in any video effortlessly with our completely free AI face swap tool!

Hot Article
Hot Tools

Notepad++7.3.1
Easy-to-use and free code editor

SublimeText3 Chinese version
Chinese version, very easy to use

Zend Studio 13.0.1
Powerful PHP integrated development environment

Dreamweaver CS6
Visual web development tools

SublimeText3 Mac version
God-level code editing software (SublimeText3)
Hot Topics
 1389
1389
 52
52

 Table Border in HTML
Sep 04, 2024 pm 04:49 PM
Table Border in HTML
Sep 04, 2024 pm 04:49 PM
Guide to Table Border in HTML. Here we discuss multiple ways for defining table-border with examples of the Table Border in HTML.
 Nested Table in HTML
Sep 04, 2024 pm 04:49 PM
Nested Table in HTML
Sep 04, 2024 pm 04:49 PM
This is a guide to Nested Table in HTML. Here we discuss how to create a table within the table along with the respective examples.
 HTML margin-left
Sep 04, 2024 pm 04:48 PM
HTML margin-left
Sep 04, 2024 pm 04:48 PM
Guide to HTML margin-left. Here we discuss a brief overview on HTML margin-left and its Examples along with its Code Implementation.
 HTML Table Layout
Sep 04, 2024 pm 04:54 PM
HTML Table Layout
Sep 04, 2024 pm 04:54 PM
Guide to HTML Table Layout. Here we discuss the Values of HTML Table Layout along with the examples and outputs n detail.
 HTML Input Placeholder
Sep 04, 2024 pm 04:54 PM
HTML Input Placeholder
Sep 04, 2024 pm 04:54 PM
Guide to HTML Input Placeholder. Here we discuss the Examples of HTML Input Placeholder along with the codes and outputs.
 Moving Text in HTML
Sep 04, 2024 pm 04:45 PM
Moving Text in HTML
Sep 04, 2024 pm 04:45 PM
Guide to Moving Text in HTML. Here we discuss an introduction, how marquee tag work with syntax and examples to implement.
 HTML Ordered List
Sep 04, 2024 pm 04:43 PM
HTML Ordered List
Sep 04, 2024 pm 04:43 PM
Guide to the HTML Ordered List. Here we also discuss introduction of HTML Ordered list and types along with their example respectively
 HTML onclick Button
Sep 04, 2024 pm 04:49 PM
HTML onclick Button
Sep 04, 2024 pm 04:49 PM
Guide to HTML onclick Button. Here we discuss their introduction, working, examples and onclick Event in various events respectively.
