

ZTE new pivot system offline installation ceph 16.2.10


About ZTE New Pivot System
ZTE New Pivot Operating System is based on the Linux stable kernel and is divided into embedded operating system (NewStart CGEL) and server operating system (NewStart CGSL ), desktop operating system (NewStart NSDL), after nearly 10 years of accumulation and development by a professional R&D team, the product has formed outstanding advantages of security reinforcement, independent controllability, and easy-to-use management. At present, ZTE's new pivot operating system has been put into use in major domestic and foreign telecom operators, state-owned large and medium-sized enterprises and e-government solutions, serving the bottom layer of switching networks, core networks, backbone networks, smart cities, video surveillance and other systems. The above is reproduced from someone.
Background
In the context of national digital transformation and localization substitution, especially government affairs projects, now basically use localized CPUs and operating systems to carry their businesses and achieve independent innovation. And safe and reliable. In this article, we used ZTE New Fulcrum System (CGSL) and Haiguang processor to conduct offline deployment of ceph. The following method also applies to Dragon Lizard and centos8.
Making an offline installation package
To start making the offline rpm source of ceph, you first need to find a ZTE new pivot machine that is connected to the network. ZTE's new pivot system will install some components (such as libvirt, qemu) by default. In order to avoid dependency conflicts with other packages when installing ceph, you can choose minimal installation when installing the system. Other components in the project that need to be installed will be installed later. In addition to ceph, I also use libvirt packages. The system installs a lower version of libvirt by default. I deploy and create offline rpm packages manually.
yum source configuration
ZTE New Pivot System currently does not find an official online yum source address. For online installation, you can use the yum sources of Dragon Lizard and epel8. The following is the configuration of the yum source.
AnolisOS.repo[AppStream]name=AnolisOS-8.6 - AppStreambaseurl=http://mirrors.openanolis.cn/anolis/8.6/AppStream/x86_64/osenabled=1gpgcheck=0gpgkey=file:///etc/pki/rpm-gpg/RPM-GPG-KEY-CGSL-V6[BaseOS]name=AnolisOS-8.6 - BaseOSbaseurl=http://mirrors.openanolis.cn/anolis/8.6/BaseOS/x86_64/osenabled=1gpgcheck=0gpgkey=file:///etc/pki/rpm-gpg/RPM-GPG-KEY-CGSL-V6[DDE]name=AnolisOS-8.6 - DDEbaseurl=http://mirrors.openanolis.cn/anolis/8.6/DDE/x86_64/osenabled=1gpgcheck=0gpgkey=file:///etc/pki/rpm-gpg/RPM-GPG-KEY-CGSL-V6[AppStream-debuginfo]name=AnolisOS-8.6 - AppStream Debuginfobaseurl=http://mirrors.openanolis.cn/anolis/8.6/AppStream/x86_64/debugenabled=1gpgcheck=0gpgkey=file:///etc/pki/rpm-gpg/RPM-GPG-KEY-CGSL-V6[BaseOS-debuginfo]name=AnolisOS-8.6 - BaseOS Debuginfobaseurl=http://mirrors.openanolis.cn/anolis/8.6/BaseOS/x86_64/debugenabled=1gpgcheck=0gpgkey=file:///etc/pki/rpm-gpg/RPM-GPG-KEY-CGSL-V6[Plus-debuginfo]name=AnolisOS-8.6 - Plus Debuginfobaseurl=http://mirrors.openanolis.cn/anolis/8.6/Plus/x86_64/debugenabled=1gpgcheck=0gpgkey=file:///etc/pki/rpm-gpg/RPM-GPG-KEY-CGSL-V6[PowerTools-debuginfo]name=AnolisOS-8.6 - PowerTools Debuginfobaseurl=http://mirrors.openanolis.cn/anolis/8.6/PowerTools/x86_64/debugenabled=1gpgcheck=0gpgkey=file:///etc/pki/rpm-gpg/RPM-GPG-KEY-CGSL-V6[DDE-debuginfo]name=AnolisOS-8.6 - DDE Debuginfobaseurl=http://mirrors.openanolis.cn/anolis/8.6/DDE/x86_64/debugenabled=1gpgcheck=0gpgkey=file:///etc/pki/rpm-gpg/RPM-GPG-KEY-CGSL-V6[Extras]name=AnolisOS-8.6 - Extrasbaseurl=http://mirrors.openanolis.cn/anolis/8.6/Extras/x86_64/osenabled=1gpgcheck=0gpgkey=file:///etc/pki/rpm-gpg/RPM-GPG-KEY-CGSL-V6[HighAvailability]name=AnolisOS-8.6 - HighAvailabilitybaseurl=http://mirrors.openanolis.cn/anolis/8.6/HighAvailability/x86_64/osenabled=1gpgcheck=0gpgkey=file:///etc/pki/rpm-gpg/RPM-GPG-KEY-CGSL-V6[Plus]name=AnolisOS-8.6 - Plusbaseurl=http://mirrors.openanolis.cn/anolis/8.6/Plus/x86_64/osenabled=1gpgcheck=0gpgkey=file:///etc/pki/rpm-gpg/RPM-GPG-KEY-CGSL-V6[PowerTools]name=AnolisOS-8.6 - PowerToolsbaseurl=http://mirrors.openanolis.cn/anolis/8.6/PowerTools/x86_64/osenabled=1gpgcheck=0gpgkey=file:///etc/pki/rpm-gpg/RPM-GPG-KEY-CGSL-V6
epel.repo[epel]name=Extra Packages for Enterprise Linux 8 - $basearch# It is much more secure to use the metalink, but if you wish to use a local mirror# place its address here.baseurl=https://mirrors.aliyun.com/epel/8/Everything/$basearchmetalink=https://mirrors.fedoraproject.org/metalink?repo=epel-8&arch=$basearch&infra=$infra&content=$contentdirenabled=1gpgcheck=1countme=1gpgkey=file:///etc/yum.repos.d/RPM-GPG-KEY-EPEL-8
ceph.repo[Ceph]name=Ceph packages for $basearchbaseurl=http://download.ceph.com/rpm-pacific/el8/$basearchenabled=1gpgcheck=0type=rpm-mdgpgkey=https://download.ceph.com/keys/release.asc[Ceph-noarch]name=Ceph noarch packagesbaseurl=http://download.ceph.com/rpm-pacific/el8/noarchenabled=1gpgcheck=0type=rpm-mdgpgkey=https://download.ceph.com/keys/release.asc[ceph-source]name=Ceph source packagesbaseurl=http://download.ceph.com/rpm-pacific/el8/SRPMSenabled=1gpgcheck=0type=rpm-mdgpgkey=https://download.ceph.com/keys/release.asc
Configure yum cache:
[main]gpgcheck=1installonly_limit=3clean_requirements_on_remove=Truebest=Trueskip_if_unavailable=Falsecachedir=/data/yumkeepcache=1
Install ceph
yum install ceph -y
Make an offline warehouse
find /data/cache -name "*.rpm" -exec cp {} /mnt \;createrepo /mnttar -zcvf offline.tar.gz mnt/Install ceph
Use the offline rpm you made Package installation ceph.
tar -zxvf offline.tar.gz cd mntrpm -ivh *.rpm --nodeps --force
Deploying monitor nodes
The Ceph cluster must have at least one monitor, and the required number of OSDs should be at least the same as the number of object copies stored in the cluster. Booting the initial mon is the first step in deploying a Ceph storage cluster. Here I create three mons directly on node1, node2, and node3.
Add monitor on node1
Generate a unique fsid for the cluster. fsid is the unique identifier of the cluster and represents the file system ID of the Ceph storage cluster mainly used for the Ceph file system.
uuidgen
Create a ceph configuration file and add the generated fsid to the configuration file.
vim /etc/ceph/ceph.conf[global]fsid=9c079a1f-6fc2-4c59-bd4d-e8bc232d33a4mon initial members = node1mon host = 192.168.2.16public network = 192.168.2.0/24auth cluster required = cephxauth service required = cephxauth client required = cephxosd journal size = 1024osd pool default size = 3osd pool default min size = 2osd pool default pg num = 8osd pool default pgp num = 8osd crush chooseleaf type = 1
Create a keyring and generate a monitor keyring to prepare for the cluster. Monitors communicate with each other through keys. When booting initial monitoring, the generated keyring with the monitoring key must be provided.
ceph-authtool --create-keyring /tmp/ceph.mon.keyring --gen-key -n mon. --cap mon 'allow *'
Create an administrative keyring and add users to the keyring of client.admin. A user must be created and added to the monitor keyring to use the CLI tool.
ceph-authtool --create-keyring /etc/ceph/ceph.client.admin.keyring --gen-key -n client.admin --cap mon 'allow *' --cap osd 'allow *' --cap mds 'allow *' --cap mgr 'allow *'
Generate boot osd key, generate user and add user to client.bootstrap-osd keyring.
ceph-authtool --create-keyring /var/lib/ceph/bootstrap-osd/ceph.keyring --gen-key -n client.bootstrap-osd --cap mon 'profile bootstrap-osd' --cap mgr 'allow r'
Add the generated key to ceph.mon.keyring.
ceph-authtool /tmp/ceph.mon.keyring --import-keyring /etc/ceph/ceph.client.admin.keyringceph-authtool /tmp/ceph.mon.keyring --import-keyring /var/lib/ceph/bootstrap-osd/ceph.keyring
Change the owner of ceph.mon.keyring.
chown ceph:ceph /tmp/ceph.mon.keyring
When generating monitor mapping, the host name, host IP address and FSID are required. Save it as :/tmp/monmap.
monmaptool --create --add `hostname` 192.168.2.16--fsid 9c079a1f-6fc2-4c59-bd4d-e8bc232d33a4 /tmp/monmap
Create a default data directory on the monitor host. The directory name is in {cluster-name}-{hostname} format.
sudo -u ceph mkdir /var/lib/ceph/mon/ceph-`hostname`
Initialize the monitor on the node1 node.
sudo -u ceph ceph-mon --mkfs -i `hostname` --monmap /tmp/monmap --keyring /tmp/ceph.mon.keyring
Start mon.
systemctl start ceph-mon@`hostname` && systemctl enable ceph-mon@`hostname`
Install mon on the other two nodes
Copy the key and configuration file to the other nodes.
scp /tmp/ceph.mon.keyring ceph2:/tmp/ceph.mon.keyringscp /etc/ceph/* root@ceph2:/etc/ceph/scp /var/lib/ceph/bootstrap-osd/ceph.keyring root@ceph2:/var/lib/ceph/bootstrap-osd/scp /tmp/ceph.mon.keyring ceph3:/tmp/ceph.mon.keyringscp /etc/ceph/* root@ceph3:/etc/ceph/scp /var/lib/ceph/bootstrap-osd/ceph.keyring root@ceph3:/var/lib/ceph/bootstrap-osd/
Modify ceph.mon.keyring owner and group to ceph on both nodes.
chown ceph.ceph /tmp/ceph.mon.keyring
Get monmap information.
ceph mon getmap -o /tmp/ceph.mon.mapgot monmap epoch 1
Perform mon initialization on the mon node.
sudo -u ceph ceph-mon --mkfs -i `hostname` --monmap /tmp/ceph.mon.map --keyring /tmp/ceph.mon.keyringsudo -u ceph ceph-mon --mkfs -i `hostname` --monmap /tmp/ceph.mon.map --keyring /tmp/ceph.mon.keyring
Start mon on both nodes.
systemctl start ceph-mon@`hostname` && systemctl enable ceph-mon@`hostname`
Modify ceph.conf and restart ceph-mon (all node operations).
vim /etc/ceph/ceph.confmon initial members = node1,node2,node3mon host = 192.168.2.16,192.168.2.17,192.168.2.18systemctl restart ceph-mon@`hostname`
Remove mon
ceph mon remove {mon-id}Add osd
Ceph can use its ceph-volume tool to prepare logical volumes, disks, or partitions. The ceph-volume tool will add indexes to create OSD IDs.
Create osd
Execute on node1.
ceph-volume lvm create --data /dev/sdb
The above creation process can be divided into two stages (preparation and activation):
ceph-volume lvm prepare --data /dev/sdb查看osd fsidceph-volume lvm listceph-volume lvm activate {ID} {FSID}Start each node osd process.
#node1systemctl restart ceph-osd@0systemctl enable ceph-osd@0 #node2systemctl restart ceph-osd@1systemctl enable ceph-osd@1#node3systemctl restart ceph-osd@2systemctl enable ceph-osd@2
Create MGR
On each node running the ceph-mon daemon, you should also set up a ceph-mgr daemon.
Create key directory
All mgr nodes must be executed.
sudo -u ceph mkdir /var/lib/ceph/mgr/ceph-`hostname -s`cd /var/lib/ceph/mgr/ceph-`hostname -s`
Create authentication key
ceph auth get-or-create mgr.`hostname -s` mon 'allow profile mgr' osd 'allow *' mds 'allow *' > keyringchown ceph.ceph /var/lib/ceph/mgr/ceph-`hostname`/keyring
Start mgr daemon
systemctl enable ceph-mgr@`hostname -s` && systemctl start ceph-mgr@`hostname -s`或者ceph-mgr -i `hostname`
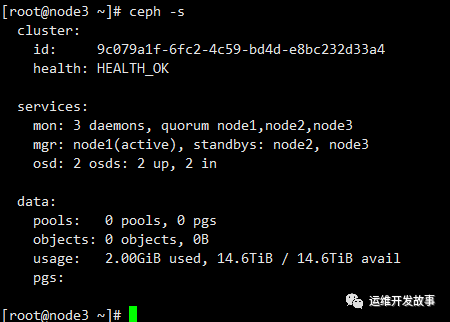
Finally check the ceph running status, I only added two osds.
The above is the detailed content of ZTE new pivot system offline installation ceph 16.2.10. For more information, please follow other related articles on the PHP Chinese website!

Hot AI Tools

Undresser.AI Undress
AI-powered app for creating realistic nude photos

AI Clothes Remover
Online AI tool for removing clothes from photos.

Undress AI Tool
Undress images for free

Clothoff.io
AI clothes remover

Video Face Swap
Swap faces in any video effortlessly with our completely free AI face swap tool!

Hot Article
Hot Tools

Notepad++7.3.1
Easy-to-use and free code editor

SublimeText3 Chinese version
Chinese version, very easy to use

Zend Studio 13.0.1
Powerful PHP integrated development environment

Dreamweaver CS6
Visual web development tools

SublimeText3 Mac version
God-level code editing software (SublimeText3)
Hot Topics
 1386
1386
 52
52

 Unable to access mysql from terminal
Apr 08, 2025 pm 04:57 PM
Unable to access mysql from terminal
Apr 08, 2025 pm 04:57 PM
Unable to access MySQL from the terminal may be due to: MySQL service not running; connection command error; insufficient permissions; firewall blocks connection; MySQL configuration file error.
 How to create oracle database How to create oracle database
Apr 11, 2025 pm 02:36 PM
How to create oracle database How to create oracle database
Apr 11, 2025 pm 02:36 PM
To create an Oracle database, the common method is to use the dbca graphical tool. The steps are as follows: 1. Use the dbca tool to set the dbName to specify the database name; 2. Set sysPassword and systemPassword to strong passwords; 3. Set characterSet and nationalCharacterSet to AL32UTF8; 4. Set memorySize and tablespaceSize to adjust according to actual needs; 5. Specify the logFile path. Advanced methods are created manually using SQL commands, but are more complex and prone to errors. Pay attention to password strength, character set selection, tablespace size and memory
 Do mysql need to pay
Apr 08, 2025 pm 05:36 PM
Do mysql need to pay
Apr 08, 2025 pm 05:36 PM
MySQL has a free community version and a paid enterprise version. The community version can be used and modified for free, but the support is limited and is suitable for applications with low stability requirements and strong technical capabilities. The Enterprise Edition provides comprehensive commercial support for applications that require a stable, reliable, high-performance database and willing to pay for support. Factors considered when choosing a version include application criticality, budgeting, and technical skills. There is no perfect option, only the most suitable option, and you need to choose carefully according to the specific situation.
 Can mysql and mariadb be installed on the same server?
Apr 08, 2025 pm 05:00 PM
Can mysql and mariadb be installed on the same server?
Apr 08, 2025 pm 05:00 PM
MySQL and MariaDB can be installed simultaneously on a single server to meet the needs of different projects for specific database versions or features. The following details need to be paid attention to: different port numbers; different data directories; reasonable allocation of resources; monitoring version compatibility.
 Can mysql run on android
Apr 08, 2025 pm 05:03 PM
Can mysql run on android
Apr 08, 2025 pm 05:03 PM
MySQL cannot run directly on Android, but it can be implemented indirectly by using the following methods: using the lightweight database SQLite, which is built on the Android system, does not require a separate server, and has a small resource usage, which is very suitable for mobile device applications. Remotely connect to the MySQL server and connect to the MySQL database on the remote server through the network for data reading and writing, but there are disadvantages such as strong network dependencies, security issues and server costs.
 What is Linux actually good for?
Apr 12, 2025 am 12:20 AM
What is Linux actually good for?
Apr 12, 2025 am 12:20 AM
Linux is suitable for servers, development environments, and embedded systems. 1. As a server operating system, Linux is stable and efficient, and is often used to deploy high-concurrency applications. 2. As a development environment, Linux provides efficient command line tools and package management systems to improve development efficiency. 3. In embedded systems, Linux is lightweight and customizable, suitable for environments with limited resources.
 Where is the Redis restart service
Apr 10, 2025 pm 02:36 PM
Where is the Redis restart service
Apr 10, 2025 pm 02:36 PM
How to restart the Redis service in different operating systems: Linux/macOS: Use the systemctl command (systemctl restart redis-server) or the service command (service redis-server restart). Windows: Use the services.msc tool (enter "services.msc" in the Run dialog box and press Enter) and right-click the "Redis" service and select "Restart".
 Who invented the mac system
Apr 12, 2025 pm 05:12 PM
Who invented the mac system
Apr 12, 2025 pm 05:12 PM
The macOS operating system was invented by Apple. Its predecessor, System Software, was launched in 1984. After many iterations, it was updated to Mac OS X in 2001 and changed its name to macOS in 2012.
