How to change contact photos on iPhone
iOS 17 is finally here, and it includes a lot of new features. Let's learn how to change contact photos on iPhone in today's tutorial.
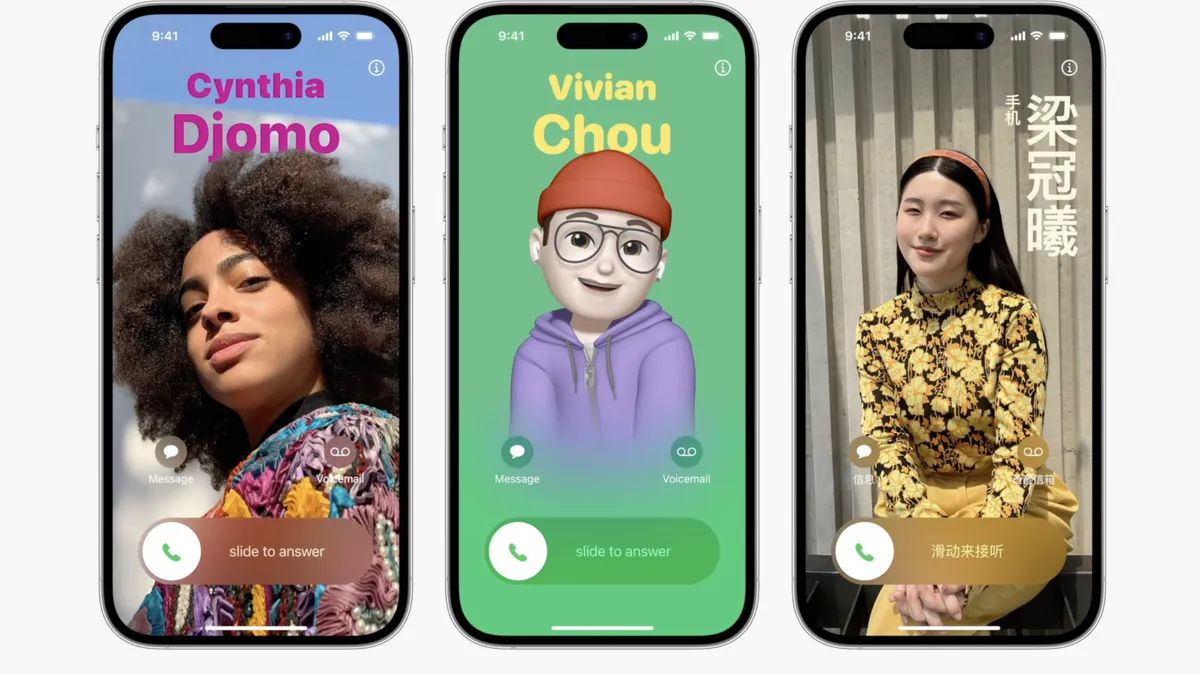
At the 2023 WWDC event, Apple announced a series of exciting products and upcoming software updates. One of the notable features of iOS 17 is the option to customize your contact photos and posters, providing a unique way to greet others when they receive a call from you on iPhone.
This innovative feature for iOS is designed to make phone calls more personal and user-friendly, allowing you to choose how they appear on the recipient's screen. If you're eager to get your hands on this new feature and greet your loved ones in a personalized way when making calls, here's a step-by-step guide on how to change contact photos and posters on iPhone.
What are Contact Photos and Posters on iOS 17?
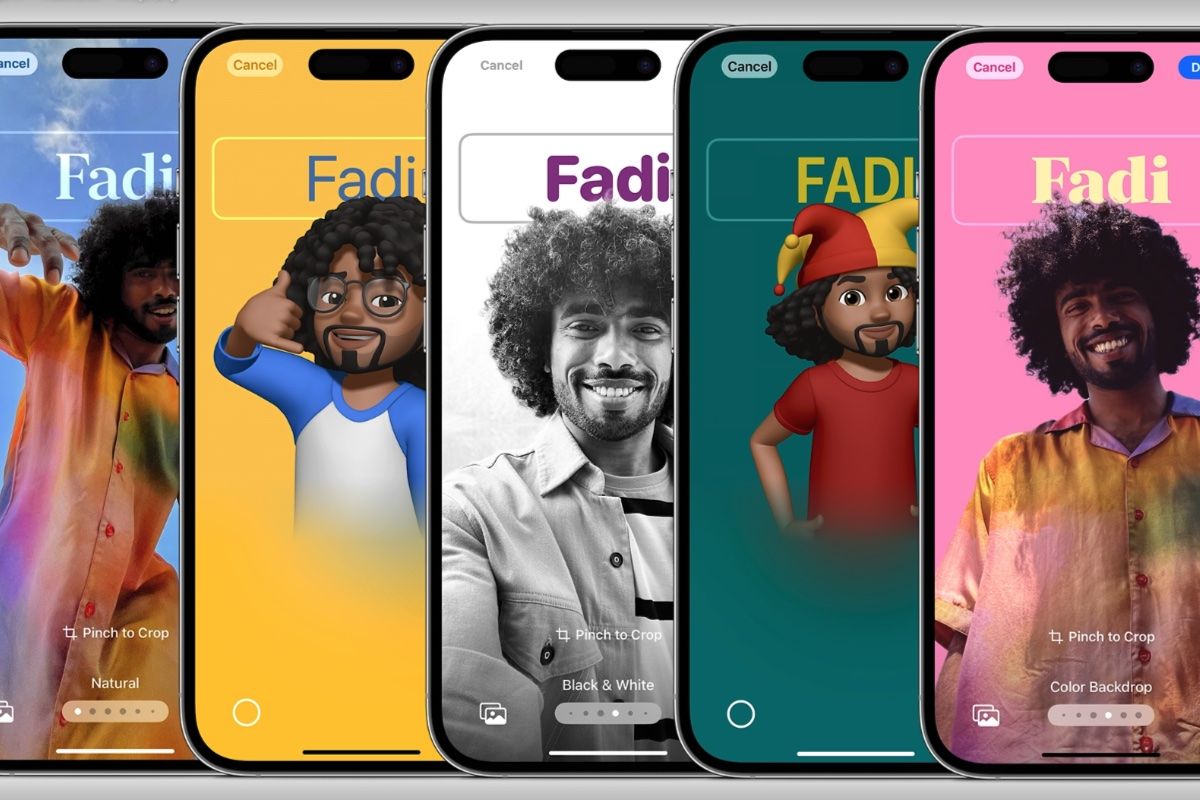
In iOS 17, users can customize the look of their iPhone for specific people, with the introduction of Contact Photos and Posters features. With this feature, you have the option to choose from a variety of elements such as Memoji, personalized photos, and font styles to display your name when connecting with others.
This exciting new feature brings a new level of creativity and personalization to the act of greeting someone before they answer your call. By allowing users to choose their preferred photos, color schemes, font styles, and even Memoji, this feature ensures you can create unique contact posters that match your aesthetic preferences and showcase your unique style.
Change Contact Photos and Posters on iOS 17
The first step is to make a personal contact or create a "My Card" on your iPhone. This card can be customized later to include photos of your contacts and posters. Below is a guide for setting up and using this feature on your iPhone.
Step One: Create My Card
- Open the Contacts app on your iPhone and find the icon located in the upper right corner.
- Enter the name and other relevant details required for My Card.
- When finished, click "Add Phone".
- If necessary, enter your phone number and the applicable area code.
- Include any additional details to customize your My Card.
- After completing creating the contact, click "Done" in the upper right corner.
- Now, open the Settings app, scroll down, and select Contacts.
- Click "My Information".
- Select a recently created contact to set it as "My Business Card".
- That's it! You can now proceed to the next step and set up custom contact photos and posters on your iPhone.
Step Two: Change Contact Photos and Posters
On iPhone, you have Ability to set up and configure contact photos and posters for "My" business cards. Please refer to the previous step to create "My Business Card" first, and then follow the steps below to create contact photos and posters. let's start.
- Open the Contacts app on your iPhone and tap "My Cards" located at the top.
- Click on "Contact Photos and Posters".
- Next, tap on "Name" and enter the desired name that you want to be visible when calling someone.
- Similarly, set your last name.
- When finished, click "Edit" at the top.
- You will find three preset options for your contact photos and posters. Swipe to choose any preset.
- If you want to customize the preset, click "Customize" at the bottom.
- If you want to create new contact photos and posters, please click the " " icon in the lower right corner.
- Alternatively, you can swipe all the way to the right and click "New" at the bottom.
- Click and select the type of poster you wish to create for yourself.
How to create a contact poster from camera?
To create a contact poster using live photos, follow these steps:
- Click "Camera" at the bottom to start the process.
- Frame your shots however you want and customize your lens options to your liking.
- When you are ready, tap the shutter icon to capture the photo.
- If you are satisfied with the image you captured, click "Use Photo".
- If you want to retake the photo, tap "Retake" to take it again.
- The photo will now be added to your contact poster. Click your name at the top to customize.
- Click and select your preferred font from the available options at the top.
- Use the slider to customize the font weight of your name.
- Swipe through the options at the bottom and tap to choose your preferred name color.
- If desired, you can click on the color wheel to select a custom color.
- After selecting a color, use the slider at the bottom to adjust its vividness (if available).
- Click the X icon after completing customization.
- You can use the pinch gesture to zoom in or out on a photo.
- Click "Finish" after completing the custom contact poster.
This is how you can utilize your camera to capture photos in real time and use them as contact posters.
How to create a contact poster from your photo?
To create a contact poster using one of your existing photos, follow these steps:
- Click "Photos" at the bottom to combine one of your existing photos with the contact poster use together.
- Scroll through your photos and tap to select the one you like.
- Use the pinch gesture to zoom in or out of the photo as needed.
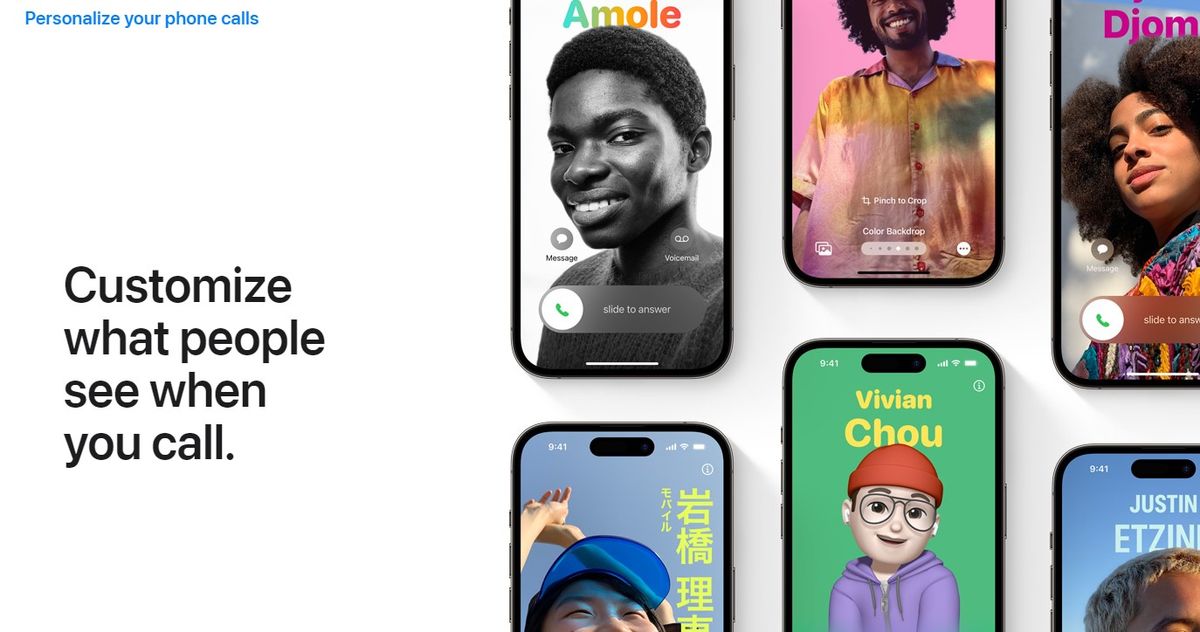
- Swipe left on the contact poster to explore the different effects you can apply to the poster. You should have access to the following options:
- Natural: This option maintains the natural look of the photo while applying a subtle blur effect to the top where the name appears.
- Natural Gradient: Selecting this option will add a natural gradient to the photo based on its overall color palette. You can click on the gradient color icon and choose your preferred shade.
- Seamless Background: This option adds a colored background to the image. Click the color icon to choose one of the presets or set a custom color to your liking. Use the slider at the bottom to adjust the vividness of the color.
- Seamless Background Mono: This option applies a monochrome filter to the image while allowing you to set a colored background, similar to the previous option. You can choose a custom background color or one of the presets, and use the slider to adjust the vividness of the color.
- Poster: This filter gives your image a toned look. You can choose a preset or custom color to use with this filter.
- Studio: This option applies the studio portrait lighting effect, which is also available in the Camera app. Click on the lighting icon to choose between high-key or low-key lighting based on your preference.
- Black and White: As the name suggests, this option applies a black and white filter to the image while allowing you to choose between a dark or light background.
- Colored Background: This option adds a colored background to the image while highlighting the subject. Click the color icon to choose one of the background presets, then use the slider to adjust its vividness.
- Duotone: This filter applies the popular duotone effect to your image, gradually transitioning between two colors. Click on the color icon to choose your favorite duotone filter.
- Washed: This filter applies a wash effect to the entire image, similar to the effect available for lock screen backgrounds since iOS 16. Click the color icon to select the filter's preferred color.
To further customize your contact poster using an existing image, follow these steps:
- Click the name at the top to adjust the font and Font weight.
- Swipe the options at the top and choose your favorite font.
- Use the slider to adjust the font weight to your liking.
- Click and select your preferred color from the available options at the bottom of the screen.
- Use the slider to adjust the vividness of the color as desired.
- When you are satisfied with the results, click the X icon to confirm your choice.
- If you want to disable the depth effect, tap the three-dot icon and then tap it to turn it off.
- Click "Done" in the upper right corner when you are satisfied with your contact poster.
How to make a Memoji contact poster?
To create and use Memoji contact posters on iPhone, follow these steps:
- Click "Memory" at the bottom.
- Select your favorite Memoji by clicking on it.
- Put your phone in front of your face to ensure that your face is recognized. Create the expression you want and when you're ready, tap the shutter icon to capture the image. Alternatively, you can click and select your preferred expression from the options at the bottom of the screen.
- After you finish capturing or selecting expressions, click "Next".
- Now, click on the color icon located in the lower left corner to select your preferred background color.
- Use the slider at the bottom to adjust the vividness of the selected color.
- Click on the name at the top.
- Swipe through the options and select your favorite font for your name from the available options at the top.
- Use the slider to adjust the font weight.
- Swipe through the options at the bottom and choose your preferred font color for your name.
- Click the X icon after completing customization.
- Finally, click "Finish" to complete the creation of the Memoji contact poster.
How to make a monogram contact poster?
To create a monogrammed contact poster on iPhone, follow these steps:
- Tap "Monogram" at the bottom of the screen.
- Click on the color icon and choose your preferred background color for the monogram.
- Click on the name at the top.
- Swipe through the options at the top and choose the font you like for your name.
- Use the slider to set your preferred font weight. This also affects the font weight of the first letter in the monogram.
- Swipe through the options at the bottom and choose your preferred font color for your name.
- Use the slider to adjust the vividness of the selected color.
- Click the X icon after completing the custom name.
- Click on your initials located in the lower right corner to customize them.
- Edit your initials as needed.
- Click "Finish" after finishing editing the initial letter.
- Again, click "Done" in the upper right corner once you are satisfied with your monogram contact poster.
After you have created your preferred contact poster, a preview of the poster will be displayed:
- If you are satisfied with the preview, click "Continue" at the bottom to continue.
- After clicking "Continue", you will be prompted to edit the contact photo. Click "Crop" to edit and reposition the image.
- Use pinch gestures to adjust and reposition the image as needed.
- Click "Select" once you are satisfied with the results.
- Various filter options will be available at the bottom of the screen. Click and select your preferred filter to apply it.
- Click "Done" in the upper right corner when you are satisfied with the results.
- Click "Update".
- You will be asked if you want to use this contact picture anywhere. Depending on your preference, click "Use" or "Not now."
- Now, click and enable the toggle for “Name and Photo Sharing”.
- Next, select one of the following options based on your privacy preferences: "Contacts Only" or "Always Ask"
Related Articles
-

Apple macOS Sonoma: Features, compatibility, and more
At its 2023 WWDC event, Apple showed off its latest technology and features included on current systems new and updated features. The Cupertino-based company has launched a new operating system called macOS Sonoma. Key highlights include desktop widget compatibility, new gaming modes and mobile...
-

New Apple Mac Pro features PCIe expansion for professional workflows
At its WWDC 2023 developer conference this week, Apple unveiled a variety of new hardware, including its new Apple Vision virtual reality headset and a new line of Mac Pros that are sure to interest tech enthusiasts and professionals alike. . The M2 Ultra chip has been integrated into the new Mac Pro, providing users with professional-level performance and experience
-

New Apple Mac Studio with M2 Ultra and M2 Max
Apple today launched its new Mac Studio at its Worldwide Developers Conference WWDC 2023, equipped with the company’s latest Apple chip processing technology, promising to redefine the boundaries of performance and connectivity. The new Mac Studio uses the new M2 Max and M2 Ultra chips, which are dedicated to greatly improving performance...
-

Mac Pro Apple Silicon Ultimate Edition debuts, 3 times faster than the previous generation
Apple today announced the launch of the new Mac Studio and Mac Pro, both of which are the most powerful ever Two Macs. Now equipped with M2 Ultra, Mac Pro has the most powerful chip in Apple’s history and PCIe expansion slots, making it even more flexible. Compared with the previous generation, it uses Intel processing...
The above is the detailed content of How to change contact photos on iPhone. For more information, please follow other related articles on the PHP Chinese website!

Hot AI Tools

Undresser.AI Undress
AI-powered app for creating realistic nude photos

AI Clothes Remover
Online AI tool for removing clothes from photos.

Undress AI Tool
Undress images for free

Clothoff.io
AI clothes remover

AI Hentai Generator
Generate AI Hentai for free.

Hot Article

Hot Tools

Notepad++7.3.1
Easy-to-use and free code editor

SublimeText3 Chinese version
Chinese version, very easy to use

Zend Studio 13.0.1
Powerful PHP integrated development environment

Dreamweaver CS6
Visual web development tools

SublimeText3 Mac version
God-level code editing software (SublimeText3)

Hot Topics
 How to sort photos by face on Windows 10 and 11
Aug 08, 2023 pm 10:41 PM
The operation of Windows is getting better and better with every version, with attractive features to improve the user experience. One feature users will want to explore on Windows 10 and 11 is the ability to sort photos by faces. This feature allows you to group photos of friends and family using facial recognition. Sounds fun, right? Read on to learn how to take advantage of this feature. Can I group photos by faces on Windows? Yes, you can use the Photos app to group pictures by faces on Windows 10 and 11. However, this feature is not available on the Photos app version. Additionally, you can link these photos to contacts using the People tab. Therefore, using this function you can
 8 Ways to Fix Contact Photos and Posters Disabled in iOS 17
Sep 22, 2023 am 10:33 AM
Learn the correct way to set up Contact Photos and Posters Contact Photos and Posters is a new feature that can be set up in iOS 17 for your contact cards and other contacts saved on your iPhone. For those who don’t know, the feature allows you to personalize the look of your call screen with custom posters, which you can design with photos, names, colors, fonts, emojis, and Memoji. Once created, contact posters can be shared with your saved contacts or restricted so that only a few selected people can view them. To learn how to create your own contact poster and how to share it with others, you can check out the guide at the following link: Contact Photos and Contact Posters Disabled: 8 Fixes Explained Despite Setting Contact Photos
 How to set multiple timers on iPhone iOS 17
Sep 18, 2023 am 09:01 AM
In iOS 17, you can set multiple timers on your iPhone using the Clock app, or use Siri to set it hands-free. We discuss both in this article. Let's take a look at them. Set Multiple Timers on iPhone Using the Clock App Open the Clock app on your iPhone and tap the Timers tab in the lower right corner. Now, set the hours, minutes, and seconds. You can use the "Label" and "When does the timer end" options to set a name for the timer and a preferred tone when the timer completes. This will help you differentiate between timers. Once done, click the "Start" button. Then, click the "+" icon in the upper right corner. Now, repeat the above steps to set multiple timers on iPhone. You can also browse
 How to add emergency contacts on Lalamove
Feb 29, 2024 pm 08:31 PM
When using the Lalamove software, there is an emergency contact function, which allows you to proactively contact the other party in an emergency. The following is an introduction to how to add an emergency contact. For those who don’t know yet, come and take a look with me. . First, open the Lalamove software on your mobile phone. After entering, click "My" in the lower right corner of the page to switch, and then click the gear-shaped icon in the upper right corner of the "My" page to enter the "Settings" function. 2. After coming to the settings page, click the "Add" button behind the "Emergency Contact" item. 3. Next, in the new interface, enter the phone number and name of the emergency contact according to the prompts. After entering, click the "Confirm Save" button below, and the emergency contact will be added.
 6 Fixes: How to solve the problem of contact poster not displaying properly on iPhone?
Sep 17, 2023 pm 12:41 PM
1. Check if your iPhone supports iOS17 If the contact poster feature does not work on your iPhone, the first thing you should do is check if your iPhone supports iOS17. This new feature is only available on iPhones running iOS 17, so be sure to update your phone to the latest update. Additionally, even if your iPhone is running iOS17, your contacts should have iPhones with iOS17 updates. Here is a list of all iPhones that support iOS17: iPhone15, 15PlusiPhone15Pro, 15ProMaxiPhone14, 14PlusiPhone14Pro, 1
 How to personalize your iPhone on the latest iOS 17
Sep 21, 2023 am 08:17 AM
How to Personalize Calls on iPhone Apple’s iOS 17 introduces a new feature called Contact Posters that allows you to personalize the look of your call screen on your iPhone. This feature allows you to design a poster using selected photos, colors, fonts, and Memoji as contact cards. So when you make a call, your custom image will appear on the recipient's iPhone exactly as you envisioned. You can choose to share your unique contact poster with all your saved contacts, or choose who can see it. Likewise, during a call exchange, you will also see other people's contact posters. Additionally, Apple lets you set specific contact photos for individual contacts, making calls from those contacts
 How to use NameDrop on iPhone iOS 17
Sep 22, 2023 pm 11:41 PM
With the launch of the new Apple iPhone15 series mobile phones and the launch of the latest iOS17 mobile operating system, a wealth of new features, adjustments and enhancements have been brought to Apple devices. Users may be wondering how to use the new NameDrop feature on iPhone and iOS17. This guide will provide a brief overview of how to share your contact information quickly and efficiently using the new NameDrop system available on iOS17. NameDrop is a feature that allows iPhone users to quickly share their contact information with others. It's a convenient tool for social events, business meetings or social gatherings where you need to exchange contact details with new friends. However, it's important to note that NameDrop only works for sending new contacts
 How to Make a Shopping List in the iOS 17 Reminders App on iPhone
Sep 21, 2023 pm 06:41 PM
How to Make a GroceryList on iPhone in iOS17 Creating a GroceryList in the Reminders app is very simple. You just add a list and populate it with your items. The app automatically sorts your items into categories, and you can even work with your partner or flat partner to make a list of what you need to buy from the store. Here are the full steps to do this: Step 1: Turn on iCloud Reminders As strange as it sounds, Apple says you need to enable reminders from iCloud to create a GroceryList on iOS17. Here are the steps for it: Go to the Settings app on your iPhone and tap [your name]. Next, select i


