

How to configure DHCP server on RHEL 9


DHCP is an acronym for Dynamic Host Configuration Protocol, a network protocol that automatically assigns IP addresses to client systems on a computer network . It allocates clients from the DHCP pool or the IP address range specified in its configuration. While you can manually assign static IPs to client systems, a DHCP server simplifies the process and dynamically assigns IP addresses to client systems on the network.
In this article, we will demonstrate how to install and configure a DHCP server on RHEL 9 / Rocky Linux 9.
Prerequisites
- Pre-installed RHEL 9 or Rocky Linux 9
- Normal user with sudo administrative rights
- Local configured YUM/DNF Repository or Red Hat Subscription for RHEL 9
- Internet Connection
Without further ado, let’s get into the DHCP server installation steps.
1. Configure a static IP address on RHEL 9 / Rocky Linux 9
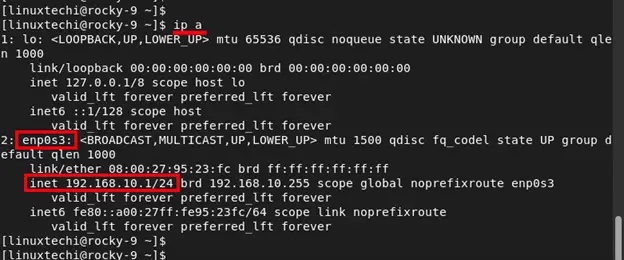
To begin, a static IP address must be set up on the RHEL or Rocky Linux system. There are multiple ways to do this, but the easiest and most intuitive is to use the nmtui or nmcli utility.
To confirm the IP address of your Linux system, please run the following ip command:
$ ip a
2. Install and configure DHCP Server
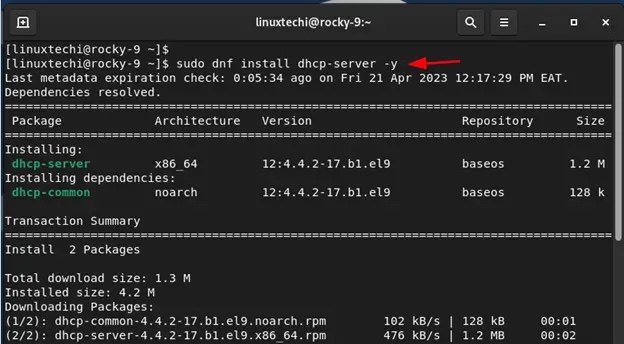
After configuring the static IP, the next step is to install the DHCP server. RHEL 9 or Rocky Linux 9 repository (BaseOS) provides the dhcp-server package by default. You can install it as shown:
$ sudo dnf install dhcp-server -y
Install dhcp After the server, we need to go further and configure the settings. So, open the DHCP configuration file:
$ sudo vi /etc/dhcp/dhcpd.conf
Paste the following lines of code into the configuration file. Be sure to configure the subnet to your preferred value:
default-lease-time 3600;max-lease-time 86400;authoritative;subnet 192.168.10.0 netmask 255.255.255.0 {range 192.168.10.100 192.168.10.200;option routers 192.168.10.1;option subnet-mask 255.255.255.0;option domain-name-servers 192.168.10.1;}Save and close the file.
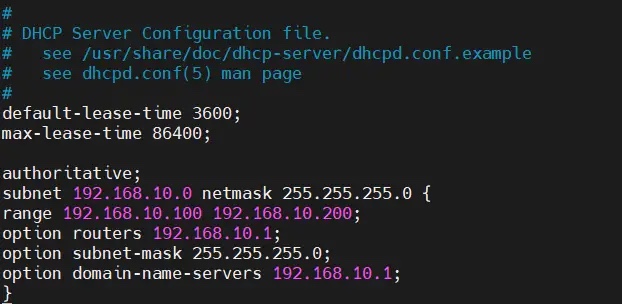
Let’s take a look at some of these values:
-
default-lease-time值指定 DHCP 服务器将地址租给客户端的时间。在这种情况下,默认租用时间值为 3600 秒或 1 小时。 -
max-lease-time是将 IP 租给客户端的最长持续时间。在我们的例子中,这被设置为 86400 秒或 24 小时。 - 下一部分是子网配置。在此设置中,
192.168.10.0是子网,255.255.255.0是子网掩码。IP 地址范围从192.168.10.100一直到192.168.10.200。 -
router选项定义默认网关。在本例中为192.168.10.1。 -
subnet-mask选项确定分配给每个客户端或主机的子网掩码。在本例中为255.255.255.0。 - 最后,
domain-name-servers选项指定 DNS 服务器。在本例中为192.168.10.1。
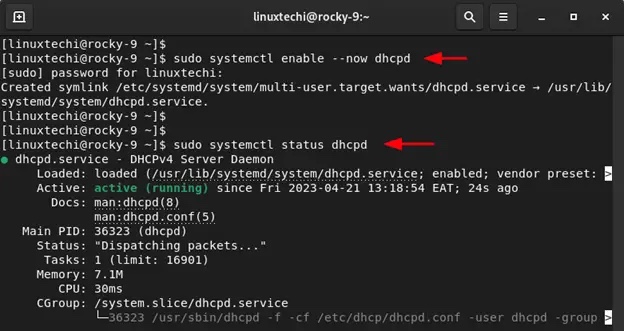
完成后,保存更改并退出。然后启用并启动 DHCP 服务。
$ sudo systemctl enable --now dhcpd$ sudo systemctl status dhcpd
请注意:
此时,DHCP 服务应该分发 IP 地址。如果存在其他 DHCP 服务器或路由器,关闭它以避免 IP 地址分配冲突是一个聪明的选择。这将导致一些客户端从 RHEL 或 Rocky Linux 服务器上的 DHCP 服务器获得 IP 分配,而其余的则从路由器获得 IP 分配,这当然不是你想要发生的事情。请牢记,在关闭局域网设置中的其他 DHCP 服务器。
3、测试 DHCP 服务器安装
在我们模拟的 LAN 设置中,你可以看到 Ubuntu 系统已经从 RHEL 或 Rocky Linux DHCP 服务器中选择了一个 IP。
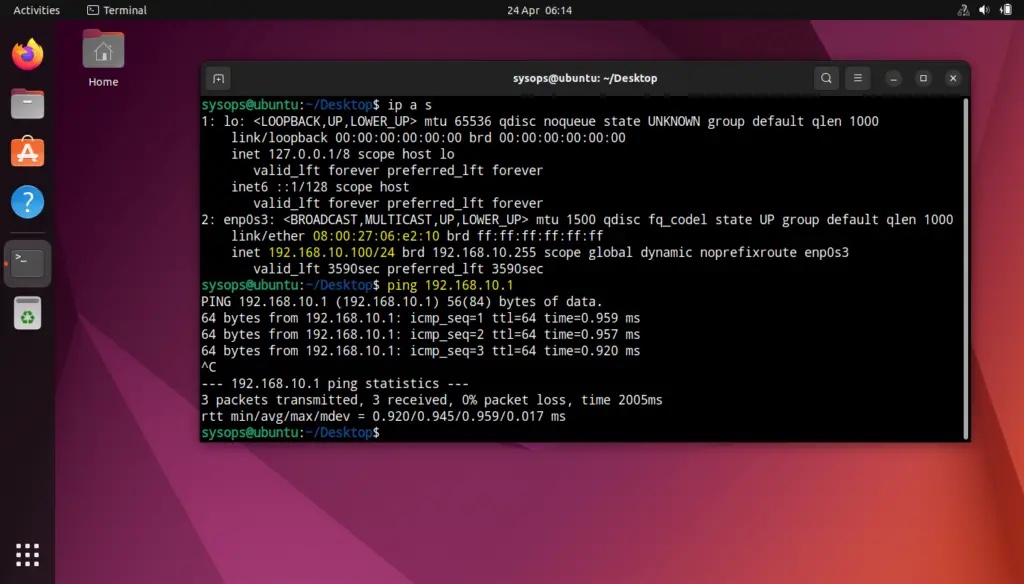
回到我们的 DHCP 服务器并在 /var/log/message 文件中搜索 Ubuntu 机器的 IP 地址:
$ sudo tail -50 /var/log/messages | grep -i 192.168.10.100

完美,上面的输出确认 Ubuntu 机器从我们的 DHCP 服务器获得了 IP 服务器。
结论
这篇文章到此结束。在本指南中,你学习了如何在 RHEL 9 / Rocky Linux 9 上安装和配置 DHCP 服务器。请在下面的评论部分发表你的疑问和反馈。
The above is the detailed content of How to configure DHCP server on RHEL 9. For more information, please follow other related articles on the PHP Chinese website!

Hot AI Tools

Undresser.AI Undress
AI-powered app for creating realistic nude photos

AI Clothes Remover
Online AI tool for removing clothes from photos.

Undress AI Tool
Undress images for free

Clothoff.io
AI clothes remover

AI Hentai Generator
Generate AI Hentai for free.

Hot Article
Hot Tools

Notepad++7.3.1
Easy-to-use and free code editor

SublimeText3 Chinese version
Chinese version, very easy to use

Zend Studio 13.0.1
Powerful PHP integrated development environment

Dreamweaver CS6
Visual web development tools

SublimeText3 Mac version
God-level code editing software (SublimeText3)
Hot Topics
 1371
1371
 52
52

 Win10 Ethernet Enable DHCP Repair Method Guide
Dec 30, 2023 pm 02:23 PM
Win10 Ethernet Enable DHCP Repair Method Guide
Dec 30, 2023 pm 02:23 PM
What happens when Windows 10 Ethernet prompts that dhcp is not enabled? Recently, some users have encountered such a problem when using computers. In order to help everyone use the network better, the editor will share the solution to the problem that Windows 10 Ethernet prompts that dhcp is not enabled. How to fix dhcp not enabled on win10 Ethernet: 1. First press the shortcut key "win+r", and then click run. 2. Then enter services.msc and press Enter. 3. Then you can find the "DHCPClient" service and double-click it to open it. 4. Finally, change the activation type to automatic and the service status to started, then press OK to save the settings and restart the local connection.
 How to solve the problem that eMule search cannot connect to the server
Jan 25, 2024 pm 02:45 PM
How to solve the problem that eMule search cannot connect to the server
Jan 25, 2024 pm 02:45 PM
Solution: 1. Check the eMule settings to make sure you have entered the correct server address and port number; 2. Check the network connection, make sure the computer is connected to the Internet, and reset the router; 3. Check whether the server is online. If your settings are If there is no problem with the network connection, you need to check whether the server is online; 4. Update the eMule version, visit the eMule official website, and download the latest version of the eMule software; 5. Seek help.
 Solution to the inability to connect to the RPC server and the inability to enter the desktop
Feb 18, 2024 am 10:34 AM
Solution to the inability to connect to the RPC server and the inability to enter the desktop
Feb 18, 2024 am 10:34 AM
What should I do if the RPC server is unavailable and cannot be accessed on the desktop? In recent years, computers and the Internet have penetrated into every corner of our lives. As a technology for centralized computing and resource sharing, Remote Procedure Call (RPC) plays a vital role in network communication. However, sometimes we may encounter a situation where the RPC server is unavailable, resulting in the inability to enter the desktop. This article will describe some of the possible causes of this problem and provide solutions. First, we need to understand why the RPC server is unavailable. RPC server is a
 Detailed explanation of CentOS installation fuse and CentOS installation server
Feb 13, 2024 pm 08:40 PM
Detailed explanation of CentOS installation fuse and CentOS installation server
Feb 13, 2024 pm 08:40 PM
As a LINUX user, we often need to install various software and servers on CentOS. This article will introduce in detail how to install fuse and set up a server on CentOS to help you complete the related operations smoothly. CentOS installation fuseFuse is a user space file system framework that allows unprivileged users to access and operate the file system through a customized file system. Installing fuse on CentOS is very simple, just follow the following steps: 1. Open the terminal and Log in as root user. 2. Use the following command to install the fuse package: ```yuminstallfuse3. Confirm the prompts during the installation process and enter `y` to continue. 4. Installation completed
 How to solve the problem that DHCP is not enabled in the local connection. Recommended solutions to the problem that the computer cannot access the Internet and prompts that the DHCP service is not enabled.
Mar 13, 2024 pm 12:07 PM
How to solve the problem that DHCP is not enabled in the local connection. Recommended solutions to the problem that the computer cannot access the Internet and prompts that the DHCP service is not enabled.
Mar 13, 2024 pm 12:07 PM
When many users use computers to connect to Ethernet, they will see the prompt "DHCP is not enabled" and don't know what to do. This is because the DHCP function is not enabled on the router. This article teaches you how to solve this problem. 1. Check the login information. To solve the problem of "DHCP is not enabled on the Ethernet", you need to log in to the router first. When logging in to a router, you usually need to obtain the router's gateway, username, and password information. This information is usually marked on the back of the router. The IP of the router is the so-called gateway address. The default gateway address of some routers is 192.168.1.1 or 192.168.0.1. The login account generally defaults to admin and the password is admin or 123456. 2. Log in to router management
 How to configure Dnsmasq as a DHCP relay server
Mar 21, 2024 am 08:50 AM
How to configure Dnsmasq as a DHCP relay server
Mar 21, 2024 am 08:50 AM
The role of a DHCP relay is to forward received DHCP packets to another DHCP server on the network, even if the two servers are on different subnets. By using a DHCP relay, you can deploy a centralized DHCP server in the network center and use it to dynamically assign IP addresses to all network subnets/VLANs. Dnsmasq is a commonly used DNS and DHCP protocol server that can be configured as a DHCP relay server to help manage dynamic host configurations in the network. In this article, we will show you how to configure dnsmasq as a DHCP relay server. Content Topics: Network Topology Configuring Static IP Addresses on a DHCP Relay D on a Centralized DHCP Server
 Best Practice Guide for Building IP Proxy Servers with PHP
Mar 11, 2024 am 08:36 AM
Best Practice Guide for Building IP Proxy Servers with PHP
Mar 11, 2024 am 08:36 AM
In network data transmission, IP proxy servers play an important role, helping users hide their real IP addresses, protect privacy, and improve access speeds. In this article, we will introduce the best practice guide on how to build an IP proxy server with PHP and provide specific code examples. What is an IP proxy server? An IP proxy server is an intermediate server located between the user and the target server. It acts as a transfer station between the user and the target server, forwarding the user's requests and responses. By using an IP proxy server
 How to enable TFTP server
Oct 18, 2023 am 10:18 AM
How to enable TFTP server
Oct 18, 2023 am 10:18 AM
The steps to start the TFTP server include selecting the TFTP server software, downloading and installing the software, configuring the TFTP server, and starting and testing the server. Detailed introduction: 1. When choosing TFTP server software, you first need to choose the TFTP server software that suits your needs. Currently, there are many TFTP server software to choose from, such as Tftpd32, PumpKIN, tftp-hpa, etc., which all provide simple and easy-to-use functions. interface and configuration options; 2. Download and install TFTP server software, etc.
