Sharing folders between host and guest of virt-manager

virt-manager Applications or software packages use the libvirt library to provide virtual machine management services. It has a desktop interface that helps create, delete and manage multiple virtual machines.
virt-manager desktop interface and its components provide flexible virtual machine management services for a variety of personal and business scenarios. It is a free and open source application mainly used for KVM virtual machines. However, it can also support other hypervisors such as Xen and LXC.
In the previous article, I explained How to use virt-manager to create a virtual machine. This article explains how to seamlessly access files and folders between the client and host.
Instructions about virtiofs
Shared files and folders are provided by the libvirt shared file system named virtiofs. It provides all functions and parameters for accessing the directory tree on the host machine. Since most virt-manager virtual machine configurations are translated into XML, shared files/folders can also be specified via XML files.
Sharing folders in virt-manager
First, make sure your client is powered off. In the virt-manager GUI, select the virtual machine and click "Open" to pop up the console settings.
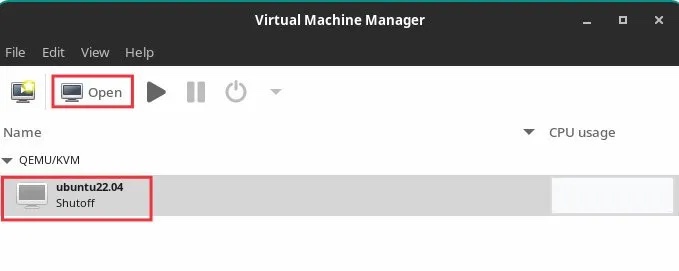
Open Settings
Click the icon on the toolbar that displays virtual hardware details. Then click "Memory" on the left panel.
Select the option "Enable shared memory". Click Apply.
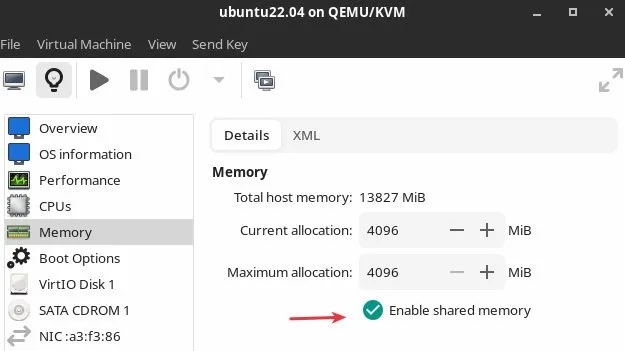
Enable the shared memory option
Then click "Add hardware" at the bottom.
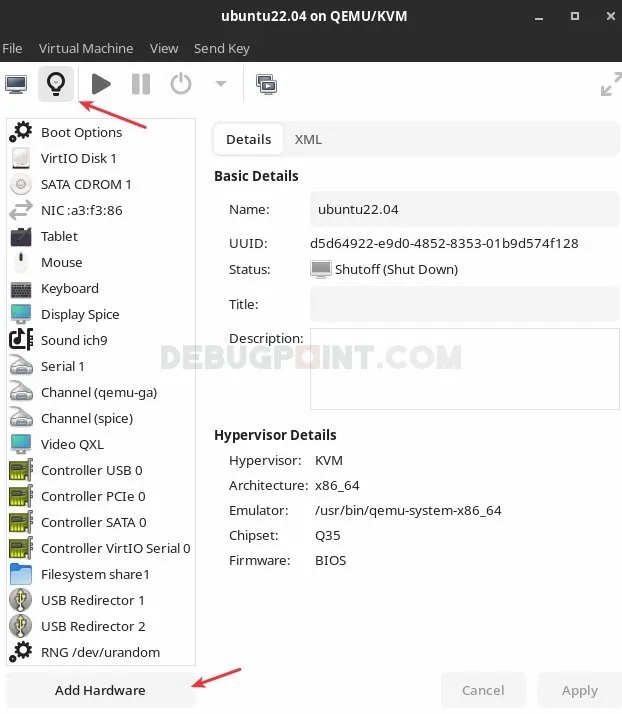
Click to add hardware
In the window to add new hardware, select "File system" from the left panel .
Then select "Driver" as "virtiofs" in the "Details" tab. Click "Browse > browse local browse local", select the host path you want to access in the client .
In Destination Path, enter any name you want. This is just a file label that will be used when mounting.
So, if I want to access the Pictures/Screenshots folder (/home/debugpoint/Pictures/Screenshots), example setup It could look like this:
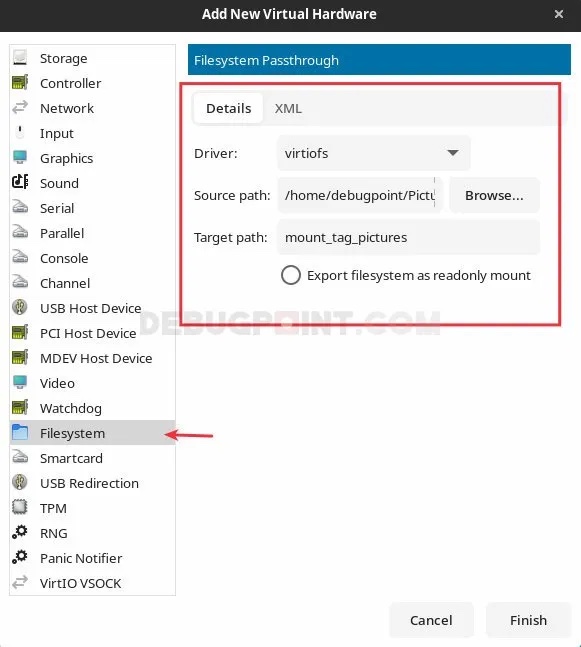
Add a new file system hardware
The following are the XML settings for the above configuration. You can find it in XML tags.
<filesystem type="mount" accessmode="passthrough"><driver type="virtiofs"/><binary path="/usr/libexec/virtiofsd"/><source dir="/home/debugpoint/Pictures/Screenshots"/><target dir="mount_tag_pictures"/><alias name="fs1"/><address type="pci" domain="0x0000" bus="0x08" slot="0x00" function="0x0"/></filesystem>
Click "Finish". In the main window of virt-manager, right-click the virtual machine and click Run to start the virtual machine. Make sure to click "show the graphical console" (if the virtual machine does not show up, click the monitor icon on the toolbar).
In the guest machine, create a folder where you want to mount the host folder. In this example, I used /mnt/pictures.
sudo mkdir /mnt/pictures
Finally, mount the hosts folder to this new folder using the label you created in the above step. Use the following command to do this in the terminal. Make sure to change the labels and folder names in the commands below according to your system.
sudo mount -t virtiofs mount_tag_pictures /mnt/pictures
Now you can browse folders and add/remove items seamlessly between host and guest in virt-manager.
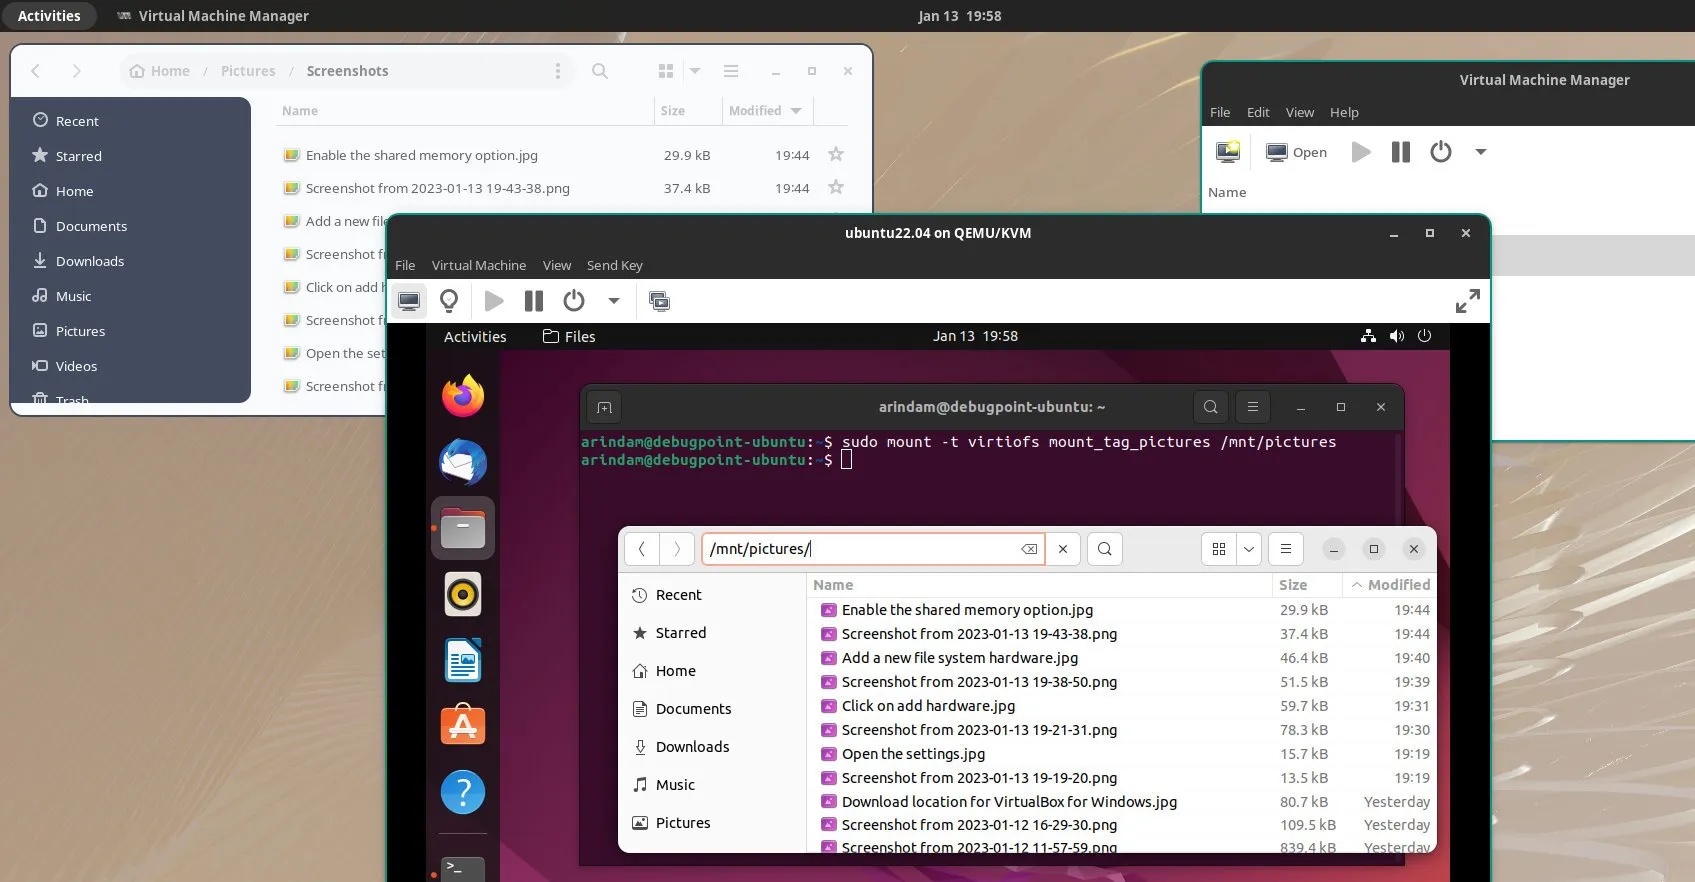
Accessing host files from the virt-manager client
Summary
I hope this solution can help you access host files and folders from the client. Remember, your user ID, which is the user used to launch the virt-manager application, should have the same permissions to access the hosts folder.
The above is the detailed content of Sharing folders between host and guest of virt-manager. For more information, please follow other related articles on the PHP Chinese website!

Hot AI Tools

Undresser.AI Undress
AI-powered app for creating realistic nude photos

AI Clothes Remover
Online AI tool for removing clothes from photos.

Undress AI Tool
Undress images for free

Clothoff.io
AI clothes remover

AI Hentai Generator
Generate AI Hentai for free.

Hot Article

Hot Tools

Notepad++7.3.1
Easy-to-use and free code editor

SublimeText3 Chinese version
Chinese version, very easy to use

Zend Studio 13.0.1
Powerful PHP integrated development environment

Dreamweaver CS6
Visual web development tools

SublimeText3 Mac version
God-level code editing software (SublimeText3)

Hot Topics
 What category does the operation and maintenance security audit system belong to?
Mar 05, 2025 pm 03:59 PM
This article examines operational security audit system procurement. It details typical categories (hardware, software, services), budget allocation (CAPEX, OPEX, project, training, contingency), and suitable government contracting vehicles (GSA Sch
 What are the job safety responsibilities of operation and maintenance personnel
Mar 05, 2025 pm 03:51 PM
This article details crucial security responsibilities for DevOps engineers, system administrators, IT operations staff, and maintenance personnel. It emphasizes integrating security into all stages of the SDLC (DevOps), implementing robust access c
 What does the operation and maintenance safety engineer do?
Mar 05, 2025 pm 04:00 PM
This article explores the roles and required skills of DevOps, security, and IT operations engineers. It details the daily tasks, career paths, and necessary technical and soft skills for each, highlighting the increasing importance of automation, c
 The difference between operation and maintenance security audit system and network security audit system
Mar 05, 2025 pm 04:02 PM
This article contrasts Operations Security (OpSec) and Network Security (NetSec) audit systems. OpSec focuses on internal processes, data access, and employee behavior, while NetSec centers on network infrastructure and communication security. Key
 What is operation and maintenance security?
Mar 05, 2025 pm 03:54 PM
This article examines DevSecOps, integrating security into the software development lifecycle. It details a DevOps security engineer's multifaceted role, encompassing security architecture, automation, vulnerability management, and incident response
 What is the prospect of safety operation and maintenance personnel?
Mar 05, 2025 pm 03:52 PM
This article examines essential skills for a successful security operations career. It highlights the need for technical expertise (network security, SIEM, cloud platforms), analytical skills (data analysis, threat intelligence), and soft skills (co
 What is operation and maintenance security?
Mar 05, 2025 pm 03:58 PM
DevOps enhances operational security by automating security checks within CI/CD pipelines, utilizing Infrastructure as Code for improved control, and fostering collaboration between development and security teams. This approach accelerates vulnerabi
 Main work of operation and maintenance security
Mar 05, 2025 pm 03:53 PM
This article details operational and maintenance (O&M) security, emphasizing vulnerability management, access control, security monitoring, data protection, and physical security. Key responsibilities and mitigation strategies, including proacti


