

How to install KVM on Rocky Linux 9 / AlmaLinux 9


KVM is a kernel virtual machine Kernel Virtualization Machine
Like most virtualization platforms, it combines hardware resources (such as CPU, memory, storage, network, graphics, etc. ) and assign them to clients that run independently of the host.
Prerequisites
- Pre-installed Rocky Linux 9/AlmaLinux 9
- sudo user with administrator rights
- Internet connection
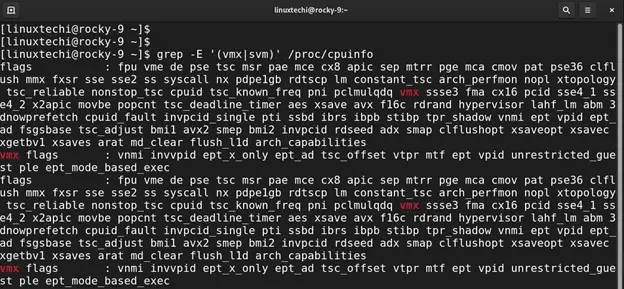
1. Verify whether hardware virtualization is enabled
First, you need to verify whether the virtualization function is enabled on your system. On most modern systems, this feature is enabled in the BIOS. But to be sure, you can verify that virtualization is enabled as shown in the picture.
This command detects the presence of VMX (Virtual Machine Extension), which is a CPU flag for Intel hardware virtualization, or SVM, which is a flag for AMD hardware virtualization.
$ cat /proc/cpuinfo | egrep "vmx|svm"
From the following output, you can see that our system has Intel hardware virtualization enabled:
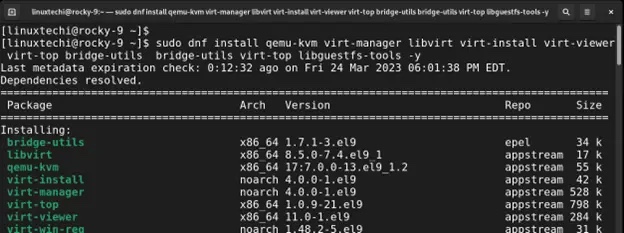
2. On Rocky Linux 9 / AlmaLinux 9 Install KVM
After ensuring that virtualization is enabled, the next step is to install KVM and management tools. To do this, run the following dnf command.
$ sudo dnf install qemu-kvm virt-manager libvirt virt-install virt-viewer virt-top bridge-utilsbridge-utils virt-top libguestfs-tools -y
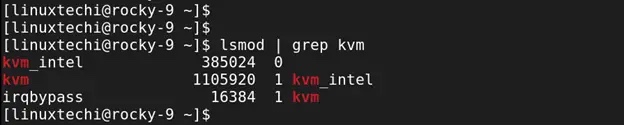
After the installation is complete, run the following command to check whether the required KVM modules are loaded.
$ lsmod | grep kvm
You should get the following output to confirm that the necessary modules have been loaded:
3. Start and enable the libvirtd daemon
Below In one step, be sure to start the libvirtd daemon. This is a server-side daemon component that can run and manage tasks on virtualized guests. It is used for the management of virtualization technologies such as Xen, KVM, ESXi, etc.
To start the libvirtd daemon, run the following command:
$ sudo systemctl start libvirtd
Be sure to enable the service to start on boot:
$ sudo systemctl enable --now libvirtd
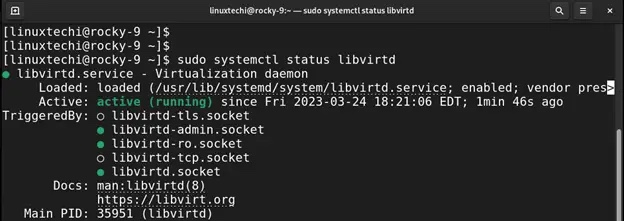
Verify that the libvirtd daemon is running, As shown below:
$ sudo systemctl status libvirtd
4. Set up the bridge interface
So far, we have installed KVM and all management tools. In fact, we can Proceed to start the virtual machine. However, it would be great if we could access the VM from outside the hypervisor network. To do this we need to create a bridge interface.
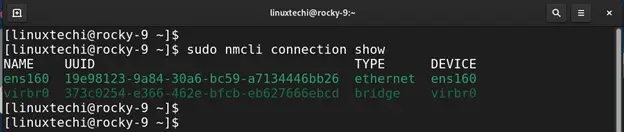
First, determine the network interfaces on the system.
$ sudo nmcli connection show
From the output, ens160 is the active network interface, be sure to pay attention to the interface in your case as you will be using it along the way.
To start creating the bridge, first, delete the connection with its UUID using the following syntax:
$ sudo nmcli connection delete UUID
In our example, the command will be:
$ sudo nmcli connection delete 19e98123-9a84-30a6-bc59-a7134446bb26
You will receive confirmation that the connection was successfully deleted.

Before proceeding, it is a good idea to have the following details ready:
- 网桥名称 – 新网桥的首选名称(例如
br1) - 设备名称 – 这是你的网络接口的名称。它将作为网桥的从属设备(例如,
ens160) - IP 地址/子网 – 桥接网络的 IP 地址和子网(例如
192.168.2.50/24)。请注意,这应该与你的网络子网和 IP 地址相对应。 - 网关 – 你网络的默认网关地址(例如
192.168.2.1) - DNS1 和 DNS2 – 首选 DNS 地址(例如
8.8.8.8和8.8.4.4)
继续,使用以下语法创建一个新的桥接接口。
$ sudo nmcli connection add type bridge autoconnect yes con-name BRIDGE NAME ifname BRIDGE NAME
在我们的例子中,br1 是首选的网桥接口名称。因此,命令将如图所示:
$ sudo nmcli connection add type bridge autoconnect yes con-name br1 ifname br1

在接下来的步骤中,你将通过指定 IP 子网、网关和 DNS 值来修改网桥。
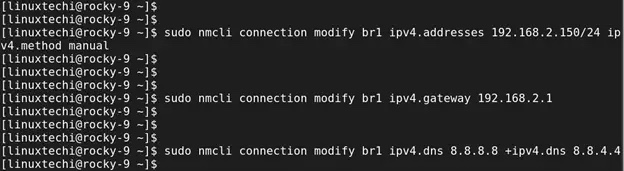
首先使用以下语法指定 IP 子网:
$ sudo nmcli connection modify BRIDGE NAME ipv4.addresses IP ADDRESS/SUBNET ipv4.method manual
根据我们的设置,命令将是:
$ sudo nmcli connection modify br1 ipv4.addresses 192.168.2.150/24 ipv4.method manual
接下来,使用以下语法指定网关地址:
$ sudo nmcli connection modify BRIDGE NAME ipv4.gateway GATEWAY
根据我们的网络,该命令采用以下格式:
$ sudo nmcli connection modify br1 ipv4.gateway 192.168.2.1
DNS 地址的语法如下:
$ sudo nmcli connection modify BRIDGE NAME ipv4.dns DNS1 +ipv4.dns DNS2
该命令采用以下格式:
$ sudo nmcli connection modify br1 ipv4.dns 8.8.8.8 +ipv4.dns 8.8.4.4
此后,使用以下命令添加网桥从属设备:
$ sudo nmcli connection add type bridge-slave autoconnect yes con-name DEVICE NAME ifname DEVICE NAME master BRIDGE NAME
使用我们的值,命令如图所示:
$ sudo nmcli connection add type bridge-slave autoconnect yes con-name ens160 ifname ens160 master br1
你将收到以下确认信息,表明已成功添加网桥从属设备。请记住,桥接从属设备是你的网络接口或适配器。

要确认网桥已创建,请运行以下命令:
$ sudo nmcli connection show
从输出中,你可以看到列出了网桥接口。

激要活它,请运行以下命令:
$ sudo nmcli connection up br1

此外,你可以使用 ip addr 命令验证:
$ ip addr | grep br1

最后,编辑网桥配置文件。
$ sudo vi /etc/qemu-kvm/bridge.conf
添加以下行:
allow all
然后重新启动虚拟化守护进程以应用更改
$ sudo systemctl restart libvirtd
5、创建虚拟机
安装 KVM 并配置桥接连接后,现在让我们创建一个虚拟机。在运行命令时,为登录用户授予必要的所有权,以避免切换到 root 用户。
$ sudo chown -R $USER:libvirt /var/lib/libvirt/
在命令行上,我们将使用以下语法使用 Ubuntu 20.04 ISO 镜像创建虚拟机。
$ virt-install \--name Ubuntu \--ram 2048 \--vcpus 2 \--disk path=/var/lib/libvirt/images/ubuntu-20.04.img,size=15 \--os-variant ubuntu20.04 \--network bridge=br1,model=virtio \--graphics vnc,listen=0.0.0.0 \--console pty,target_type=serial \--cdrom /home/linuxtechi/Downloads/ubuntu-20.04.4-desktop-amd64.iso
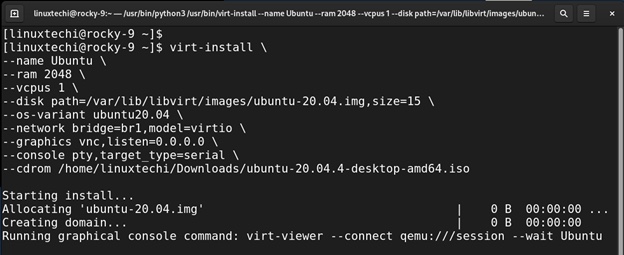
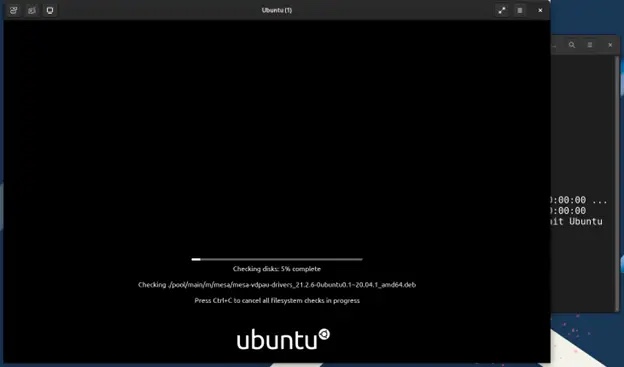
执行该命令后,将启动图形屏幕会话,并开始安装客户操作系统。
Summary
This concludes our article on how to install KVM on Rocky Linux 9 / AlmaLinux 9, your feedback is more than welcome.
The above is the detailed content of How to install KVM on Rocky Linux 9 / AlmaLinux 9. For more information, please follow other related articles on the PHP Chinese website!

Hot AI Tools

Undresser.AI Undress
AI-powered app for creating realistic nude photos

AI Clothes Remover
Online AI tool for removing clothes from photos.

Undress AI Tool
Undress images for free

Clothoff.io
AI clothes remover

AI Hentai Generator
Generate AI Hentai for free.

Hot Article
Hot Tools

Notepad++7.3.1
Easy-to-use and free code editor

SublimeText3 Chinese version
Chinese version, very easy to use

Zend Studio 13.0.1
Powerful PHP integrated development environment

Dreamweaver CS6
Visual web development tools

SublimeText3 Mac version
God-level code editing software (SublimeText3)
Hot Topics
 1386
1386
 52
52

 Difference between centos and ubuntu
Apr 14, 2025 pm 09:09 PM
Difference between centos and ubuntu
Apr 14, 2025 pm 09:09 PM
The key differences between CentOS and Ubuntu are: origin (CentOS originates from Red Hat, for enterprises; Ubuntu originates from Debian, for individuals), package management (CentOS uses yum, focusing on stability; Ubuntu uses apt, for high update frequency), support cycle (CentOS provides 10 years of support, Ubuntu provides 5 years of LTS support), community support (CentOS focuses on stability, Ubuntu provides a wide range of tutorials and documents), uses (CentOS is biased towards servers, Ubuntu is suitable for servers and desktops), other differences include installation simplicity (CentOS is thin)
 How to use docker desktop
Apr 15, 2025 am 11:45 AM
How to use docker desktop
Apr 15, 2025 am 11:45 AM
How to use Docker Desktop? Docker Desktop is a tool for running Docker containers on local machines. The steps to use include: 1. Install Docker Desktop; 2. Start Docker Desktop; 3. Create Docker image (using Dockerfile); 4. Build Docker image (using docker build); 5. Run Docker container (using docker run).
 How to install centos
Apr 14, 2025 pm 09:03 PM
How to install centos
Apr 14, 2025 pm 09:03 PM
CentOS installation steps: Download the ISO image and burn bootable media; boot and select the installation source; select the language and keyboard layout; configure the network; partition the hard disk; set the system clock; create the root user; select the software package; start the installation; restart and boot from the hard disk after the installation is completed.
 Centos options after stopping maintenance
Apr 14, 2025 pm 08:51 PM
Centos options after stopping maintenance
Apr 14, 2025 pm 08:51 PM
CentOS has been discontinued, alternatives include: 1. Rocky Linux (best compatibility); 2. AlmaLinux (compatible with CentOS); 3. Ubuntu Server (configuration required); 4. Red Hat Enterprise Linux (commercial version, paid license); 5. Oracle Linux (compatible with CentOS and RHEL). When migrating, considerations are: compatibility, availability, support, cost, and community support.
 How to view the docker process
Apr 15, 2025 am 11:48 AM
How to view the docker process
Apr 15, 2025 am 11:48 AM
Docker process viewing method: 1. Docker CLI command: docker ps; 2. Systemd CLI command: systemctl status docker; 3. Docker Compose CLI command: docker-compose ps; 4. Process Explorer (Windows); 5. /proc directory (Linux).
 Detailed explanation of docker principle
Apr 14, 2025 pm 11:57 PM
Detailed explanation of docker principle
Apr 14, 2025 pm 11:57 PM
Docker uses Linux kernel features to provide an efficient and isolated application running environment. Its working principle is as follows: 1. The mirror is used as a read-only template, which contains everything you need to run the application; 2. The Union File System (UnionFS) stacks multiple file systems, only storing the differences, saving space and speeding up; 3. The daemon manages the mirrors and containers, and the client uses them for interaction; 4. Namespaces and cgroups implement container isolation and resource limitations; 5. Multiple network modes support container interconnection. Only by understanding these core concepts can you better utilize Docker.
 What to do if the docker image fails
Apr 15, 2025 am 11:21 AM
What to do if the docker image fails
Apr 15, 2025 am 11:21 AM
Troubleshooting steps for failed Docker image build: Check Dockerfile syntax and dependency version. Check if the build context contains the required source code and dependencies. View the build log for error details. Use the --target option to build a hierarchical phase to identify failure points. Make sure to use the latest version of Docker engine. Build the image with --t [image-name]:debug mode to debug the problem. Check disk space and make sure it is sufficient. Disable SELinux to prevent interference with the build process. Ask community platforms for help, provide Dockerfiles and build log descriptions for more specific suggestions.
 What computer configuration is required for vscode
Apr 15, 2025 pm 09:48 PM
What computer configuration is required for vscode
Apr 15, 2025 pm 09:48 PM
VS Code system requirements: Operating system: Windows 10 and above, macOS 10.12 and above, Linux distribution processor: minimum 1.6 GHz, recommended 2.0 GHz and above memory: minimum 512 MB, recommended 4 GB and above storage space: minimum 250 MB, recommended 1 GB and above other requirements: stable network connection, Xorg/Wayland (Linux)
